2017 SUBARU FORESTER service
[x] Cancel search: servicePage 516 of 634

Towing
If towing is necessary, it is best done by
your SUBARU dealer or a commercial
towing service. Observe the following
procedures for safety.
WARNING
Never tow AWD models (both CVT
and MT models) with the front
wheels raised off the ground while
the rear wheels are on the ground,
or with the rear wheels raised off the
ground while the front wheels are on
the ground. This will cause the
vehicle to spin away due to the
operation or deterioration of the
center differential.
&Towing and tie-down hooks
The towing hooks should be used only in
an emergency (e.g., to free a stuck vehicle
from mud, sand or snow).
CAUTION
. Use only the specified towing
hook and tie-down hook. Never
use suspension parts or other
parts of the body for towing or
tie-down purposes.
. To prevent deformation to the
front bumper and the towing
hook, do not apply excessive
lateral load to the towing hook. Front towing hook:
1. Take the towing hook, screwdriver and
jack handle out of the cargo area.
2. Cover the tip of a flat-head screwdriver
with vinyl tape or cloth so that it will not
scratch the bumper. Insert the flat-head
screwdriver into the cutout of the cover
and pry open the cover.
In case of emergency/Towing
–CONTINUED –9-13
Page 524 of 634

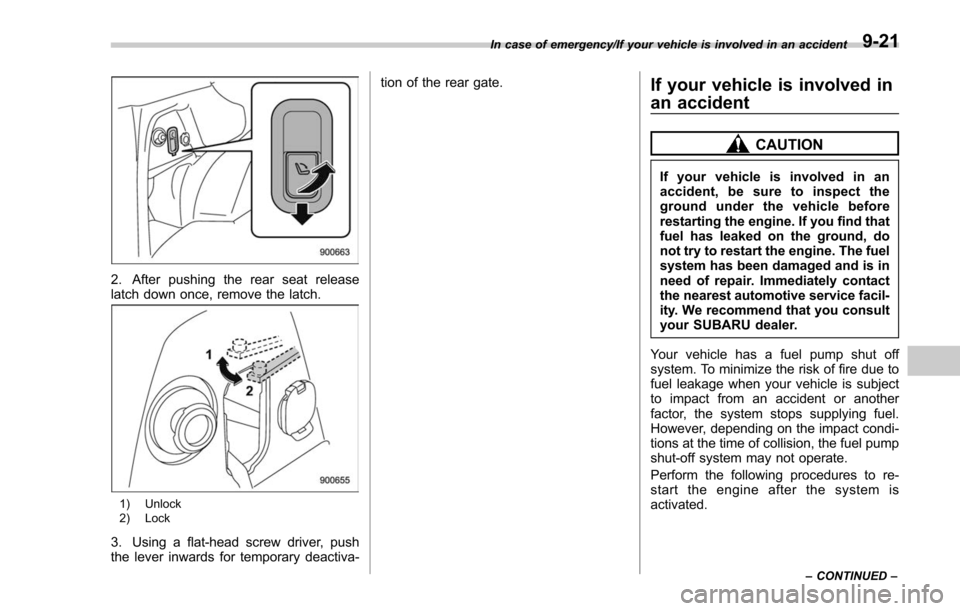
2. After pushing the rear seat release
latch down once, remove the latch.
1) Unlock
2) Lock
3. Using a flat-head screw driver, push
the lever inwards for temporary deactiva-tion of the rear gate.
If your vehicle is involved in
an accident
CAUTION
If your vehicle is involved in an
accident, be sure to inspect the
ground under the vehicle before
restarting the engine. If you find that
fuel has leaked on the ground, do
not try to restart the engine. The fuel
system has been damaged and is in
need of repair. Immediately contact
the nearest automotive service facil-
ity. We recommend that you consult
your SUBARU dealer.
Your vehicle has a fuel pump shut off
system. To minimize the risk of fire due to
fuel leakage when your vehicle is subject
to impact from an accident or another
factor, the system stops supplying fuel.
However, depending on the impact condi-
tions at the time of collision, the fuel pump
shut-off system may not operate.
Perform the following procedures to re-
start the engine after the system is
activated.
In case of emergency/If your vehicle is involved in an accident
–CONTINUED –9-21
Page 532 of 634

Maintenance schedule....................................... 11-3
Maintenance precautions ................................... 11-3
Before checking or servicing in the engine
compartment .................................................... 11-4
When checking or servicing in the engine compartment while the engine is running .......... 11-5
Maintenance tips................................................ 11-5Removing and reinstalling clips .......................... 11-5
Engine hood....................................................... 11-7
Engine compartment overview .......................... 11-8
Non-turbo models.............................................. 11-8
Turbo models ..................................................... 11-9
Engine oil.......................................................... 11-10Engine oil consumption .................................... 11-10
Checking the oil level ....................................... 11-10
Changing the oil and oil filter ............................ 11-11
Recommended grade and viscosity .................. 11-11
Synthetic oil ..................................................... 11-12
Cooling system ................................................ 11-12Cooling fan, hose and connections ................... 11-12
Engine coolant ................................................. 11-13
Air cleaner element .......................................... 11-14Replacing the air cleaner element ..................... 11-14
Spark plugs...................................................... 11-16Recommended spark plugs .............................. 11-16
Drive belts........................................................ 11-16
Manual transmission oil .................................. 11-17
Recommended grade and viscosity .................. 11-17
Continuously variable transmission fluid ....... 11-17Front differential gear oil (CVT models) and
rear differential gear oil ................................ 11-17
Recommended grade and viscosity .................. 11-17
Brake fluid........................................................ 11-18Checking the fluid level .................................... 11-18
Recommended brake fluid ............................... 11-18
Clutch fluid (MT models)................................. 11-19Checking the fluid level.................................... 11-19
Recommended clutch fluid ............................... 11-19
Brake booster.................................................. 11-20
Brake pedal ...................................................... 11-20
Checking the brake pedal free play .................. 11-20
Checking the brake pedal reserve distance ....... 11-20
Clutch pedal (MT models) ............................... 11-21Checking the clutch function ............................ 11-21
Checking the clutch pedal free play .................. 11-21
Hill start assist system.................................... 11-21
Replacement of brake pad and lining ............ 11-22
Breaking-in of new brake pads and linings ....... 11-22
Parking brake stroke ....................................... 11-23
Tires and wheels .............................................. 11-23
Types of tires................................................... 11-23
Tire pressure monitoring system (TPMS) (if equipped) ...................................................... 11-23
Tire inspection ................................................. 11-25
Tire pressures and wear .................................. 11-25
Wheel balance ................................................. 11-27
Wear indicators ............................................... 11-27
Tire rotation direction mark .............................. 11-28
Tire rotation ..................................................... 11-28
Maintenance and service
11
Page 533 of 634

Maintenance and service
Tire replacement.............................................. 11-29
Wheel replacement ........................................... 11-30
Aluminum wheels............................................. 11-30
Windshield washer fluid .................................. 11-30
Replacement of wiper blades .......................... 11-32
Windshield wiper blade assembly ..................... 11-33
Windshield wiper blade rubber ......................... 11-33
Rear window wiper blade assembly .................. 11-34
Rear window wiper blade rubber ....................... 11-35
Battery............................................................... 11-36
Fuses ................................................................ 11-37
Installation of accessories ............................... 11-38 Replacing bulbs
............................................... 11-39
Headlights (models with LED headlights) .......... 11-39
Headlights (models with halogen headlights) .................................................... 11-39
Front turn signal light, front side marker light and parking light ........................................... 11-41
Front fog light (if equipped) .............................. 11-42
Rear combination lights ................................... 11-42
License plate light ........................................... 11-44
Other bulbs ..................................................... 11-44
Replacing key battery ...................................... 11-44Replacing battery of access key ....................... 11-45
Replacing transmitter battery ........................... 11-46
Page 534 of 634

Maintenance schedule
U.S. models
The scheduled maintenance items re-
quired to be serviced at regular intervals
are shown in the“Warranty and Main-
tenance Booklet ”. For details, read the
separate “Warranty and Maintenance
Booklet ”.
Canada models
The scheduled maintenance items re-
quired to be serviced at regular intervals
are shown in the “Warranty and Service
Booklet ”. For details, read the separate
“Warranty and Service Booklet ”.
Except for U.S. and Canada models
Some items of your vehicle are required to
be serviced at scheduled intervals. For
details about your maintenance schedule,
read the separate “Warranty and Main-
tenance Booklet ”.
NOTE
For models with a multi function dis-
play, you can set a reminder to be
displayed when a scheduled mainte-
nance item is almost due. For details,
refer to“Maintenance settings ”F 3-76.
Maintenance precautions
When maintenance and service are re-
quired, it is recommended that all work be
done by an authorized SUBARU dealer.
If you perform maintenance and service
by yourself, you should familiarize yourself
with the information provided in this
section on general maintenance and
service for your SUBARU.
Incorrect or incomplete service could
cause improper or unsafe vehicle opera-
tion. Any problems caused by improper
maintenance and service performed by
you are not eligible for warranty coverage.
WARNING
. Always select a safe area when
performing maintenance on your
vehicle.
. Always be very careful to avoid
injury when working on the vehi-
cle. Remember that some of the
materials in the vehicle may be
hazardous if improperly used or
handled, for example, battery
acid.
. Your vehicle should only be ser-
viced by persons fully competent
to do so. Serious personal injury may result to persons not experi-
enced in servicing vehicles.
. Always use the proper tools and
make certain that they are well
maintained.
. Never get under the vehicle sup-
ported only by a jack. Always use
safety stands to support the
vehicle.
. Never keep the engine running in
a poorly ventilated area, such as
a garage or other closed areas.
. Do not smoke or allow open
flames around the fuel or battery.
This will cause a fire.
. Because the fuel system is under
pressure, replacement of the fuel
filter should be performed only
by your SUBARU dealer.
. Wear adequate eye protection to
guard against getting oil or fluids
in your eyes. If something does
get in your eyes, thoroughly
wash them out with clean water.
. Do not tamper with the wiring of
the SRS airbag system or seat-
belt pretensioner system, or at-
tempt to take its connectors
apart, as that may activate the
system or it can render it inop-
Maintenance and service/Maintenance schedule
–CONTINUED –11-3
Page 535 of 634

Maintenance and service/Maintenance precautions
erative. NEVER use a circuit
tester for this wiring. If your
SRS airbag or seatbelt preten-
sioner needs service, consult
your nearest SUBARU dealer.
NOTE
SUBARU does not endorse the use of
non-SUBARU approved flushing sys-
tems and strongly advises against
performing these services on a
SUBARU vehicle. Non-SUBARU ap-
proved flushing systems use chemi-
cals and/or solvents which have not
been tested or approved by SUBARU.
SUBARU warranties do not cover any
part of the vehicle which is damaged by
adding or applying chemicals and/or
solvents other than those approved or
recommended by SUBARU.
&Before checking or servicing
in the engine compartment
WARNING
. Always stop the engine and set
the parking brake firmly to pre-
vent the vehicle from moving.
. Always let the engine cool down.
Engine parts become very hot when the engine is running and
remain hot for some time after
the engine has stopped.
. Do not spill engine oil, engine
coolant, brake fluid or any other
fluid on hot engine components.
This may cause a fire.
. Always remove the key from the
ignition switch. When the ignition
switch is in the “ON ”position,
thecoolingfanmayoperate
suddenly even when the engine
is stopped. If your body or
clothes come into contact with a
rotating fan, that could result in
serious injury.
. Before performing any servicing
on a vehicle equipped with a
remote engine start system (a
dealer option), temporarily place
the remote engine start system in
service mode to prevent it from
unexpectedly starting the engine.
CAUTION
. Do not contact the drive belt
cover while checking the compo-
nents in the engine compart-
ment. Doing so may cause your
hand to slip off the cover and
result in an unexpected injury.
. Do not touch the oil filter until the
engine has cooled down comple-
tely. Doing so may result in a
burn or other injury. Note that the
oil filter becomes very hot when
the engine is running and re-
mains hot for some time after
the engine has stopped.
11-4
Page 536 of 634

&When checking or servicing
in the engine compartment
while the engine is running
WARNING
A running engine can be dangerous.
Keep your fingers, hands, clothing,
hair and tools away from the cooling
fan, drive belt and any other moving
engine parts. Removing rings,
watches and ties is advisable.
Maintenance tips
Some clips and fender linings must be
removed before replacing the air cleaner
elements or specific bulbs.
&Removing and reinstalling
clips
! Removing clips
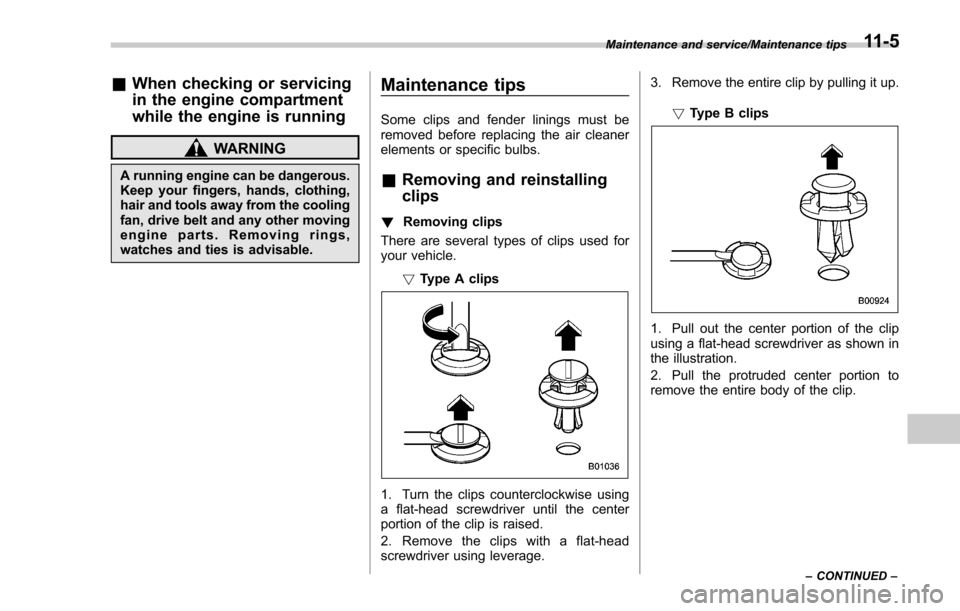
There are several types of clips used for
your vehicle.
!Type A clips
1. Turn the clips counterclockwise using
a flat-head screwdriver until the center
portion of the clip is raised.
2. Remove the clips with a flat-head
screwdriver using leverage. 3. Remove the entire clip by pulling it up.
!Type B clips
1. Pull out the center portion of the clip
using a flat-head screwdriver as shown in
the illustration.
2. Pull the protruded center portion to
remove the entire body of the clip.
Maintenance and service/Maintenance tips
–CONTINUED –11-5
Page 537 of 634

Maintenance and service/Maintenance tips
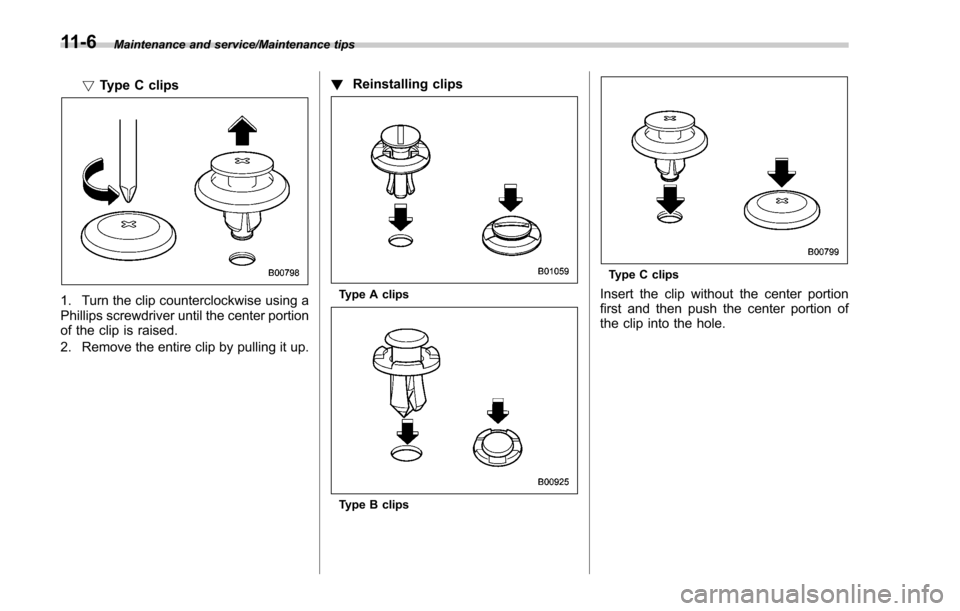
!Type C clips
1. Turn the clip counterclockwise using a
Phillips screwdriver until the center portion
of the clip is raised.
2. Remove the entire clip by pulling it up. !
Reinstalling clipsType A clips
Type B clips
Type C clips
Insert the clip without the center portion
first and then push the center portion of
the clip into the hole.
11-6