2017 SUBARU FORESTER tow
[x] Cancel search: towPage 249 of 634
Instruments and controls/Light control switch
.The timing of the change of headlight
mode may differ due to the following
factors.
–Color or brightness of the head-
lights of an oncoming vehicle or the tail
lights of a vehicle ahead
– The headlights of the oncoming
vehicle or the tail lights of the vehicle
ahead are covered with mud, snow,
etc.
– Movement and direction of an on-
coming vehicle or a vehicle ahead
– When the headlights of an oncom-
ing vehicle or the tail lights of a vehicle
ahead illuminate on only one side
– When the oncoming vehicle or
vehicle ahead is a motorcycle
– Conditions of a road (slope, curve,
road surface, etc.)
– Number of passengers and weight
of loaded cargo
– Limitation of the detection ability of
the stereo camera& Headlight flasher
CAUTION
Do not hold the lever in the flashing
position for more than just a few
seconds.
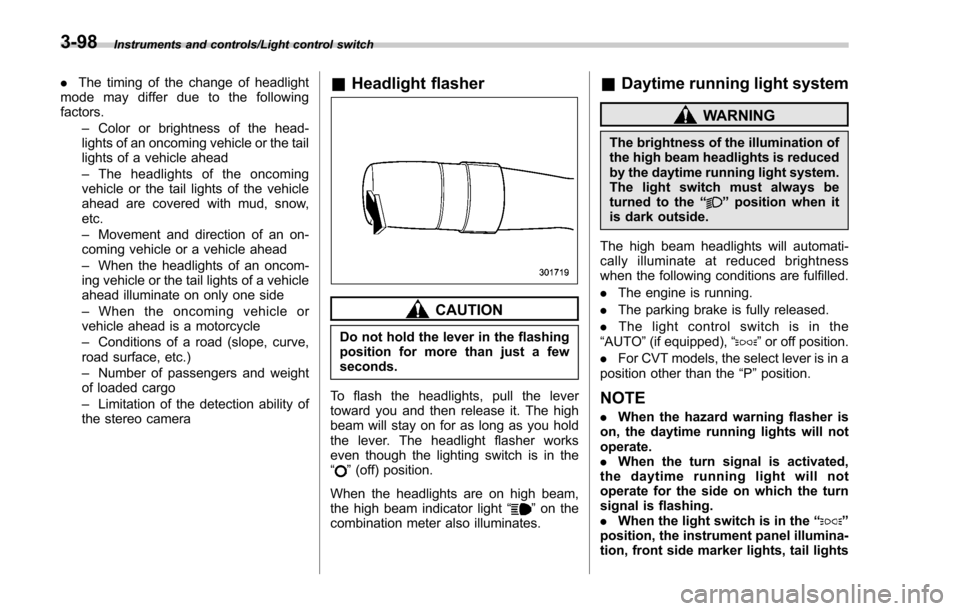
To flash the headlights, pull the lever
toward you and then release it. The high
beam will stay on for as long as you hold
the lever. The headlight flasher works
even though the lighting switch is in the
“
” (off) position.
When the headlights are on high beam,
the high beam indicator light “
”on the
combination meter also illuminates.
& Daytime running light system
WARNING
The brightness of the illumination of
the high beam headlights is reduced
by the daytime running light system.
The light switch must always be
turned to the “
”position when it
is dark outside.
The high beam headlights will automati-
cally illuminate at reduced brightness
when the following conditions are fulfilled.
. The engine is running.
. The parking brake is fully released.
. The light control switch is in the
“AUTO ”(if equipped), “
”or off position.
. For CVT models, the select lever is in a
position other than the “P”position.
NOTE
. When the hazard warning flasher is
on, the daytime running lights will not
operate.
. When the turn signal is activated,
the daytime running light will not
operate for the side on which the turn
signal is flashing.
. When the light switch is in the “
”
position, the instrument panel illumina-
tion, front side marker lights, tail lights
3-98
Page 257 of 634
Instruments and controls/Wiper and washer
!Windshield washer
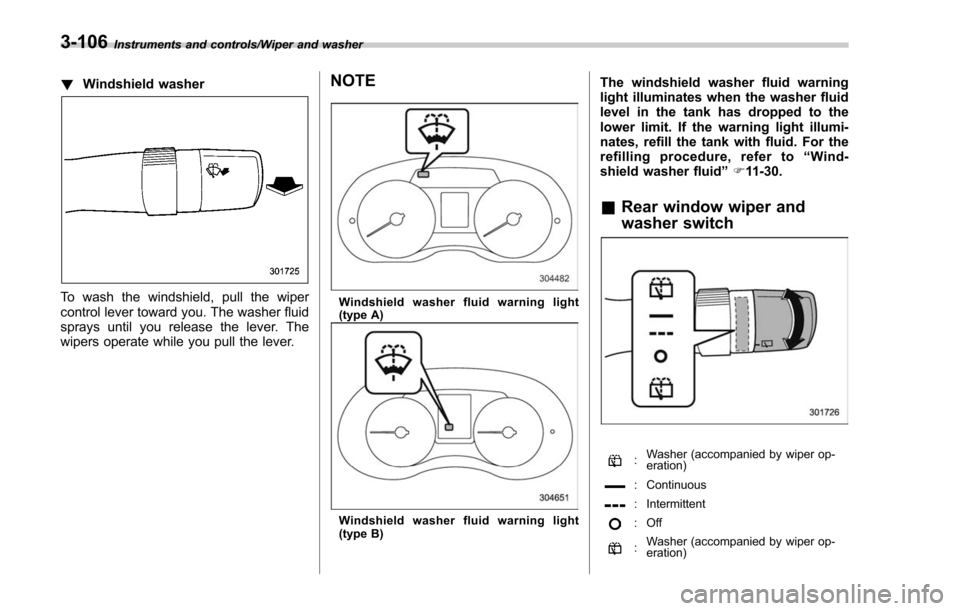
To wash the windshield, pull the wiper
control lever toward you. The washer fluid
sprays until you release the lever. The
wipers operate while you pull the lever.
NOTE
Windshield washer fluid warning light
(type A)
Windshield washer fluid warning light
(type B)
The windshield washer fluid warning
light illuminates when the washer fluid
level in the tank has dropped to the
lower limit. If the warning light illumi-
nates, refill the tank with fluid. For the
refilling procedure, refer to “Wind-
shield washer fluid ”F 11-30.
& Rear window wiper and
washer switch
:Washer (accompanied by wiper op-
eration)
: Continuous
: Intermittent
:Off
:Washer (accompanied by wiper op-
eration)
3-106
Page 258 of 634
!Rear wiper
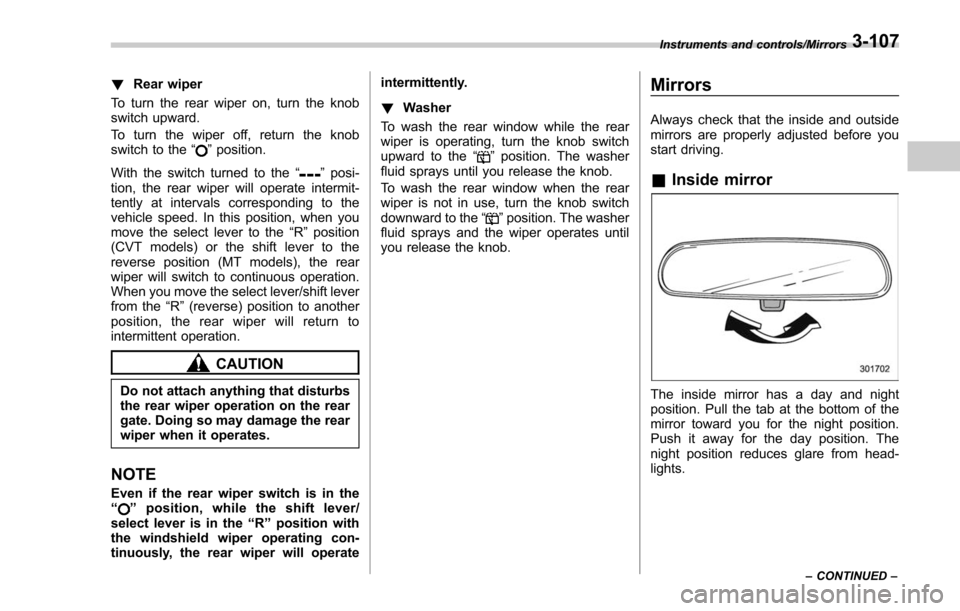
To turn the rear wiper on, turn the knob
switch upward.
To turn the wiper off, return the knob
switch to the “
”position.
With the switch turned to the “
”posi-
tion, the rear wiper will operate intermit-
tently at intervals corresponding to the
vehicle speed. In this position, when you
move the select lever to the “R ” position
(CVT models) or the shift lever to the
reverse position (MT models), the rear
wiper will switch to continuous operation.
When you move the select lever/shift lever
from the “R”(reverse) position to another
position, the rear wiper will return to
intermittent operation.
CAUTION
Do not attach anything that disturbs
the rear wiper operation on the rear
gate. Doing so may damage the rear
wiper when it operates.
NOTE
Even if the rear wiper switch is in the
“” position, while the shift lever/
select lever is in the “R ” position with
the windshield wiper operating con-
tinuously, the rear wiper will operate intermittently.
!
Washer
To wash the rear window while the rear
wiper is operating, turn the knob switch
upward to the “
”position. The washer
fluid sprays until you release the knob.
To wash the rear window when the rear
wiper is not in use, turn the knob switch
downward to the “
”position. The washer
fluid sprays and the wiper operates until
you release the knob.
Mirrors
Always check that the inside and outside
mirrors are properly adjusted before you
start driving.
& Inside mirror
The inside mirror has a day and night
position. Pull the tab at the bottom of the
mirror toward you for the night position.
Push it away for the day position. The
night position reduces glare from head-
lights.
Instruments and controls/Mirrors
–CONTINUED –3-107
Page 332 of 634
Audio panel
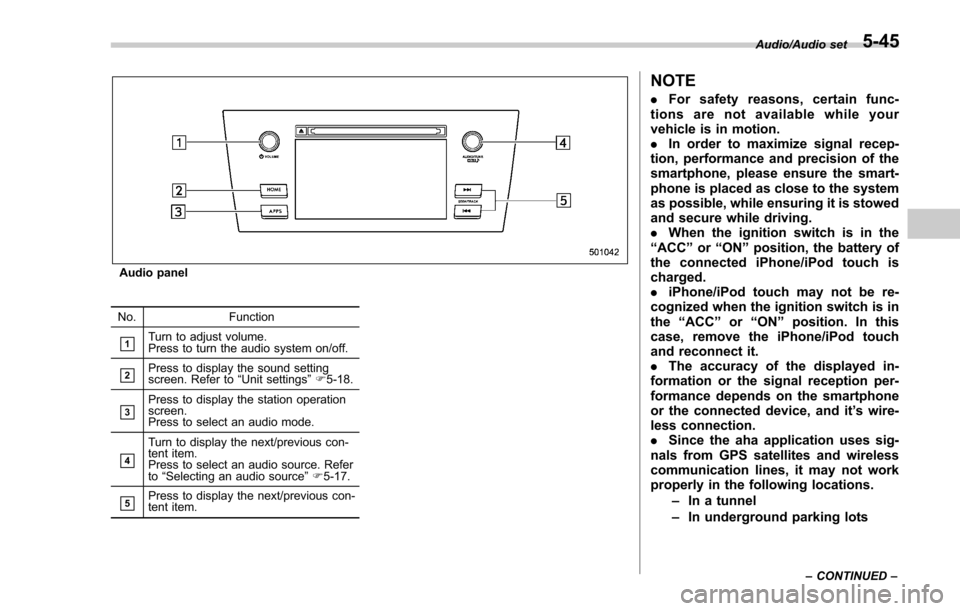
No. Function
&1Turn to adjust volume.
Press to turn the audio system on/off.
&2Press to display the sound setting
screen. Refer to“Unit settings ”F 5-18.
&3Press to display the station operation
screen.
Press to select an audio mode.
&4
Turn to display the next/previous con-
tent item.
Press to select an audio source. Refer
to “Selecting an audio source ”F 5-17.
&5Press to display the next/previous con-
tent item.
NOTE
. For safety reasons, certain func-
tions are not available while your
vehicle is in motion.
. In order to maximize signal recep-
tion, performance and precision of the
smartphone, please ensure the smart-
phone is placed as close to the system
as possible, while ensuring it is stowed
and secure while driving.
. When the ignition switch is in the
“ ACC ”or “ON ”position, the battery of
the connected iPhone/iPod touch is
charged.
. iPhone/iPod touch may not be re-
cognized when the ignition switch is in
the “ACC ”or “ON ”position. In this
case, remove the iPhone/iPod touch
and reconnect it.
. The accuracy of the displayed in-
formation or the signal reception per-
formance depends on the smartphone
or the connected device, and it ’s wire-
less connection.
. Since the aha application uses sig-
nals from GPS satellites and wireless
communication lines, it may not work
properly in the following locations.
–In a tunnel
– In underground parking lots
Audio/Audio set
–CONTINUED –5-45
Page 357 of 634
Audio/Hands–free phone system
Hands-free phone system
The hands-free system enables calls to be
made and received without having to take
your hands off the steering wheel.
This system supports Bluetooth. Bluetooth
is a wireless data system that enables cell
phones to be used without being con-
nected by a cable or placed in a cradle.
The operating procedure of the phone is
explained here.
WARNING
. While driving, do not use a cell
phone or connect the Bluetooth
phone. Doing so may result in
loss of control of your vehicle
and cause an accident or serious
injury.
. Your audio unit is fitted with
Bluetooth antennas. People with
implantable cardiac pacemakers,
cardiac resynchronization ther-
apy-pacemakers or implantable
cardioverter defibrillators should
maintain a reasonable distance
between themselves and the
Bluetooth antennas. The radio
waves may affect the operation
of such devices. .
Before using Bluetooth devices,
users of any electrical medical
device other than implantable
cardiac pacemakers, cardiac re-
synchronization therapy-pace-
makers or implantable cardiover-
ter defibrillators should consult
the manufacturer of the device
for information about its opera-
tion under the influence of radio
waves. Radio waves could have
unexpected effects on the opera-
tion of such medical devices.CAUTION
Do not leave your cell phone in the
vehicle. The temperature inside may
rise to a level that could damage the
phone.
NOTE
. If your cell phone does not support
Bluetooth, this system cannot function.
. In the following conditions, the sys-
tem may not function:
–The cell phone is turned off.
– The current position is outside
the communication area.
– The cell phone is not connected.
– The cell phone has a low battery. .
When using the hands free function
and other Bluetooth functions at the
same time, the following problems may
occur:
–The Bluetooth connection may
be cut.
– Noise may be heard when play-
ing back voice with the Bluetooth
function.
. The other party’ s voice will be heard
from the front speakers. The audio/
visual system will be muted during
phone calls or when hands-free voice
commands are used.
. Talk alternately with the other party
on the phone. If both parties speak at
the same time, the other party may not
hear what has been said. (This is not a
malfunction.)
. Keep call volume down. Otherwise,
the other party’ s voice may be audible
outside the vehicle and voice echo may
increase. When talking on the phone,
speak clearly towards the microphone.
. The other party may not hear you
clearly when:
–Drivingonanunpavedroad.
(Making excessive traffic noise.)
– Driving at high speeds.
– The moonroof or windows are
open.
– The air conditioning vents are
5-70
Page 358 of 634

pointed towards the microphone.
–The sound of the air conditioning
fan is loud.
– Thereisanegativeeffecton
sound quality due to the phone
and/or network being used.
. When another phone is connected,
the following registered data cannot be
read:
–Contact data
– Call history data
– All phone settings
. When selling or disposing of the
vehicle, initialize the data. Refer to
“ Unit settings ”F 5-18.
. Once initialized, the data and set-
tings will be erased. Take extra caution
when initializing the data.
. The voice command system sup-
ports phone commands, so dialing a
phone number using your voice is
possible. Refer to “Vo i c e c o m m a n d
system ”F 5-80.
. The images shown in this Owner ’s
Manual are sample images. The actual
images may vary depending on the
market and specifications of your ve-
hicle.& Control screen
PHONE (Menu) screen
PHONE (Dialpad) screen No. Function
&1Open the
“Incoming Calls ”screen.
Refer to “By incoming calls ”F 5-73.
&2Open the “Outgoing Calls ”screen.
Refer to “By outgoing calls ”F 5-74.
&3Open the “Contacts ”screen. Refer to
“ By contacts list ”F 5-74.
&4Open the dialpad screen. Refer to “By
Dialpad ”F 5-75.
&5Open the phone volume settings
screen. Refer to “Phone volume set-
tings ”F 5-78.
&6
Use to make a phone call. You cannot
press this key until you open the
dialpad screen and enter a phone
number.
&7Open the “BT Devices Connection ”
screen. Refer to “Setting Bluetooth
details ”F 5-68.
&8Enter the phone number that you
want to call.
&9Switch the screen to the phone
(menu) screen.
NOTE
When the cell phone is not registered
and the Bluetooth setting is off, a
message is displayed instead of menu
items.
Audio/Hands –free phone system
–CONTINUED –5-71
Page 368 of 634
&Using the voice command
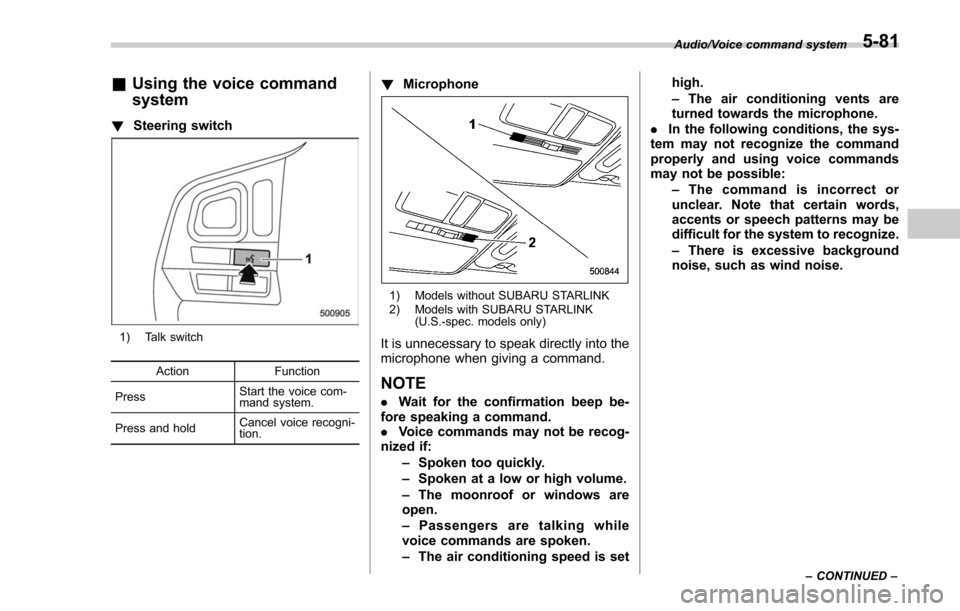
system
! Steering switch
1) Talk switch
Action Function
Press Start the voice com-
mand system.
Press and hold Cancel voice recogni-
tion.
!
Microphone
1) Models without SUBARU STARLINK
2) Models with SUBARU STARLINK
(U.S.-spec. models only)
It is unnecessary to speak directly into the
microphone when giving a command.
NOTE
.Wait for the confirmation beep be-
fore speaking a command.
. Voice commands may not be recog-
nized if:
–Spoken too quickly.
– Spoken at a low or high volume.
– The moonroof or windows are
open.
– Passengers are talking while
voice commands are spoken.
– The air conditioning speed is set high.
–
The air conditioning vents are
turned towards the microphone.
. In the following conditions, the sys-
tem may not recognize the command
properly and using voice commands
may not be possible:
–The command is incorrect or
unclear. Note that certain words,
accents or speech patterns may be
difficult for the system to recognize.
– There is excessive background
noise, such as wind noise.
Audio/Voice command system
–CONTINUED –5-81
Page 382 of 634
Interior lights....................................................... 6-2Dome light.......................................................... 6-2
Cargo area light .................................................. 6-2
Map lights ........................................................... 6-3
OFF delay timer .................................................. 6-3
Sun visors........................................................... 6-4Sun visor extension plate .................................... 6-4
Vanity mirror ....................................................... 6-5
Vanity mirror with light (if equipped) .................... 6-5
Storage compartment......................................... 6-6Glove box........................................................... 6-6
Center console .................................................... 6-6
Overhead console (if equipped) ........................... 6-7
Cup holders......................................................... 6-7Front passenger ’s cup holder .............................. 6-7
Rear passenger ’s cup holder (if equipped) ........... 6-8
Bottle holders...................................................... 6-9
Accessory power outlets .................................... 6-9
Use with a cigarette lighter (if equipped) .. ........... 6-11
Ashtray (if equipped)......................................... 6-11
Floor mat (if equipped) ...................................... 6-12
Shopping bag hook ........................................... 6-13
Convenient hook ................................................ 6-13
Cargo area cover (if equipped) ......................... 6-14
Using the cover................................................. 6-14
To install the front cover .................................... 6-14
To remove the front cover .................................. 6-14
To remove the cover housing ... .......................... 6-15
Stowage of the cargo area cover ........................ 6-15
To install the cover housing ............................... 6-16
Cargo tie-down hooks....................................... 6-16
Under-floor storage compartment (if equipped) ........................................................ 6-17
Rear view camera (if equipped) ........................ 6-17
How to use the rear view camera ....................... 6-18
Viewing range on the screen .............................. 6-19
Help line ............................................................ 6-20
Interior equipment
6