2017 SUBARU FORESTER Power window
[x] Cancel search: Power windowPage 139 of 634
Keys and doors/Windows
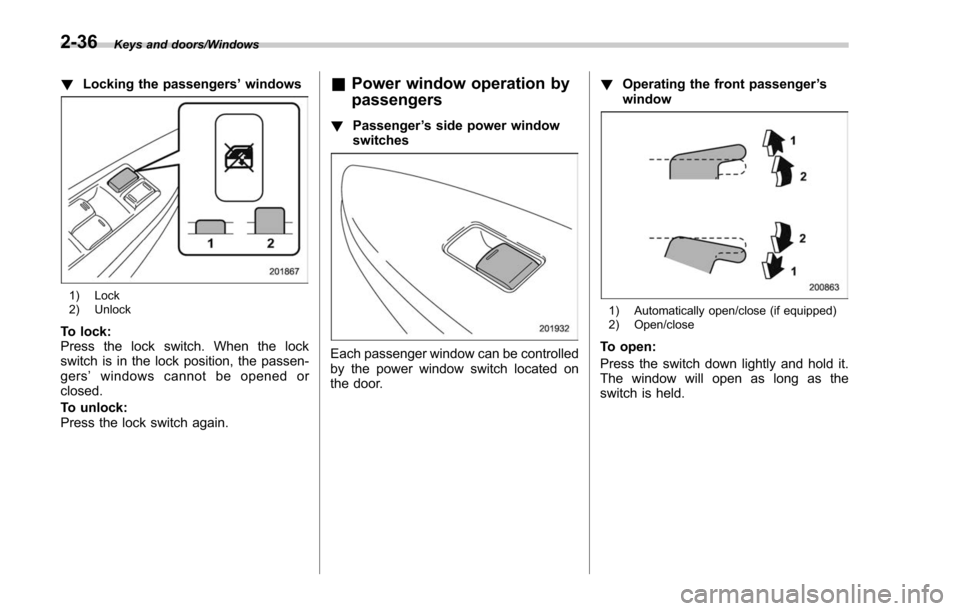
!Locking the passengers ’windows
1) Lock
2) Unlock
To lock:
Press the lock switch. When the lock
switch is in the lock position, the passen-
gers ’windows cannot be opened or
closed.
To unlock:
Press the lock switch again.
& Power window operation by
passengers
! Passenger ’s side power window
switches
Each passenger window can be controlled
by the power window switch located on
the door. !
Operating the front passenger ’s
window
1) Automatically open/close (if equipped)
2) Open/close
To open:
Press the switch down lightly and hold it.
The window will open as long as the
switch is held.
2-36
Page 140 of 634
NOTE
If you continue to hold the AUTO
switch in the down position after the
window has been fully opened, the
circuit breaker may activate for a short
time and the window may not operate.
Allow several seconds for the system
to reset without touching the switch,
and the window will begin to operate
normally on its own.
For some models, this switch is also
equipped with a one-touch auto down
feature that allows the window to be
opened fully without holding the switch.
Press the switch down until it clicks and
release it, and the window will fully open.
To stop the window halfway, pull the
switch up lightly.
To close:
Pull the switch up lightly and hold it. The
window will close as long as the switch is
held.
NOTE
If you continue to hold the AUTO
switch in the up position after the
window has fully closed, the circuit
breaker may open and the system may
not operate. After several seconds, the
window will be able to be opened by
holding the switch down until it is fullyopened. The AUTO function will not
operate. The window can be raised by
pulling up on the switch several times
until the window is fully closed.
To reset to normal operation, initialize
the power window to reactivate the
one-touch auto up/down function. Re-
fer to
“Initialization of power window ”
F 2-38.
For some models, this switch is also
equipped with a one-touch auto up feature
that allows the window to be closed fully
without holding the switch.
Press the switch up until it clicks and
release it, and the window will fully close.
To stop the window halfway, push the
switch down lightly.
NOTE
If the vehicle ’s battery is disconnected
due to situations such as battery or
fuse replacement, the one-touch auto
up/down function will be deactivated.
Initialize the power window to reacti-
vate the one-touch auto up/down func-
tion. Refer to “Initialization of power
window ”F 2-38.
! Anti-entrapment function
Refer to “Anti-entrapment function ”F 2-
35. !
Operating the rear passengers ’
windows
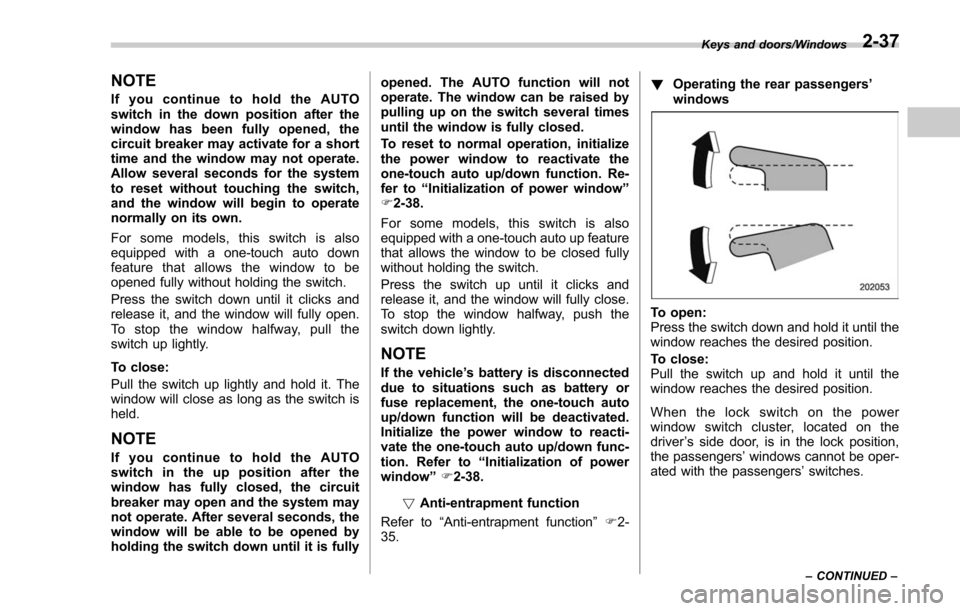
To open:
Press the switch down and hold it until the
window reaches the desired position.
To close:
Pull the switch up and hold it until the
window reaches the desired position.
When the lock switch on the power
window switch cluster, located on the
driver ’s side door, is in the lock position,
the passengers’ windows cannot be oper-
ated with the passengers’ switches.
Keys and doors/Windows
–CONTINUED –2-37
Page 141 of 634
Keys and doors/Rear gate
&Initialization of power win-
dow
If the vehicle’ s battery is disconnected due
to situations such as battery or fuse
replacement, the following functions will
be deactivated.
. One-touch auto up/down function
. Anti-entrapment function
Initialize the power window using the
following procedure to reactivate these
functions.
1. Close the driver ’s door.
2. Turn the ignition switch to the “ON”
position.
3. Open the driver ’s side window halfway
by pushing down the power window
switch.
4. Pull up the power window switch and
close the window completely. Continue
pulling up the switch for approximately 1
second after the window is closed com-
pletely.
5. Open the driver ’s side window com-
pletely by fully pushing down the power
windows switch.
Rear gate
& Manual rear gate (if
equipped)
The rear gate can be locked and unlocked
using any of the following systems.
. Power door locking switch: Refer to
“Power door locking switches ”F 2-8.
. Keyless access with the push-button
start system (if equipped): Refer to “Key-
less access with push-button start system ”
F 2-9.
. Remote keyless entry system: Refer to
“Remote keyless entry system ”F 2-21.
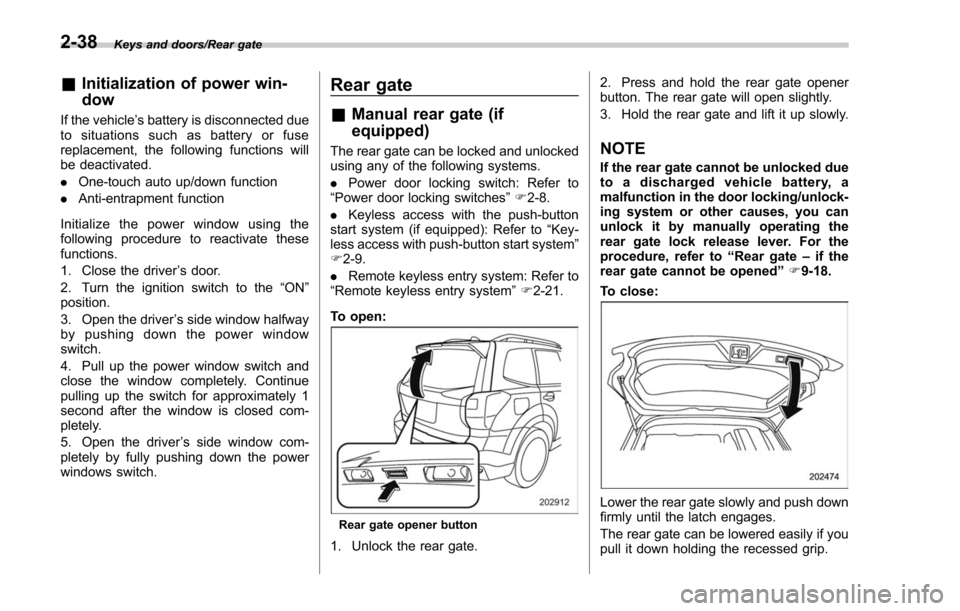
To open:
Rear gate opener button
1. Unlock the rear gate. 2. Press and hold the rear gate opener
button. The rear gate will open slightly.
3. Hold the rear gate and lift it up slowly.
NOTE
If the rear gate cannot be unlocked due
to a discharged vehicle battery, a
malfunction in the door locking/unlock-
ing system or other causes, you can
unlock it by manually operating the
rear gate lock release lever. For the
procedure, refer to
“Rear gate–if the
rear gate cannot be opened ”F 9-18.
To close:
Lower the rear gate slowly and push down
firmly until the latch engages.
The rear gate can be lowered easily if you
pull it down holding the recessed grip.
2-38
Page 155 of 634

Instruments and controls/Ignition switch (models without push–button start system)
Ignition switch (models with-
out push-button start sys-
tem)
WARNING
. Never turn the ignition switch to
the “LOCK ”position while the
vehicle is being driven or towed
because that will lock the steer-
ing wheel, preventing steering
control. And when the engine is
turned off, it takes a much great-
er effort than usual to steer.
. Before leaving the vehicle, al-
ways remove the key from the
ignition switch for safety and
never allow an unattended child
to remain in the vehicle. Failure
to follow this procedure could
result in injury to a child or
others. Children could operate
the power windows, the moon-
roof or other controls or even
make the vehicle move.
CAUTION
Do not attach a large key holder or
key case to either key. If it banged
against your knees or hands while
you are driving, it could turn the
ignition switch from the “ON ”posi-
tion to the “ACC ”or “LOCK ”posi-
tion, thereby stopping the engine.
Also, if the key is attached to a
keyholder or to a large bunch of
other keys, centrifugal force may act
on it as the vehicle moves, resulting
in unwanted turning of the ignition
switch.
The ignition switch has four positions:
LOCK, ACC, ON and START.
NOTE
. Keep the ignition switch in the
“ LOCK ”position when the engine is
not running.
. Using electrical accessories for a
long time with the ignition switch in the
“ ON ”or “ACC ”position can cause the
battery to go dead.
. If the ignition switch will not move
from the “LOCK ”position to the “ACC ”
position, turn the steering wheel
slightly to the left and right as you turn
the ignition switch.
& LOCK
The key can only be inserted or removed
in this position. The ignition switch will lock
the steering wheel when you remove the
key.
If turning the key is difficult, turn the
steering wheel slightly to the right and left
as you turn the key.
3-4
Page 419 of 634
Starting and operating/Remote engine start system (dealer option)
operating range of the system and the
start request is received, the following
phenomena will occur.
.The fob flashes and beeps once.
. The horn sounds once.
. The side marker lights, tail lights, and
parking lights flash once.
If the fob is not within range (the user is
too far away from the vehicle), the fob will
indicate two long flashes without beeping.
The system will check certain safety
preconditions before starting, and if all
conditions are met, the engine will start
within 5 seconds. After the engine starts,
the following phenomena will occur.
. The fob flashes and beeps twice.
. The horn sounds once.
. The side marker lights, tail lights, and
parking lights flash once.
While the engine is idling via the remote
engine start system, the following phe-
nomena will occur.
. The side marker lights, tail lights, and
parking lights remain illuminated.
. The fob button flashes once every 3
seconds.
. The power windows are disabled.
If the engine turns over but does not start
(or starts and stalls) the remote engine start system will power off and then
attempt to start the engine 3 additional
times. The system will not attempt to
restart the engine if it determines a vehicle
malfunction is preventing starting. If the
engine does not start after 3 additional
attempts, the remote engine start request
will be aborted.
!
Stopping the engine
Press and hold the fob button for at least 2
seconds to stop the engine. The fob will
flash and beep three times, indicating the
engine has stopped. If the stop request is
not received (for example, if the user is too
far away from the vehicle), the fob will
continue to flash once every 3 seconds.
The system will automatically stop the
engine after 15 minutes.
! Remote start safety features
For safety and security reasons, the
remote engine start system will prevent
starting (or stop the engine if running) and
sound the horn twice if any of the following
conditions is detected. In addition, the fob
will flash and beep 3 times.
. The brake pedal is depressed
. A key is in the ignition switch
. The engine hood is open
. The remote start system “Service
mode ”is engaged
. The engine idle speed exceeds 3,500 RPM
.
The security alarm is triggered
. The select lever is not in the “P ”
position
If the system detects any door (including
the rear gate) open during operation, it will
prevent starting or stop the engine, and
sound the horn and flash side marker
lights, tail lights, and parking lights 6
times.
In addition to the items above, if the
vehicle’ s engine management system
determines there is a safety risk due to a
vehicle-related problem, the vehicle will
power down and the horn will sound 3
times.
NOTE
. If the alarm system is armed at the
time of remote engine starter activation
(the security indicator light on the
combination meter is flashing), the
alarm system will remain armed
throughout the remote start run cycle.
. If the alarm system is disarmed at
the time of remote engine starter
activation (the security indicator light
on the combination meter is not flash-
ing), the alarm system will remain
disarmed throughout the remote start
run cycle.
7-16
Page 485 of 634
Driving tips/Winter driving
need to be washed thoroughly.
.Frequent driving of an AWD model
under hard-driving conditions such as
rough roads or off roads will necessitate
more frequent replacement of the follow-
ing items than that specified in the
maintenance schedule described in the
“Warranty and Maintenance Booklet ”.
– Engine oil
– Brake fluid
– Rear differential gear oil
– Manual transmission oil (MT mod-
els)
– Continuously variable transmission
fluid (CVT models)
– Front differential gear oil (CVT
models)
Remember that damage done to your
SUBARU while operating it off-road and
not using common sense precautions
such as those listed above is not eligible
for warranty coverage.Winter driving
& Operation during cold
weather
Carry some emergency equipment, such
as a window scraper, a bag of sand,
flares, a small shovel and jumper cables.
Check the battery and cables. Cold
temperatures reduce battery capacity.
The battery must be in good condition to
provide enough power for cold winter
starts.
It normally takes longer to start the engine
in very cold weather conditions. Use an
engine oil of a proper grade and viscosity
for cold weather. Using heavy summer oil
will make it harder to start the engine.
Keep the door locks from freezing by
squirting them with deicer or glycerin.
Forcing a frozen door open may damage
or separate the rubber weather strips
around the door. If the door is frozen,
use hot water to melt the ice, and after-
wards thoroughly wipe the water away.
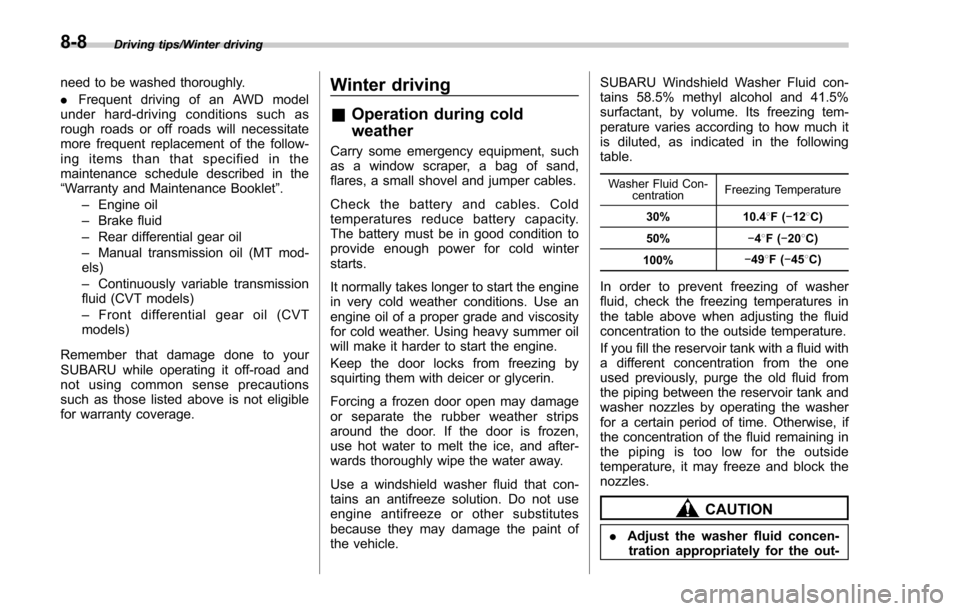
Use a windshield washer fluid that con-
tains an antifreeze solution. Do not use
engine antifreeze or other substitutes
because they may damage the paint of
the vehicle. SUBARU Windshield Washer Fluid con-
tains 58.5% methyl alcohol and 41.5%
surfactant, by volume. Its freezing tem-
perature varies according to how much it
is diluted, as indicated in the following
table.
Washer Fluid Con-
centration Freezing Temperature
30% 10.4 8F( −12 8C)
50% −48F( −20 8C)
100% −
49 8F( −45 8C)
In order to prevent freezing of washer
fluid, check the freezing temperatures in
the table above when adjusting the fluid
concentration to the outside temperature.
If you fill the reservoir tank with a fluid with
a different concentration from the one
used previously, purge the old fluid from
the piping between the reservoir tank and
washer nozzles by operating the washer
for a certain period of time. Otherwise, if
the concentration of the fluid remaining in
the piping is too low for the outside
temperature, it may freeze and block the
nozzles.
CAUTION
. Adjust the washer fluid concen-
tration appropriately for the out-
8-8
Page 487 of 634
Driving tips/Winter driving
frost or snow etc. on the power rear
gate, remove it. If you forcibly
operate the power rear gate with
frost or snow, it may cause a mal-
function.
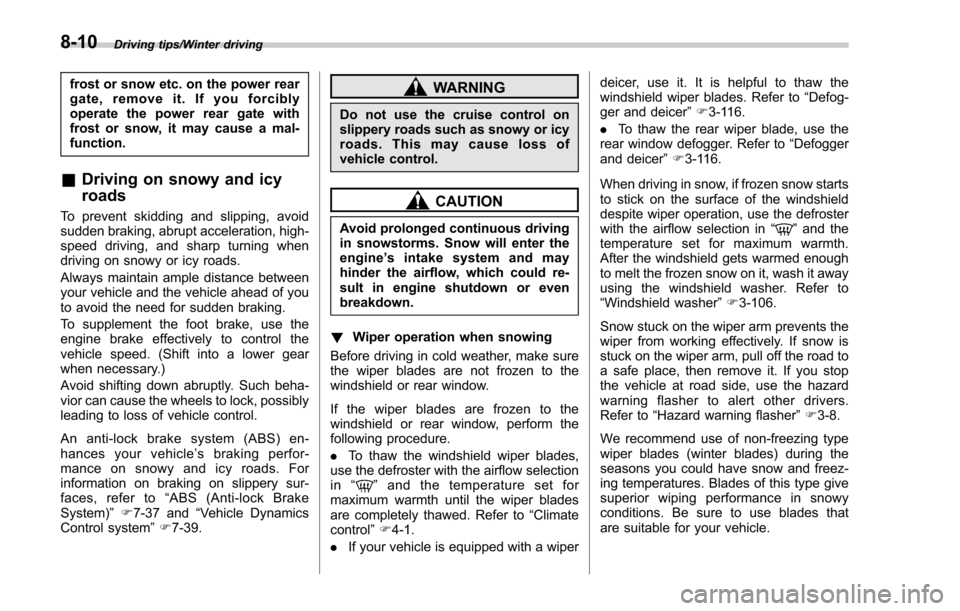
&Driving on snowy and icy
roads
To prevent skidding and slipping, avoid
sudden braking, abrupt acceleration, high-
speed driving, and sharp turning when
driving on snowy or icy roads.
Always maintain ample distance between
your vehicle and the vehicle ahead of you
to avoid the need for sudden braking.
To supplement the foot brake, use the
engine brake effectively to control the
vehicle speed. (Shift into a lower gear
when necessary.)
Avoid shifting down abruptly. Such beha-
vior can cause the wheels to lock, possibly
leading to loss of vehicle control.
An anti-lock brake system (ABS) en-
hances your vehicle’ s braking perfor-
mance on snowy and icy roads. For
information on braking on slippery sur-
faces, refer to “ABS (Anti-lock Brake
System) ”F 7-37 and “Vehicle Dynamics
Control system ”F 7-39.
WARNING
Do not use the cruise control on
slippery roads such as snowy or icy
roads. This may cause loss of
vehicle control.
CAUTION
Avoid prolonged continuous driving
in snowstorms. Snow will enter the
engine ’sintakesystemandmay
hinder the airflow, which could re-
sult in engine shutdown or even
breakdown.
! Wiper operation when snowing
Before driving in cold weather, make sure
the wiper blades are not frozen to the
windshield or rear window.
If the wiper blades are frozen to the
windshield or rear window, perform the
following procedure.
. To thaw the windshield wiper blades,
use the defroster with the airflow selection
in “
”and the temperature set for
maximum warmth until the wiper blades
are completely thawed. Refer to “Climate
control ”F 4-1.
. If your vehicle is equipped with a wiper deicer, use it. It is helpful to thaw the
windshield wiper blades. Refer to
“Defog-
ger and deicer ”F 3-116.
. To thaw the rear wiper blade, use the
rear window defogger. Refer to “Defogger
and deicer ”F 3-116.
When driving in snow, if frozen snow starts
to stick on the surface of the windshield
despite wiper operation, use the defroster
with the airflow selection in “
”and the
temperature set for maximum warmth.
After the windshield gets warmed enough
to melt the frozen snow on it, wash it away
using the windshield washer. Refer to
“Windshield washer ”F 3-106.
Snow stuck on the wiper arm prevents the
wiper from working effectively. If snow is
stuck on the wiper arm, pull off the road to
a safe place, then remove it. If you stop
the vehicle at road side, use the hazard
warning flasher to alert other drivers.
Refer to “Hazard warning flasher ”F 3-8.
We recommend use of non-freezing type
wiper blades (winter blades) during the
seasons you could have snow and freez-
ing temperatures. Blades of this type give
superior wiping performance in snowy
conditions. Be sure to use blades that
are suitable for your vehicle.
8-10
Page 592 of 634

Fuse
panel Fuse
rating Circuit
15 10A .Luggage light
. Keyless unit
16 7.5A .Illumination
17 15A .Seat heaters
18 10A .Backup light
19 7.5A .Wiper relay
20 10A .Accessory power outlet
(instrument panel)
21 10A .Starter relay
22 7.5A .Air conditioner
. Rear window defogger
relay coil
23 Empty
24 10A .Audio unit
. Navigation system (if
equipped)
25 15A .SRS airbag system
26 Empty
27 15A .Blower fan
28 15A .Blower fan
29 15A .Fog light
30 Empty Fuse
panel Fuse
rating Circuit
31 7.5A .Auto air conditioner unit
. Integrated unit
32 7.5A .Clutch switch
. Steering lock control
unit
33 7.5A .Vehicle Dynamics Con-
trol unit Specifications/Fuses and circuits
–CONTINUED –
12-13