2017 SUBARU FORESTER Control arm
[x] Cancel search: Control armPage 193 of 634

Instruments and controls/Multi information display (models with type B combination meter)
Menu screen entering screen:
While this screen is selected, pull the“/
SET ”switch to enter the menu screen.
& Menu screens
Pull the “/SET”switch to enter the menu
screens when all of the following condi-
tions are satisfied.
. The vehicle has been completely
stopped.
. The select lever is in the “P”position.
. The menu screen entering screen is
selected.
. The “
”information reminder is off. The menu list is as follows.
First menu
Second menu
Screen Settings Welcome Good-bye Screen
Gauge Initial Movement
Languages
Go Back
EyeSight (models with EyeSight system) Warning Volume
Lead Vehicle Acquisition Sound
Lead Vehicle Moving Monitor Function
Go Back
BSD/RCTA (if equipped) Warning Volume
RAB (if equipped) Warning Volume
Sonar Audible Alarm
Default Settings ―
3-42
Page 194 of 634

By operating the“”or “”switch on the
steering wheel, you can select the menu.
Pull the “
/SET”switch to enter the
selected menu.
NOTE
If you enter the “Go Back ”menu, the
system will return to the previous
screen.
! Screen Settings
After entering the “Screen Settings”menu,
select one of the following menus.
!Welcome Good-bye Screen
The welcome screen/good-bye screens
can be activated or deactivated. Select
“On” to activate the screens. Select “Off ”
to deactivate the screens.
!Gauge Initial Movement
The movement of the meter needles and
gauge needles that occurs when the
ignition switch is turned to the “ON ”
position can be activated or deactivated.
Select “On”to activate. Select “Off ”to
deactivate.
!Languages
Operate the “
”or “”switch on the
steering wheel to display the preferred
language. Then pull the “
/SET”switch to
select the displayed language. !
EyeSight (models with EyeSight
system)
NOTE
For models with the EyeSight system,
refer to the Owner ’s Manual supple-
ment for the EyeSight system.
After entering the “EyeSight”menu, select
one of the following menus.
!Warning Volume
The volume of the warning buzzer that
sounds when the EyeSight system is in
use can be set in 3 stages (“ Max”,“Mid ”
and “Min ”).
! Lead Vehicle Acquisition Sound
When adaptive cruise control is used, the
buzzer that sounds if a vehicle is detected
in front or if detection is not possible can
be activated or deactivated. Select “On ”to
activate the buzzer. Select “Off”to deac-
tivate the buzzer.
! Lead Vehicle Moving Monitor
Function
When the lead vehicle moving monitor
function is in operation, the buzzer that
sounds if a vehicle in front has started can
be activated or deactivated. Select “On”to
activate the buzzer. Select “Off”to deac-
tivate the buzzer. !
BSD/RCTA (if equipped)
After entering the “BSD/RCTA ”menu,
select the “Warning Volume ”menu. You
can set the volume of the warning buzzer
for RCTA (Rear Cross Traffic Alert). You
can select “Max ”,“Mid ”,“Min ”or “Off ”.
! RAB (if equipped)
NOTE
For models with the RAB (Reverse
Automatic Braking) system, refer to
“Reverse Automatic Braking System ”
F 7-66.
After entering the “RAB”menu, select one
of the following menus.
!Warning Volume
The volume of the warning sound that is
activated when the RAB (Reverse Auto-
matic Braking) system is in operation can
be set in 3 stages (“Max ”,“Mid ”and “Min ”).
! Sonar Audible Alarm
The RAB (Reverse Automatic Braking)
system is equipped with a function that
emits a warning sound when the system
operates. The function can be activated or
deactivated. Select “On”to set the warn-
ing sound to active. Select “Off ”to set the
warning sound to inactive.
Instruments and controls/Multi information display (models with type B combination meter)
–CONTINUED –3-43
Page 255 of 634
Instruments and controls/Wiper and washer
Wiper and washer
WARNING
In freezing weather, do not use the
windshield washer until the wind-
shield is sufficiently warmed by the
defroster.
Otherwise the washer fluid can
freeze on the windshield, blocking
your view.
CAUTION
.Do not operate the washer con-
tinuously for more than 10 sec-
onds, or when the washer fluid
tank is empty. This may cause
overheating of the washer motor.
Check the washer fluid level
frequently, such as at fuel stops.
. Do not operate the wipers when
the windshield or rear window is
dry. This may scratch the glass,
damage the wiper blades and
might cause the wiper motor to
fail. Before operating the wiper
on a dry windshield or rear
window, always use the wind-
shield washer. .
In freezing weather, be sure that
the wiper blades are not frozen to
the windshield or rear window
before switching on the wipers.
Attempting to operate the wiper
with the blades frozen to the
window glass could cause not
only the wiper blades to be
damaged but also might cause
the wiper motor to fail. If the
wiper blades are frozen to the
window glass, be sure to operate
the defroster, windshield wiper
deicer (if equipped) or rear win-
dow defogger before turning on
the wiper.
. If the wipers stop during opera-
tion because of ice or some other
obstruction on the window, this
might cause the wiper motor to
fail even if the wiper switch is
turned off. If this occurs,
promptly stop the vehicle in a
safe place, turn the ignition
switch to the “LOCK ”/“ OFF ”po-
sition and clean the window
glass to allow proper wiper op-
eration.
. Use clean water if windshield
washer fluid is unavailable. In
areas where water freezes in
winter, use SUBARU Windshield Washer Fluid or the equivalent.
Refer to
“Windshield washer
fluid ”F 11-30.
Also, when driving the vehicle
when there are freezing tempera-
tures, use non-freezing type wi-
per blades.
. Do not clean the wiper blades
with gasoline or a solvent, such
as paint thinner or benzine. This
will cause deterioration of the
wiper blades.
NOTE
. The windshield wiper motor is pro-
tected against overloads by a circuit
breaker. If the motor operates continu-
ously under an unusually heavy load,
the circuit breaker may trip to stop the
motor temporarily. If this happens, park
your vehicle in a safe place, turn off the
wiper switch, and wait for approxi-
mately 10 minutes. The circuit breaker
will reset itself, and the wipers will
again operate normally.
. Clean your wiper blades and win-
dow glass periodically with a washer
solution to prevent streaking, and to
remove accumulations of road salt or
road film. Operate the windshield
washer for at least 1 second so that
3-104
Page 261 of 634
Instruments and controls/Mirrors
until a“C”appears in the display. Once a
“C ”appears in the display, slowly drive the
vehicle in circles until compass is cali-
brated.
! HomeLink
®Wireless Control Sys-
tem
The HomeLink
®Wireless Control System
provides a convenient way to replace up
to three hand-held radio-frequency re-
motes used to activate devices such as
gate operators, garage door openers,
entry door locks, security systems, even
home lighting. The below steps are
generic programming instructions; for
Genie and Sommer garage door openers
please go directly to the HomeLink web-
site. Additional information and program-
ming videos can be found at
www.HomeLink.com and
www.youtube.com/HomeLinkGentex.
CAUTION
. Before programming HomeLink
to a garage door opener or gate
operator, make sure that people
and objects are out of the way of
the device to prevent potential
harm or damage.
. When programming a garage
door opener, it is advised to park outside of the garage.
. Do not use HomeLink with any
garage door opener that lacks
safety stop and reverse features
as required by U.S. federal safety
standards (this includes any gar-
age door opener model manufac-
tured before April 1, 1982). A
garage door that cannot detect
an object signaling the door to
stop and reverse does not meet
current U.S. federal safety stan-
dards.
. It is also recommended that a
new battery be placed in the
hand-held remote (garage door
opener remote) of the device for
quicker and more accurate train-
ing.
. Some vehicles may require the
ignition switch to be turned to the
“ON ”or “ACC ”position for pro-
gramming and/or operation of
HomeLink.
. Keep the hand-held remote (gar-
age door opener remote) of the
device you are programming for
use in other vehicles as well as
for future HomeLink program-
ming. It is also suggested that
upon the sale of the vehicle, the programmed HomeLink buttons
be erased for security purposes.
Refer to
“Erasing HomeLink But-
tons ”F 3-113.
! Programming a New HomeLink
Button
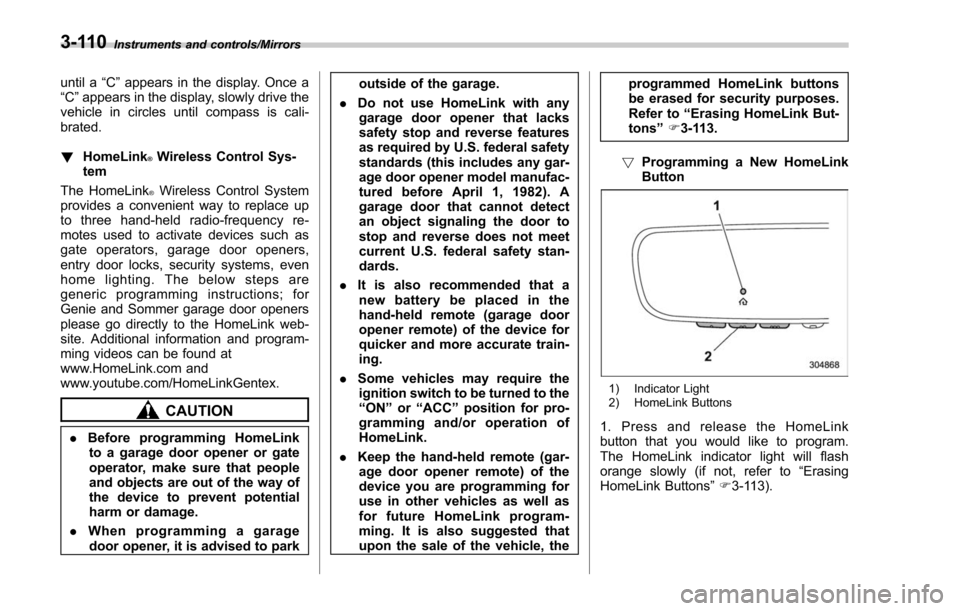
1) Indicator Light
2) HomeLink Buttons
1. Press and release the HomeLink
button that you would like to program.
The HomeLink indicator light will flash
orange slowly (if not, refer to “Erasing
HomeLink Buttons ”F 3-113).
3-110
Page 266 of 634
by calling the toll-free HomeLink-hotline at
1-800-355-3515.
NOTE
.This device complies with FCC rules
part 15 and Industry Canada RSS-210.
Operation is subject to the following
two conditions: (1) This device may not
cause harmful interference, and (2)
This device must accept any interfer-
ence that may be received including
interference that may cause undesired
operation. WARNING: The transmitter
has been tested and complies with FCC
and IC rules. Changes or modifications
not expressly approved by the party
responsible for compliance could void
the user ’s authority to operate the
device.
. This equipment complies with FCC
radiation exposure limits set forth for
an uncontrolled environment. End
Users must follow the specific operat-
ing instructions for satisfying RF ex-
posure compliance. This transmitter
must be at least 20 cm from the user
and must not be co-located or operat-
ing in conjunction with any other
antenna or transmitter. .
The term “IC: ”before the certifica-
tion/registration number only signifies
that Industry Canada technical specifi-
cations were met.
HomeLink®and the HomeLink House®logo are registered trademarks of Gentex
Corporation.
& Outside mirrors
! Convex mirror (passenger side)
WARNING
Objects look smaller in a convex
mirror and farther away than when
viewed in a flat mirror. Do not use
the convex mirror to judge the
distance of vehicles behind you
when changing lanes. Use the inside
mirror (or glance backwards) to
determine the actual size and dis-
tance of objects that you view in
convex mirror.
Instruments and controls/Mirrors
–CONTINUED –3-115
Page 270 of 634
Heated Steering Wheel sys-
tem (if equipped)
The Heated Steering Wheel system is a
function that warms the surface tempera-
ture of the steering wheel at the constant
temperature.
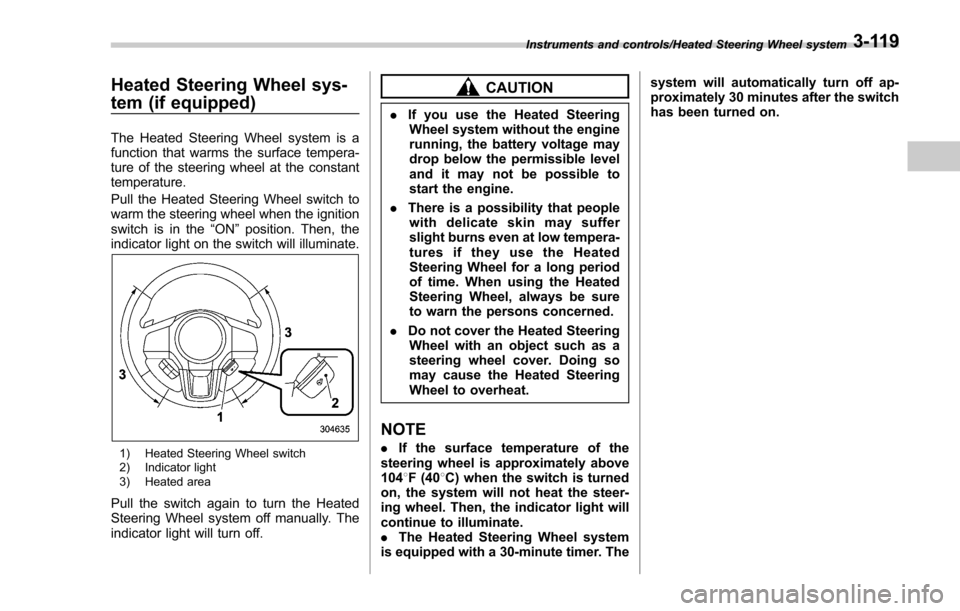
Pull the Heated Steering Wheel switch to
warm the steering wheel when the ignition
switch is in the“ON”position. Then, the
indicator light on the switch will illuminate.
1) Heated Steering Wheel switch
2) Indicator light
3) Heated area
Pull the switch again to turn the Heated
Steering Wheel system off manually. The
indicator light will turn off.
CAUTION
. If you use the Heated Steering
Wheel system without the engine
running, the battery voltage may
drop below the permissible level
and it may not be possible to
start the engine.
. There is a possibility that people
with delicate skin may suffer
slight burns even at low tempera-
turesiftheyusetheHeated
Steering Wheel for a long period
of time. When using the Heated
Steering Wheel, always be sure
to warn the persons concerned.
. Do not cover the Heated Steering
Wheel with an object such as a
steering wheel cover. Doing so
may cause the Heated Steering
Wheel to overheat.
NOTE
. If the surface temperature of the
steering wheel is approximately above
104 8F (40 8C) when the switch is turned
on, the system will not heat the steer-
ing wheel. Then, the indicator light will
continue to illuminate.
. The Heated Steering Wheel system
is equipped with a 30-minute timer. The system will automatically turn off ap-
proximately 30 minutes after the switch
has been turned on.
Instruments and controls/Heated Steering Wheel system3-119
Page 280 of 634
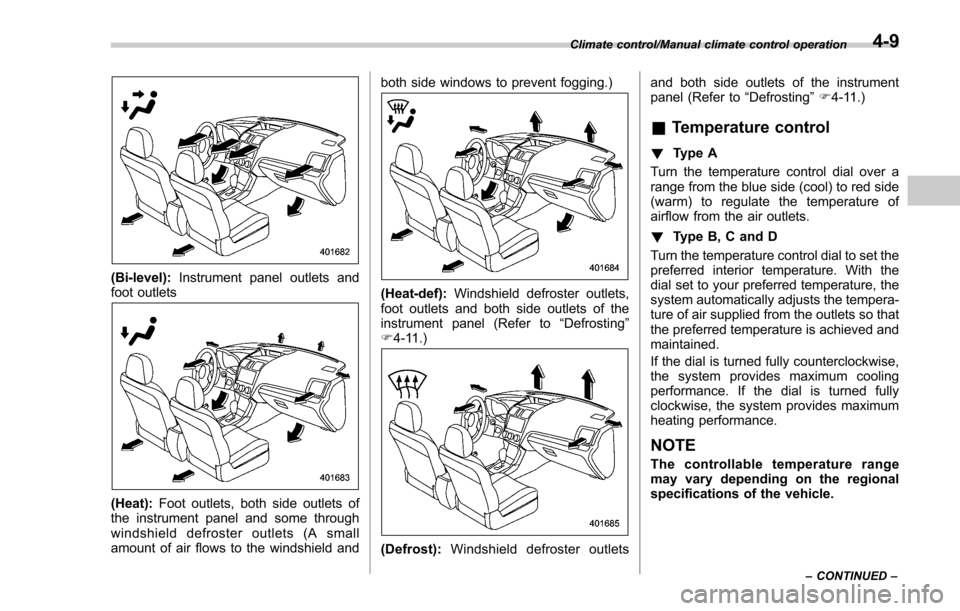
(Bi-level):Instrument panel outlets and
foot outlets
(Heat): Foot outlets, both side outlets of
the instrument panel and some through
windshield defroster outlets (A small
amount of air flows to the windshield and both side windows to prevent fogging.)
(Heat-def):
Windshield defroster outlets,
foot outlets and both side outlets of the
instrument panel (Refer to “Defrosting ”
F 4-11.)
(Defrost): Windshield defroster outlets and both side outlets of the instrument
panel (Refer to
“Defrosting”F 4-11.)
& Temperature control
! Type A
Turn the temperature control dial over a
range from the blue side (cool) to red side
(warm) to regulate the temperature of
airflow from the air outlets.
! Type B, C and D
Turn the temperature control dial to set the
preferred interior temperature. With the
dial set to your preferred temperature, the
system automatically adjusts the tempera-
ture of air supplied from the outlets so that
the preferred temperature is achieved and
maintained.
If the dial is turned fully counterclockwise,
the system provides maximum cooling
performance. If the dial is turned fully
clockwise, the system provides maximum
heating performance.
NOTE
The controllable temperature range
may vary depending on the regional
specifications of the vehicle.
Climate control/Manual climate control operation
–CONTINUED –4-9
Page 288 of 634

Antenna................................................................ 5-2Roof antenna ...................................................... 5-2
Audio set............................................................. 5-2Base display audio set (if equipped) .................... 5-3
STARLINKTM7.0 Multimedia Plus audio set
(U.S. spec. models only, if equipped) ................. 5-5
Tips for operating the audio/visual system ........... 5-6
Basic information before use .............................. 5-14
Basic operation .................................................. 5-17
Unit settings ...................................................... 5-18
SUBARU STARLINK (if equipped) ....................... 5-25
AM/FM radio ....................................................... 5-27
SiriusXM Satellite Radio (if equipped) ................. 5-36
aha
TMby HARMAN ............................................. 5-43
Pandora®(if equipped) ....................................... 5-49
CD ..................................................................... 5-52
USB memory ...................................................... 5-54
iPod ................................................................... 5-55
Bluetooth audio .................................................. 5-57
AUX ................................................................... 5-60
Steering switches for audio .............................. 5-62
Bluetooth®settings ............................................ 5-65Regulatory information ....................................... 5-65 Registering/connecting Bluetooth
®device
.......... 5-65
Setting Bluetooth details .................................... 5-68
Hands-free phone system ................................. 5-70Control screen................................................... 5-71
Registering/connecting a Bluetooth phone ......... 5-72
Using the phone switch/microphone ................... 5-72
How to change the hands-free phone system ..... 5-72
Making a call ..................................................... 5-73
Receiving a call ................................................. 5-76
Talking on the phone ......................................... 5-77
Phone settings .................................................. 5-78
Voice command system .................................... 5-80Using the voice command system ...................... 5-81
Voice command system operation ...................... 5-82
Command list .................................................... 5-84
What to do if.... ................................................... 5-88Troubleshooting ................................................. 5-88
Appendix............................................................ 5-92Certification ....................................................... 5-92
Certification for the Hands-free system ............... 5-92
Certification for Mexico models .......................... 5-93
Audio
5