Page 207 of 634

Instruments and controls/Multi function display
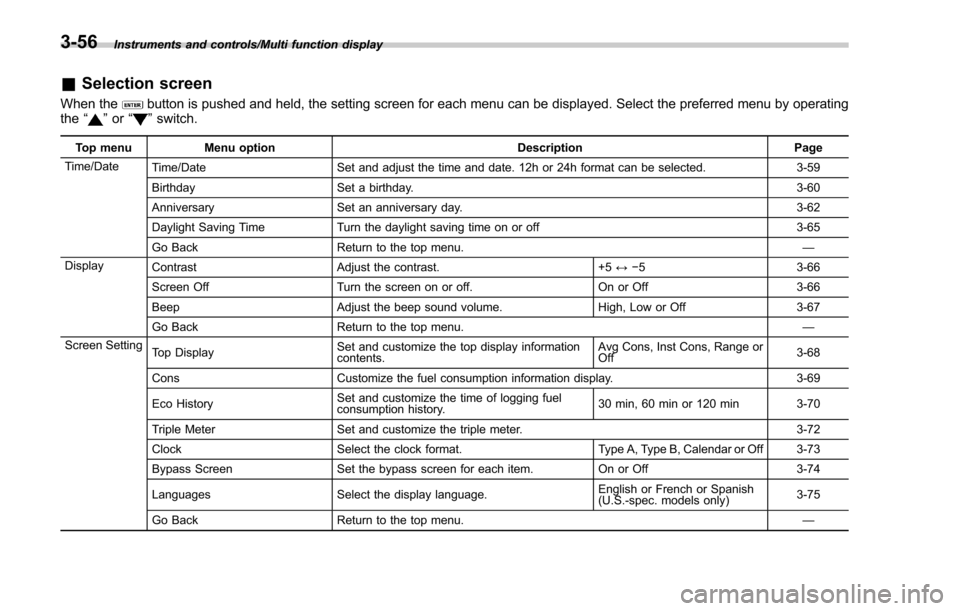
&Selection screen
When thebutton is pushed and held, the setting screen for each menu can be displayed. Select the preferred menu by operating
the “”or “”switch.
Top menu Menu option DescriptionPage
Time/Date Time/Date Set and adjust the time and date. 12h or 24h format can be selected. 3-59
Birthday Set a birthday. 3-60
Anniversary Set an anniversary day. 3-62
Daylight Saving Time Turn the daylight saving time on or off 3-65
Go Back Return to the top menu. —
Display Contrast Adjust the contrast. +5↔−53 -6 6
Screen Off Turn the screen on or off. On or Off3-66
Beep Adjust the beep sound volume. High, Low or Off3-67
Go Back Return to the top menu. —
Screen Setting Top Display Set and customize the top display information
contents. Avg Cons, Inst Cons, Range or
Off
3-68
Cons Customize the fuel consumption information display. 3-69
Eco History Set and customize the time of logging fuel
consumption history. 30 min, 60 min or 120 min 3-70
Triple Meter Set and customize the triple meter. 3-72
Clock Select the clock format. Type A, Type B, Calendar or Off 3-73
Bypass Screen Set the bypass screen for each item. On or Off3-74
Languages Select the display language. English or French or Spanish
(U.S.-spec. models only)
3-75
Go Back Return to the top menu. —
3-56
Page 216 of 634
!Daylight saving time setting
1. Perform the preparation steps accord-
ing to “Preparation for date setting ”F 3-
59.
2. Operate the “”or “”switch to
select the “Daylight Saving Time ”item.
Then push the
button.
3. The current setting will be displayed.
Push thebutton to enter the selection
mode.
4. Select “On”or“Off ”by operating the
“” or “”switch. Then push thebutton.
5. Select “Set ”by operating the “”
switch, and confirm the setting by pushing
the
button.
6. The system will notify you that the
setting is complete.
Instruments and controls/Multi function display
–CONTINUED –3-65
Page 226 of 634
“”switch, and confirm the setting by
pushing thebutton.
6. The system will notify you that the
setting is complete.
! Language setting
1. Perform the preparation steps accord-
ing to “Preparation for screen settings ”
F 3-68.
2. Operate the “”or “”switch to
select the “Languages ”item. Then push
the
button.
3. The current language setting will be
displayed. Push thebutton to enter
the language selection mode.
4. Select the preferred language by
operating the “”or “”switch. Then
push thebutton.
5. Select “Set ”by operating the “”
switch and confirm the setting by pushing
the
button.
Instruments and controls/Multi function display
–CONTINUED –3-75
Page 229 of 634
Instruments and controls/Multi function display
2. Operate the“”or “”switch to
select the “On/Off ”item. Then push the
button.
3. The current setting will be displayed.
Push thebutton to enter the selection
mode.
4. Select “On”or“Off ”by operating the
“” or “”switch. Then push thebutton.
5. Select “Set ”by operating the “”
switch, and confirm the setting by pushing
the
button.
6. The system will notify you that the
setting is complete.
! Clear setting
1. Perform the preparation steps accord-
ing to “Preparation for maintenance set-
tings ”F 3-76.
3-78
Page 231 of 634
Instruments and controls/Multi function display
4. Push thebutton once more to
enter the setting mode.
5. The system will notify you of the place
to be selected for approximately 2 sec-
onds.
6. Select one of the registration lines by
operating the “”or “”switch. Then
push thebutton.
7. To overwrite the previous registration,
push thebutton. When registration is
performed the first time, it is registered directly without a notification.
8. The system will notify you that the
registration is complete.
NOTE
The driving history can be registered
for the trip meter A or B.
&
Car settings
The items in the car settings can be set.
To change the items, operate the “”or
“” switch, and then push thebutton.
NOTE
When the vehicle is in motion, the
selectable items will be limited.
3-80
Page 233 of 634
Instruments and controls/Multi function display
!Hazard warning flasher setting
1. Perform the preparation steps accord-
ing to “Preparation for car settings” F3-81.
2. Operate the “”or “”switch to
select the “Hazard Warning Flasher” item.
Then push the
button.
3. The current setting will be displayed.
Push thebutton to enter the selection
mode.
4. Select “On”or“Off ”by operating the
“” or “”switch. Then push thebutton.
5. Select “Set ”by operating the “”
switch, and confirm the setting by pushing
the
button.
6. The system will notify you that the
setting is complete.
If the setting is not available, the following
notification will be displayed. In this case,
perform the setting procedure again.
3-82
Page 234 of 634
!Defogger setting
1. Perform the preparation steps accord-
ing to “Preparation for car settings” F3-81.
2. Operate the “”or “”switch to
select the “Defogger”item. Then push the
button.
3. The current setting will be displayed.
Push thebutton to enter the selection
mode.
4. Select the preferred setting by operat-
ing the “”or “”switch. Then push the
button.
5. Select “Set ”by operating the “”
switch, and confirm the setting by pushing
the
button.
6. The system will notify you that the
setting is complete.
Instruments and controls/Multi function display
–CONTINUED –3-83
Page 235 of 634
Instruments and controls/Multi function display
If the setting is not available, the following
notification will be displayed. In this case,
perform the setting procedure again.
!Interior light off delay timer setting
1. Perform the preparation steps accord-
ing to “Preparation for car settings” F3-81.
2. Operate the “”or “”switch to
select the “Interior Light ”item. Then push
the
button.
3. The current setting will be displayed.
Push thebutton to enter the selection
mode.
4. Select the preferred setting by operat-
ing the “”or “”switch. Then push thebutton.
5. Select “Set ”by operating the “”
switch, and confirm the setting by pushing
the
button.
3-84