Page 98 of 334
96 Navigation
Read First
■Map operations
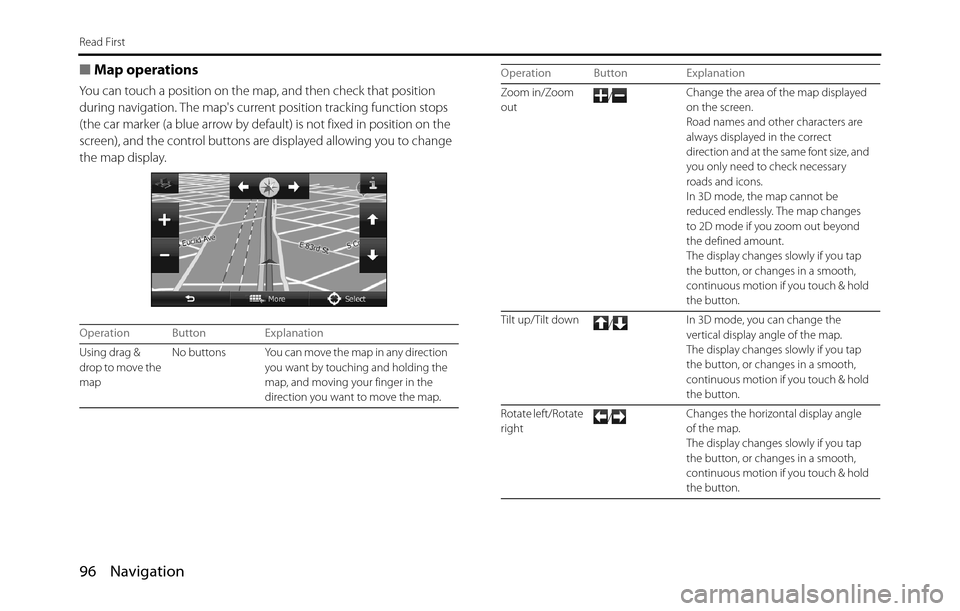
You can touch a position on the map, and then check that position
during navigation. The map's current position tracking function stops
(the car marker (a blue arrow by default) is not fixed in position on the
screen), and the control buttons are displayed allowing you to change
the map display.
Operation Button Explanation
Using drag &
drop to move the
mapNo buttons You can move the map in any direction
you want by touching and holding the
map, and moving your finger in the
direction you want to move the map.
Zoom in/Zoom
out/Change the area of the map displayed
on the screen.
Road names and other characters are
always displayed in the correct
direction and at the same font size, and
you only need to check necessary
roads and icons.
In 3D mode, the map cannot be
reduced endlessly. The map changes
to 2D mode if you zoom out beyond
the defined amount.
The display changes slowly if you tap
the button, or changes in a smooth,
continuous motion if you touch & hold
the button.
Tilt up/Tilt down
/In 3D mode, you can change the
vertical display angle of the map.
The display changes slowly if you tap
the button, or changes in a smooth,
continuous motion if you touch & hold
the button.
Rotate left/Rotate
right/Changes the horizontal display angle
of the map.
The display changes slowly if you tap
the button, or changes in a smooth,
continuous motion if you touch & hold
the button. Operation Button Explanation
Page 151 of 334
Navigation 149
Navigation
Voice Control Navigation
By using the voice control system (voice input microphone
and button), you can set the destination by giving voice
commands. This enables you to use functions that are usually
inoperable while driving.
1By using the voice recognition button you can use voice
commands to operate the navigation. (See Page 284.)
2When using voice commands to operate the navigation,
a command list is displayed.
3Voice a command after the “beep”. From then on, you
can give voice commands that are displayed on the
command list to set the destination in the same manner.
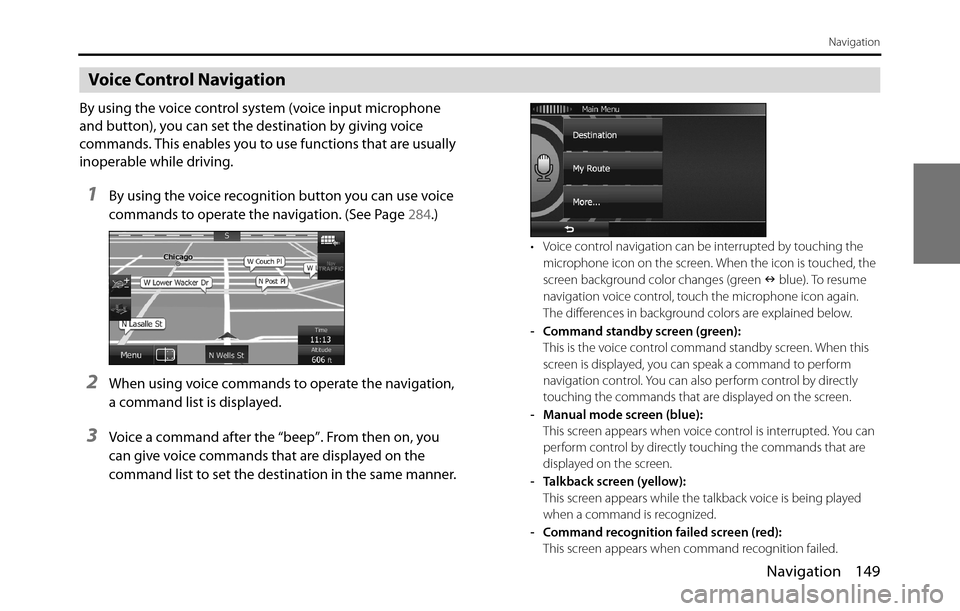
• Voice control navigation can be interrupted by touching the
microphone icon on the screen. When the icon is touched, the
screen background color changes (green �Q blue). To resume
navigation voice control, touch the microphone icon again.
The differences in background colors are explained below.
- Command standby screen (green):
This is the voice control command standby screen. When this
screen is displayed, you can speak a command to perform
navigation control. You can also perform control by directly
touching the commands that are displayed on the screen.
- Manual mode screen (blue):
This screen appears when voice control is interrupted. You can
perform control by directly touching the commands that are
displayed on the screen.
- Talkback screen (yellow):
This screen appears while the talkback voice is being played
when a command is recognized.
- Command recognition failed screen (red):
This screen appears when command recognition failed.
Page 166 of 334
164 Navigation
Reference Data
Visual Guidance
Changes settings related to Map screen guidance.
• (Data Fields):
You can set the data fields displayed at the corner of the Map screen
to match your needs. Touch this button and select the guidance you
want to display. Values may differ when driving without having set a
destination in route navigation. You can select altitude and so on for
a standard trip data, or select route data related to the final
destination or the next waypoint on the route.
• (Highway Services):
Displays service area information while driving on the expressway.
You can turn this function on and off.
• (Facility Types):
Touch this button and select the service area information display
items you want to display.
• (Signposts):
When information is available, lane information similar to overhead
road traffic signs is displayed at the top of the map. You can turn this
function on and off.
• (Junction View):
When approaching an expressway exit or a complicated intersection,
the map switches to a 3D display if the necessary information can be
displayed.• (Route Progress Bar):
Turns on the route progress bar which is displayed as a straight line
to the left of the map. This shows the progress made on the current
route. When a blue arrow is used to indicate position, the arrow
continues to rise as you drive towards your destination. Waypoints
and traffic conditions are displayed on the line.
Data Fields
Highway Services
Facility Types
Signposts
Junction View
Route Progress Bar
Page 194 of 334
192 Audio and Visual
Basic Operation
* When the external unit is connected, can be displayed and screen.
AUX
Page 257 of 334
Audio and Visual 255
How to Operate Portable Audio Devices
Using Bluetooth Audio
Before Using Bluetooth Audio
A Bluetooth-supporting portable audio player (“portable device”
hereafter) can be used as a source for this unit by utilizing the Bluetooth
wireless communication technology. To use a Bluetooth-supporting
portable device with this unit, it is necessary to perform Bluetooth
registration and connection settings.
WA R N I N G
Do not register a portable device while driving. Be sure to park
the vehicle in a safe location and apply the parking brake
before registering a device.
CAUTION
•Certain functions (such as touch panel operation and/or
video image) offered by this unit may not be used while
driving.
•The frequency band used by this unit is the same band that is
used by industrial, scientific and medical devices such as
microwave ovens, facility wireless stations used for identifying
moving objects in factory production lines and other
locations (wireless station that requires a license), special low
output wireless stations (wireless station that does not require
a license), and amateur radios (wireless station that requires a
license). (The 3 types of wireless stations above are hereafter
called “other wireless stations”.) Before operating this unit,
make sure that no “other wireless stations” are operating
nearby. If the unit causes harmful radio wave interference in
“other wireless stations”, immediately change the location to
stop the radio wave interference.
•The frequency band used by this unit is the 2.4 GHz band.
•The FH-SS modulation scheme is used.
•The estimated distance in which interference may occur is
less than 10 m.
•This unit uses the full band, making it possible to avoid the
band of devices that identify moving objects.
•This unit complies with the standards specified by the Radio
Act and Telecommunications Business Act in Japan. The
stickers attached to the product certify this. Do not remove
the stickers.
Disassembling or modifying this unit is punishable by law.
Page 258 of 334
256 Audio and Visual
How to Operate Portable Audio Devices
The Bluetooth-supporting portable device connected to this unit must
support the following specifications. Be aware that the available
functions may vary depending on the type of portable device.
•Supported Bluetooth Specifications
-Bluetooth Specification Ver. 1.1 or higher ( Ver. 2.0 + EDR or higher is
recommended)
•Supported Profiles-A2DP (Advanced Audio Distribution Profile) Ver. 1.0 or higher
-AVRCP (Audio/Video Remote Control Profile) Ver. 1.0 or higher ( Ver. 1.4 or
higher is recommended)
NOTE•For details of Bluetooth operations, see the portable device or cell phone
instruction manual.
•Factors in the surrounding environment may negatively affect the connection
status and prevent Bluetooth audio operations on the unit.
•Bluetooth audio feature is subject to portable devices or cell phone
compatibility.
•Bluetooth is a short-range wireless technology for connecting cell phones,
computers and other such devices.
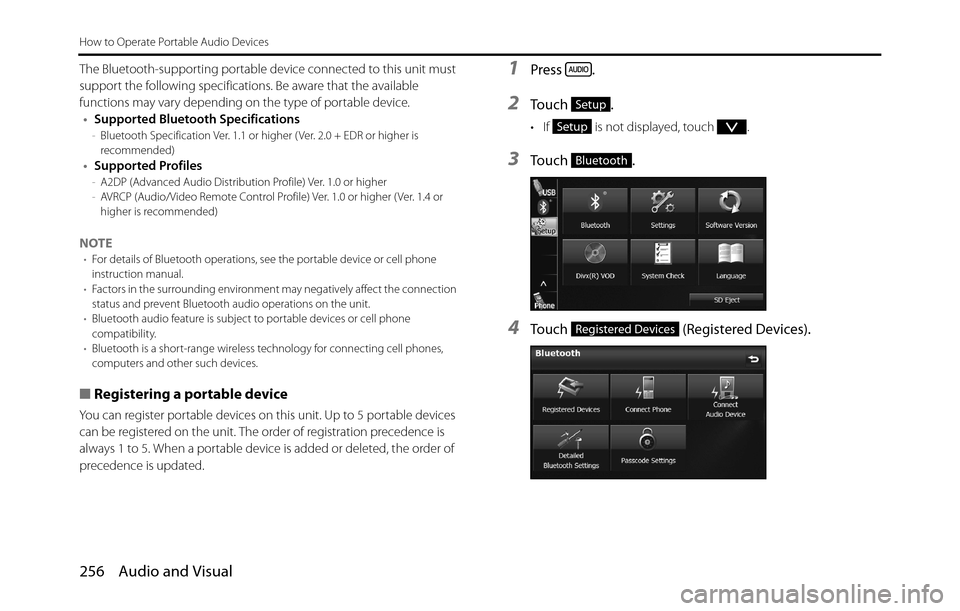
■Registering a portable device
You can register portable devices on this unit. Up to 5 portable devices
can be registered on the unit. The order of registration precedence is
always 1 to 5. When a portable device is added or deleted, the order of
precedence is updated.
1Press .
2To u c h .
• If is not displayed, touch .
3To u c h .
4Touch (Registered Devices).
Setup
Setup
Bluetooth
Registered Devices
Page 260 of 334
258 Audio and Visual
How to Operate Portable Audio Devices
3To u c h .
4Touch (Registered Devices).
5Select the portable device that you want to delete.
6Touch (Delete).
• “Are you sure you want to delete this device?” appears on the
screen. Touch (Yes) or (No).
7After touching (Yes), when the deletion is complete,
“Completed.” appears.
• The portable device deletion is complete.
■Connecting a portable device
You can connect portable devices that are registered on the unit.
•Make the preparations necessary for connecting to the unit, for
example by setting the portable device's Bluetooth standby to On.
For details of operations on the portable device, see the portable
device's instruction manual.
1Press .
2To u c h .
• If is not displayed, touch .
Bluetooth
Registered Devices
Delete
YesNo
Yes
Setup
Setup
Page 261 of 334
Audio and Visual 259
How to Operate Portable Audio Devices
3To u c h .
4Touch (Connect Audio Device).
5Select the portable device that you want to connect.
• The Bluetooth mark is displayed for portable devices with an
active Bluetooth connection.
6Touch (Connect).
• The connection screen appears.
7When the connection is complete, “Connection
completed.” appears.
• The connection between the portable device and the unit is
complete.
NOTE
•If the connection fails, “Connection failed.” appears on the screen. If this
happens, perform the connection operation again.
•Connection is not possible if no portable devices are registered.
•On the Connect Audio Device screen, touch (Add New) to
register a portable device.
Bluetooth
Connect Audio Device
Bluetooth mark
Connect
Add New