2017 Seat Toledo tow
[x] Cancel search: towPage 15 of 108

Introduction
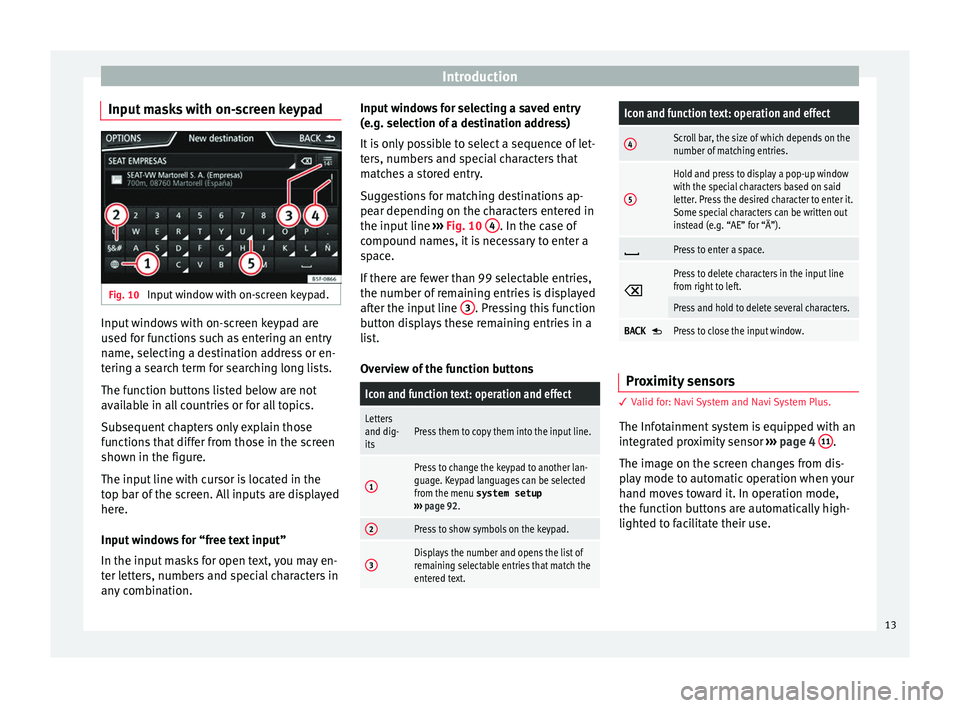
Input masks with on-screen keypad Fig. 10
Input window with on-screen keypad. Input windows with on-screen keypad are
u sed f
or f
unctions such as entering an entry
name, selecting a destination address or en-
tering a search term for searching long lists.
The function buttons listed below are not
available in all countries or for all topics.
Subsequent chapters only explain those
functions that differ from those in the screen
shown in the figure.
The input line with cursor is located in the
top bar of the screen. All inputs are displayed
here.
Input windows for “free text input”
In the input masks for open text, you may en-
ter letters, numbers and special characters in
any combination. Input windows for selecting a saved entry
(e.g. selection of
a destination address)
It is only possible to select a sequence of let-
ters, numbers and special characters that
matches a stored entry.
Suggestions for matching destinations ap-
pear depending on the characters entered in
the input line ››› Fig. 10 4 . In the case of
c ompou
nd n
ames, it is necessary to enter a
space.
If there are fewer than 99 selectable entries,
the number of remaining entries is displayed
after the input line 3 . Pressing this function
b utt
on di
splays these remaining entries in a
list.
Overview of the function buttons
Icon and function text: operation and effect
Letters
and dig-
itsPress them to copy them into the input line.
1
Press to change the keypad to another lan-
guage. Keypad languages can be selected
from the menu system setup
››› page 92.
2Press to show symbols on the keypad.
3Displays the number and opens the list of
remaining selectable entries that match the
entered text.
Icon and function text: operation and effect
4Scroll bar, the size of which depends on the
number of matching entries.
5
Hold and press to display a pop-up window
with the special characters based on said
letter. Press the desired character to enter it.
Some special characters can be written out
instead (e.g. “AE” for “Ä”).
Press to enter a space.
Press to delete characters in the input line
from right to left.
Press and hold to delete several characters.
BACK Press to close the input window.
Proximity sensors
3 V
alid for: Navi System and Navi System Plus.
The Inf
otainment system is equipped with an
integrated proximity sensor ›››
page 4 11 .
The im ag
e on the s
creen changes from dis-
play mode to automatic operation when your
hand moves toward it. In operation mode,
the function buttons are automatically high-
lighted to facilitate their use.
13
Page 20 of 108

Connectivity
Connectivity Dat a tr
an
sferThis communication can allow data to be
re
a
d and/or written.
From the SETTINGS menu > Data transfer for
SEAT apps, there is a checkbox to acti-
vate/deactivate the function and a dropdown
menu called Operation via apps which con-
trols the level of interaction between the
apps and the system ››› table on page 92.
Related video Fig. 13
Full Link (Toledo) Fig. 14
Connectivity
(Atec a) Full Link*
Fu
l
l Link technology description The Full Link system provides a way of bring-
ing t
og
ether technologies that allow commu-
nication between the Infotainment System
and mobile devices:
● MirrorLink ®
● Android Auto™
● Apple CarPlay™
Interf
aces
Depending on the versions, to access the Full
Link system press the APP
› ›
› Fig. 2 7 button
of the Inf
ot
ainment system or press the Info-
tainment MENU button
››
›
Fig. 1 9 and then
pr e
s
s the Full Link icon.
The connection to Full Link is made through a
USB interface. WARNING
If a mobile terminal is not secured or is incor-
rectly sec
ured in the vehicle, it could move
around the passenger compartment in the
event of a sudden driving manoeuvre, emer-
gency stop or accident, resulting in injury.
● While driving, mobile terminals must be se-
curely
fastened in position, outside the air-
bag deployment zones, or safely stowed
away. WARNING
Any applications that are not suitable or exe-
cut e inc
orrectly may cause damage to the ve-
hicle, accidents and serious injuries.
● SEAT recommends the use of the Apps that
SEAT pr
ovides for this vehicle.
● To make full use of SEAT Apps, you must ac-
tivate the option
Setup, “Data transfer for
SEAT apps” ››› page 92.
● The interaction level of the Apps on the
syst
em must be: ALLOW.
● Protect the mobile terminal with its appli-
cations
from improper use.
● Never make modifications to the applica-
tions.
● Con
sult the instruction manual for the mo-
bil
e terminal. WARNING
The use of applications while driving can dis-
tract
your attention from the traffic. Distract-
ing the driver in any way can lead to an acci-
dent and cause injuries.
● Always drive carefully and responsibly. CAUTION
● In are a
s where special regulations apply or
the use of mobile terminals is forbidden, the
mobile terminal must be switched off at all
times. The radiation produced by the mobile
terminal when switched on may interfere with 18
Page 62 of 108

Navigation
Infotainment system will not recognise the
fil
e
s saved on it.
● SEAT recommends a CLASS 10 1)
memory
car
d for the use of navigation data. The use of
other memory cards could limit its operation. Navigation main menu
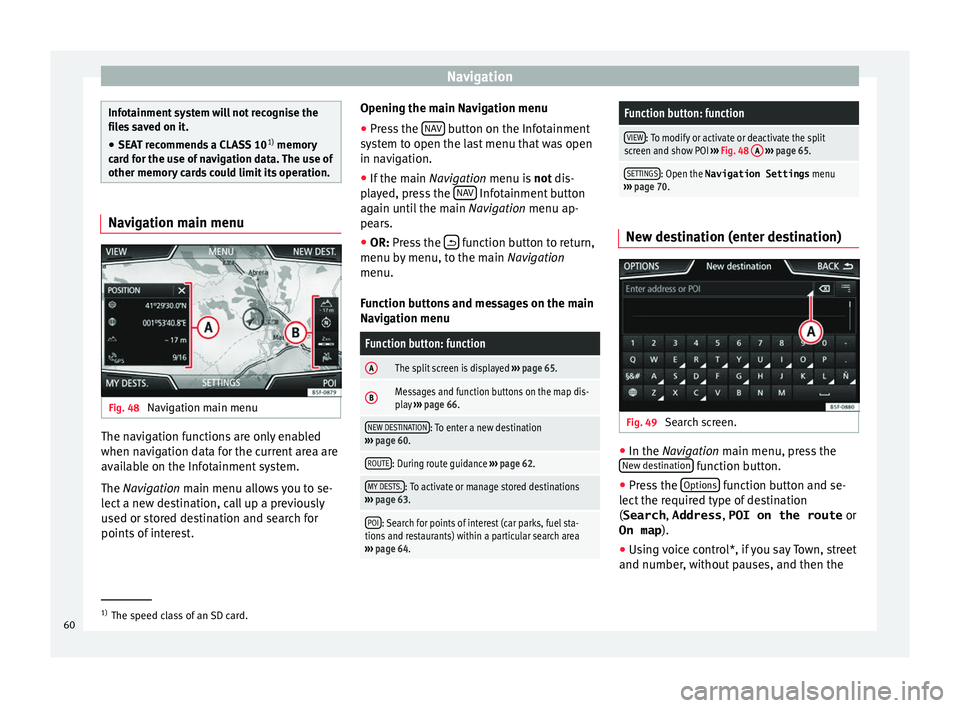
Fig. 48
Navigation main menu The navigation functions are only enabled
when n
av
ig
ation data for the current area are
available on the Infotainment system.
The Navigation main menu allows you to se-
lect a new destination, call up a previously
used or stored destination and search for
points of interest. Opening the main Navigation menu
● Press the NAV button on the Infotainment
sy s
t
em to open the last menu that was open
in navigation.
● If the main Navigation menu i
s not dis-
played, press the NAV Infotainment button
ag ain u
nti
l the main Navigation menu ap-
pears.
● OR: Press the function button to return,
menu b y
menu, t
o the main Navigation
menu.
Function buttons and messages on the main
Navigation menu
Function button: function
AThe split screen is displayed ››› page 65.
BMessages and function buttons on the map dis-
play ››› page 66.
NEW DESTINATION: To enter a new destination
››› page 60.
ROUTE: During route guidance ››› page 62.
MY DESTS.: To activate or manage stored destinations
››› page 63.
POI: Search for points of interest (car parks, fuel sta-
tions and restaurants) within a particular search area
››› page 64.
Function button: function
VIEW: To modify or activate or deactivate the split
screen and show POI ››› Fig. 48 A
››› page 65.
SETTINGS: Open the Navigation Settings menu
››› page 70. New destination (enter destination)
Fig. 49
Search screen. ●
In the Na vigation main menu, press the
New de s
tination function button.
● Press the Option
s function button and se-
l ect
the r
equired type of destination
(Search , Address , POI on the route or
On map ).
● Using voice control*, if you say Town, street
and number, without
pauses, and then the1)
The speed class of an SD card.
60
Page 63 of 108

Navigation
instruction “Start Route Guidance” a route to
the giv en de
s
tination will start.
Search
Search for addresses and Points of Interest
using the keypad to enter them ››› Fig. 49.
For cities, post codes and points of interest,
the full details must be entered. You can also
search for points of interest by names or cat-
egories. When necessary, enter the name of
the city to refine the search.
››› Fig. 49
APress to open the cursor buttons (, ), which
allow you to move within the text. Address
Af
t
er ent
ering a country and a town, you can
start navigating towards the centre of the se-
lected town.
When narrowing down the destination ad-
dress, please note that every entry restricts
the available range of subsequent selections.
For instance, if the street you are looking for
is not in the postcode area you have selected
in a previous window, you will not be able to
find the street at the street selection stage.
Function button: function
Country: To select the desired country.
Function button: function
City: To enter the desired city or postcode.
Street: To enter the desired street name.
House number: To enter the desired house number.
Junction: To select the desired intersection.
Last destinations: Open the My destinations menu
››› page 63.
Start: Start route guidance to the selected address. Using the
● Select the destination on the map or enter
it u
s
ing GPS coordinates and confirm with
OK .
Function button: function
Save: To save the selected point of interest in the desti-
nation memory ››› page 63.
Edit: To edit a destination or to enter another destina-
tion.
Route options: To adjust route options, see Navigation
Setup ››› page 70.
Start: Starts guided navigation to the selected point of
interest. After starting route guidance
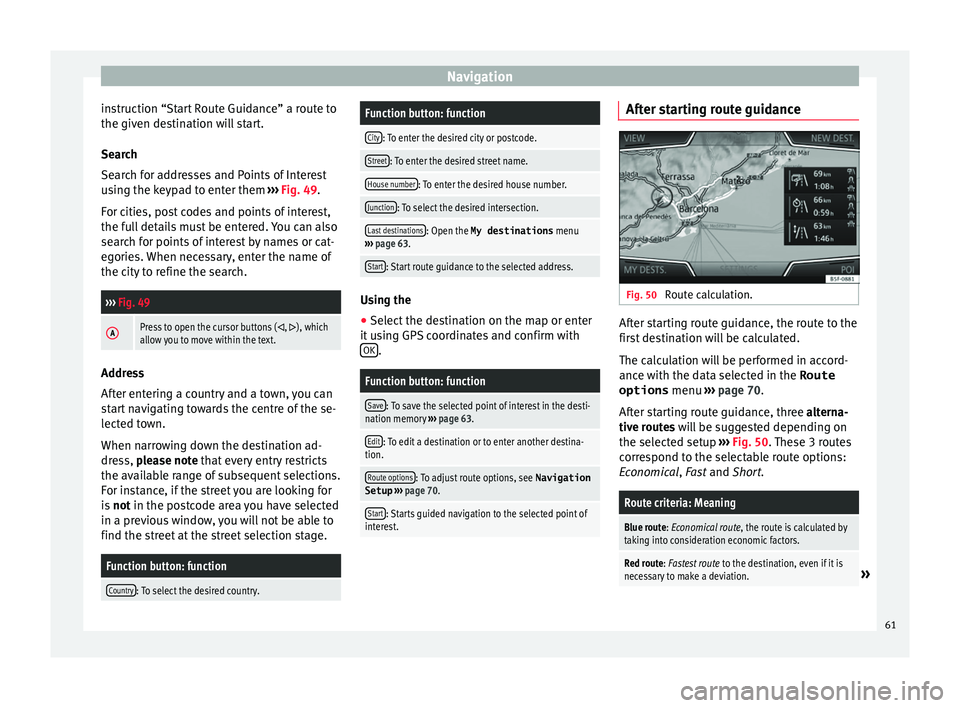
Fig. 50
Route calculation. After starting route guidance, the route to the
fir
s
t
destination will be calculated.
The calculation will be performed in accord-
ance with the data selected in the Route options menu ››› page 70.
After starting route guidance, three alterna-
tive routes will be suggested depending on
the selected setup ››› Fig. 50. These 3 routes
correspond to the selectable route options:
Economical, Fast and Short.
Route criteria: Meaning
Blue route: Economical route, the route is calculated by taking into consideration economic factors.
Red route: Fastest route to the destination, even if it is
necessary to make a deviation.» 61