2017 Seat Leon SC phone
[x] Cancel search: phonePage 49 of 104
Audio and Media Mode
card from the system, the function button be-
c ome
s
inactive (grey colour).
● Press the inserted memory card. The mem-
ory c
ard “jumps” to the eject position.
● Remove the memory card.
Unrea
dable memory card
If a memory card is inserted and the data
cannot be read, the relevant warning ap-
pears.
External data storage device connec-
ted to USB por
t Depending on the features and the country,
the
v
ehic
le may have one or two USB connec-
tions. For their location consult the ››› Booklet
Instruction Manual.
Audio files on an external data storage de-
vice connected to the USB port can be
played and controlled via the Infotainment
system.
Where this manual refers to external data
storage devices, this means USB mass stor-
age devices containing supported audio
files, such as MP3 players, iPods™ and USB
sticks.
Only supported audio files are displayed and
played. Other files are ignored. Further operation of the external data medi-
um (chan
ging track, selecting tracks and
playback modes) is described in the appro-
priate chapters of this manual ››› page 37.
Instructions and restrictions
Compatibility with Apple™ devices and other
media players depends on the unit.
The USB port supplies the usual USB volt-
age of 5 volts for a USB connection.
External hard disks with a capacity greater
than 32 GB must be reformatted for the
FAT32 file system in some circumstances. You
will find the necessary software and informa-
tion on the Internet.
Take into account all other instructions and
limitations regarding requirements for media
sources ››› page 37.
iPod™, iPad™ and iPhone™
Depending on the country and the equip-
ment, iPods™, iPads™ or iPhones™ can be
connected using the device's USB cable to
the USB port of the vehicle and used as
audio sources.
After connecting an iPod™, iPad™ or
iPhone™, the specific list views of the iPod
are displayed in the upper selection level
( Playlists , Artists, Albums ,
Tracks , Podcasts etc.). Possible error messages after connecting an
extern
al data storage device
Error mes-
sageCauseProcedure
The device
is not
compatibleThe external
data carrier
cannot be
played or com-
munication is
not possible
with the adapt-
er cable being
used.Check the connec-
tion and make sure
the external data
storage device is
working correctly.
If possible, update
the external data
storage device soft-
ware.
The device
does not
workCommunication
fault.Check the connec-
tion and make sure
the external data
medium is working
correctly.
Due to the large number of different data storage devi-
ces and various iPod™, iPad™ and iPhone™ genera-
tions available, it is not possible to guarantee fault-free
operation of all functions described here. Disconnecting
An
y
c
onnected data storage devices must be
prepared before their disconnection in order
to remove them.
● From the main Media menu, press the
SETTINGS button to open the Media Set-
tings menu or pr e
s
s the Infotainment MENU button
››
›
Fig. 1 1 and then press the
Set-
tin g
s context to open the System set-
tings menu. »
47
Page 50 of 104
Audio and Media Mode
● Pr e
s
s the Remove safely function button. A
dr opdo
wn menu ap
pears with the following
options: SD1 Card, SD2 Card*, USB1 and
USB2*. After correctly ejecting the data stor-
age device from the system, the function but-
ton becomes inactive (grey colour).
● Now the data storage device can be discon-
nected. Note
● Do not c onnect
an external media player at
the same time to play music via Bluetooth ®
and via the USB port with the Infotain-
ment system, as this could cause playback
limitations.
● If the external player is an Apple device™,
it cannot
be simultaneously connected by
USB and by Bluetooth.
● If a connected device is not recognised, dis-
connect a
ll the connected devices and try
connecting the device again.
● Do not use memory card adaptors, USB ex-
tens
ion cords or USB hubs! External audio source connected to
the A
UX
-IN mu
ltimedia socket Depending on the equipment and country
ther
e m
a
y be an AUX-IN multimedia socket
››› Booklet Instruction Manual.
In order to connect the external audio source
to the AUX-IN socket, a suitable cable is re- quired with a 3.5 mm jack that is inserted in-
to the AUX
-IN socket of the vehicle.
The connected external audio source is
played over the vehicle speakers and cannot
be controlled via the Infotainment system
controls.
The connection of an external audio source is
indicated by AUX on the screen.
Connecting an external audio source to the
AUX-IN multimedia socket ● Lower the base volume on the Infotainment
syst
em.
● Connect the external audio source to the
AUX-IN mu
ltimedia socket.
● Start playback on the external audio
source.
● In the MEDIA m
ain menu, press the SOURCE function button and select
A
UX .
The outp ut
volume of the connected external
audio source should be adjusted to the vol-
ume of the other audio sources ››› page 91.
Information on operating an external audio
source connected to the AUX-IN multimedia
socket
OperationEffect
Selection of another au-
dio source from the Info-
tainment system.The external audio source
continues to run in the
background.
OperationEffect
Stopping playback on the
external audio source.The infotainment system
remains in the AUX menu.
Disconnecting the plug
from the AUX-IN multime-
dia socket.The infotainment system
remains in the AUX menu. Note
● Ple a
se read and observe the manufactur-
er's instruction manual for the external audio
source.
● Interference noise may be heard if the ex-
terna
l audio source is powered from the 12-
volt power socket of the vehicle. Connecting an external audio source
v
i
a Bluet
ooth® Bluetooth
®
Audio mode al lo
w
s you to listen
to audio files being played on a Bluetooth ®
audio source (e.g., a mobile telephone) con-
nected via Bluetooth ®
(audio playback by
Bluetooth ®
) over the vehicle speakers.
Conditions ● The Bluetooth ®
audio source mu
st support
the A2DP Bluetooth ®
profile.
● In the Bluetooth settings menu, the
Bluetooth Audio (A2DP/A
VRCP) function must
be activ at
ed ›
›› page 87.
48
Page 51 of 104
Audio and Media Mode
Starting Bluetooth ®
audio tr an
sf er
● Activate Bluetooth ®
vis
ibility on the exter-
nal Bluetooth ®
audio source (e.g., mobile tel-
ephone).
● Lower the base volume on the Infotainment
syst
em.
● In the MEDIA main menu, press the SOURCEfunction button and select
B
T audio .
● Press Se
ar
c
h for new device in order to con-
nect an e
xt
ernal Bluetooth ®
audio source for
the first time ››› page 78.
● OR: Select a Bluetooth ®
ext
ernal audio
source from the list.
● Please refer to the instructions on the
scr
een of the Infotainment system and on the
Bluetooth ®
audio source regarding the rest
of the procedure.
You may still need to manually start playback
on the Bluetooth ®
source.
When playback on the Bluetooth ®
audio
source is stopped, the Infotainment system
remains in Bluetooth ®
Audio mode.
Controlling playback
The extent to which the Bluetooth ®
audio
source can be controlled via the Infotainment
system depends on the connected Blue-
tooth ®
audio source. The available functions will depend on the
Bluetooth
®
Audio profi
le that the connected
external player supports.
With media players that support the AVRCP
Bluetooth ®
profile, playback on the Blue-
tooth ®
audio source can be automatically
started or stopped when the unit is switched
to Bluetooth ®
Audio mode or to a different
audio source. In addition, it is possible to
view or change the track via the Infotainment
system. Note
● Due t o the l
arge number of possible Blue-
tooth ®
audio sources, it is not possible to
guarantee fault-free operation of all descri-
bed functions.
● Always switch off the warning and service
tones
on a connected Bluetooth ®
audio
source, e.g. key tones on a mobile telephone,
to prevent possible interference noise and
malfunctions.
● To play music, do not link the external me-
dia pl
ayer simultaneously to Bluetooth and
the USB interface of the infotainment system,
as this can cause limitations during playback.
● Depending on the external player connec-
ted, the re
sponse time of the system can
vary. ●
Do not c onnect
an external media player to
play music via Bluetooth ®
and via the USB
port ››› page 47 at the same time with the
Infotainment system, as this could cause
playback limitations.
● If the external player is an Apple device™,
it c
annot be simultaneously connected by
USB and by Bluetooth. Jukebox (SSD)
3 Only
available for the model: Navi System Plus Fig. 37
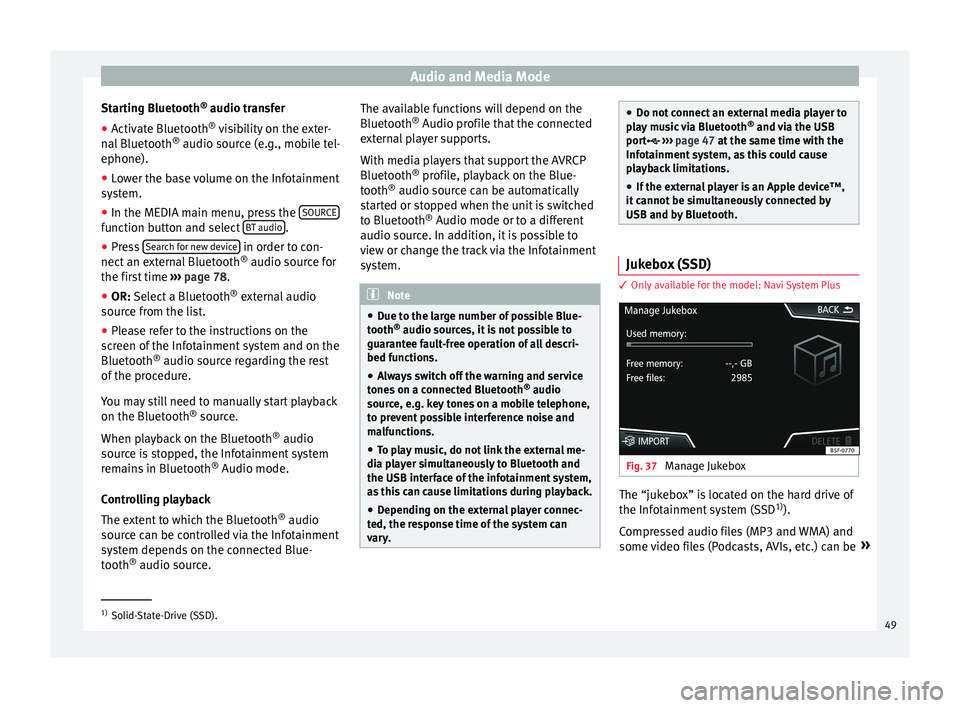
Manage Jukebox The “jukebox” is located on the hard drive of
the Inf
ot
ainment
system (SSD1)
).
Compressed audio files (MP3 and WMA) and
some video files (Podcasts, AVIs, etc.) can be »1)
Solid-State-Drive (SSD).
49
Page 53 of 104
Audio and Media Mode
● Mu
s
ic genre
● Title
● Video
● Non-playable files (an unsupported file has
been imported). Note
● If the Inf ot
ainment system cancels a copy-
ing operation, check the storage space on the
internal hard drive and check the data stor-
age device.
● Due to copyright laws, before any change in
ownership of
the Infotainment system, all
files stored on the jukebox must be deleted.
● There are various possible reasons why
file
s may be shown with inactive status (grey
colour): files that cannot be imported (e.g.
images), files that are already present in
Jukebox or files that occupy more space than
is available in the internal memory. Connecting an external audio source
v
i
a
WLAN 3 Only
available for the model: Navi System Plus
WLAN al
lows wireless connection between an
external audio source (for example a smart
phone) and the Infotainment system.
To use this connection, the device being con-
nected must have an app compatible with
the UPnP (Universal Plug and Play) communi- cation protocol, allowing the app to provide
the sys
t
em with the available media content.
Conditions ● Having a compatible (UPnP) app installed
on the mobi
le device.
● Having the mobile hotspot found in the
w
ireless connection configuration active
››› page 51, WLAN setup.
● Pairing the mobile device to the Infotain-
ment sys
tem using a password generated by
the system. The pairing must be done from
the mobile device that you wish to connect to
the Infotainment system.
Starting the WLAN audio transfer
● Lower the base volume on the Infotainment
syst
em.
● Start the UPnP app or the app for the play-
back
of the WLAN audio source.
● In the MEDIA main menu, press the SOURCE function button and select
WLAN .
● Please refer to the instructions on the
s c
r
een of the Infotainment system and on the
WLAN audio source regarding the rest of the
procedure.
Controlling playback
The extent to which the WLAN audio source
can be controlled via the Infotainment sys- tem depends on the connected WLAN audio
source and the ap
plication used. Note
● The Infot ainment
system does not provide
an internet connection, it only establishes a
wireless connection between the mobile de-
vice and said system.
● Via the WLAN, only the connection between
the device and the Inf
otainment system can
be guaranteed, its operation depends on the
application itself. WLAN setup
3 Only
available for the model: Navi System Plus
T
o access the WLAN settings, the ignition
must be on.
● Select the Media Main menu by pressing
the Infot ainment
MENU button
››
›
Fig. 1 1 and then selecting the M
edi
a context.
● Press the SETTINGS function button to open
the Media Settings menu.
● Press the WLAN function button, then the
Hotspot settings butt
on w
ill appear, to-
gether with a text with information about us-
ing the WLAN.
● Press the Hotspot settings function
b
utton, and you will then be able to switch
on/off the Mobile hotspot and access the
Configuration of the WLAN network. »
51
Page 64 of 104

Navigation
To move a stopover or a destination to
another position on the list. Press and
drag to move the destination.
a)
This function button is only displayed with route guidance ac-
tivated and when a destination has been added to the tour.
b) This function button is only displayed with route guidance ac-
tivated.
Last destinations
View of destinations for which a route has al-
ready been started.
My destinations
● Press the Options function button and se-
lect the de
sired function button.
Function button: function
Destination memory: View of destinations stored manually
and from imported vCards ››› page 66, Importing
vCards (electronic business cards) .
Favourites: View of destinations stored as favourites.
Contacts: View of entries in the phonebook that have a
stored address (postal address). Home address
On
ly
one a
ddress or position can be stored
as the home address at any one time. The
stored home address can be edited or over-
written. If a home address has already been stored,
route guid
ance will be started to the stored
home address.
If a home address has not yet been stored,
an address can be assigned as the home ad-
dress.
Assigning the home address for the first time:
Position: Press to store the vehicle's current position as
the home address.
Address: Press to enter the home address manually.
Editing the home address:
The home address can be edited in the Navigation
settings menu ››› page 67.
Points of interest (POI) Fig. 46
Points of interest on the map. The points of interest saved in the navigation
d
at
a memor
y are divided into different point of interest categories. Each point of interest
cate
gory is assigned a symbol for display on
the map.
If a database of points of interest has been
imported into the Infotainment system,
››› page 66, Importing Personal POI the cat-
egory Personal POI is also shown.
In the Map settings menu, the cat
e
gories
of points of interest to display on the map
can be configured ››› page 67. Up to 10 cat-
egories of points of interest can be selected.
Selecting a point of interest on the map
Function button: function
1There are several points of interest in the area.
Press this symbol to open a list of points of inter-
est.
2The only point of interest in this zone. Press the
symbol to open the detailed view of the point of
interest. Fast search for a POI
In the Na
vigation
m
ain menu, press the POI function button and the three main catego-
rie
s
w
ill appear. Alternatively, enter the name
of the point of interest to be searched using
the new destination keypad, or press Search nearby on the map.
››
›
table on
page 63.
62
Page 70 of 104
NavigationFunction button: function
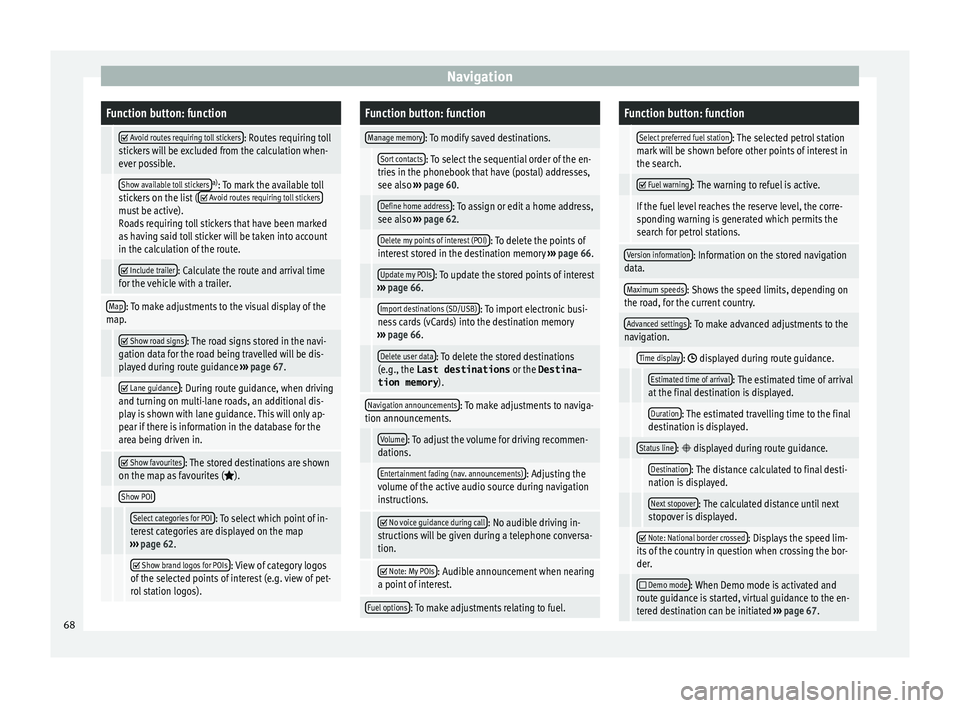
Avoid routes requiring toll stickers: Routes requiring toll
stickers will be excluded from the calculation when-
ever possible.
Show available toll stickersa) : To mark the available toll
stickers on the list ( Avoid routes requiring toll stickersmust be active).
Roads requiring toll stickers that have been marked
as having said toll sticker will be taken into account
in the calculation of the route.
Include trailer: Calculate the route and arrival time
for the vehicle with a trailer.
Map: To make adjustments to the visual display of the
map.
Show road signs: The road signs stored in the navi-
gation data for the road being travelled will be dis-
played during route guidance ››› page 67.
Lane guidance: During route guidance, when driving
and turning on multi-lane roads, an additional dis-
play is shown with lane guidance. This will only ap-
pear if there is information in the database for the
area being driven in.
Show favourites: The stored destinations are shown
on the map as favourites ().
Show POI
Select categories for POI: To select which point of in-
terest categories are displayed on the map
››› page 62.
Show brand logos for POIs: View of category logos
of the selected points of interest (e.g. view of pet-
rol station logos).
Function button: function
Manage memory: To modify saved destinations.
Sort contacts: To select the sequential order of the en-
tries in the phonebook that have (postal) addresses,
see also ››› page 60.
Define home address: To assign or edit a home address,
see also ››› page 62.
Delete my points of interest (POI): To delete the points of
interest stored in the destination memory ››› page 66.
Update my POIs: To update the stored points of interest
››› page 66.
Import destinations (SD/USB): To import electronic busi-
ness cards (vCards) into the destination memory
››› page 66.
Delete user data: To delete the stored destinations
(e.g., the Last destinations or the Destina-
tion memory ).
Navigation announcements: To make adjustments to naviga-
tion announcements.
Volume: To adjust the volume for driving recommen-
dations.
Entertainment fading (nav. announcements): Adjusting the
volume of the active audio source during navigation
instructions.
No voice guidance during call: No audible driving in-
structions will be given during a telephone conversa-
tion.
Note: My POIs: Audible announcement when nearing
a point of interest.
Fuel options: To make adjustments relating to fuel.
Function button: function
Select preferred fuel station: The selected petrol station
mark will be shown before other points of interest in
the search.
Fuel warning: The warning to refuel is active.
If the fuel level reaches the reserve level, the corre-
sponding warning is generated which permits the
search for petrol stations.
Version information: Information on the stored navigation
data.
Maximum speeds: Shows the speed limits, depending on
the road, for the current country.
Advanced settings: To make advanced adjustments to the
navigation.
Time display: displayed during route guidance.
Estimated time of arrival: The estimated time of arrival
at the final destination is displayed.
Duration: The estimated travelling time to the final
destination is displayed.
Status line: displayed during route guidance.
Destination: The distance calculated to final desti-
nation is displayed.
Next stopover: The calculated distance until next
stopover is displayed.
Note: National border crossed: Displays the speed lim-
its of the country in question when crossing the bor-
der.
Demo mode: When Demo mode is activated and
route guidance is started, virtual guidance to the en-
tered destination can be initiated ››› page 67. 68
Page 79 of 104
Telephone management system (PHONE)
Telephone management sys-
t em (PHONE)
Intr oduction t
o the telephone
management system
Related video Fig. 65
Telephone man-
agement sy
stem General information
The Telephone functions described below
c
an be u
sed thr
ough the Infotainment system
if there is a mobile telephone connected to it
via Bluetooth ®
›››
page 79.
In order for the mobile telephone to be able
to connect to the Infotainment system the tel-
ephone must be equipped with Bluetooth®
.
If there is no mobile telephone connected to
the Infotainment system, the telephone man-
agement system will not be available. The instructions shown on the screen for the
telephone menu
s will depend on the mobile
telephone used. There may be variations.
Only use compatible Bluetooth ®
devices. For
further information on compatible Blue-
tooth ®
products, ask your nearest SEAT deal-
er or check on the internet.
Use the instruction manual of the mobile tel-
ephone and of any accessories.
If you detect any operating issues between
your mobile telephone and the Infotainment
system, restart your mobile by switching it off
and on again.
You may experience poor reception or may be
cut off in areas where the signal is weak.
Most electronic devices are shielded against
HF (high-frequency) signals. In any case, the
electronic equipment may not be protected
from the HF signals of the telephone man-
agement system. This may cause interfer-
ence. WARNING
Speaking by telephone and operating the mo-
bi l
e telephone whilst driving can distract you
from the road and cause an accident.
● Always drive carefully and responsibly.
● Select volume settings that allow you to
eas
ily hear signals from outside the vehicle
at all times (e.g. emergency services sirens
and horns). ●
In are a
s of little or no coverage or, in some
cases, in a tunnel, garage or underpass, your
call may be cut off and you may not be able to
make even emergency calls. WARNING
If a mobile telephone is not secured or is in-
c orr ectly
secured in the vehicle, it could move
around the passenger compartment in the
event of a sudden driving manoeuvre or emer-
gency stop, resulting in injury.
● While the vehicle is in motion, always se-
cure the mo
bile telephone properly outside
the airbag deployment zone. WARNING
Mobile telephones may interfere with and al-
ter the c orr
ect operation of pacemakers if
they are carried directly over them.
● Maintain a minimum distance of at least
20 centimetre
s between the aerials of the
mobile telephone and the pacemaker, as mo-
bile phones may affect the functioning of
pacemakers.
● Do not carry your switched-on mobile tele-
phone in your br
east pocket directly over the
pacemaker.
● If you suspect interference, switch off the
mobi
le telephone immediately. » 77
Page 80 of 104
Telephone management system (PHONE)
CAUTION
High speeds, poor weather or road conditions
and the quality of
reception can all affect the
quality of a telephone conversation in the ve-
hicle. Note
● Re s
trictions on the use of devices using
Bluetooth ®
technology may apply in some
countries. For further information, contact the
local authorities.
● If you wish to connect a device to the tele-
phone manag
ement system via Bluetooth ®
technology, consult the safety warnings in its
instruction manual. Only use compatible
Bluetooth ®
devices. Areas where special regulations apply
Switch off the mobile telephone and the mo-
b
i
l
e Bluetooth function in places with a risk
of explosion. In the majority of cases, these
places are signposted, but not always clearly
››› in General information on page 77.
They
inc lude, f
or example:
● the vicinity of chemical pipelines and tanks
● The lower decks of boats and ferries.
● In the proximity of vehicles that run on liq-
uid gas
(such as propane or butane). ●
plac
es where the air is laden with chemi-
cals or particles such as flour, dust or metal
powder.
● all other places where the vehicle engine
must
be switched off. WARNING
Switch off the mobile phone in areas with a
risk of
explosion! The mobile telephone can
automatically connect to the mobile tele-
phone network again if it loses the Blue-
tooth ®
connection to the telephone manage-
ment system. CAUTION
In areas where special regulations apply or
the use of mo
bile telephones is prohibited,
both the telephone and the telephone man-
agement system must be switched off. The
radiation produced by the mobile telephone
when switched on may interfere with sensi-
tive technical and medical equipment, possi-
bly resulting in a malfunction or damage to
the equipment. Bluetooth
® Bluetooth
®
tec
hno
logy allows a mobile tele-
phone to be connected to your vehicle's tele-
phone management system. In order to use
the telephone management system with a
mobile telephone with Bluetooth ®
technolo-
gy, it is first necessary to pair them. Some Bluetooth
®
mobi
le telephones detect
and automatically connect when turning on
the ignition if a connection has been previ-
ously established. For this to take place the
telephone must be switched on and its Blue-
tooth ®
function activated, and there must be
no active Bluetooth ®
connection with other
devices.
Bluetooth ®
connections are free.
Bluetooth ®
is a registered trademark of
Bluetooth ®
SIG, Inc.
Bluetooth profiles ®
When a mobile phone is connected to the tel-
ephone management system, a data ex-
change takes place via one of the Bluetooth ®
profiles.
● Hands-free Bluetooth profile (HFP): If a mo-
bi
le telephone is connected to the telephone
manager through the HFP, calls can be made
wirelessly through the hands-free device.
This function also requires other Bluetooth
profiles such as the phonebook download
and instant messaging.
● Audio profile (A2DP): Bluetooth profi
le for
transmitting audio signals with stereo quali-
ty. This function can also connect other addi-
tional Bluetooth profiles for viewing tracks
and for controlling playback on the mobile
device.
78