2017 SEAT IBIZA ST steering wheel
[x] Cancel search: steering wheelPage 82 of 248
Emergencies
Note
● Ob ser
ve legal requirements when towing or
tow-starting.
● Switch on the hazard warning lights of both
vehicl
es. However, observe any regulations
to the contrary.
● For technical reasons, vehicles with an au-
tomatic
gearbox must not be tow-started.
● If there is no lubricant in the gearbox as the
res
ult of a fault, you must raise the driven
wheels while the vehicle is being towed.
● If the vehicle has to be towed more than
50 km (30 mile
s), the front wheels should be
raised during towing, and towing should be
carried out by a qualified person.
● The steering wheel is locked when the vehi-
cle h
as no electrical power. The vehicle must
then be towed with the front wheels raised.
Towing should be carried out by a qualified
person.
● The towline anchorage should always be
kept in the
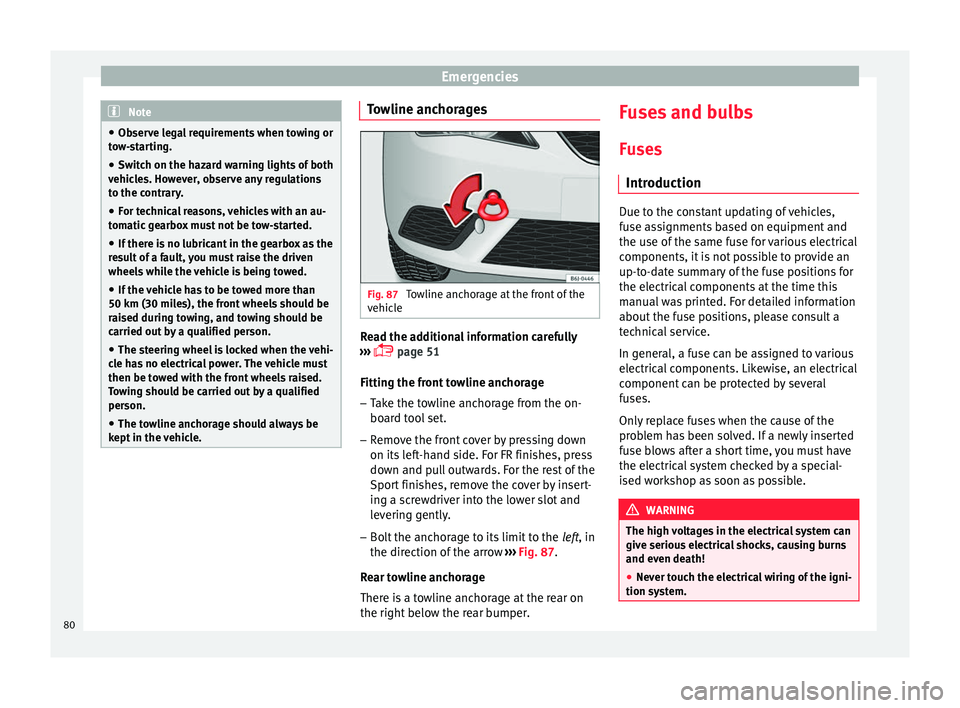
vehicle. Towline anchorages
Fig. 87
Towline anchorage at the front of the
v ehic
l
e Read the additional information carefully
› ›
›
page 51
Fitting the front towline anchorage
– Take the towline anchorage from the on-
board t
ool set.
– Remove the front cover by pressing down
on its lef
t-hand side. For FR finishes, press
down and pull outwards. For the rest of the
Sport finishes, remove the cover by insert-
ing a screwdriver into the lower slot and
levering gently.
– Bolt the anchorage to its limit to the left, in
the dir
ection of the arrow ››› Fig. 87.
Rear towline anchorage
There is a towline anchorage at the rear on
the right below the rear bumper. Fuses and bulbs
F u
se
s
Introduction Due to the constant updating of vehicles,
fu
se a
ssignments based on equipment and
the use of the same fuse for various electrical
components, it is not possible to provide an
up-to-date summary of the fuse positions for
the electrical components at the time this
manual was printed. For detailed information
about the fuse positions, please consult a
technical service.
In general, a fuse can be assigned to various
electrical components. Likewise, an electrical
component can be protected by several
fuses.
Only replace fuses when the cause of the
problem has been solved. If a newly inserted
fuse blows after a short time, you must have
the electrical system checked by a special-
ised workshop as soon as possible. WARNING
The high voltages in the electrical system can
give seriou s
electrical shocks, causing burns
and even death!
● Never touch the electrical wiring of the igni-
tion syst
em.80
Page 95 of 248

Controls and displays
Operation
C ontr
o
ls and displays
General instrument panel Door release lever
Light sw
it
ch . . . . . . . . . . . . . . . . . . . . . . 117
Headlight range control* . . . . . . . . . .121
Air vents
Lever f
or:
– Turn signals/main beam head-
lights . . . . . . . . . . . . . . . . . . . . . . . . . . 119
– Crui se c
ontrol* . . . . . . . . . . . . . . . . . 180
Instrument panel and warning
lamp s:
– In
struments . . . . . . . . . . . . . . . . . . . . 94
– Warnin g and indic
ation lamps . . .35
Steering wheel with horn and – Driver airb ag . . . . . . . . . . . . . . . . . . . 66
– On-boar d c
omputer controls . . . .25
– Contro
ls for radio, telephone,
navigation and speech dialogue
system ›››
Booklet Radio
– Paddle levers for tiptronic gear-
shift (automatic gearbox) . . . . . . .161
1 2
3
4
5
6
7 Steering and starter lock
. . . . . . . . . .147
Lever for: – Wind
s
creen wipers and washer . .123
– Window w
asher-wiper system* . .123
– Multi-f
unction display control* . .25
Infotainment system:
Depending on the equipment,
glo
ve compartment with: . . . . . . . . .130
– CD pla
yer* and/or SD card*
››› Booklet Radio
Passenger airbag* . . . . . . . . . . . . . . . . 14
Switches for:
– Heating and
ventilation . . . . . . . . . 139
– Air conditionin g* . . . . . . . . . . . . . . . 141
– C
limatr
onic* . . . . . . . . . . . . . . . . . . . . 143
Depending on the equipment, but-
ton s
for:
– SEAT Drive Profile . . . . . . . . . . . . . . . 182
– Park a
ssist system . . . . . . . . . . . . . . 173
– Hazard w
arning lights . . . . . . . . . .121
– Airbag off w
arning lamp* . . . . . . .68, 70
Depending on the equipment:
– USB/AUX -IN inp
ut . . . . . . . . . . . . . . 105
– Cig ar
ette lighter/Power socket . .132
Drink holder/Ashtray . . . . . . . . . . . . .131
8 9
10
11
12
13
14
15
16 Controls in the centre console:
– St ar
t
-Stop operation button . . . . .170
– Tyr
e pressure monitoring* . . . . . . .213
– Heated r
ear window . . . . . . . . . . . . 123
– Heated se
ats* . . . . . . . . . . . . . . . . . . 128
– Central
locking* . . . . . . . . . . . . . . . . 108
Handbrake lever . . . . . . . . . . . . . . . . . . 149
Gear lever – Automatic* . . . . . . . . . . . . . . . . . . . . . 158
– M
anual . . . . . . . . . . . . . . . . . . . . . . . . . 158
Stor
age space
Pedal
s . . . . . . . . . . . . . . . . . . . . . . . . . . . 61
Steering column control lever* . . . .13
Bonnet release lever . . . . . . . . . . . . . .199
Fuse housing . . . . . . . . . . . . . . . . . . . . . 80
Control for adjusting electric exteri-
or mirrors* . . . . . . . . . . . . . . . . . . . . . . . 126
El
ectric window controls* . . . . . . . . .114 Note
Some of the items of equipment listed here
are fitt ed on
ly on certain model versions or
are optional extras. 17
18
19
20
21
22
23
24
25
26
93
Technical data
Advice
Operation
Emergencies
Safety
Page 103 of 248
Communications and multimedia
Communications and multi-
medi a
St eerin
g wheel controls*
General information The steering wheel includes a multifunction
modul
e fr
om where it is possible to control
the audio, telephone and radio/navigation
functions without needing to distract the
driver.
There are two versions of the multifunction
module:
● Audio system + telephone without voice
contr o
l version (MID) : for controlling the au-
dio functions available (radio, audio CD,
MP3, iPod ®1)
, USB 1)
, SD 1)
) and Bluetooth sys-
tem from the steering wheel.
● Audio system + telephone with voice con-
trol
version (HIGH) : for controlling the audio
functions available (radio, audio CD, MP3,
iPod ®1)
, USB 1)
, SD 1)
) and Bluetooth system
from the steering wheel. 1)
Depending on the vehicle equipment.
101
Technical data
Advice
Operation
Emergencies
Safety
Page 104 of 248
Operation
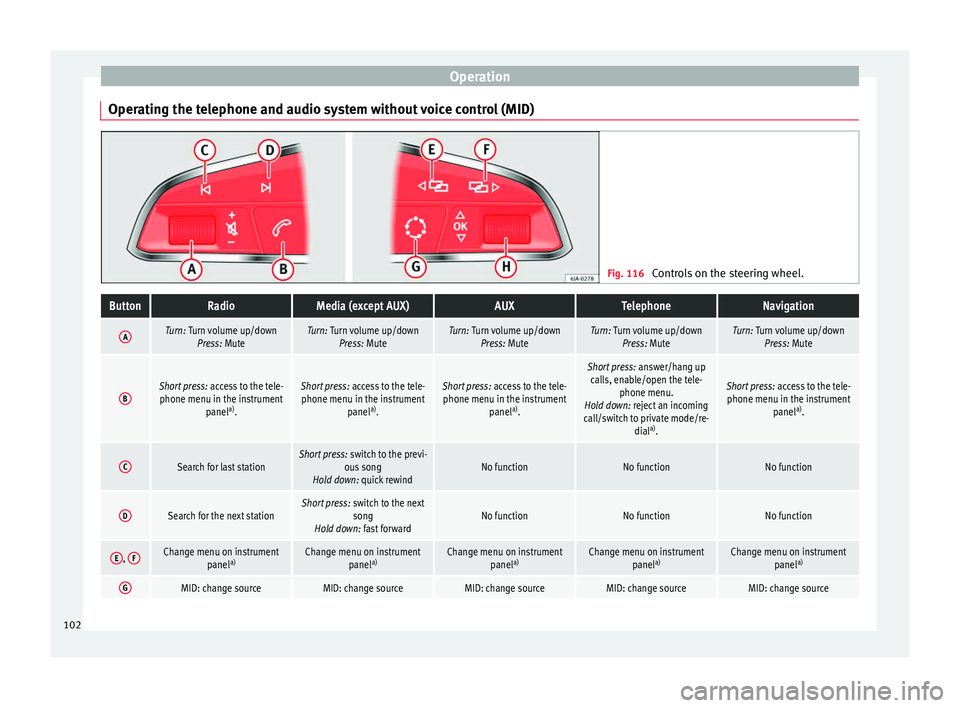
Operating the telephone and audio system without voice control (MID) Fig. 116
Controls on the steering wheel.ButtonRadioMedia (except AUX)AUXTelephoneNavigation
ATurn: Turn volume up/down
Press: MuteTurn: Turn volume up/downPress: MuteTurn: Turn volume up/downPress: MuteTurn: Turn volume up/downPress: MuteTurn: Turn volume up/downPress: Mute
BShort press: access to the tele-
phone menu in the instrument panela)
.Short press: access to the tele-
phone menu in the instrument panela)
.Short press: access to the tele-
phone menu in the instrument panela)
.
Short press: answer/hang up
calls, enable/open the tele- phone menu.
Hold down: reject an incoming
call/switch to private mode/re- diala)
.
Short press: access to the tele-
phone menu in the instrument panela)
.
CSearch for last stationShort press: switch to the previ-
ous song
Hold down: quick rewindNo functionNo functionNo function
DSearch for the next stationShort press: switch to the next
song
Hold down: fast forwardNo functionNo functionNo function
E, FChange menu on instrument
panela)Change menu on instrument
panela)Change menu on instrument
panela)Change menu on instrument
panela)Change menu on instrument
panela)
GMID: change sourceMID: change sourceMID: change sourceMID: change sourceMID: change source102
Page 105 of 248
Communications and multimediaButtonRadioMedia (except AUX)AUXTelephoneNavigation
HTurn: Next/previous preset
b)
Press: Acts on the MFDTurn: Next/previous song b)
Press: Acts on the MFDTurn: No function
Press: Acts on the MFDTurn: Acts on the MFD Press: ConfirmTurn: Changes menu or memory on instrument panel
Press: Operates on instrument panel
a)According to the vehicle's equipment package.
b) Only if the dash panel is in audio menu.
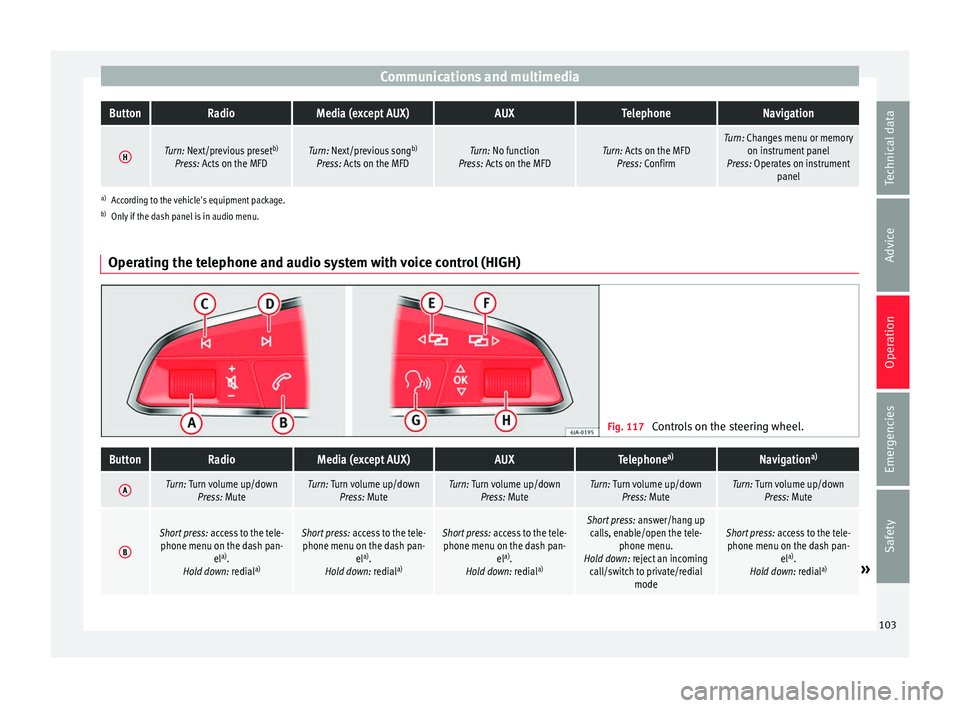
Operating the telephone and audio system with voice control (HIGH) Fig. 117
Controls on the steering wheel.
ButtonRadioMedia (except AUX)AUXTelephone a)Navigation a)
ATurn: Turn volume up/down
Press: MuteTurn: Turn volume up/downPress: MuteTurn: Turn volume up/downPress: MuteTurn: Turn volume up/downPress: MuteTurn: Turn volume up/downPress: Mute
B
Short press: access to the tele-
phone menu on the dash pan- ela)
.
Hold down: redial a)Short press:
access to the tele-
phone menu on the dash pan- ela)
.
Hold down: redial a)Short press:
access to the tele-
phone menu on the dash pan- ela)
.
Hold down: redial a)Short press:
answer/hang up
calls, enable/open the tele- phone menu.
Hold down: reject an incoming call/switch to private/redial modeShort press: access to the tele-
phone menu on the dash pan- ela)
.
Hold down: redial a)
» 103
Technical data
Advice
Operation
Emergencies
Safety
Page 122 of 248
Operation
lights, the tail lights and the number plate
light w
i
ll light up to provide assistance.
Coming home function
The Coming Home function is activated by
switching off the ignition and briefly flashing
the lights. When the driver door is opened,
the Coming Home lighting comes on. If the
driver door is already open when the lights
are flashed briefly, the Coming Home lighting
comes on immediately.
When the last door of the vehicle or the rear
lid is closed, the Coming Home function
starts and the switching off the headlights is
delayed.
The Coming Home lighting switches off in the
following cases:
● On completion of the time period establish-
ed for the dela
y in switching off the lights af-
ter all the vehicle doors and the rear lid have
been closed.
● If, 30 seconds after being connected, any
doors or the r
ear lid remain open.
● If the light switch is turned to position .
● If the ignition is switched on.
Automatic
Leaving Home function
The Leaving Home function is activated when
the vehicle is unlocked if:
● the light control is in position and●
the photosen
sor detects “darkness”.
The Leaving Home lighting switches off in the
following cases: ● If the time period for the delay in switching
off the hea
dlights has ended
● If the vehicle is locked again.
● If the light switch is turned to position .
● If the ignition is switched on.
Manual
Leaving Home function
In vehicles without an automatic headlight
system (light sensor), if the manual Coming
Home function is activated when leaving the
car, upon returning to the car and unlocking
it the manual Leaving Home function will be
activated automatically. Note
● To activ at
e the Coming/Leaving home func-
tion, the rotary light switch must be in posi-
tion and the light sensor must detect
darkness.
● If the ignition key is removed while the
lights ar
e on, the lights flash briefly and the
driver door opens, no audible warning is
heard, since with the Coming Home function
on, the lights are automatically switched off
after a period of time (except when the light
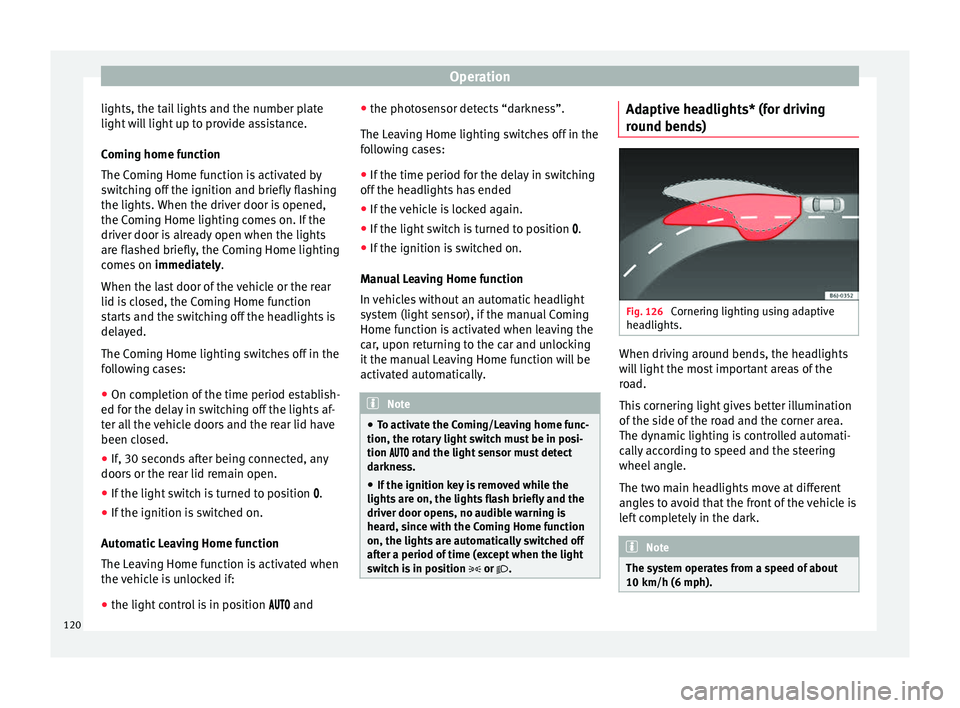
switch is in position or . Adaptive headlights* (for driving
r
ou
nd bend
s) Fig. 126
Cornering lighting using adaptive
he a
dlights. When driving around bends, the headlights
w
i
l
l light the most important areas of the
road.
This cornering light gives better illumination
of the side of the road and the corner area.
The dynamic lighting is controlled automati-
cally according to speed and the steering
wheel angle.
The two main headlights move at different
angles to avoid that the front of the vehicle is
left completely in the dark. Note
The system operates from a speed of about
10 km/h (6 mph). 120
Page 123 of 248
Lights and visibility
Fog lights with cornering function* This is an additional light source to dipped
beam he
a
dlights to light up the road as a
bend is taken.
The cornering light operates with the lights
switched on and when driving at less than
40 Km/h (25 mph). Ignition occurs by turning
the steering or connecting the turn signal.
Forward gear
● If the steering wheel is turned to the right,
or the right-h and t
urn signal operated, the
right-hand fog light turns on.
● If the steering wheel is turned to the left, or
the left
-hand turn signal operated, the left-
hand fog light turns on.
In reverse, both fog lights turn on. Note
When the fog lamps are on, the cornering
fu nction i
s activated and both headlights are
continuously on. Instrument and switch lighting, head-
light
r
an
ge control Fig. 127
Dash panel: headlight range control Instrument and switch lighting
The lightin
g l
ev
el of instruments, controls
and displays can be adjusted through the in-
fotainment system with the CAR button and
the S
ETUP function button
››
›
page 24.
The instrument lighting (some dials and nee-
dles), the centre console lighting and the
lighting of the displays are regulated by a
photodiode incorporated in the instrument
panel.
The instrument lighting (needles) is switched
on when the ignition is on and the light is
off. The instrument lighting is dimmed auto-
matically as the daylight starts to fade. It
goes out completely when ambient light is
very low. This function is intended to remind
the driver to switch on the dipped beam headlights in good time when light condi-
tions bec
ome poor.
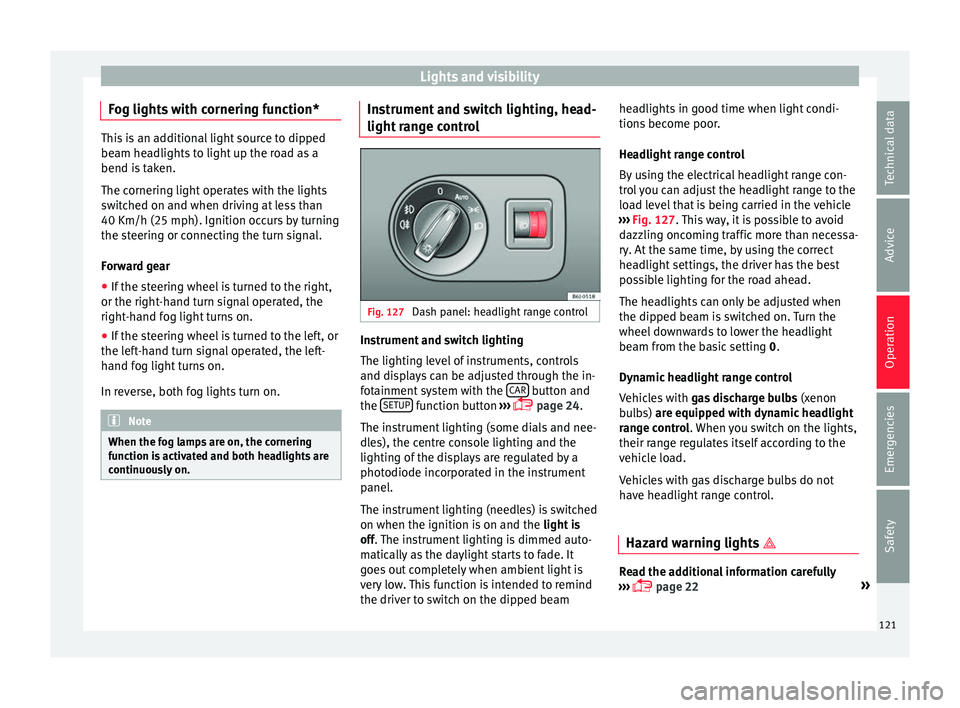
Headlight range control
By using the electrical headlight range con-
trol you can adjust the headlight range to the
load level that is being carried in the vehicle
››› Fig. 127. This way, it is possible to avoid
dazzling oncoming traffic more than necessa-
ry. At the same time, by using the correct
headlight settings, the driver has the best
possible lighting for the road ahead.
The headlights can only be adjusted when
the dipped beam is switched on. Turn the
wheel downwards to lower the headlight
beam from the basic setting 0.
Dynamic headlight range control
Vehicles with gas discharge bulbs (xenon
bulbs) are equipped with dynamic headlight
range control. When you switch on the lights,
their range regulates itself according to the
vehicle load.
Vehicles with gas discharge bulbs do not
have headlight range control.
Hazard warning lights Read the additional information carefully
› ››
page 22 »
121
Technical data
Advice
Operation
Emergencies
Safety
Page 126 of 248

Operation
WARNING
The rain sensor* may not detect enough rain
to sw it
ch on the wipers.
● If necessary, switch on the wipers manually
when water on the w
indscreen obstructs visi-
bility. CAUTION
In icy conditions, always check that the wiper
bl a
des are not frozen to the glass before us-
ing the wipers for the first time. If you switch
on the windscreen wipers when the wiper
blades are frozen to the windscreen, you
could damage both the wiper blades and the
wiper motor. Note
● The wind s
creen wipers will only work when
the ignition is switched on.
● The heat output of the heated jets* is con-
trol
led automatically when the ignition is
switched on, depending upon the outside
temperature.
● In certain versions of vehicles with alarms,
the winds
creen wiper will only work in inter-
val/rain sensor mode when the ignition is on
and the bonnet closed.
● When the interval wipe function is on, the
interv
als are directly proportional to the
speed. This way, the higher the vehicle speed
the shorter the intervals. ●
If y
ou stop the vehicle with the windscreen
wiper in position 1 or 2, it will automatically
change to a lower position speed. The set
speed will be resumed when the vehicle pulls
away.
● The windscreen will be wiped again after
appro
ximately five seconds once the “auto-
matic wash/wipe system” has been activa-
ted, provided the vehicle is moving (drip func-
tion). If you activate the wipers less than 3
seconds after the drip function, a new wash
sequence will begin without performing the
last wipe. For the “drip” function to work
again, you have to turn the ignition off and
then on again.
● Do not put stickers on the windscreen in
front of
the rain sensor*. This may cause sen-
sor disruption or faults. Rear window wiper
Fig. 130
Windscreen wiper lever: rear window
w iper
. Switching on the interval wipe
– Press the lever forward to position 6 ›››
Fig. 130. The w
iper w
ill wipe the window
approximately every 6 seconds.
Switching off the interval wipe function
– Pull the lever back from position 6 toward
the s t
eerin
g wheel. The wiper will continue
to function for a short period if you switch
off whilst the wipers are in motion.
Switching on the window wiper and washer
system – Press the lever fully forwards to position 7 ›››
Fig. 130 . The w iper and w
asher operate
at the same time. The rear window wash
system will function as long as you hold the
lever in this position.
– Release the lever. The washer system stops
and the wiper s
continue until the end of
the cycle.
– Move the lever towards the steering wheel
to swit
ch off. WARNING
● Worn and dir ty
wiper blades reduce visibili-
ty and safety levels while driving.
● Always note the corresponding warnings
›››
page 54.124