2017 SEAT IBIZA ST headlights
[x] Cancel search: headlightsPage 120 of 248
Operation
mph), a warning will appear on the
ins
trument
panel: Turn off the fog
light! .
● The use of the lighting described here is
subj
ect to the relevant statutory require-
ments. Automatic lighting*
Activation
– Rotate the switch to the po
s
ition, this
indication will light up.
Deactivation
– Turn the light switch to .
Automatic
lighting
If automatic headlight control is switched on,
dipped beam headlights are automatically
switched on by a photosensor if you drive in-
to a tunnel, for example. WARNING
● Ev en if
the automatic headlight control is
switched on, the dipped beam headlights will
not be switched on with fog. Therefore, the
dipped beam must be switched on manually. Note
● For tho se
vehicles with the automatic head-
light system, when the key is removed from the ignition, the audible warning will only
sound if
the light
knob is in position or .
● If the daylight driving automatic light func-
tion is sw
itched on, the front fog lights or
rear fog light cannot be switched on in addi-
tion.
● The use of the lighting described here is
subj
ect to the relevant statutory require-
ments.
● Do not put stickers on the windscreen in
front of
the sensor. This may cause disrup-
tions or faults in the automatic lighting sys-
tem.
● The rain sensor switches on the dipped
beam hea
dlights when the windscreen wipers
have been operating continuously for a few
seconds and it switches the lights off when
the continuous or interval wipe is switched
off for some minutes. Daytime running lights
›› ›
table on page 2
The daytime running lights are enabled auto-
matically when the ignition is switched on.
Daytime running lights are signalling devices
for improving road safety. The lights are built
into the headlights and come on each time
the ignition is turned on if the light switch is
in position 0 or . It is automatically
switched off when the dipped beam lights
are turned on. WARNING
The side lights or daytime driving lights are
not bright enough t
o illuminate the road
ahead and to ensure that other road users are
able to see you.
● Always use your dipped beam head lights if
it is
raining or if visibility is poor.
● The rear lights do not come on with the
daytime driv
ing light. A vehicle which does
not have the rear lights on may not be visible
to other drivers in the darkness, if it is rain-
ing or in conditions of poor visibility. Note
See legal requirements for each country. Fog lights
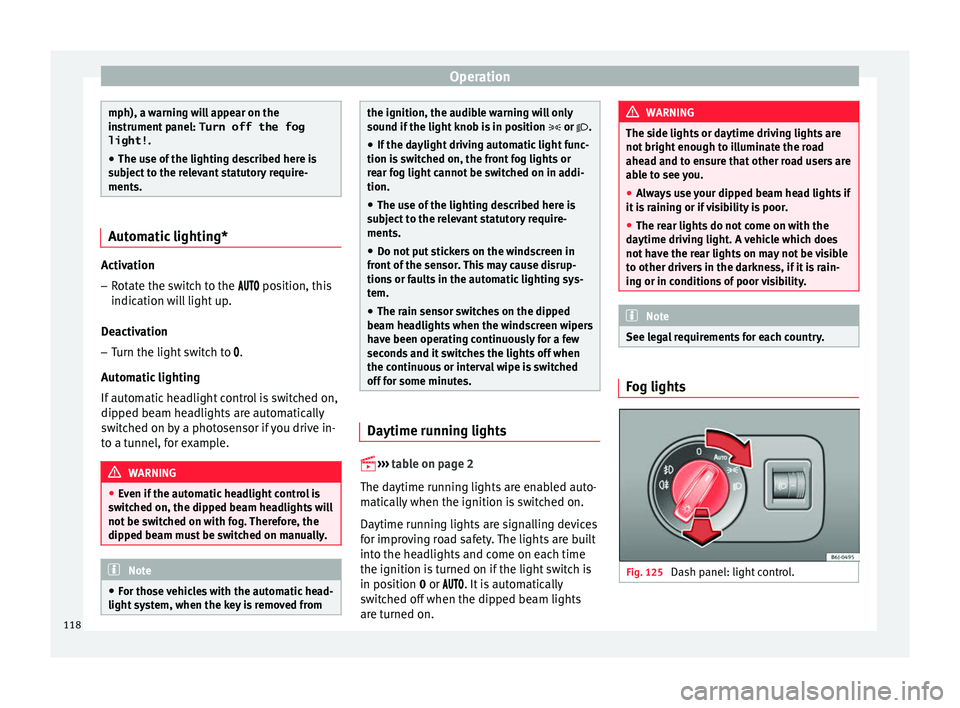
Fig. 125
Dash panel: light control.118
Page 121 of 248
Lights and visibility
Switching on the front fog lights*
● Turn the switch from position
or
to the first stop and pull it. The symbol in
the light switch lights up.
Switching on the rear fog light (vehicles with
front fog lights)
● Turn the lights control from position
or to the second stop and pull it ››› in
Sw it
c
hing lights on and off on page 117. A
lamp on the control and warning lamps panel
lights up.
Switching on the rear fog light (vehicles with
no front fog lights)
● Turn the light control to the end from posi-
tion or and pul
l it. A lamp on the con-
trol and warning lamps panel lights up.
Turn signal and main beam lever Read the additional information carefully
› ›
›
page 22
Parking lights
● Switch the ignition off and remove the key
from the lock.
● Mo
ve the turn signal lever up or down to
turn the right or l
eft-hand parking lights on,
respectively. Convenience turn signals
For the con
venience turn signals, move the
lever as far as possible upwards or down-
wards and release the lever. The turn signal
will flash three times.
The convenience turn signals are activated
and deactivated in the Easy Connect system
via the key and the
Set
up function button
› ›
›
page 99.
In vehicles that do not have the correspond-
ing menu, this function can be deactivated in
a specialised workshop. WARNING
The main beam can dazzle other drivers. Risk
of ac c
ident! Never use the main beam head-
lights or the headlight flasher if they could
dazzle other drivers. Note
● If the c on
venience turn signals are operat-
ing (three flashes) and the other convenience
turn signals are switched on, the active part
stops flashing and only flashes once in the
new part selected.
● The turn signals only
work when the igni-
tion is switched on. The corresponding warn-
ing lamp or flashes in the instrument
panel. The control lamp flashes when the
turn signals are operated, provided a trailer is
correctly attached and connected to the vehi-
cle. If a turn signal bulb is defective, the con- trol lamp flashes at double speed. If the trail-
er turn s
ign
al bulbs are defective, the control
lamp does not light up. Change the bulb.
● The main beam headligh
ts can only be
switched on if the dipped beam headlights
are already on. The warning lamp then
comes on in the instrument panel.
● The headlight flasher come
s on for as long
as you pull the lever – even if no other lights
are switched on. The warning lamp then
comes on in the instrument panel.
● When the parking ligh
ts are switched on,
the headlight and the tail light on the corre-
sponding side of the vehicle light up. The
parking lights will only work if the key is re-
moved from the ignition. If said light is on, an
audible warning will be emitted while the
driver door is open.
● If the turn signal lever is left on after the
key h
as been taken out of the ignition lock,
an acoustic signal sounds when the driver
door is opened. This is intended as a remind-
er to switch off the turn signal, unless you
wish to leave the parking light on. Coming Home/Leaving Home Func-
tion*
The Coming Home function is controlled man-
ual
ly
.
The Leaving Home function is control-
led with a photosensor.
If the Coming Home or Leaving Home func-
tion is connected, the front side and dipped »
119
Technical data
Advice
Operation
Emergencies
Safety
Page 122 of 248
Operation
lights, the tail lights and the number plate
light w
i
ll light up to provide assistance.
Coming home function
The Coming Home function is activated by
switching off the ignition and briefly flashing
the lights. When the driver door is opened,
the Coming Home lighting comes on. If the
driver door is already open when the lights
are flashed briefly, the Coming Home lighting
comes on immediately.
When the last door of the vehicle or the rear
lid is closed, the Coming Home function
starts and the switching off the headlights is
delayed.
The Coming Home lighting switches off in the
following cases:
● On completion of the time period establish-
ed for the dela
y in switching off the lights af-
ter all the vehicle doors and the rear lid have
been closed.
● If, 30 seconds after being connected, any
doors or the r
ear lid remain open.
● If the light switch is turned to position .
● If the ignition is switched on.
Automatic
Leaving Home function
The Leaving Home function is activated when
the vehicle is unlocked if:
● the light control is in position and●
the photosen
sor detects “darkness”.
The Leaving Home lighting switches off in the
following cases: ● If the time period for the delay in switching
off the hea
dlights has ended
● If the vehicle is locked again.
● If the light switch is turned to position .
● If the ignition is switched on.
Manual
Leaving Home function
In vehicles without an automatic headlight
system (light sensor), if the manual Coming
Home function is activated when leaving the
car, upon returning to the car and unlocking
it the manual Leaving Home function will be
activated automatically. Note
● To activ at
e the Coming/Leaving home func-
tion, the rotary light switch must be in posi-
tion and the light sensor must detect
darkness.
● If the ignition key is removed while the
lights ar
e on, the lights flash briefly and the
driver door opens, no audible warning is
heard, since with the Coming Home function
on, the lights are automatically switched off
after a period of time (except when the light
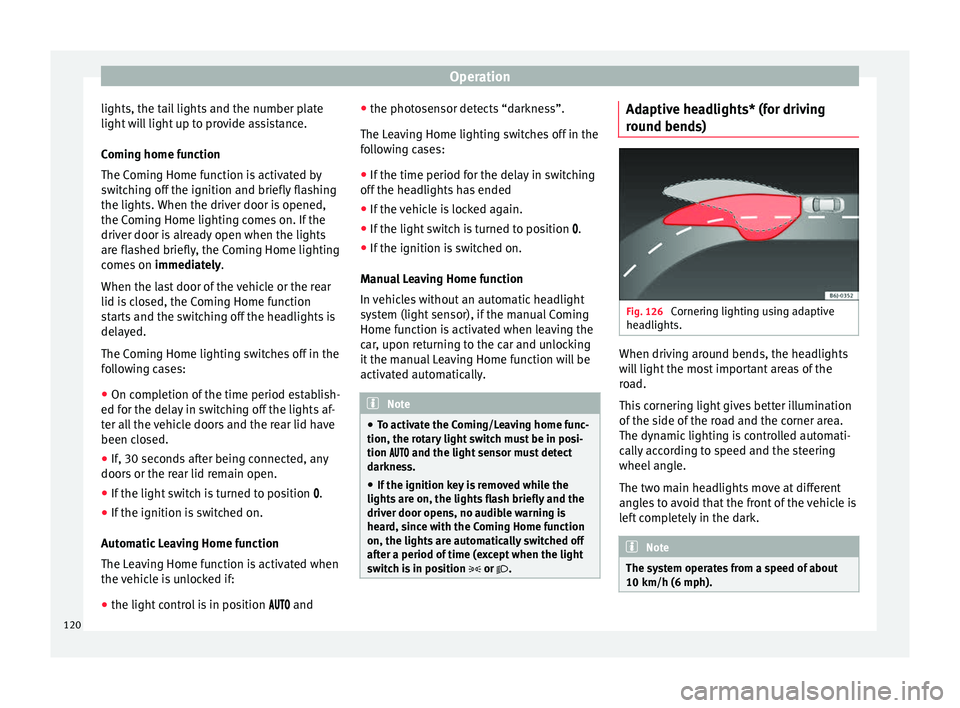
switch is in position or . Adaptive headlights* (for driving
r
ou
nd bend
s) Fig. 126
Cornering lighting using adaptive
he a
dlights. When driving around bends, the headlights
w
i
l
l light the most important areas of the
road.
This cornering light gives better illumination
of the side of the road and the corner area.
The dynamic lighting is controlled automati-
cally according to speed and the steering
wheel angle.
The two main headlights move at different
angles to avoid that the front of the vehicle is
left completely in the dark. Note
The system operates from a speed of about
10 km/h (6 mph). 120
Page 123 of 248
Lights and visibility
Fog lights with cornering function* This is an additional light source to dipped
beam he
a
dlights to light up the road as a
bend is taken.
The cornering light operates with the lights
switched on and when driving at less than
40 Km/h (25 mph). Ignition occurs by turning
the steering or connecting the turn signal.
Forward gear
● If the steering wheel is turned to the right,
or the right-h and t
urn signal operated, the
right-hand fog light turns on.
● If the steering wheel is turned to the left, or
the left
-hand turn signal operated, the left-
hand fog light turns on.
In reverse, both fog lights turn on. Note
When the fog lamps are on, the cornering
fu nction i
s activated and both headlights are
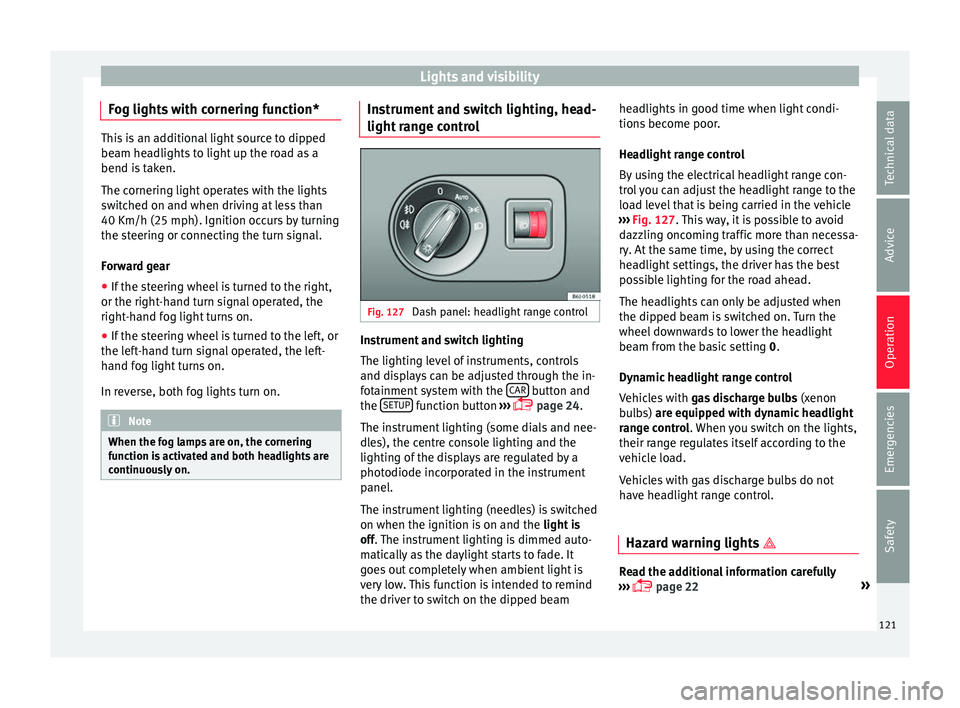
continuously on. Instrument and switch lighting, head-
light
r
an
ge control Fig. 127
Dash panel: headlight range control Instrument and switch lighting
The lightin
g l
ev
el of instruments, controls
and displays can be adjusted through the in-
fotainment system with the CAR button and
the S
ETUP function button
››
›
page 24.
The instrument lighting (some dials and nee-
dles), the centre console lighting and the
lighting of the displays are regulated by a
photodiode incorporated in the instrument
panel.
The instrument lighting (needles) is switched
on when the ignition is on and the light is
off. The instrument lighting is dimmed auto-
matically as the daylight starts to fade. It
goes out completely when ambient light is
very low. This function is intended to remind
the driver to switch on the dipped beam headlights in good time when light condi-
tions bec
ome poor.
Headlight range control
By using the electrical headlight range con-
trol you can adjust the headlight range to the
load level that is being carried in the vehicle
››› Fig. 127. This way, it is possible to avoid
dazzling oncoming traffic more than necessa-
ry. At the same time, by using the correct
headlight settings, the driver has the best
possible lighting for the road ahead.
The headlights can only be adjusted when
the dipped beam is switched on. Turn the
wheel downwards to lower the headlight
beam from the basic setting 0.
Dynamic headlight range control
Vehicles with gas discharge bulbs (xenon
bulbs) are equipped with dynamic headlight
range control. When you switch on the lights,
their range regulates itself according to the
vehicle load.
Vehicles with gas discharge bulbs do not
have headlight range control.
Hazard warning lights Read the additional information carefully
› ››
page 22 »
121
Technical data
Advice
Operation
Emergencies
Safety
Page 127 of 248
Lights and visibility
CAUTION
In icy conditions, always check that the wiper
bl a
de is not frozen to the glass before using
the wiper for the first time. If you switch on
the wiper when the wiper blade is frozen to
the glass, this could damage both the wiper
blade and the wiper motor. Note
● The re ar w
indow wiper will only work when
the ignition is switched on.
● Depending on the version of the model,
when you en
gage reverse gear and with the
headlight wiper activated, this can start a
wipe. Headlight washer*
The headlight washers clean the headlight
l
en
se
s.
The headlight washers are activated auto-
matically when the windscreen washer is
used and the window wiper lever is pulled to-
wards the steering wheel for at least 1.5 sec-
onds – provided the dipped beam headlights
or main beams are switched on. Clean off
stubborn dirt (insects, etc.) from the head-
lights at regular intervals, for instance when
filling the fuel tank. Note
● To en s
ure that the headlight washers work
properly in winter, keep the nozzle holders in
the bumper free of snow and remove any ice
with a de-icer spray.
● To remove water, the windscreen wipers
wil
l be activated from time to time, the head-
light washers will be activated every three cy-
cles. Rear view mirrors
Int erior mirr
or It is dangerous to drive if you cannot see
c
l
e
arly through the rear window.
Interior mirror with automatic anti-dazzle
function*
The anti-dazzle function is activated every
time the ignition is switched on.
When the anti-dazzle function is enabled, the
interior rear vision mirror will darken auto-
matically according to the amount of light it
receives. The anti-dazzle function is cancel-
led if reverse gear is engaged. Note
● The autom atic
anti-dazzle function will only
work properly if the sun blind* for the rear window is retracted and there are no other
ob
j
ects preventing light from reaching the in-
terior rear vision mirror.
● If you have to stick any type of sticker on
the winds
creen, do not do so in front of the
sensors. Doing so could prevent the anti-daz-
zle function from working well or even from
working at all. Folding in the exterior mirrors man-
ual
ly The exterior mirrors of the vehicle may be fol-
ded in. F
or thi
s, pr
ess the mirror housing to-
wards the vehicle. Note
Before washing the vehicle with an automatic
car w a
sh, fold in the exterior mirrors to avoid
damage. 125
Technical data
Advice
Operation
Emergencies
Safety
Page 171 of 248
Driving
Driving tips Driv in
g abr
oadTo drive abroad, the following must be taken
into c
on
sideration:
● For vehicles fitted with a catalytic converter
ensur
e that unleaded petrol is available for
the journey. See the chapter “Refuelling”. Au-
tomobile organisations will have information
about service station networks selling unlea-
ded fuel.
● In some countries, it is possible that your
car model i
s not sold, and therefore some
spare parts are not available or the technical
services may only be able to carry out limited
repairs.
SEAT importers and distributors will gladly
provide information about the technical prep-
aration that your vehicle requires and also
about necessary maintenance and repair
possibilities.
Adhesive strips for headlights
In countries where vehicles drive on the other
side of the road to your home country, the
asymmetric dipped beam may dazzle drivers
of oncoming vehicles.
To prevent dazzling, you must apply stickers
to certain parts of the headlight lenses. Fur- ther information is available at any Technical
Servic
e.
In vehicles with adaptive headlights, the ro-
tation system must previously be disconnec-
ted. To do this, please go to a specialised
workshop.
Driving on flooded roads To prevent damage to the vehicle when driv-
ing thr
ough w
ater, for example, along a floo-
ded road, please observe the following:
● The water should never come above the
low er edg
e of the bodywork.
● Drive at pedestrian speed. WARNING
After driving through water, mud, sludge,
etc ., the br
aking effect can be delayed slight-
ly due to moisture build-up on the discs and
brake pads. Applying the brakes carefully
several times will remove the moisture and
restore the full braking effect. CAUTION
● Drivin g thr
ough flooded areas may severely
damage vehicle components such as the en-
gine, transmission, running gear or electrical
system. ●
Whenever driv in
g through water, the Start-
Stop system* must be switched off
››› page 170. Note
● Chec k the depth of
the water before enter-
ing the flooded zone.
● Do not stop in the water, drive in reverse, or
stop the en
gine in any situation.
● Note that vehicles travelling in the opposite
direction ma
y splash water that could exceed
the maximum permitted water height for your
vehicle.
● Avoid driving through salt water (corro-
sion). 169
Technical data
Advice
Operation
Emergencies
Safety
Page 209 of 248
Checking and refilling levels
WARNING
Brake fluid is poisonous. Old brake fluid im-
pair s
the braking effect.
● Before opening the bonnet to check the
brake fluid l
evel, read and observe the warn-
ings ››› page 198.
● Brake fluid should be stored in the closed
original
container in a safe place out of reach
of children. There is a toxic risk.
● Perform the brake fluid change according to
the Mainten
ance Programme. Heavy use of
the brakes may cause a vapour lock if the
brake fluid is left in the brake system for too
long. This would seriously affect the effec-
tiveness of the brakes and the safety of the
vehicle. This may cause an accident. CAUTION
Brake fluid damages the vehicle paintwork.
Wipe off an
y brake fluid from the paintwork
immediately. For the sake of the environment
The brake pads and brake fluid must be col-
lect ed and di
sposed of according the applica-
ble regulations. The SEAT Technical Service
network has the necessary equipment and
qualified personnel for collecting and dispos-
ing of this waste material. Windscreen washer reservoir
Top
pin
g up the windscreen washer
reservoir water Read the additional information carefully
›› ›
page 43
The windscreen washer and the headlight
washers are supplied with fluid from the
windscreen washer fluid container in the en-
gine compartment. The container holds ap-
prox. 3 litres; in vehicles with headlight
washers* it holds approx. 4.5 litres.
The tank is in the engine compartment.
Plain water is not enough to clean the wind-
screen and headlights. We recommend that
you always add a product to the windscreen
washer fluid. Approved windscreen cleaning
products exist on the market with high deter-
gent and anti-freeze properties, these may be
added all-year-round. Please follow the dilu-
tion instructions on the packaging. WARNING
Any work carried out in the engine compart-
ment or on the en gine mu
st be carried out
cautiously.
● When working in the engine compartment,
alwa
ys observe the safety warnings
››› page 198. CAUTION
● Never p ut
radiator anti-freeze or other addi-
tives into the windscreen washer fluid.
● Always use approved windscreen cleansing
products
diluted as per instructions. If you
use other washer fluids or soap solutions,
the tiny holes in the fan-shaped nozzles
could become blocked. Vehicle battery
Symbo l
s and warnings on handling
the battery Read the additional information carefully
› ›
›
page 43
Wear eye protection
Battery acid is extremely corrosive. Wear protec-
tive gloves and eye protection!
Fires, sparks, open flames and smoking are pro-
hibited!
A highly explosive mixture of gases is released
when the battery is under charge.
Keep children away from acid and batteries!»
207
Technical data
Advice
Operation
Emergencies
Safety
Page 239 of 248
Index
Exhaust gas purification system cat
alytic
converter . . . . . . . . . . . . . . . . . . . . . . 166
diesel particulate filter . . . . . . . . . . . . . . . . . . . 166
Extending the luggage compartment . . . . . . . . . . . . . . . . 129
exterior lighting changing the bulbs . . . . . . . . . . . . . . . . . . . . . . 83
Exterior mirrors . . . . . . . . . . . . . . . . . . . . . . . . . . . 125 adjusting . . . . . . . . . . . . . . . . . . . . . . . . . . . . . . . 13
control . . . . . . . . . . . . . . . . . . . . . . . . . . . . . . . . 126
folding in electrically . . . . . . . . . . . . . . . . . . . . 126
folding in manually . . . . . . . . . . . . . . . . . . . . . 125
heated . . . . . . . . . . . . . . . . . . . . . . . . . . . . . . . . 126
Exterior view . . . . . . . . . . . . . . . . . . . . . . . . . . . . . 5, 6
F Fabric: cleaning . . . . . . . . . . . . . . . . . . . . . . . . . . 194
Fastening rings . . . . . . . . . . . . . . . . . . . . . . . . . . . 134
Fatigue detection . . . . . . . . . . . . . . . . . . . . . . . . . 171
Fault in electronic differential lock (EDL) control lamp . . . . . . . . . . . . . . . . . . . . . . . . . . . 155
Faulty bulbs changing the bulbs . . . . . . . . . . . . . . . . . . . . . . 83
Filling the fuel tank . . . . . . . . . . . . . . . . . . . . . . . 196
Filling the tank . . . . . . . . . . . . . . . . . . . . . . . . . . . 196 fuel gauge . . . . . . . . . . . . . . . . . . . . . . . . . . . . . . 98
Fire extinguisher . . . . . . . . . . . . . . . . . . . . . . . . . . . 75
First-aid kit . . . . . . . . . . . . . . . . . . . . . . . . . . . . . . . 75
Floor mats . . . . . . . . . . . . . . . . . . . . . . . . . . . . . . . . 61
Fluid Level control . . . . . . . . . . . . . . . . . . . . . . . . . 40
Fog-light bulb FR version . . . . . . . . . . . . . . . . . . . . . . . . . . . . . . 88
Fog light bulb . . . . . . . . . . . . . . . . . . . . . . . . . . . . . 87
Front airbags . . . . . . . . . . . . . . . . . . . . . . . . . . 14, 69 safety instructions . . . . . . . . . . . . . . . . . . . . . . . 69
Front ashtray . . . . . . . . . . . . . . . . . . . . . . . . . . . . . 132
Front drink holder . . . . . . . . . . . . . . . . . . . . . . . . . 131 Front passenger front airbag
contro l lamp . . . . . . . . . . . . . . . . . . . . . . . . . . . . 68
deactivation . . . . . . . . . . . . . . . . . . . . . . . . . . . . 14
Front seat manual adjustment . . . . . . . . . . . . . . . . . . . . . . 12
Front seat backrest folding . . . . . . . . . . . . . . . . . . . . . . . . . . . . . . . . 127
lifting . . . . . . . . . . . . . . . . . . . . . . . . . . . . . . . . . 127
Fuel . . . . . . . . . . . . . . . . . . . . . . . . . . . . . . . . 41, 196 consumption . . . . . . . . . . . . . . . . . . . . . . . . . . . 217
diesel . . . . . . . . . . . . . . . . . . . . . . . . . . . . . . . . . 197
ethanol . . . . . . . . . . . . . . . . . . . . . . . . . . . . . . . 196
fuel gauge . . . . . . . . . . . . . . . . . . . . . . . . . . . . . . 98
refuelling . . . . . . . . . . . . . . . . . . . . . . . . . . . . . . 196
saving . . . . . . . . . . . . . . . . . . . . . . . . . . . . . . . . 165
Fuel consumption . . . . . . . . . . . . . . . . . . . . . . . . . 165 why does fuel consumption increase? . . . . . . 167
Fuel tank cap opening and closing . . . . . . . . . . . . . . . . . . . . . 41
Fuel tank flap opening and closing . . . . . . . . . . . . . . . . . . . . . 41
Fuses . . . . . . . . . . . . . . . . . . . . . . . . . . . . . . . . . 44, 80 fuse box . . . . . . . . . . . . . . . . . . . . . . . . . . . . . . . . 81
identifying blown fuses . . . . . . . . . . . . . . . . . . . 45
identifying by colours . . . . . . . . . . . . . . . . . . . . . 44
preparation before replacing . . . . . . . . . . . . . . . 44
replacing . . . . . . . . . . . . . . . . . . . . . . . . . . . . . . . 44
G
Gear-change indicator . . . . . . . . . . . . . . . . . 28, 158
Gearbox lever . . . . . . . . . . . . . . . . . . . . . . . . . . . . . 37
Gear change . . . . . . . . . . . . . . . . . . . . . . . . . . . . . . 37 automatic . . . . . . . . . . . . . . . . . . . . . . . . . . . . . . 38
changing gears (manual gearbox) . . . . . . . . . 158
manual . . . . . . . . . . . . . . . . . . . . . . . . . . . . . . . . 37
manual gear change . . . . . . . . . . . . . . . . . . . . . 158
Gear engaged . . . . . . . . . . . . . . . . . . . . . . . . . . . . . 37 Gear recommendation . . . . . . . . . . . . . . . . . . . . . . 28
General in
strument panel
controls and displays . . . . . . . . . . . . . . . . . . . . . 93
turn signal and main beam lever . . . . . . . . . . . 119
warning and indication lamps . . . . . . . . . . . . . . 35
General overview of the engine compartment . . 201
Glove compartment . . . . . . . . . . . . . . . . . . . . . . . 130
Glow plug system . . . . . . . . . . . . . . . . . . . . . . . . . 149
H
Handbrake . . . . . . . . . . . . . . . . . . . . . . . . . 149, 150 warning lamp . . . . . . . . . . . . . . . . . . . . . . . . . . 151
Hazard warning lights . . . . . . . . . . . . . . . . . 22, 121
HBA . . . . . . . . . . . . . . . . . . . . . . . . . . . . . . . . . . . . 155
Head-on collisions and the laws of physics . . . . . 63
Head-protection airbags description . . . . . . . . . . . . . . . . . . . . . . . . . . . . . 15
safety instructions . . . . . . . . . . . . . . . . . . . . . . . 15
Headlight range control . . . . . . . . . . . . . . . . . . . . 121
Headlights driving abroad . . . . . . . . . . . . . . . . . . . . . . . . . 169
fog lights . . . . . . . . . . . . . . . . . . . . . . . . . . . . . . 119
headlight washer . . . . . . . . . . . . . . . . . . . . . . . 125
Head restraints . . . . . . . . . . . . . . . . . . . . . . . . . . . . 12 adjustment . . . . . . . . . . . . . . . . . . . . . . . . . . . . 128
front head restraints . . . . . . . . . . . . . . . . . . . . . . 60
rear head restraints . . . . . . . . . . . . . . . . . . . . . . 60
Headrests . . . . . . . . . . . . . . . . . . . . . . . . . . . . . . . . 12 adjustment . . . . . . . . . . . . . . . . . . . . . . . . . . . . 128
front . . . . . . . . . . . . . . . . . . . . . . . . . . . . . . . . . . . 60
rear . . . . . . . . . . . . . . . . . . . . . . . . . . . . . . . . . . . 60
Heated rear window heating element wires . . . . . . . . . . . . . . . . . . . 192
switch . . . . . . . . . . . . . . . . . . . . . . . . . . . . . . . . 123
Heating . . . . . . . . . . . . . . . . . . . . . . . . . . . . . . . . . 140 defrosting the windscreen . . . . . . . . . . . . . . . . 140
demisting the windscreen and side windows 140
237