2017 SEAT IBIZA SC technical
[x] Cancel search: technicalPage 2 of 248

SEAT S.A. is permanently concerned about continuous development of its t\
ypes and models. For this reason we ask you to under-
stand, that at any given time, changes regarding shape, equipment and te\
chnique may take place on the car delivered. For this reason
no right at all may derive based on the data, drawings and descriptions \
in this current handbook.
All texts, illustrations and standards in this handbook are based on the\
status of information at the time of printing. Except for error
or omission, the information included in the current handbook is valid a\
s of the date of closing print.
Re-printing, copying or translating, whether total or partial is not all\
owed unless SEAT allows it in written form.
SEAT reserves all rights in accordance with the “Copyright” Act.
All rights on changes are reserved.
❀This paper has been manufactured using bleached non-chlorine cellulose.
© SEAT S.A. - Reprint: 15.11.16
About this manual
This manual contains a description of the
equipment supplied with the vehicle at the
time this manual was published. Some of the
units described herein will not be available
until a later date or are only available in cer -
tain markets.
B ecause this is a general manual for the IBIZA
range, some of the equipment and functions
that are described in this manual are not in-
cluded in all types or variants of the model;
they may vary or be modied depending on
the technical requirements and on the mar -
ket; this is in no way deceptive advertising.
The illustrations are intended as a general
guide and may vary from the equipment tted
in your vehicle in some details.
The steering indications (left, right, forward,
reverse) appearing in this manual refer to the
normal driving movements of the vehicle ex -
cept when otherwise indicated.
The audiovisual material only is intended to
help users to understand certain car function -
alities better. It does not replace the instruc -
tion manual. Please use the instruction manu-
al to obtain more comprehensive information
and indications.
The equipment marked with an aster -
isk* is tted as standard only in certain
versions, and is only supplied as op -
tional extras for some versions, or are
only offered in certain countries.
® All registered marks are indicated with
®. Although the copyright symbol does
not appear, it is a copyrighted mark.
>> The section is continued on the follow -
ing page.
Important warnings on a given page
Detailed contents on a given page
General information on a given page
Emergency information on a given page
Audiovisual material on a given page
WARNING
Texts preceded by this symbol contain infor -
mation on safety. They warn you about possi -
ble dangers of accident or injury.
CAUTION
Texts with this symbol draw your attention to
potential sources of damage to your vehicle.
For the sake of the environment
Texts preceded by this symbol contain rele-
vant information concerning environmental
protection.
Note
Texts preceded by this symbol contain additio -
nal information.
This manual is divided into six large parts,
which are:
1. The essentials
2. Safety
3. Emergencies
4. Operation
5. Tips
6. Technical data
At the end of this manual, there is a detailed
alphabetical index that will help you quickly
nd the information you require.
Page 6 of 248

Table of Contents
Engine management and exhaust gas purifica-
tion sy s
t
em . . . . . . . . . . . . . . . . . . . . . . . . . . . . . 166
Driving tips . . . . . . . . . . . . . . . . . . . . . . . . . . . . . 169
Driver assistance systems . . . . . . . . . . . . . . . . . 170
Start-Stop System* . . . . . . . . . . . . . . . . . . . . . . . 170
Fatigue detection (break recommendation)* . . 171
Parking aid . . . . . . . . . . . . . . . . . . . . . . . . . . . . . 173
Rear Assist “Rear View Camera”* . . . . . . . . . . . 177
Cruise speed* (cruise control - GRA) . . . . . . . . . 180
“SEAT Drive Profile” system . . . . . . . . . . . . . . . . 182
Towing bracket device and trailer . . . . . . . . . . . 183
Trailer mode . . . . . . . . . . . . . . . . . . . . . . . . . . . . 183
Retrofitting a towing bracket* . . . . . . . . . . . . . . 185
Advice . . . . . . . . . . . . . . . . . . . . . . . . . . . . . . . . 187
Care and maintenance . . . . . . . . . . . . . . . . . . . . 187
Accessories and modifications to the vehi-
cle
. . . . . . . . . . . . . . . . . . . . . . . . . . . . . . . . . . . . 187
Care and cleaning . . . . . . . . . . . . . . . . . . . . . . . 188
Care of the vehicle exterior . . . . . . . . . . . . . . . . 189
Caring for the vehicle interior . . . . . . . . . . . . . . 194
Checking and refilling levels . . . . . . . . . . . . . . . 196
Refuelling . . . . . . . . . . . . . . . . . . . . . . . . . . . . . . 196
Fuel . . . . . . . . . . . . . . . . . . . . . . . . . . . . . . . . . . . 196
Working in the engine compartment . . . . . . . . 198
Engine oil . . . . . . . . . . . . . . . . . . . . . . . . . . . . . . 201
Cooling system . . . . . . . . . . . . . . . . . . . . . . . . . . 204
Brake fluid . . . . . . . . . . . . . . . . . . . . . . . . . . . . . 206
Windscreen washer reservoir . . . . . . . . . . . . . . 207
Vehicle battery . . . . . . . . . . . . . . . . . . . . . . . . . . 207
Wheels . . . . . . . . . . . . . . . . . . . . . . . . . . . . . . . . 210
Wheels and tyres . . . . . . . . . . . . . . . . . . . . . . . . 210
Winter service . . . . . . . . . . . . . . . . . . . . . . . . . . . 214
Technical data . . . . . . . . . . . . . . . . . . . . . . . . 216
Technical specifications . . . . . . . . . . . . . . . . . . 216
Important information . . . . . . . . . . . . . . . . . . . . 216
Information on fuel consumption . . . . . . . . . . . 217 Trailer mode . . . . . . . . . . . . . . . . . . . . . . . . . . . . 217
Wheels . . . . . . . . . . . . . . . . . . . . . . . . . . . . . . . . 218
Engine data . . . . . . . . . . . . . . . . . . . . . . . . . . . . . 219
Dimensions . . . . . . . . . . . . . . . . . . . . . . . . . . . . . 231
Index . . . . . . . . . . . . . . . . . . . . . . . . . . . . . . . . . 233
4
Page 52 of 248
The essentials
Subsequent work ●
Alloy wheels: repl ace the wheel bolt caps.
● Plate wheels: repl
ace the wheel hubcap.
● Return all tools to their proper storing loca-
tion.
● If the replaced wheel does not fit in the
spar
e wheel housing, store it safely in the
luggage compartment ›››
page 133.
● Check the tyre pressure of the newly moun-
ted tyr
e as soon as possible.
● In vehicles fitted with a tyre pressure indi-
cat or
, adjust the pressure and store it in
memory ›››
page 213.
● Have the tightening torque of the wheel
bolts c
hecked as soon as possible with a tor-
que wrench (it should be 120 Nm). Mean-
while, drive carefully.
● Have the flat tyre replaced as quickly as
poss
ible.
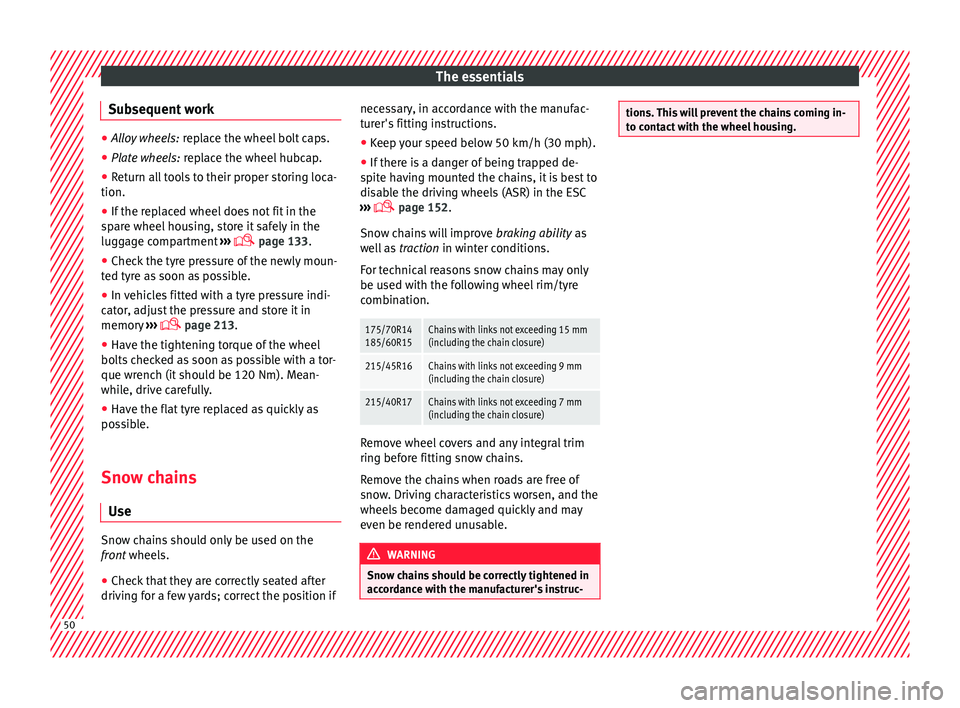
Snow chains Use Snow chains should only be used on the
fr
on
t
wheels.
● Check that they are correctly seated after
driving f
or a few yards; correct the position if necessary, in accordance with the manufac-
turer's
fitting instructions.
● Keep your speed below 50 km/h (30 mph).
● If there is a danger of being trapped de-
spite h
aving mounted the chains, it is best to
disable the driving wheels (ASR) in the ESC
››› page 152.
Snow chains will improve braking ability as
well as traction in winter conditions.
For technical reasons snow chains may only
be used with the following wheel rim/tyre
combination.
175/70R14
185/60R15Chains with links not exceeding 15 mm
(including the chain closure)
215/45R16Chains with links not exceeding 9 mm
(including the chain closure)
215/40R17Chains with links not exceeding 7 mm
(including the chain closure) Remove wheel covers and any integral trim
rin
g bef
or
e fitting snow chains.
Remove the chains when roads are free of
snow. Driving characteristics worsen, and the
wheels become damaged quickly and may
even be rendered unusable. WARNING
Snow chains should be correctly tightened in
acc or
dance with the manufacturer's instruc- tions. This will prevent the chains coming in-
to c
ont
act with the wheel housing.50
Page 59 of 248

Safe driving
risk of injury. The following list includes most
of the s
af
ety equipment in your SEAT:
● Three-point seat belts
● Belt tension limiter for the front and rear
side seats
● B
elt tensioners for the front seats
● Front airbags
● Side airbags in the front seat backrests,
with che
st and head protection
● “ISOFIX” anchor points for “ISOFIX” rear
chil
d seat system
● Height-adjustable front head restraints
● Rear-centre head restraints with in-use po-
sition and non-use po
sition
● Adjustable steering column
The safety
equipment mentioned above
works together to provide you and your pas-
sengers with the best possible protection in
the event of an accident. However, these
safety systems can only be effective if you
and your passengers are sitting in a correct
position and use this equipment properly.
Safety is everyone's business! Correct position for passengers
Correct
sitting position for driver Fig. 74
The proper distance between driver
and s t
eerin
g wheel Fig. 75
Correct head restraint position for the
driv er
. For your own safety and to reduce the risk of
injur
y
in the ev
ent of an accident, we recom- mend the following adjustments for the driv-
er:
– Adjust the steering wheel so that there is a
dist
ance of at least 25 cm between the
steering wheel and the centre of your chest
››› Fig. 74.
– Move the driver's seat forwards or back-
ward
s so that you are able to press the ac-
celerator, brake and clutch pedals to the
floor with your knees still slightly angled
››› .
– Ensure that you can reach the highest point
of the s
t
eering wheel.
– Adjust the head restraint so that its upper
edge is
at the same level as the top of your
head, or as close as possible to the same
level as the top of your head ››› Fig. 75.
– Move the seat backrest to an upright posi-
tion so that
your back rests completely
against it.
– Fasten your seat belt securely ›››
page 61.
– Keep both feet in the footwell so that you
have the
vehicle under control at all times.
Adjustment of the driver's seat ››› page 127. WARNING
● An incorr ect
sitting position of the driver
can lead to severe injuries. » 57
Technical data
Advice
Operation
Emergencies
Safety
Page 61 of 248

Safe driving
●
Alw a
ys keep your feet in the footwell when
the vehicle is moving; never rest them on the
dash panel, out the window or on the seat. An
incorrect sitting position exposes you to an
increased risk of injury in case of a sudden
braking or an accident. If the airbag is trig-
gered, you could sustain severe injuries due
to an incorrect sitting position.
● To reduce the risk of injury to the front pas-
senger in ev
ents such as sudden braking ma-
noeuvres or an accident, never travel with the
backrest tilted far back! The airbag system
and seat belts can only provide optimal pro-
tection when the backrest is in an upright po-
sition and the front passenger is wearing his
or her seat belt properly. The further the seat
backrests are tilted to the rear, the greater
the risk of injury due to incorrect positioning
of the belt web or to the incorrect sitting po-
sition!
● Adjust the head restraint correctly in order
to achiev
e maximum protection. Correct sitting position for rear seat
p
a
s
sengers To reduce the risk of injury in the event of a
s
ud
den br
aking manoeuvre or an accident,
passengers on the rear seat bench must con-
sider the following:
– Sit up straight.
– Adjust the head restraint to the correct po-
sition ››
› page 60. –
Alwa
ys keep both feet in the footwell in
front of the rear seat.
– Fasten your seat belt securely ›››
page 61.
– Use an appropriate child restraint system
when you t
ake children in the vehicle
››› page 72. WARNING
● If the p a
ssengers in the rear seats are not
sitting properly, they could sustain severe in-
juries.
● Adjust the head restraint correctly in order
to achiev
e maximum protection.
● Seat belts can only provide optimal protec-
tion when seat b
ackrests are in an upright
position and the vehicle occupants are wear-
ing their seat belts correctly. If passengers In
the rear seats are not sitting in an upright po-
sition, the risk of injury due to incorrect posi-
tioning of the seat belt increases. Examples of incorrect sitting posi-
tion
s Seat belts can provide optimal protection on-
ly
when the belt
w
ebs are properly posi-
tioned. Incorrect sitting positions substan-
tially reduce the protective function of seat
belts and increase the risk of injury due to in-
correct seat belt position. As the driver, you
are responsible for all passengers, especially
children. –
Never allo
w anyone to assume an incorrect
sitting position in the vehicle while travel-
ling ››› .
The f o
l
lowing list contains examples of sit-
ting positions that could be dangerous for all
vehicle occupants. The list is not complete,
but we would like to make you aware of this
issue.
Therefore, whenever the vehicle is in motion:
● Never stand in the vehicle.
● Never stand on the seats.
● Never kneel on the seats.
● Never tilt your seat backrest far to the rear.
● Never lean against the dash panel.
● Never lie on the rear bench.
● Never sit on the front edge of a seat.
● Never sit sideways.
● Never lean out of a window.
● Never put your feet out of a window.
● Never put your feet on the dash panel.
● Never put your feet on the surface of a seat.
● Do not allow anyone to travel in the foot-
well
.
● Never travel without wearing the seat belt.
● Do not allow anyone to travel in the lug-
gage c
ompartment. »
59
Technical data
Advice
Operation
Emergencies
Safety
Page 63 of 248

Seat belts
●
Do not sw ap the c
entre rear head restraint
with either of the outer seat rear head re-
straints. Risk of injury in case of an accident! Note
Note the instructions on the head restraints
a dju s
tment. Pedal area
P ed
a
ls –
Ensure that you can always press the accel-
er at
or
, brake and clutch pedals unimpaired
to the floor.
– Ensure that the pedals can return unim-
paired t
o their initial positions.
– Ensure that the floor mats are securely fas-
tened during the trip and do not
obstruct
the pedals ››› .
On ly
u
se floor mats which leave the pedals
clear and which are secured to prevent them
from slipping. You can obtain suitable floor
mats from a specialised dealership.
If a brake circuit fails, the brake pedal must
be pressed down thoroughly in order to stop
the vehicle. Wear suitable footwear
Alwa
ys wear shoes which support your feet
properly and give you a good feeling for the
pedals. WARNING
● If the ped a
ls are obstructed, an accident
may occur. Risk of serious injuries.
● Never lay or fit floor mats or other floor cov-
erings
over the original floor mats. This
would reduce the pedal area and could ob-
struct the pedals. Risk of accident.
● Never place objects in the driver footwell.
An obj
ect could move into the pedal area and
impair pedal operation. In the event of a sud-
den driving or braking manoeuvre, you will
not be able to operate the brake, clutch or ac-
celerator pedal. Risk of accident! Seat belts
Wh y
w
ear a seat belt?
Number of seats Your vehicle has
five se
ats, two in the front
and three in the rear. Each seat is equipped
with a three-point seat belt.
In some versions, your vehicle is approved
only for four seats. Two front seats and two
rear seats. WARNING
● Never tr an
sport more than the permitted
amount of people in your vehicle.
● Every vehicle occupant must properly fas-
ten and we
ar the seat belt belonging to his or
her seat. Children must be protected with an
appropriate child restraint system. 61
Technical data
Advice
Operation
Emergencies
Safety
Page 65 of 248

Seat belts
Safety instructions on using seat
belt s –
Always wear the seat belt as described in
this section.
– En
sure that the seat belts can be fastened
at all
times and are not damaged. WARNING
● If se at
belts are worn incorrectly or not at
all, the risk of severe injuries increases. The
optimal protection from seat belts can be
achieved only if you use them properly.
● Fasten your seat belt before every trip -
even when drivin
g in town. Other vehicle oc-
cupants must also wear the seat belts at all
times, otherwise they run the risk of being in-
jured.
● The seat belt cannot offer its full protection
if the seat
belt is not positioned correctly.
● Never allow two passengers (even children)
to shar
e the same seat belt.
● Always keep both feet in the footwell in
front of
your seat as long as the vehicle is in
motion.
● Never unbuckle a seat belt while the vehi-
cle i
s in motion. Risk of fatal injury.
● The seat belt must never be twisted while it
is bein
g worn.
● The seat belt should never lie on hard or
fragil
e objects (such as glasses or pens, etc.)
because this can cause injuries. ●
Do not a l
low the seat belt to be damaged or
jammed, or to rub on any sharp edges.
● Never wear the seat belt under the arm or
in any other inc
orrect position.
● Loose, bulky clothing (such as an overcoat
over a j
acket) impairs the proper fit and func-
tion of the seat belts, reducing their capacity
to protect.
● The slot in the seat belt buckle must not be
block
ed with paper or other objects, as this
can prevent the latch plate from engaging se-
curely.
● Never use seat belt clips, fastening rings or
simil
ar items to alter the position of the belt
webbing.
● Frayed or torn seat belts or damage to the
connections, belt
retractors or parts of the
buckle could cause severe injuries in the
event of an accident. Therefore, you must
check the condition of all seat belts at regular
intervals.
● Seat belts which have been worn in an acci-
dent and str
etched must be replaced by a
specialised workshop. Renewal may be nec-
essary even if there is no apparent damage.
The belt anchorage should also be checked.
● Do not attempt to repair a damaged seat
belt y
ourself. The seat belts must not be re-
moved or modified in any way.
● The belts must be kept clean, otherwise the
retract
ors may not work properly. Head-on collisions and the laws of
ph
y
s
ics Fig. 80
A driver not wearing a seat belt is
thr o
wn f
orward violently Fig. 81
The unbelted passenger in the rear
se at
i
s thrown forward violently, hitting the
driver who is wearing a seat belt. It is easy to explain how the laws of physics
w
ork
in the c
ase of a head-on collision: when
a vehicle starts moving, a type of energy »
63
Technical data
Advice
Operation
Emergencies
Safety
Page 67 of 248

Seat belts
Fig. 83
Position of seat belt during pregnan-
cy . Fasten your seat belt
The se
at
belt
cannot offer its full protection if
the seat belt is not positioned correctly.
● Adjust the seat and head restraint correctly.
● To fasten the belt, take hold of the latch
plat
e and pull it slowly across your chest and
lap.
● Insert the latch plate into the buckle for the
appropri
ate seat and push it down until it is
securely locked with an audible click
››› Fig. 82.
● Pull the belt to ensure that the latch plate is
securely
engaged in the buckle.
The seat belts are equipped with an automat-
ic retractor on the shoulder strap. Full free-
dom of movement is permitted when the
shoulder belt is pulled slowly. However, dur- ing sudden braking, during travel in steep
area
s or bends and during acceleration, the
automatic retractor on the shoulder belt is
locked.
The automatic belt retractors on the front
seats are fitted with seat belt tensioners
››› page 65.
Releasing the seat belt ● Press the red button on the belt buckle
›››
Fig. 82. The latch plate is released and
springs out ››› .
● Guide the belt back by hand so that it rolls
up e a
s
ily and the trim is not damaged.
Positioning seat belts
Seat belts offer their maximum protection on-
ly when they are properly positioned. WARNING
● The seat belt
s offer best protection only
when the backrests are in an upright position
and the seat belts have been fastened prop-
erly.
● Never put the latch plate in the buckle of
another seat. If
you do this, the seat belt will
not protect you properly and the risk of injury
is increased.
● Never unbuckle a seat belt while the vehi-
cle i
s in motion. If you do, you increase the
risk of sustaining severe or fatal injuries. ●
An incorr ectly
worn seat belt can cause se-
vere injuries in the event of an accident.
● The shoulder part of the seat belt must lie
on the centre of
the shoulder, never across
the neck. The seat belt must lie flat and fit
comfortably on the torso
● The lap part of the seat belt must lie across
the pelvis, nev
er across the stomach. The
seat belt must lie flat and fit comfortably on
the pelvis Pull the belt tight if necessary to
take up any slack.
● For pregnant women, the lap part of the
seat belt
must lie as low as possible over the
pelvis, never across the stomach, and always
lie flat so that no pressure is exerted on the
abdomen ››› Fig. 83.
● Always engage the retractor lock when you
are securin
g a child seat in group 0, 0+ or 1
››› page 72.
● Read and observe the warnings ›››
page 63. Belt pretensioners*
Ho w the se at
belt tensioner works Read the additional information carefully
› ›
›
page 13
The seat belts for the occupants in the front
seats are equipped with belt tensioners. Sen-
sors will trigger the belt pretensioners during
severe head-on, lateral and rear collisions »
65
Technical data
Advice
Operation
Emergencies
Safety