2017 SEAT IBIZA SC ECU
[x] Cancel search: ECUPage 136 of 248
Operation
vehicle may change, leading to accidents,
injuries
and d
amage to the vehicle.
● Please note that the centre of gravity may
shift when tr
ansporting heavy objects; this
may affect vehicle handling and lead to an ac-
cident. Therefore, it is essential to adjust
your speed and driving style accordingly, to
avoid accidents.
● Never leave your vehicle unattended, espe-
cia
lly when the rear lid is open. Children
could climb into the luggage compartment,
closing the door behind them; they will be
trapped and run the risk of death.
● Never allow children to play in or around
the vehic
le. Close and lock all the doors and
rear lid when you leave the vehicle. Before
you lock the vehicle, make sure that there are
no adults or children in the vehicle.
● Please observe the notes on the ›››
page 56. CAUTION
Hard objects on the rear shelf could chafe
again s
t the wires of the heating element in
the heated rear window and cause damage. Note
● The tyr e pr
essure must be adjusted accord-
ing to the load. When necessary check the
tyre pressures on the label located on the in-
side fuel tank flap ››› page 210.
● Air circulation in the vehicle helps reduce
foggin
g of the windows. Used air escapes through ventilation slits in the side trim of
the lugg
ag
e compartment. Ensure that the
ventilation slots are never covered.
● Straps for securing the load to the fasten-
ing ring
s* are commercially available from ac-
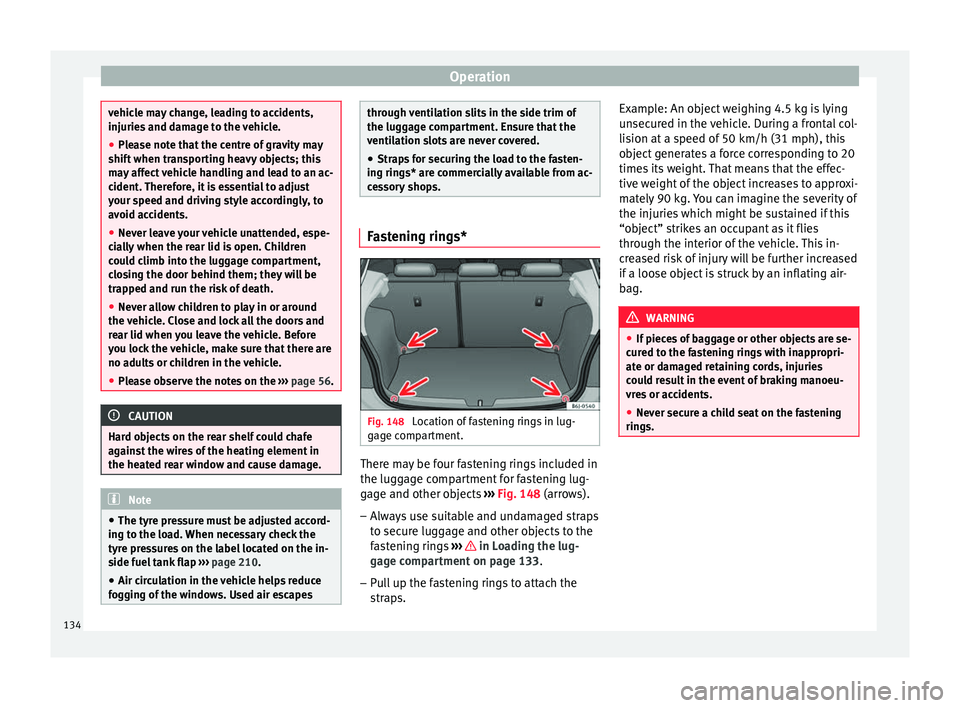
cessory shops. Fastening rings*
Fig. 148
Location of fastening rings in lug-
g ag
e c
ompartment. There may be four fastening rings included in
the lug
g
ag
e compartment for fastening lug-
gage and other objects ››› Fig. 148 (arrows).
– Always use suitable and undamaged straps
to secur
e luggage and other objects to the
fastening rings ››› in Loading the lug-
g ag
e c
ompartment on page 133.
– Pull up the fastening rings to attach the
strap
s. Example: An object weighing 4.5 kg is lying
unsec
ured in the vehicle. During a frontal col-
lision at a speed of 50 km/h (31 mph), this
object generates a force corresponding to 20
times its weight. That means that the effec-
tive weight of the object increases to approxi-
mately 90 kg. You can imagine the severity of
the injuries which might be sustained if this
“object” strikes an occupant as it flies
through the interior of the vehicle. This in-
creased risk of injury will be further increased
if a loose object is struck by an inflating air-
bag. WARNING
● If piec e
s of baggage or other objects are se-
cured to the fastening rings with inappropri-
ate or damaged retaining cords, injuries
could result in the event of braking manoeu-
vres or accidents.
● Never secure a child seat on the fastening
rings. 134
Page 138 of 248
Operation
Attach the cross bars of the roof carri-
er sy s
t
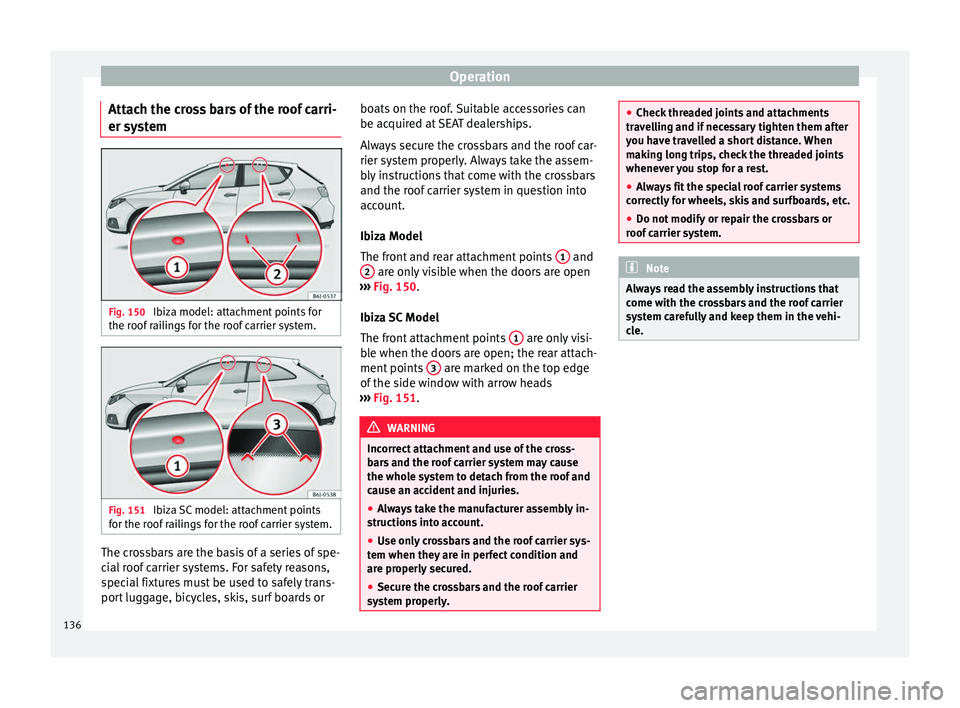
em Fig. 150
Ibiza model: attachment points for
the r oof
r
ailings for the roof carrier system. Fig. 151
Ibiza SC model: attachment points
f or the r
oof
railings for the roof carrier system. The crossbars are the basis of a series of spe-
c
i
al
roof carrier systems. For safety reasons,
special fixtures must be used to safely trans-
port luggage, bicycles, skis, surf boards or boats on the roof. Suitable accessories can
be acquired at
SEAT dealerships.
Always secure the crossbars and the roof car-
rier system properly. Always take the assem-
bly instructions that come with the crossbars
and the roof carrier system in question into
account.
Ibiza Model
The front and rear attachment points 1 and
2 are only visible when the doors are open
› ›
›
Fig. 150.
Ibiza SC Model
The front attachment points 1 are only visi-
b l
e when the door
s are open; the rear attach-
ment points 3 are marked on the top edge
of the s
ide w
indow with arrow heads
››› Fig. 151. WARNING
Incorrect attachment and use of the cross-
bar s
and the roof carrier system may cause
the whole system to detach from the roof and
cause an accident and injuries.
● Always take the manufacturer assembly in-
structions
into account.
● Use only crossbars and the roof carrier sys-
tem when they ar
e in perfect condition and
are properly secured.
● Secure the crossbars and the roof carrier
syst
em properly. ●
Check thr
eaded joints and attachments
travelling and if necessary tighten them after
you have travelled a short distance. When
making long trips, check the threaded joints
whenever you stop for a rest.
● Always fit the special roof carrier systems
correctly
for wheels, skis and surfboards, etc.
● Do not modify or repair the crossbars or
roof c
arrier system. Note
Always read the assembly instructions that
c ome w ith the c
rossbars and the roof carrier
system carefully and keep them in the vehi-
cle. 136
Page 153 of 248

Driving
Applying the handbrake
– Pull the handbrake lever up firmly
› ›
›
Fig. 157.
Releasing the handbrake
– Pull the lever up slightly and press the re-
lea
se knob in the direction of the arrow
››› Fig. 157 and guide the handbrake lever
down fully ››› .
A lw
a
ys pull the handbrake all the way up, so
there is less risk of driving off with it still en-
gaged ››› .
The h andbr
ak
e warning lamp lights up
when the handbrake is applied and the igni-
tion switched on. The warning lamp turns off
when the handbrake is released. WARNING
● Never u se the h
andbrake to stop the vehi-
cle when it is in motion. The braking distance
is considerably longer, because braking is
only applied to the rear wheels. Risk of acci-
dent!
● If the handbrake is only partially released,
this w
ill cause the rear brakes to overheat,
which can impair the function of the brake
system and could lead to an accident. This al-
so causes premature wear on the rear brake
pads. CAUTION
Always apply the handbrake before you leave
the v ehic
le. Put it in 1st gear as well. In vehi-
cles with an automatic gearbox, place the
gear lever in position P. Parking
The handbrake should always be firmly ap-
plied when the
v
ehicle is parked.
Always note the following points when park-
ing the vehicle: – Use the brake pedal to stop the vehicle.
– Apply the handbrake.
– Put it in 1st gear.
– Switch the engine off and remove the key
from the ignition. T
urn the steering wheel
slightly to engage the steering lock.
– Always take you keys with you when you
leav
e the vehicle ››› .
Ad dition
a
l notes on parking the vehicle on
gradients:
Turn the steering wheel so that the vehicle
rolls against the kerb if it started to roll.
● If the vehicle is parked facing downhil
l,
turn the front wheels so that they point to-
wards the kerb . ●
If the v
ehicle is parked facing uphill, turn
the front wheels so that they point away from
the kerb.
● Secure the vehicle as usual by applying the
handbrak
e firmly and putting it in 1st gear. WARNING
● Tak e me
asures to reduce the risk of injury
when you leave your vehicle unattended.
● Never park where the hot exhaust system
coul
d ignite inflammable materials, such as
dry grass, low bushes, spilt fuel etc.
● Never allow vehicle occupants to remain in
the vehic
le when it is locked. They would be
unable to open the vehicle from the inside,
and could become trapped in the vehicle in
an emergency. In the event of an emergency,
locked doors will delay assistance to vehicle
occupants.
● Never leave children alone in the vehicle.
They cou
ld set the vehicle in motion, for ex-
ample, by releasing the handbrake or the
gearbox lever.
● Depending on weather conditions, it may
become extr
emely hot or cold inside the vehi-
cle. This can be fatal. 151
Technical data
Advice
Operation
Emergencies
Safety
Page 186 of 248
Operation
The maximum trailer weights listed are only
ap p
lic
able for altitudes up to 1000 m above
sea level. With increasing altitude the engine
power and therefore the vehicle climbing
ability are impaired because of the reduced
air density. The maximum trailer weight has
to be reduced accordingly. The weight of the
vehicle and trailer combination must be re-
duced by 10% for every further 1000 m (or
part thereof). The gross combination weight
is the actual weight of the laden vehicle plus
the actual weight of the laden trailer. When
possible, operate the trailer with the maxi-
mum permitted drawbar load on the ball joint
of the towing bracket, but do not exceed the
specified limit.
The figures for trailer weights and drawbar
loads that are given on the data plate of the
towing bracket are for certification purposes
only. The correct figures for your specific
model, which may be lower than these fig-
ures for the towing bracket, are given in the
vehicle documentation or in ››› chapter Tech-
nical Data .
Distributing the load
Distribute loads in the trailer so that heavy
objects are as near to the axle as possible.
Loads carried in the trailer must be secured
to prevent them moving. Tyre pressure
Set tyr
e pressure to the maximum permissi-
ble pressure shown on the sticker on the in-
side of the fuel tank flap. Set the tyre pres-
sure of the trailer tyres in accordance with the
trailer manufacturer's recommendations.
Exterior mirrors
Check whether you can see enough of the
road behind the trailer with the standard rear
vision mirrors. If this is not the case, you
should have additional exterior mirrors fitted.
Both exterior mirrors should be mounted on
hinged extension brackets. Adjust the mirrors
to give sufficient vision to the rear. WARNING
Never transport people in a trailer. This could
re s
ult in fatal accidents. Note
● To w
ing a trailer places additional demands
on the vehicle. We recommend additional
services between the normal inspection inter-
vals if the vehicle is used frequently for tow-
ing a trailer.
● Find out whether special regulations apply
to to
wing a trailer in your country. Ball coupling of towing bracket*
The ball coupling is provided with instruc-
tions
on fittin
g and removing the ball cou-
pling of the towing bracket. WARNING
The towing bracket ball coupling must be
st or
ed securely in the luggage compartment
to prevent them being flung through the vehi-
cle and causing injury. Note
● By l
aw, the ball coupling must be removed
if a trailer is not being towed if it obscures
the number plate. Driving tips
Driving with a trailer always requires extra
c
ar
e.
W
eight distribution
The weight distribution of a loaded trailer
with an unladen vehicle is very unfavourable.
However, if this cannot be avoided, drive ex-
tra slowly to allow for the unbalanced weight
distribution.
184
Page 187 of 248
Towing bracket device and trailer
Speed
The s t
ab
ility of the vehicle and trailer is re-
duced with increasing speed. For this reason,
it is advisable not to drive at the maximum
permissible speed in an unfavourable road,
weather or wind conditions. This applies es-
pecially when driving downhill.
You should always reduce speed immediately
if the trailer shows the slightest sign of snak-
ing. Never try to stop the “snaking” by in-
creasing speed.
Always brake in due course. If the trailer has
an overrun brake, apply the brakes gently at
first and then, firmly. This will prevent the
jerking that can be caused by locking of trail-
er wheels. Select a low gear in due course
before going down a steep downhill. This en-
ables you to use the engine braking to slow
down the vehicle.
Reheating
At very high temperatures and during pro-
longed slopes, driving with a low gear and
high engine speed; always monitor whether
the excessive coolant temperature gauge is
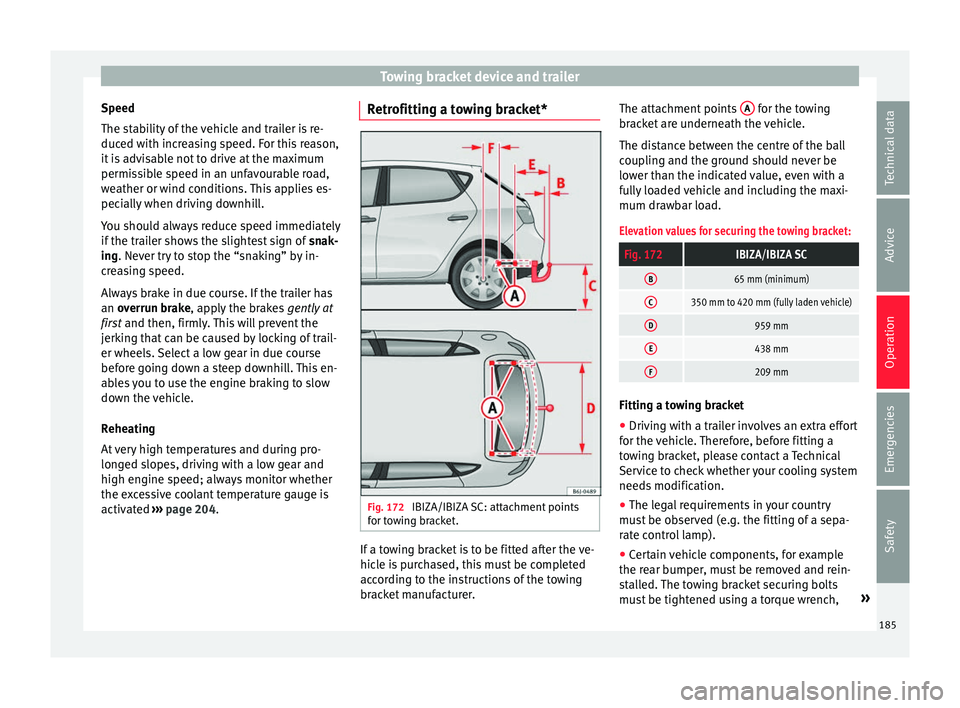
activated ››› page 204. Retrofitting a towing bracket*
Fig. 172
IBIZA/IBIZA SC: attachment points
f or t
o
wing bracket. If a towing bracket is to be fitted after the ve-
hic
l
e i
s purchased, this must be completed
according to the instructions of the towing
bracket manufacturer. The attachment points
A for the towing
br ac
k
et are underneath the vehicle.
The distance between the centre of the ball
coupling and the ground should never be
lower than the indicated value, even with a
fully loaded vehicle and including the maxi-
mum drawbar load.
Elevation values for securing the towing bracket:
Fig. 172IBIZA/IBIZA SC
B65 mm (minimum)
C350 mm to 420 mm (fully laden vehicle)
D959 mm
E438 mm
F209 mm Fitting a towing bracket
●
Driving with a trailer involves an extra effort
f or the
v
ehicle. Therefore, before fitting a
towing bracket, please contact a Technical
Service to check whether your cooling system
needs modification.
● The legal requirements in your country
must
be observed (e.g. the fitting of a sepa-
rate control lamp).
● Certain vehicle components, for example
the rear b
umper, must be removed and rein-
stalled. The towing bracket securing bolts
must be tightened using a torque wrench, »
185
Technical data
Advice
Operation
Emergencies
Safety
Page 201 of 248

Checking and refilling levels
●
Never t ouc
h hot engine parts. There is a
risk of burns.
● Never spill liquids on a hot engine or on a
hot exh
aust gas system. This is a fire hazard.
● Avoid causing short-circuits in the electri-
cal
system, particularly at the points where
the jump leads are attached ›››
page 52.
The battery could explode.
● Never touch the radiator fan. It is tempera-
ture c
ontrolled and could start automatically,
even when the engine has been switched off
and the key removed from the ignition!
● Never cover the engine with additional in-
sul
ating materials such as a blanket. Risk of
fire!
● Do not unscrew the cap on the coolant ex-
pans
ion tank when the engine is hot. If the
coolant is hot, the cooling system will be
pressurised!
● Protect face, hands and arms by covering
the cap with a l
arge, thick cloth to protect
against escaping coolant and steam.
● Always make sure you have not left any ob-
jects, s
uch as cleaning cloths or tools, in the
engine compartment.
● If you have to work underneath the vehicle,
you mus
t use suitable stands additionally to
support the vehicle, there is a risk of acci-
dent!. A hydraulic jack is insufficient for se-
curing the vehicle and there is a risk of injury.
● If any work has to be performed when the
engine is
started or with the engine running,
there is an additional, potentially fatal, safety
risk from the rotating parts, such as the drive belts, alternator, radiator fan, etc., and from
the high-v
o
ltage ignition system. You should
also observe the following:
– Never touch the electrical wiring of the
ignition system.
– Ensure that jewellery, loose clothing and
long hair do not get trapped in rotating
engine parts. Danger of death. Before
starting any work remove jewellery, tie
back and cover hair, and wear tight-fit-
ting clothes.
– Never accelerate with a gear engaged
without taking the necessary precau-
tions. The vehicle could move, even if the
handbrake is applied. Danger of death.
● If work has to be carried out on the fuel
syst
em or on electrical components, you
must observe the following safety notes in
addition to the above warnings:
– Always disconnect the battery from the
on-board network. The vehicle must be
unlocked when this is done, otherwise
the alarm will be triggered.
– Do not smoke.
– Never work near naked flames.
– Always have a fire extinguisher on hand. WARNING
If the bonnet is not correctly closed, it could
sud den
ly open while driving leaving the driv-
er without visibility. This could result in a se-
rious accident. ●
Aft er c
losing the bonnet, always check that
it is properly secured by the locking mecha-
nism in the lock carrier piece. The bonnet
must be flush with the surrounding body pan-
els.
● While driving, if you notice that the bonnet
is not
correctly closed then stop immediately
and close it correctly.
● Only open and close the bonnet when there
is no
body within its range. CAUTION
When topping up service fluids, make sure
not to mi
stake them. Using the wrong fluids
could cause serious malfunctions and engine
damage! For the sake of the environment
Service fluids leaks are harmful to the envi-
ronment . F
or this reason you should make
regular checks on the ground underneath
your vehicle. If you find spots of oil or other
fluids, have your vehicle inspected in a speci-
alised workshop. Opening the bonnet
Read the additional information carefully
› ›
›
page 10
The bonnet is released from inside the vehi-
cle. »
199
Technical data
Advice
Operation
Emergencies
Safety
Page 202 of 248
Advice
Before opening the bonnet ensure that the
w ind
s
creen wipers are in rest position. WARNING
Hot coolant can scald!
● Never open the bonnet if you see steam,
smoke or c oo
lant escaping from the engine
compartment.
● Wait until no more steam, smoke or coolant
is emitt
ed from the bonnet, then carefully
open the bonnet.
● When working in the engine compartment,
alwa
ys observe the safety warnings
››› page 198. Closing the bonnet
–
Slightly lift the bonnet.
– Release the bonnet stay and replace it in its
sup
por
t.
– At a height of approximately 30 cm let it fall
so it lock
s.
If the bonnet does not close, do not press
downwards. Open it again and let it fall as
mentioned above. WARNING
If the bonnet is not closed properly, it could
open whil e
you are driving and completely obscure your view of the road. Risk of acci-
dent.
●
Af t
er closing the bonnet, always check that
it is
properly secured. The bonnet must be
flush with the surrounding body panels.
● If you notice that the bonnet latch is not se-
cured when the
vehicle is moving, stop the
vehicle immediately and close the bonnet
properly. Risk of accident. 200
Page 210 of 248
Advice
WARNING
Always be aware of the danger of injury and
chemic a
l burns as well as the risk of accident
or fire when working on the battery and the
electrical system:
● Wear eye protection. Protect your eyes,
skin and clothin
g from acid and particles con-
taining lead.
● Battery acid is extremely corrosive. Wear
protectiv
e gloves and eye protection. Do not
tilt the batteries. This could spill acid through
the vents.
● Rinse battery acid from eyes immediately
for sever
al minutes with clear water. Then
seek medical care immediately. Neutralise
any acid splashes on the skin or clothing
with a soapy solution, and rinse off with plen-
ty of water. If acid is swallowed by mistake,
consult a doctor immediately.
● Fires, sparks, open flames and smoking are
prohibit
ed. When handling cables and electri-
cal equipment, avoid causing sparks and
electrostatic charge. Never short the battery
terminals. High-energy sparks can cause in-
jury.
● A highly explosive mixture of gases is re-
lea
sed when the battery is under charge. The
batteries should be charged in a well-ventila-
ted room only.
● Keep children away from acid and batteries.
● Before working on the electrical system,
you mus
t switch off the engine, the ignition
and all electrical devices. The negative cable on the battery must be disconnected. When a
light b
u
lb is changed, you need only switch
off the light.
● Deactivate the anti-theft alarm by unlock-
ing the v
ehicle before you disconnect the bat-
tery! The alarm will otherwise be triggered.
● When disconnecting the battery from the
vehicl
e on-board network, disconnect first
the negative cable and then the positive ca-
ble.
● Switch off all electrical devices before re-
connecting the b
attery. Reconnect first the
positive cable and then the negative cable.
Never reverse the polarity of the connections.
This could cause an electrical fire.
● Never charge a frozen battery, or one which
has
thawed. This could result in explosions
and chemical burns. Always replace a battery
which has frozen. A flat battery can also
freeze at temperatures close to 0°C (+32°F).
● Ensure that the vent hose is always connec-
ted to the b
attery.
● Never use a defective battery. This could
cause an e
xplosion. Replace a damaged bat-
tery immediately.
● For vehicles with the battery in the luggage
compar
tment: Check that the battery gas
ventilation hose is securely attached. CAUTION
● Never di s
connect the battery if the ignition
is switched on or if the engine is running. This could damage the electrical system or
electr
onic
components.
● Do not expose the battery to direct sunlight
over a lon
g period of time, as the intense ul-
traviolet radiation can damage the battery
housing.
● If the vehicle is left standing in cold condi-
tions f
or a long period, protect the battery
from “freezing”. If it freezes it will be dam-
aged. Warning lamp
It lights up
Alternator fault.
The control lamp
lights up when the igni-
tion i s
switched on. It should go out when the
engine has started running.
If the control lamp lights up while driving,
the alternator is no longer charging the bat-
tery. You should immediately drive to the
nearest specialised workshop.
You should avoid using electrical equipment
that is not absolutely necessary because this
will drain the battery.
208