Page 110 of 294

1.104
EXTERIOR LIGHTING AND SIGNALS (2/4)
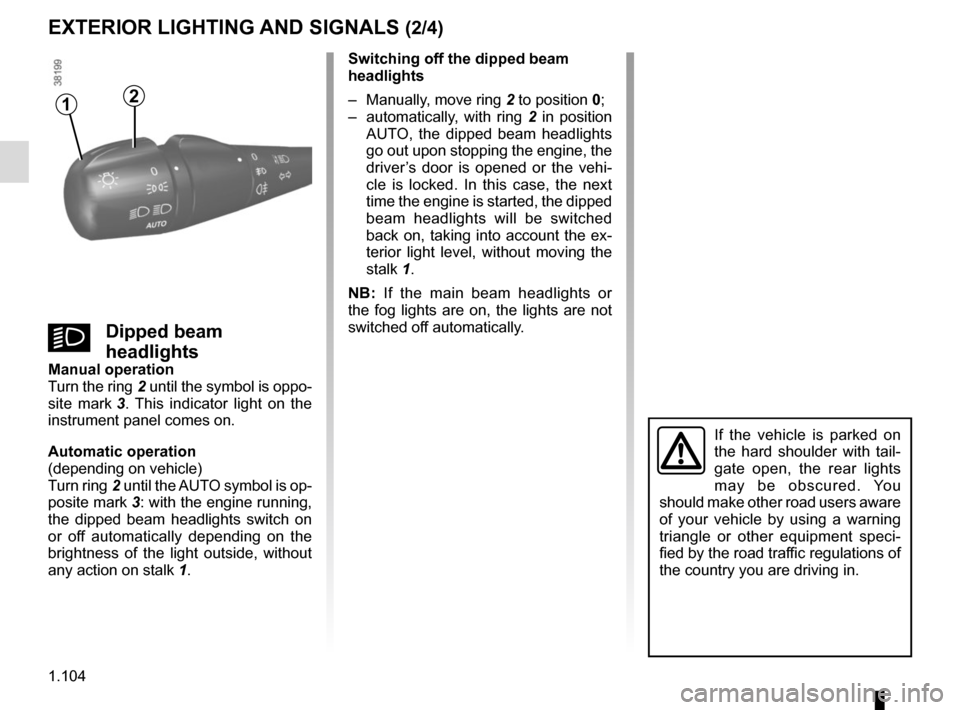
12
Switching off the dipped beam
headlights
– Manually, move ring 2 to position 0;
– automatically, with ring 2 in position
AUTO, the dipped beam headlights
go out upon stopping the engine, the
driver’s door is opened or the vehi-
cle is locked. In this case, the next
time the engine is started, the dipped
beam headlights will be switched
back on, taking into account the ex-
terior light level, without moving the
stalk 1.
NB: If the main beam headlights or
the fog lights are on, the lights are not
switched off automatically.
kDipped beam
headlights
Manual operation
Turn the ring 2 until the symbol is oppo-
site mark 3. This indicator light on the
instrument panel comes on.
Automatic operation
(depending on vehicle)
Turn ring 2 until the AUTO symbol is op-
posite mark 3: with the engine running,
the dipped beam headlights switch on
or off automatically depending on the
brightness of the light outside, without
any action on stalk 1.
If the vehicle is parked on
the hard shoulder with tail-
gate open, the rear lights
may be obscured. You
should make other road users aware
of your vehicle by using a warning
triangle or other equipment speci-
fied by the road traffic regulations of
the country you are driving in.
Page 111 of 294

1.105
áMain beam headlightsWith the engine running and
the dipped beam headlights lit, push
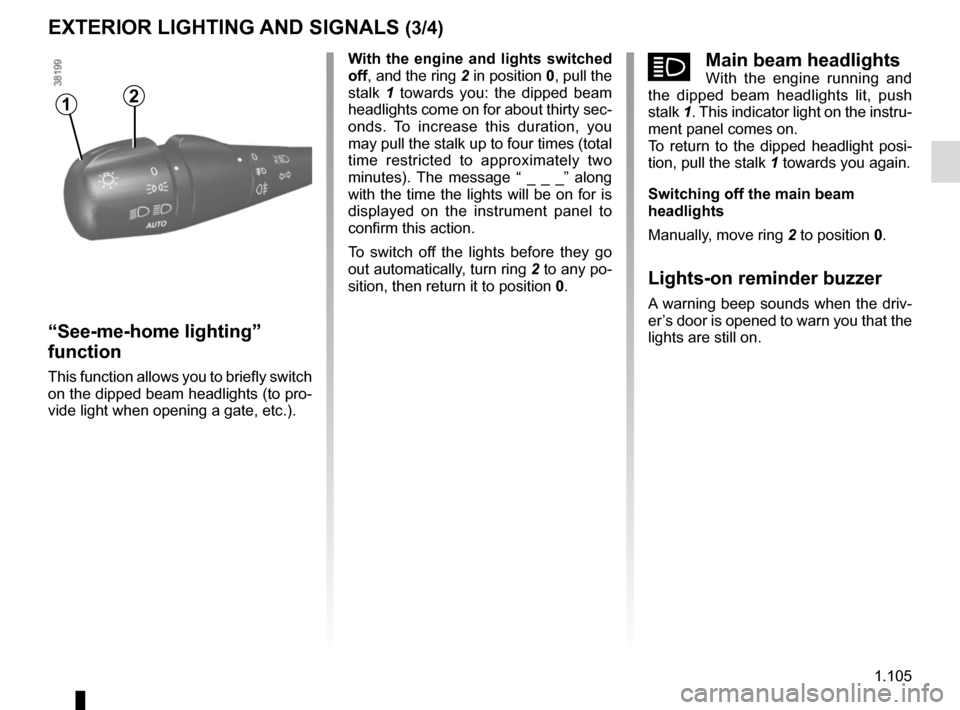
stalk 1. This indicator light on the instru-
ment panel comes on.
To return to the dipped headlight posi-
tion, pull the stalk 1 towards you again.
Switching off the main beam
headlights
Manually, move ring 2 to position 0.
Lights-on reminder buzzer
A warning beep sounds when the driv-
er’s door is opened to warn you that the
lights are still on.
EXTERIOR LIGHTING AND SIGNALS (3/4)
With the engine and lights switched
off, and the ring 2 in position 0, pull the
stalk 1 towards you: the dipped beam
headlights come on for about thirty sec-
onds. To increase this duration, you
may pull the stalk up to four times (total
time restricted to approximately two
minutes). The message “ _ _ _” along
with the time the lights will be on for is
displayed on the instrument panel to
confirm this action.
To switch off the lights before they go
out automatically, turn ring 2 to any po-
sition, then return it to position 0.
“See-me-home lighting”
function
This function allows you to briefly switch
on the dipped beam headlights (to pro-
vide light when opening a gate, etc.).
12
Page 112 of 294

1.106
EXTERIOR LIGHTING AND SIGNALS (4/4)
Cornering lights function
Whenever the dipped beam headlights
are on and under certain conditions (at
speed, the steering wheel at an angle,
in forward gear, the indicator lights on,
etc.), when taking a corner one of the
front fog lights will come on to light the
inside of the bend.
fRear fog light
Turn centre ring 4 on the stalk
until the symbol faces mark 5, then re-
lease it.
Operation of the fog lights depends on
the exterior lighting selected, and an in-
dicator light will light up on the instru-
ment panel.
To avoid inconveniencing other road
users, remember to switch off the rear
fog light when it is no longer needed.
Switching off the lights
Turn ring 4 again until mark 5 is oppo-
site the symbol for the fog light you wish
to switch off. The corresponding indi-
cator light goes out on the instrument
panel.
The front and rear fog lights switch off
when the exterior lights are switched
off.
gFront fog lightsTurn centre ring 4 on the
stalk 1 until the symbol faces mark 5,
then release it.
Operation of the fog lights depends on
the exterior lighting position selected,
and an indicator light will light up on the
instrument panel.
When driving in fog or snow, or
when transporting objects which are
higher than the roof, the headlights
do not come on automatically.
Switching on the fog lights remains
the responsibility of the driver: the
indicator lights on the instrument
panel inform you whether the fog
lights are lit (indicator light on) or not
(indicator light not on).
If the vehicle is parked on the hard shoulder with tailgate open, the re\
ar
lights may be obscured. You should make other road users aware of your
vehicle by using a warning triangle or other equipment specified by the \
road traffic regulations of the country you are driving in.
415
Page 115 of 294

1.109
éHazard warning lights
Press switch 2.
This switch activates all four direction
indicators and the side indicator lights
simultaneously. It must only be used in
an emergency to warn drivers of other
vehicles that you have had to stop in
an area where stopping is prohibited or
unexpected, or that you are obliged to
drive under special conditions.
Depending on the vehicle, the hazard
warning lights may come on auto-
matically under heavy deceleration.
You can switch them off by pressing
switch 2 once.
Direction indicators
Move stalk 1 parallel to the steering
wheel and in the direction you are going
to turn it.
One-touch mode
When driving, it is possible that the
steering wheel may not be turned suf-
ficiently to return the stalk automatically
to its starting position.
In this case, move the stick 1 to half-
way, then release it: the stalk returns to
its original point and the indicator light
flashes three times.
Horn
Press steering wheel boss A.
Headlight flasher
Pull stalk 1 towards you to flash the
headlights.
AUDIBLE AND VISUAL SIGNALS
A
2
1
Page 120 of 294

1.114
Filling with fuel
With the ignition off, insert the nozzle
and insert it fully before turning it on to
fill the fuel tank (risk of splashing).
Keep the nozzle in this position through-
out the entire filling operation.
When the pump cuts out automatically
at the end of the filling procedure, a
maximum of two further filling attempts
may be made, as there must be suffi-
cient space in the fuel tank to allow for
expansion.
Make sure that no water enters the fuel
tank during filling. The cover A and its
surround must remain clean.
FUEL TANK (2/3)
Vehicle fitted with the Stop and
Start function
To fill up with fuel, the engine must
be stopped (and not on standby):
stop the engine (please refer to the
information on “Starting and stop-
ping the engine” in Section 2).
Persistent fuel odour
If you notice a persistent
fuel odour you should:
– stop the vehicle as soon as traf- fic conditions allow and switch off
the ignition;
– switch on the hazard warning lights and ask your passengers to
leave the vehicle and stay clear
of the traffic;
– contact an approved Dealer.
Page 122 of 294

1.116
Please ensure that you comply with the
legislation of your country.
It is important to remember that failure
to respect regulations in force could
lead to legal action being taken against
the vehicle owner.
Operating principleThe use of additives reduces exhaust
emissions by transforming the pollut-
ants into water vapour and nitrogen.
FillingCapacity of the fuel tank: 20 litres ap-
proximately.
Open the front left door to open the
cover A. Unscrew the cap 1.
ADDITIVE TANK (1/4)
A
1
Fuel filler cap: this is spe-
cific.
If you have to replace it,
make sure it is identical to
the original cap. Contact an appro-
ved Dealer. Do not wash the filler
area with a high pressure washer.
Vehicle fitted with the Stop and
Start function
To fill up with additive, the engine
must be stopped (and not on
standby): stop the engine (Please
See “Starting, stopping the engine”
in Section 2).
No work whatsoever is
permitted on any part of
the system. To prevent
damage, only qualified per-
sonnel from our network may work
on the system.
Topping upAfter filling the additive
tank, check that the cap and
cover are closed, start the
engine and WAIT 10 seconds with
the vehicle stationary, engine
running before setting off again.
If this operation is not carried out,
the filling of the tank will not be
taken into account automatically
until after several dozens of minutes
of driving. The message “--- TOP UP
ADBLUE” and/or the warning lights
will continue to appear until the fill-
ing has been taken into account by the system.
If the warning “XXXX
KM FAILURE TOP UP
ADBLUE” appears, fill the
additive tank and refer to
the filling instructions.
Risk of immobilisation of the
vehicle.
Page 123 of 294

1.117
Additive quality
Use only additives which conform
to standard ISO 22241 and in accor-
dance with the label on the fuel filler
flap.
Average fuel consumption
Approximately 941 mpg (3 l/1000 km)
depending on the vehicle and the driv-
ing style.
The additive must not come
into contact with eyes or
skin. If it does, wash the af-
fected area with plenty of
cold water. If necessary, consult a
doctor.
ADDITIVE TANK (2/4)
Precautions for use
Always read the information on the ad-
ditive can.
Handle additives with care. They can
damage clothes, shoes, bodywork
components etc.
If the additive overflows, or contami-
nates any paintwork, clean the affected
area quickly with a damp cloth.
In extreme cold weather conditions
The vehicle is fitted with a system for
reheating the additive fluid that enables
you to drive in extreme cold weather
conditions.
Precautions when filling the tank
The additive fluid freezes below about
-10°C.
In this case, do not attempt filling when
the fluid is frozen.
It is therefore advisable to top up the
additive fluid or have it topped up by a
qualified professional as soon as the
warning light on the instrument
panel first comes on.
Page 124 of 294
1.118
ADDITIVE TANK (3/4)
Maintenance/Range
Warning lights and messages on the instrument panel
When the indicator lights described light up, this may be accompanied by\
a beep.
Indicator lights Message What to do?
comes on each
time the vehicle is started. « ADBLUE LEVEL
LOW »
Fill or have an Approved Dealer fill or top up the additive tank.
comes on.« ADBLUE TO FILL »
comes on.« XXXX KM FAILURE
TOP UP ADBLUE »
Fill or have an Approved Dealer fill the additive tank as soon as possible.
comes on.« 0KM FAILURE TOP
UP ADBLUE »
The engine will not start.
To restart, you must fill the additive tank yourself.