Page 93 of 294

1.87
WARNING LIGHTS (4/4)
ΦSpeed limiter and cruise
control indicator lights
See the information on the “Speed lim-
iter” and “Cruise control” in Section 2.
Tyre pressure loss warning
Please refer to the information
on the “Tyre pressure loss warning” in
Section 2.
Traction control warning
light
Refer to the information on “Driving cor-
rection devices and aids” in Section 2.
ÉPreheating warning light
(diesel version)
This should come on when the igni-
tion is switched on. It indicates that the
heater plugs are in operation.
It goes out when preheating is com-
plete. The engine can be started.
A
The display of information shown below DEPENDS ON THE VEHICLE EQUIPMENT \
AND COUNTRY.
Š‰Gear change indicators
This lights up to advise you to
change to a higher gear (up arrow) or
lower gear (down arrow).
ECO mode warning light
This comes on when ECO
mode is activated.
Please refer to the information on
“Driving advice, Eco-driving” in
Section 2.
ßFront seat belt reminder
warning light
It lights up on the central display when
the engine is started and, if the driv-
er's seat belt is not fastened, the light
flashes and a beep sounds for about
2 minutes when the vehicle reaches a
speed of about 9.92 mph (16 km/h).
Depending on the vehicle, this flashes if
the front passenger seat belt is not fas-
tened.
2 Door(s) open warning light
\bEngine standby warning
light
Please see information in the para-
graph on “Stop and Start Function” in
Section 2.
Unavailability of engine
standby warning light
Please see information in the para-
graph on “Stop and Start Function” in
Section 2.
Page 95 of 294
1.89
Instrument panel 6 in miles
(option to switch to km/h)
– With ignition off, press button 9 or 10 at the end of stalk 7 and the start
button 8;
– the speedometer unit indicator flashes for approximately ten se-
conds, then the new unit is dis-
played: release button 9 or 10 when
the unit stops flashing.
9
10
67
7
To return to the previous mode, repeat
the same operation.
Note: once the battery is switched off,
the trip computer and warning system
automatically returns to the original unit
of measurement.
DISPLAYS AND INDICATORS (2/2)
8
Page 104 of 294
1.98
TRIP COMPUTER AND WARNING SYSTEM: warning message
These appear with the ® warning light and require you to stop immediately, for your own safety, as soon as traffic
conditions allow. Stop your engine and do not restart it. Contact an approved Dealer.
Examples of warning messages are given in the following pages. Note: the messages appear on the display either individually
or alternately (when there are several messages to be displayed), and \
may be accompanied by a warning light and/or a beep.
Examples of messages Interpreting the display selected
« GEAR BOX RISK OF BREAKAGE » Indicates an injection fault, the vehicle’s engine has overheated or there is a serious engine fault.
« Braking system fault » Indicates a fault in the braking system.
« BATTERY CHARGING FAULT » Indicates a fault in the vehicle battery charging circuit (alternator e\
tc.).
« PUNCTURE « Indicates that at least one wheel is punctured or severely underinflated\
.
Page 110 of 294

1.104
EXTERIOR LIGHTING AND SIGNALS (2/4)
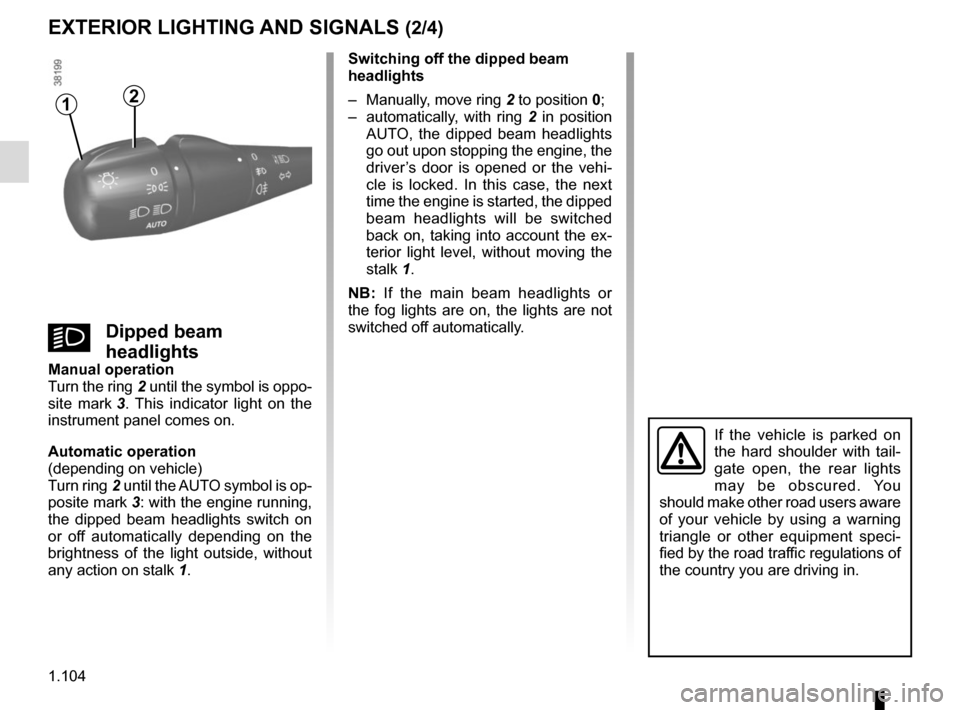
12
Switching off the dipped beam
headlights
– Manually, move ring 2 to position 0;
– automatically, with ring 2 in position
AUTO, the dipped beam headlights
go out upon stopping the engine, the
driver’s door is opened or the vehi-
cle is locked. In this case, the next
time the engine is started, the dipped
beam headlights will be switched
back on, taking into account the ex-
terior light level, without moving the
stalk 1.
NB: If the main beam headlights or
the fog lights are on, the lights are not
switched off automatically.
kDipped beam
headlights
Manual operation
Turn the ring 2 until the symbol is oppo-
site mark 3. This indicator light on the
instrument panel comes on.
Automatic operation
(depending on vehicle)
Turn ring 2 until the AUTO symbol is op-
posite mark 3: with the engine running,
the dipped beam headlights switch on
or off automatically depending on the
brightness of the light outside, without
any action on stalk 1.
If the vehicle is parked on
the hard shoulder with tail-
gate open, the rear lights
may be obscured. You
should make other road users aware
of your vehicle by using a warning
triangle or other equipment speci-
fied by the road traffic regulations of
the country you are driving in.
Page 115 of 294

1.109
éHazard warning lights
Press switch 2.
This switch activates all four direction
indicators and the side indicator lights
simultaneously. It must only be used in
an emergency to warn drivers of other
vehicles that you have had to stop in
an area where stopping is prohibited or
unexpected, or that you are obliged to
drive under special conditions.
Depending on the vehicle, the hazard
warning lights may come on auto-
matically under heavy deceleration.
You can switch them off by pressing
switch 2 once.
Direction indicators
Move stalk 1 parallel to the steering
wheel and in the direction you are going
to turn it.
One-touch mode
When driving, it is possible that the
steering wheel may not be turned suf-
ficiently to return the stalk automatically
to its starting position.
In this case, move the stick 1 to half-
way, then release it: the stalk returns to
its original point and the indicator light
flashes three times.
Horn
Press steering wheel boss A.
Headlight flasher
Pull stalk 1 towards you to flash the
headlights.
AUDIBLE AND VISUAL SIGNALS
A
2
1
Page 117 of 294

1 .
111
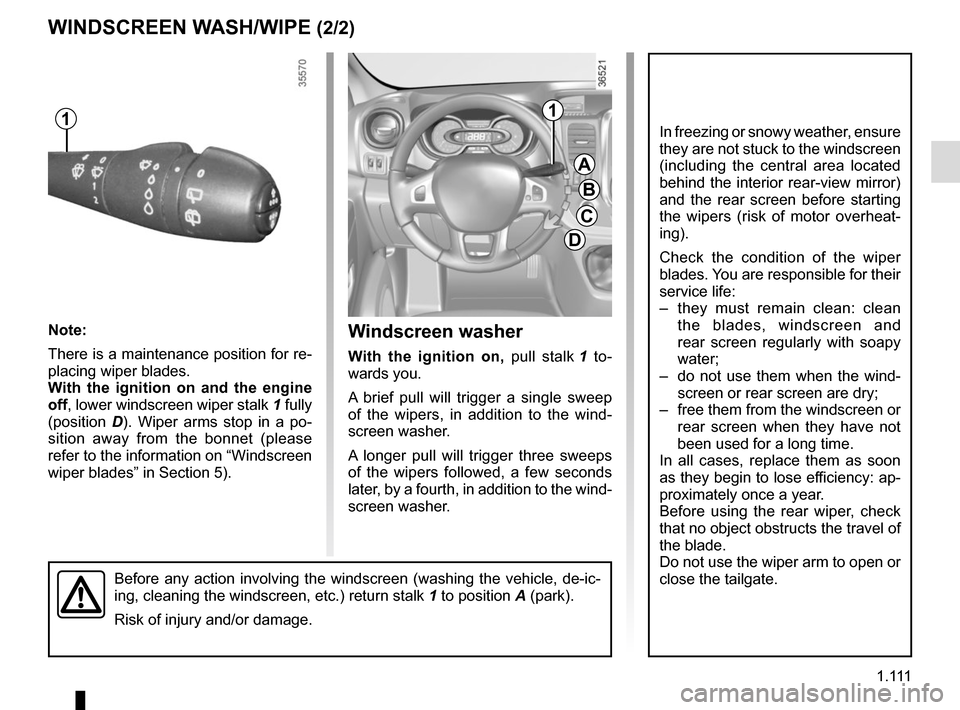
Before any action involving the windscreen (washing the vehicle, de-ic-\
ing, cleaning the windscreen, etc.) return stalk 1 to position A (park).
Risk of injury and/or damage.
Windscreen washer
With the ignition on, pull stalk 1 to-
wards you.
A brief pull will trigger a single sweep
of the wipers, in addition to the wind-
screen washer.
A longer pull will trigger three sweeps
of the wipers followed, a few seconds
later, by a fourth, in addition to the wind-
screen washer.
WINDSCREEN WASH/WIPE (2/2)
A
B
C
D
11
In freezing or snowy weather, ensure
they are not stuck to the windscreen
(including the central area located
behind the interior rear-view mirror)
and the rear screen before starting
the wipers (risk of motor overheat-
ing).
Check the condition of the wiper
blades. You are responsible for their
service life:
– they must remain clean: clean the blades, windscreen and
rear screen regularly with soapy
water;
– do not use them when the wind- screen or rear screen are dry;
– free them from the windscreen or rear screen when they have not
been used for a long time.
In all cases, replace them as soon
as they begin to lose efficiency: ap-
proximately once a year.
Before using the rear wiper, check
that no object obstructs the travel of
the blade.
Do not use the wiper arm to open or
close the tailgate.
Note:
There is a maintenance position for re-
placing wiper blades.
With the ignition on and the engine
off, lower windscreen wiper stalk 1 fully
(position D). Wiper arms stop in a po-
sition away from the bonnet (please
refer to the information on “Windscreen
wiper blades” in Section 5).
Page 120 of 294

1.114
Filling with fuel
With the ignition off, insert the nozzle
and insert it fully before turning it on to
fill the fuel tank (risk of splashing).
Keep the nozzle in this position through-
out the entire filling operation.
When the pump cuts out automatically
at the end of the filling procedure, a
maximum of two further filling attempts
may be made, as there must be suffi-
cient space in the fuel tank to allow for
expansion.
Make sure that no water enters the fuel
tank during filling. The cover A and its
surround must remain clean.
FUEL TANK (2/3)
Vehicle fitted with the Stop and
Start function
To fill up with fuel, the engine must
be stopped (and not on standby):
stop the engine (please refer to the
information on “Starting and stop-
ping the engine” in Section 2).
Persistent fuel odour
If you notice a persistent
fuel odour you should:
– stop the vehicle as soon as traf- fic conditions allow and switch off
the ignition;
– switch on the hazard warning lights and ask your passengers to
leave the vehicle and stay clear
of the traffic;
– contact an approved Dealer.
Page 122 of 294

1.116
Please ensure that you comply with the
legislation of your country.
It is important to remember that failure
to respect regulations in force could
lead to legal action being taken against
the vehicle owner.
Operating principleThe use of additives reduces exhaust
emissions by transforming the pollut-
ants into water vapour and nitrogen.
FillingCapacity of the fuel tank: 20 litres ap-
proximately.
Open the front left door to open the
cover A. Unscrew the cap 1.
ADDITIVE TANK (1/4)
A
1
Fuel filler cap: this is spe-
cific.
If you have to replace it,
make sure it is identical to
the original cap. Contact an appro-
ved Dealer. Do not wash the filler
area with a high pressure washer.
Vehicle fitted with the Stop and
Start function
To fill up with additive, the engine
must be stopped (and not on
standby): stop the engine (Please
See “Starting, stopping the engine”
in Section 2).
No work whatsoever is
permitted on any part of
the system. To prevent
damage, only qualified per-
sonnel from our network may work
on the system.
Topping upAfter filling the additive
tank, check that the cap and
cover are closed, start the
engine and WAIT 10 seconds with
the vehicle stationary, engine
running before setting off again.
If this operation is not carried out,
the filling of the tank will not be
taken into account automatically
until after several dozens of minutes
of driving. The message “--- TOP UP
ADBLUE” and/or the warning lights
will continue to appear until the fill-
ing has been taken into account by the system.
If the warning “XXXX
KM FAILURE TOP UP
ADBLUE” appears, fill the
additive tank and refer to
the filling instructions.
Risk of immobilisation of the
vehicle.