2017 RENAULT TRAFIC check engine
[x] Cancel search: check enginePage 117 of 294

1 .
111
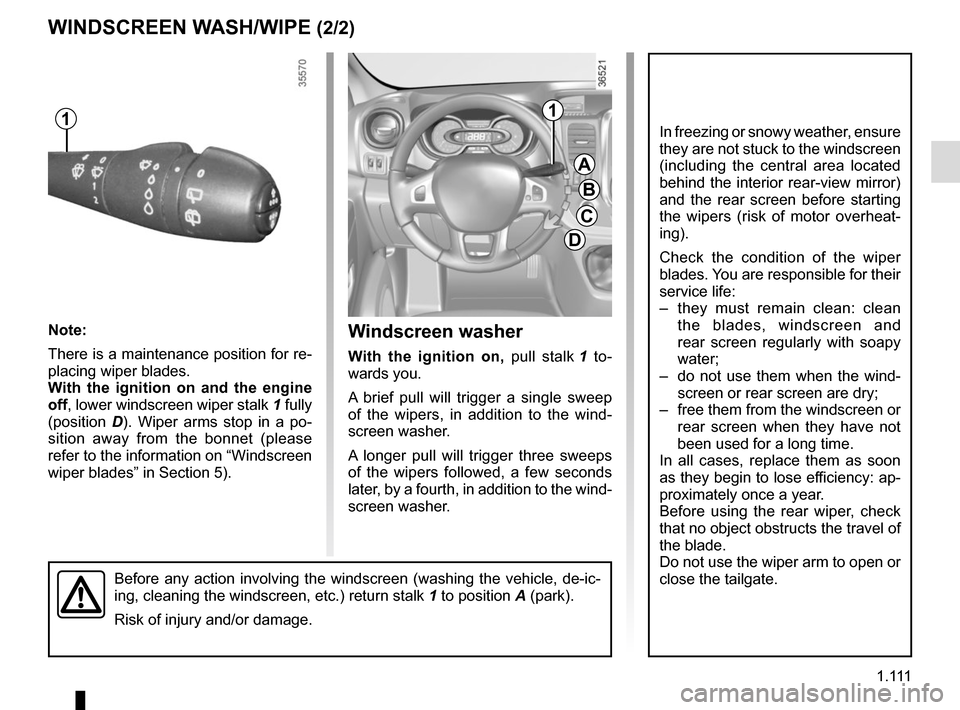
Before any action involving the windscreen (washing the vehicle, de-ic-\
ing, cleaning the windscreen, etc.) return stalk 1 to position A (park).
Risk of injury and/or damage.
Windscreen washer
With the ignition on, pull stalk 1 to-
wards you.
A brief pull will trigger a single sweep
of the wipers, in addition to the wind-
screen washer.
A longer pull will trigger three sweeps
of the wipers followed, a few seconds
later, by a fourth, in addition to the wind-
screen washer.
WINDSCREEN WASH/WIPE (2/2)
A
B
C
D
11
In freezing or snowy weather, ensure
they are not stuck to the windscreen
(including the central area located
behind the interior rear-view mirror)
and the rear screen before starting
the wipers (risk of motor overheat-
ing).
Check the condition of the wiper
blades. You are responsible for their
service life:
– they must remain clean: clean the blades, windscreen and
rear screen regularly with soapy
water;
– do not use them when the wind- screen or rear screen are dry;
– free them from the windscreen or rear screen when they have not
been used for a long time.
In all cases, replace them as soon
as they begin to lose efficiency: ap-
proximately once a year.
Before using the rear wiper, check
that no object obstructs the travel of
the blade.
Do not use the wiper arm to open or
close the tailgate.
Note:
There is a maintenance position for re-
placing wiper blades.
With the ignition on and the engine
off, lower windscreen wiper stalk 1 fully
(position D). Wiper arms stop in a po-
sition away from the bonnet (please
refer to the information on “Windscreen
wiper blades” in Section 5).
Page 118 of 294

1.112
pRear screen wash/wipe
With the ignition on, turn the
end of stalk 1 to align mark 2 with the
symbol.
When the stalk is released, it returns to
the rear wipe position.
Special note
If the windscreen wipers are operat-
ing or are in automatic mode, the rear
screen wiper wipes intermittently when
reverse gear is engaged.
YSpeed-dependent
timed rear screen
wiper
With the ignition on, turn the end of
stalk 1 to align mark 2 with the symbol.
Wiping frequency varies with speed.
REAR SCREEN WASH/WIPE
12In freezing or snowy weather, ensure
they are not stuck to the windscreen
(including the central area located
behind the interior rear-view mirror)
and the rear screen before starting
the wipers (risk of motor overheat-
ing).
Check the condition of the wiper
blades. You are responsible for their
service life:
– they must remain clean: clean the blades, windscreen and
rear screen regularly with soapy
water;
– do not use them when the wind- screen or rear screen are dry;
– free them from the windscreen or rear screen when they have not
been used for a long time.
In all cases, replace them as soon
as they begin to lose efficiency: ap-
proximately once a year.
Before using the rear wiper, check
that no object obstructs the travel of
the blade.
Do not use the wiper arm to open or
close the tailgate.
Before any action on the
windscreen (washing the
vehicle, de-icing, cleaning
the windscreen, etc.) return
stalk 1 to the park position.
Risk of injury or damage.
When working in the engine
compartment, ensure that
the windscreen wiper stalk
is in the park position.
Risk of injury.
Page 119 of 294

1.113
Fuel grade
Use a high-grade fuel that complies
with the legislation in force in each
country and which must comply with
the specifications given on the label
on the cover A. Please refer to the in-
formation on “Engine specifications” in
Section 6.
Diesel version
Only use diesel fuel which complies
with the information on the label located
inside the cover A.
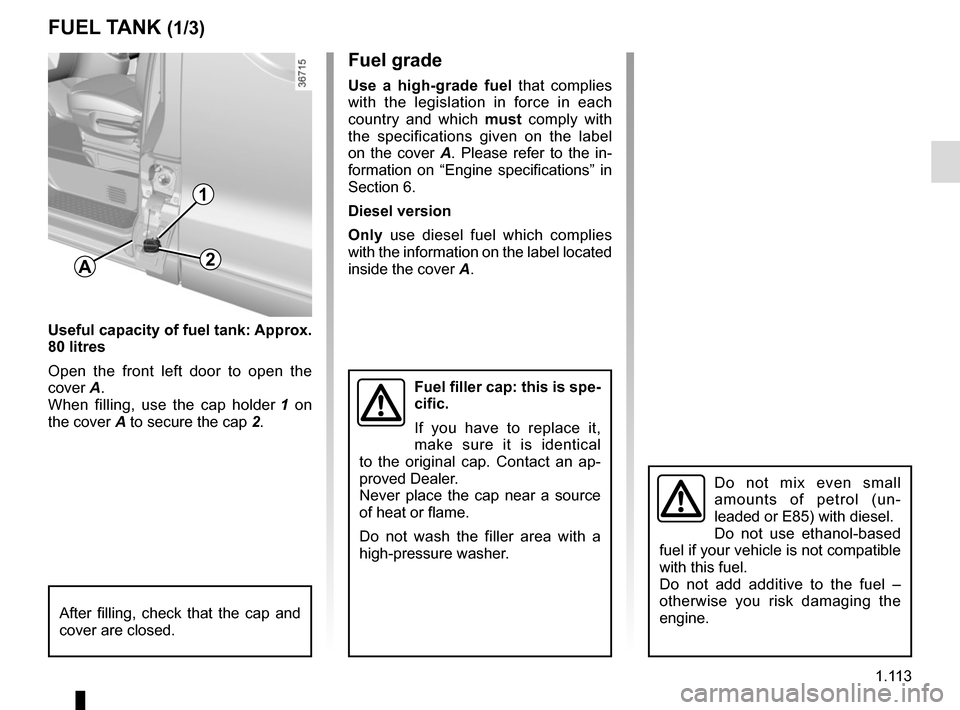
Useful capacity of fuel tank: Approx.
80 litres
Open the front left door to open the
cover A.
When filling, use the cap holder 1 on
the cover A to secure the cap 2.
FUEL TANK (1/3)
After filling, check that the cap and
cover are closed.
Fuel filler cap: this is spe-
cific.
If you have to replace it,
make sure it is identical
to the original cap. Contact an ap-
proved Dealer.
Never place the cap near a source
of heat or flame.
Do not wash the filler area with a
high-pressure washer.
Do not mix even small
amounts of petrol (un-
leaded or E85) with diesel.
Do not use ethanol-based
fuel if your vehicle is not compatible
with this fuel.
Do not add additive to the fuel –
otherwise you risk damaging the
engine.
A
1
2
Page 122 of 294

1.116
Please ensure that you comply with the
legislation of your country.
It is important to remember that failure
to respect regulations in force could
lead to legal action being taken against
the vehicle owner.
Operating principleThe use of additives reduces exhaust
emissions by transforming the pollut-
ants into water vapour and nitrogen.
FillingCapacity of the fuel tank: 20 litres ap-
proximately.
Open the front left door to open the
cover A. Unscrew the cap 1.
ADDITIVE TANK (1/4)
A
1
Fuel filler cap: this is spe-
cific.
If you have to replace it,
make sure it is identical to
the original cap. Contact an appro-
ved Dealer. Do not wash the filler
area with a high pressure washer.
Vehicle fitted with the Stop and
Start function
To fill up with additive, the engine
must be stopped (and not on
standby): stop the engine (Please
See “Starting, stopping the engine”
in Section 2).
No work whatsoever is
permitted on any part of
the system. To prevent
damage, only qualified per-
sonnel from our network may work
on the system.
Topping upAfter filling the additive
tank, check that the cap and
cover are closed, start the
engine and WAIT 10 seconds with
the vehicle stationary, engine
running before setting off again.
If this operation is not carried out,
the filling of the tank will not be
taken into account automatically
until after several dozens of minutes
of driving. The message “--- TOP UP
ADBLUE” and/or the warning lights
will continue to appear until the fill-
ing has been taken into account by the system.
If the warning “XXXX
KM FAILURE TOP UP
ADBLUE” appears, fill the
additive tank and refer to
the filling instructions.
Risk of immobilisation of the
vehicle.
Page 132 of 294

2.6
When you leave your vehi-
cle, especially if you have
your RENAULT card with
you, check that the engine
is completely switched off.
With the engine switched off, any ac-
cessories being used (radio, etc.) will
continue to function for approximately
10 minutes.
When the driver’s door is opened, the
accessories stop working.Conditions for stopping the
engine
The vehicle must be at a standstill.
With the 2 card in the card reader or
in the detection zone 3, press button 1:
the engine stops. The steering column
is locked when the driver’s door is
opened or the vehicle is locked.
If the card is no longer in the pas-
senger compartment when you try to
switch the engine off, the message “NO
KEYCARD PRESS AND HOLD” ap-
pears on the instrument panel: press
button 1 for longer than 2 seconds.
STARTING, STOPPING THE ENGINE: vehicle with RENAULT CARD (3/3)
3
1
2
Driver’s responsibility
when parking or stopping
the vehicle
Never leave an animal,
child or adult who is not self-suffi-
cient alone in your vehicle, even for
a short time.
They may pose a risk to themselves
or to others by starting the engine,
activating equipment such as the
electric windows or locking the
doors, for example.
Also, in hot and/or sunny weather,
please remember that the tempera-
ture inside the passenger compart-
ment increases very quickly.
RISK OF DEATH OR SERIOUS
INJURY.
Never switch off the igni-
tion before the vehicle has
stopped completely. Once
the engine has stopped, the
brake servo, power-assisted steer-
ing, etc. and the passive safety de-
vices such as air bags and preten-
sioners will no longer operate.
Page 135 of 294

2.9
Operating faults
When the message “CHECK STOP
AND START” appears on the instru-
ment panel and the integrated warn-
ing light 2 lights up on the switch 1, the
system is deactivated.
Please consult an authorised dealer.
Deactivating, activating the
function
Press switch 1 to deactivate the func-
tion. The message “STOP AND START
DEACTIVATED” will appear on the in-
strument panel and the integrated
warning light 2 on the switch will light
up.
Pressing again will reactivate the
system. The message “STOP AND
START ACTIVATED” will appear on the
instrument panel and the integrated
warning light 2 on the switch 1 will go
out.
STOP AND START function (3/3)
The system is automatically reactivated
each time the vehicle is started (please
see section on “Starting, stopping the
engine”).
Special note: engine on standby,
press switch 1 to automatically restart
the engine.
1
2
The engine must be stopped
before leaving the vehicle
(and not on standby): stop
the engine (please refer
to the information on “Starting and
stopping the engine” in Section 2).
In the event of an emer-
gency, the engine can be
restarted by pressing on the
clutch pedal if the Stop and
Start function is activated.
Page 136 of 294

2.10
SPECIAL FEATURES OF DIESEL VERSIONS
Diesel engine speed
Diesel engines are fitted with injection
equipment which prevents the engine
speed being exceeded irrespective of
the gear selected.
If the message “Check antipollution
system” is displayed along with warn-
ing lights
Ä and ©, consult an
authorised dealer immediately.
When driving, depending on the fuel
grade used, it is possible that white
smoke may be emitted.
This is due to the exhaust particle filter
being cleaned automatically, and does
not affect the way the vehicle runs.
Running out of fuel
If the tank has been completely
drained, the system must be reprimed
after the tank is refilled: see information
on the “fuel tank” in section 1 before re-
starting the engine.
Do not park the vehicle or
run the engine in locations
where combustible sub-
stances or materials such
as grass or leaves can come into
contact with the hot exhaust system.
Precautions to be taken in
winter
To avoid any faults in icy weather:
– ensure that the battery is always fully charged,
– always keep the diesel tank rela- tively full to avoid water vapour con-
densing in it and accumulating at the
bottom of the tank.
Page 140 of 294

2.14
Driving advice, Eco-driving
Behaviour
– Drive carefully for the first few miles until the engine reaches its normal
operating temperature, rather than
let it warm up while the vehicle is sta-
tionary.
– Speed is expensive.
– Sporty driving uses a lot of fuel: drive with a light right foot.
– Do not overrev the engine in the in- termediate gears.
You should always use the highest gear possible.
DRIVING ADVICE, ECO-DRIVING (3/4)
Obstructions to the driver
On the driver’s side, only
use mats suitable for the
vehicle, attached with the
pre-fitted components, and check
the fitting regularly. Do not lay one
mat on top of another.
There is a risk of wedging the
pedals
– Avoid sudden acceleration.
– Brake as little as possible. If you an- ticipate an obstacle or bend in ad-
vance, you may then simply release
the accelerator pedal.
– Do not try to maintain the same speed up a hill, accelerate no more
than you would on the level. Keep
your foot in the same position on the
accelerator pedal.
– Double declutching and accelerating before switching off are unnecessary
in modern vehicles.
– Bad weather, flooded roads:
Do not drive through
floods if the water is
above the lower edge of
the wheel rims.