2017 RENAULT TALISMAN update
[x] Cancel search: updatePage 44 of 130
2.12
Latest map guarantee
Once your new vehicle has been de-
livered, you will have a limited time in
which to update the map for free. Once
this time has elapsed, you will need to
pay for updates.
For further information, please contact
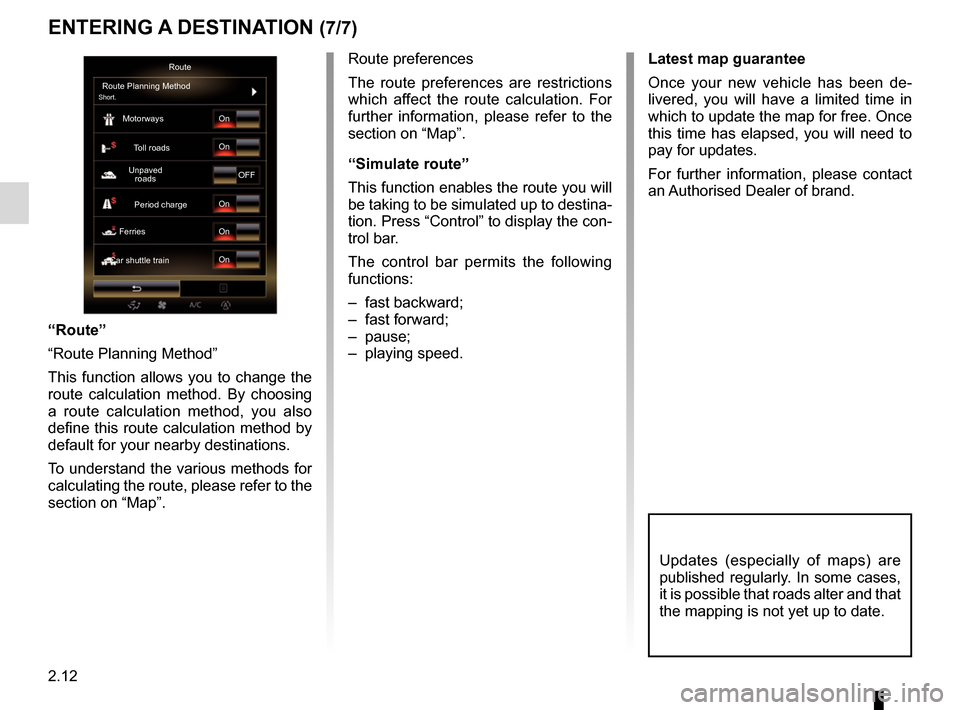
an Authorised Dealer of brand.Route
Route Planning Method
Short.
Motorways
Period charge
Toll roads
Ferries Unpaved
roads
Car shuttle train On
On
OFF
On
On
On
Updates (especially of maps) are
published regularly. In some cases,
it is possible that roads alter and that
the mapping is not yet up to date.
ENTERING A DESTINATION (7/7)
Route preferences
The route preferences are restrictions
which affect the route calculation. For
further information, please refer to the
section on “Map”.
“Simulate route”
This function enables the route you will
be taking to be simulated up to destina-
tion. Press “Control” to display the con-
trol bar.
The control bar permits the following
functions:
– fast backward;
– fast forward;
– pause;
– playing speed.
“Route”
“Route Planning Method”
This function allows you to change the
route calculation method. By choosing
a route calculation method, you also
define this route calculation method by
default for your nearby destinations.
To understand the various methods for
calculating the route, please refer to the
section on “Map”.
Page 60 of 130
3.6
LISTENING TO THE RADIO (5/8)
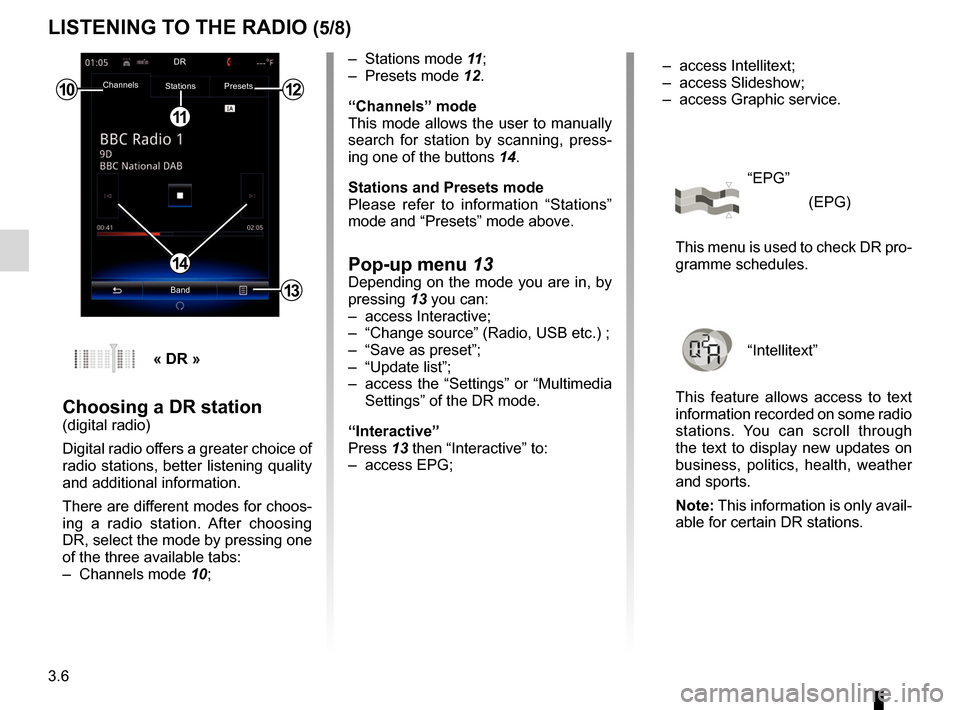
– Stations mode 11;
– Presets mode 12.
“Channels” mode
This mode allows the user to manually
search for station by scanning, press-
ing one of the buttons 14.
Stations and Presets mode
Please refer to information “Stations”
mode and “Presets” mode above.
Pop-up menu 13Depending on the mode you are in, by
pressing 13 you can:
– access Interactive;
– “Change source” (Radio, USB etc.) ;
– “Save as preset”;
– “Update list”;
– access the “Settings” or “Multimedia Settings” of the DR mode.
“Interactive”
Press 13 then “Interactive” to:
– access EPG;
10
11
12
14
13
Channels Stations Presets
BandDR
« DR »
Choosing a DR station(digital radio)
Digital radio offers a greater choice of
radio stations, better listening quality
and additional information.
There are different modes for choos-
ing a radio station. After choosing
DR, select the mode by pressing one
of the three available tabs:
– Channels mode
10; – access Intellitext;
– access Slideshow;
– access Graphic service.
“EPG”
(EPG)
This menu is used to check DR pro-
gramme schedules.
“Intellitext”
This feature allows access to text
information recorded on some radio
stations. You can scroll through
the text to display new updates on
business, politics, health, weather
and sports.
Note: This information is only avail-
able for certain DR stations.
Page 61 of 130

3.7
“Graphic service”
This menu is used to see the web-
site provided by the current station
when you have a connection.
“Slideshow”
This menu is used to see images
provided by the station in slide-
show.
Storing a station
From “Channels” mode or “Stations”
mode, press 13 then “Save as preset”.
You can also give a long press on one
of the preset buttons until you hear a
beep.
You can store up to 12 stations per
band.
“Update list”
Select this menu to update the list of
radio stations.
LISTENING TO THE RADIO (6/8)
13
Channels Stations Presets
BandDR
You can also access this menu by
pressing
15.
Note: The slideshow 15 is dis-
played when Timeshift function
(direct control) is deactivated.
“Change source”
This function allows you to change the
audio source (Radio, USB, AUX, etc.).
Channels Stations Presets
BandDR
15
Channels Stations Presets
Band
13
Page 80 of 130
4.8
PHONEBOOK
Note: the contacts saved on the SIM
card are not visible. Only contacts
saved on the phone are visible.
Updating the phonebook
You can transfer your phone contacts
into the handset memory of your hands-
free phone system via Bluetooth® (if
your phone allows this).
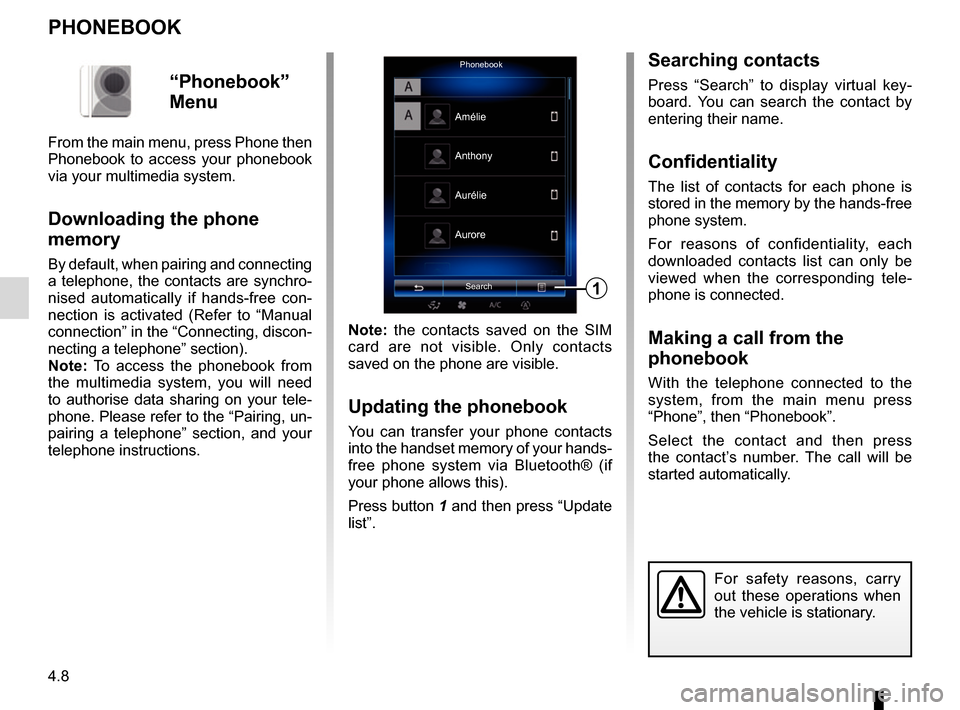
Press button 1 and then press “Update
list”.
PhonebookSearch
Anthony
Aurore
1
Amélie
Aurélie
“Phonebook”
Menu
From the main menu, press Phone then
Phonebook to access your phonebook
via your multimedia system.
Downloading the phone
memory
By default, when pairing and connecting
a telephone, the contacts are synchro-
nised automatically if hands-free con-
nection is activated (Refer to “Manual
connection” in the “Connecting, discon-
necting a telephone” section).
Note: To access the phonebook from
the multimedia system, you will need
to authorise data sharing on your tele-
phone. Please refer to the “Pairing, un-
pairing a telephone” section, and your
telephone instructions.
Searching contacts
Press “Search” to display virtual key-
board. You can search the contact by
entering their name.
Confidentiality
The list of contacts for each phone is
stored in the memory by the hands-free
phone system.
For reasons of confidentiality, each
downloaded contacts list can only be
viewed when the corresponding tele-
phone is connected.
Making a call from the
phonebook
With the telephone connected to the
system, from the main menu press
“Phone”, then “Phonebook”.
Select the contact and then press
the contact’s number. The call will be
started automatically.
For safety reasons, carry
out these operations when
the vehicle is stationary.
Page 81 of 130
4.9
CALL LOG
Browsing the call log
Press a tab to view its content.
Swipe up and down to scroll through
the list of calls.
Updating the call log
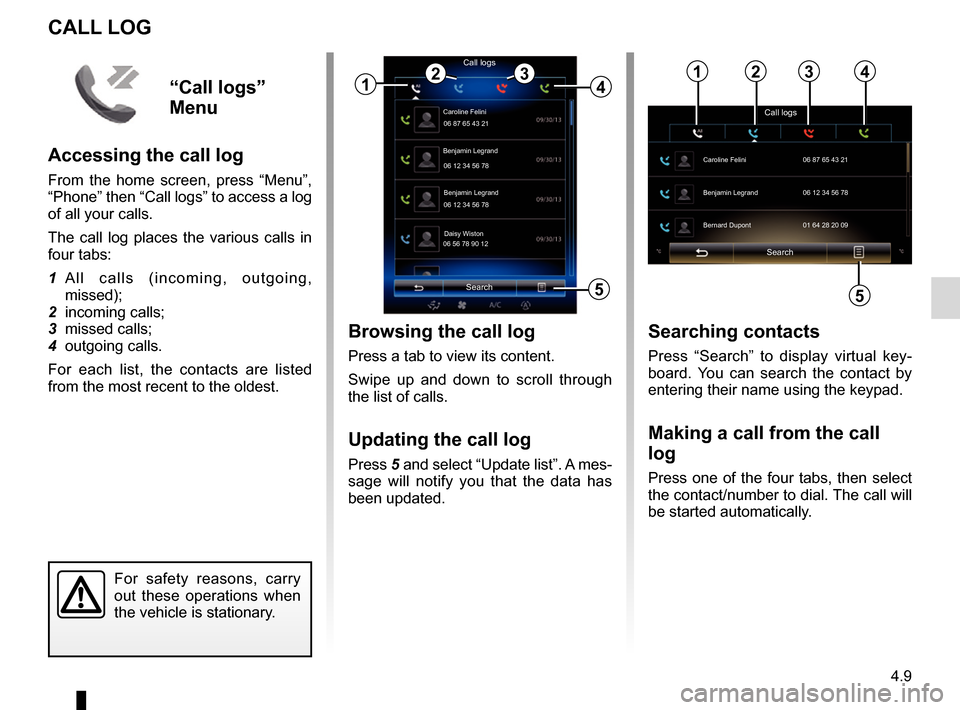
Press 5 and select “Update list”. A mes-
sage will notify you that the data has
been updated.
Search
Caroline Felini
Call logs
06 87 65 43 21
Benjamin Legrand
06 12 34 56 78
Benjamin Legrand
06 12 34 56 78
Daisy Wiston
06 56 78 90 12
1
Searching contacts
Press “Search” to display virtual key-
board. You can search the contact by
entering their name using the keypad.
Making a call from the call
log
Press one of the four tabs, then select
the contact/number to dial. The call will
be started automatically.
For safety reasons, carry
out these operations when
the vehicle is stationary.
243
5
“Call logs”
Menu
Accessing the call log
From the home screen, press “Menu”,
“Phone” then “Call logs” to access a log
of all your calls.
The call log places the various calls in
four tabs:
1 All calls (incoming, outgoing, missed);
2 incoming calls;
3 missed calls;
4 outgoing calls.
For each list, the contacts are listed
from the most recent to the oldest.
Search
Call logs
Caroline Felini
06 87 65 43 21
Benjamin Legrand 06 12 34 56 78
Bernard Dupont 01 64 28 20 09
1234
5
Page 90 of 130
5.4
R-LINK STORE (1/4)
Downloading and installing
applications from R-Link
Store
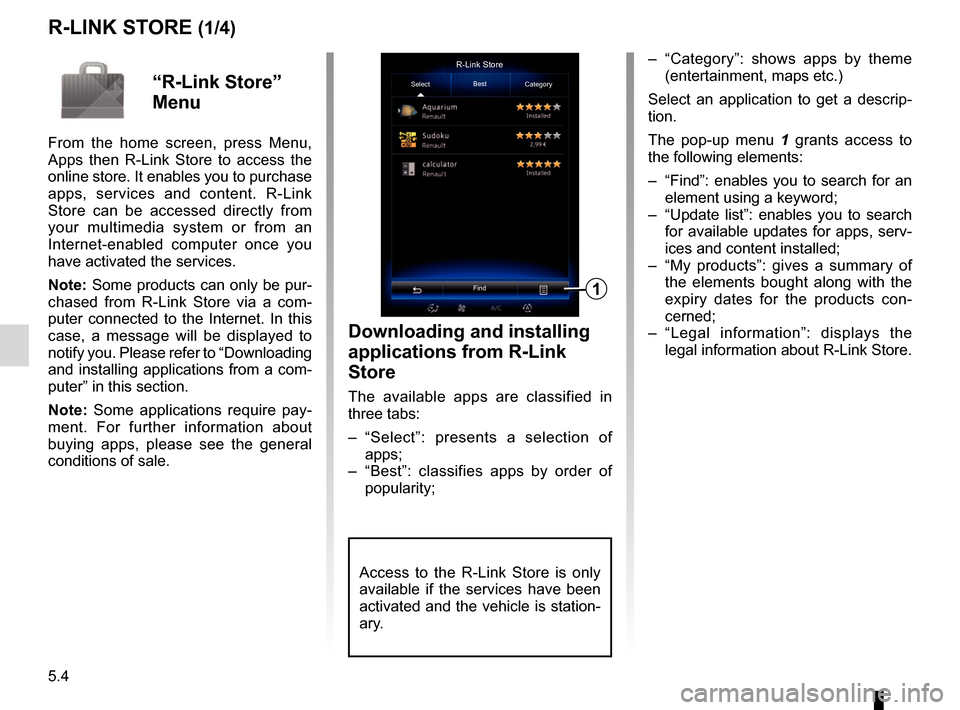
The available apps are classified in
three tabs:
– “Select”: presents a selection of apps;
– “Best”: classifies apps by order of popularity;
– “Category”: shows apps by theme (entertainment, maps etc.)
Select an application to get a descrip-
tion.
The pop-up menu 1 grants access to
the following elements:
– “Find”: enables you to search for an element using a keyword;
– “Update list”: enables you to search for available updates for apps, serv-
ices and content installed;
– “My products”: gives a summary of the elements bought along with the
expiry dates for the products con-
cerned;
– “Legal information”: displays the legal information about R-Link Store.R-Link Store
Select Best
Category
Find
1
“R-Link Store”
Menu
From the home screen, press Menu,
Apps then R-Link Store to access the
online store. It enables you to purchase
apps, services and content. R-Link
Store can be accessed directly from
your multimedia system or from an
Internet-enabled computer once you
have activated the services.
Note: Some products can only be pur-
chased from R-Link Store via a com-
puter connected to the Internet. In this
case, a message will be displayed to
notify you. Please refer to “Downloading
and installing applications from a com-
puter” in this section.
Note: Some applications require pay-
ment. For further information about
buying apps, please see the general
conditions of sale.
Access to the R-Link Store is only
available if the services have been
activated and the vehicle is station-
ary.
Page 92 of 130
5.6
Note: Some products can only be pur-
chased from a computer connected to
the Internet, from the www.renault.com
website.
Create an account on My Renault
web site
To buy and download applications from
a computer connected to the Internet
from www.renault.com, you must first
create an account My Renault:
– from a computer connected to the Internet, open your browser, go to
www.renault.com and select your
country;
– click on the “Connection” button and follow the steps indicated on the
website.
Once you have created an account and
registered your vehicle in My Renault,
you can explore the catalogue of appli-
cations and search for product updates.
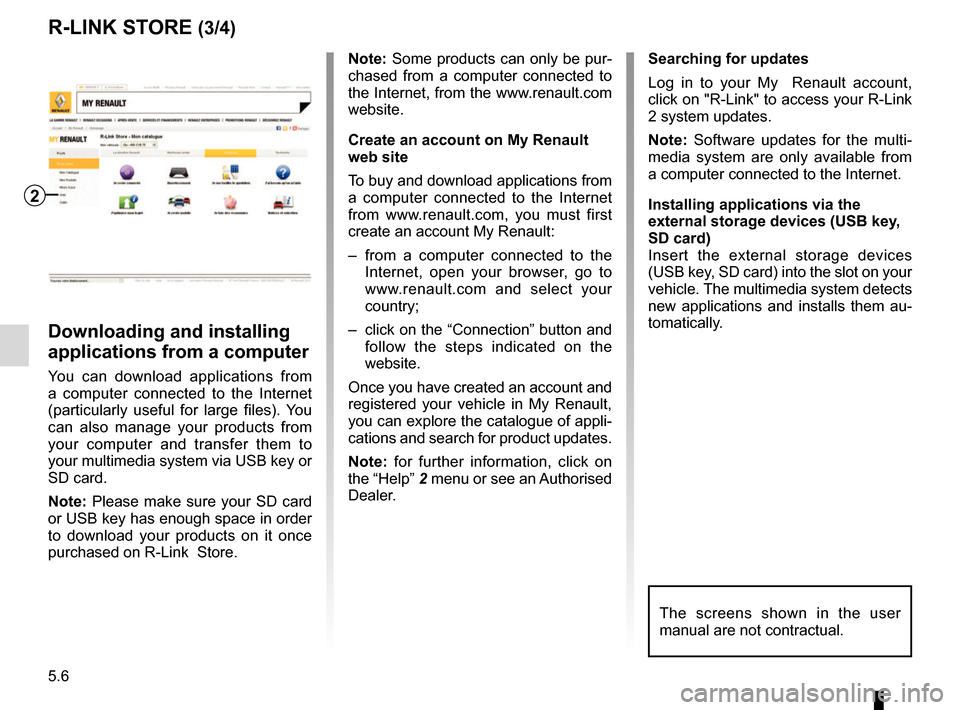
Note: for further information, click on
the “Help” 2 menu or see an Authorised
Dealer.
Downloading and installing
applications from a computer
You can download applications from
a computer connected to the Internet
(particularly useful for large files). You
can also manage your products from
your computer and transfer them to
your multimedia system via USB key or
SD card.
Note: Please make sure your SD card
or USB key has enough space in order
to download your products on it once
purchased on R-Link Store. Searching for updates
Log in to your My Renault account,
click on "R-Link" to access your R-Link
2 system updates.
Note: Software updates for the multi-
media system are only available from
a computer connected to the Internet.
Installing applications via the
external storage devices (USB key,
SD card)
Insert the external storage devices
(USB key, SD card) into the slot on your
vehicle. The multimedia system detects
new applications and installs them au-
tomatically.
R-LINK STORE (3/4)
The screens shown in the user
manual are not contractual.
2
Page 109 of 130
6.13
DRIVING ECO2 (1/4)
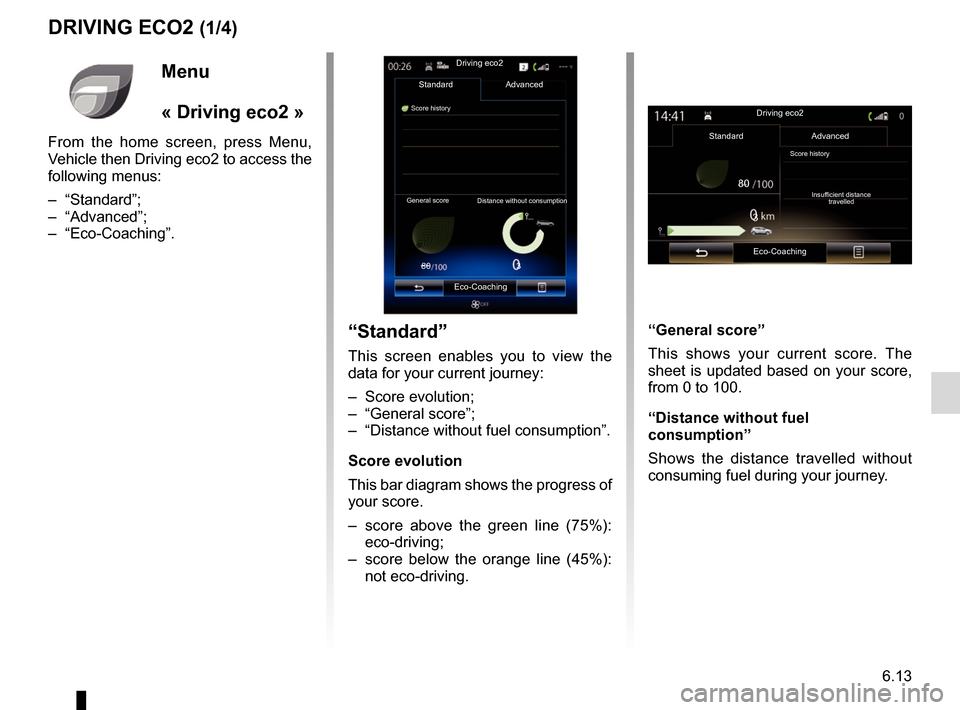
“Standard”
This screen enables you to view the
data for your current journey:
– Score evolution;
– “General score”;
– “Distance without fuel consumption”.
Score evolution
This bar diagram shows the progress of
your score.
– score above the green line (75%): eco-driving;
– score below the orange line (45%): not eco-driving.
Eco-CoachingDriving eco2
Standard
“General score”
This shows your current score. The
sheet is updated based on your score,
from 0 to 100.
“Distance without fuel
consumption”
Shows the distance travelled without
consuming fuel during your journey.
Advanced
Score history
General score Distance without consumption
Menu
« Driving eco2 »
From the home screen, press Menu,
Vehicle then Driving eco2 to access the
following menus:
– “Standard”;
– “Advanced”;
– “Eco-Coaching”.
Driving eco2
Standard Advanced
Eco-Coaching
Score historyInsufficient distance travelled
3
80
80
3