2017 RENAULT TALISMAN Navigation
[x] Cancel search: NavigationPage 39 of 130
2.7
“Previous destinations”
This menu enables you to select
a destination from the list of ad-
dresses last used. These are au-
tomatically stored.
From the “Navigation” menu:
– select “Destination” then “Previous destinations”.
– From the list of stored destina- tions, select an address to start
navigating.
ENTERING A DESTINATION (2/7)
For safety reasons, carry
out these operations when
the vehicle is stationary.
Note: The system will store the
last towns/cities entered in its
memory. You can directly select
one of these towns.
Note: Only addresses known to
the system through the digital
map are authorised.
Note: The system displays the
country and town/city correspond-
ing to your final destination by de-
fault. You can directly enter the
street name if the requested des-
tination is in the same town/city as
the final destination entered. Using voice recognition to enter an
address
From the Destination and Itinerary
screens, press the voice recognition
button, then state a town/city, street
name and/or number after the beep.
Page 40 of 130
2.8
“Points of interest”
A point of interest (POI) is a serv-
ice, establishment or even a tour-
ist area close to a location (start
point, destination city, en route,
etc.).
Points of Interest are listed by cat-
egory: restaurants, museums, car
parks, etc.
Select “Destination” from the
“Navigation” menu, then “Points
of interest” to select a destination
from the points of interest.
“Name search”
A list is displayed in which you can consult all POIs found
along the route (if there are
any) or around your current po-
sition. You can filter the list of
POIs using the keypad. Select
a POI from the list of results or
enter the name/type of POI that
you want to look for using the
keypad.
ENTERING A DESTINATION (3/7)
For safety reasons, carry
out these operations when
the vehicle is stationary.
“Location search”
This function enables you to search for POIs in a town/city
or along a route, by selecting a
point of interest from a list or by
typing it using the keypad.
Select the search area from among the following catego-
ries:
– “In a city”;
– “Nearby”;
– “Along Route” (if any);
– “Near destination” (if any).
After selecting a search area, the screen displays the POIs
available by category (All,
Airport, Automobile, etc.).
Select a category.
All POIs in this category are displayed in a search area.
Select the desired POI to start
guidance. Categories
(service station/car park/restau-
rant/accommodation)
Search for points of interest by
selecting categories from the
“Points of interest” menu.
On this screen, you can launch a quick search using four types
of preset POIs:
– “Petrol Station” along a route, if there are any.
– “Parking” near the destina- tion, if there are any.
– “Restaurant” along a route, if there are any.
– “Accommodation” near the destination, if there are any.
If you currently do not have a route or destination, these
POIs are searched around your
current or last known position.
Page 41 of 130
2.9
ENTERING A DESTINATION (4/7)
“Address book”
You can save addresses in
the address book and use
them as a destination at a
later time.
“Coordinate”
This function allows you to define
a destination using coordinates
(latitude and longitude).
“On map”
This function enables you to
define a destination from a point
you have selected on the map.
From the “Navigation” menu, select
“Destination”, then “On map”.
“Work”
This menu can be used to start navigating towards your work
location.
When you select “Work” from
the “Favourites” menu for the
first time, the system asks you
to save the address of your
place of work by selecting GPS
position, Address, Address
book, etc.
Select the way in which you
wish to enter your work ad-
dress, then confirm.
Note: to reset the home or work
address, press pop-up menu
button from the “Favourites”
menu, then press “Reset home
address” or “Reset work ad-
dress”.“Favourites”
This menu allows you to select a
destination stored previously in
your multimedia system. Thus,
you have access to the following
functions:
“Home”
This menu can be used to start
navigating your way home.
When you select “Home” from
the “Favourites” menu for the
first time, the system asks you
to store your home address
by selecting “GPS position”,
“Address”, “Address book”,
etc. Select the way in which
you wish to enter your home
address, then confirm.
Page 42 of 130

2.10
ENTERING A DESTINATION (5/7)
Confirming the destination
Once your destination information has
been entered, the system displays a
route summary for confirmation. Press
Select at the bottom of the screen to
confirm. The system will make the cal-
culation.
Note: The calculation criteria can be
modified in the route settings.
At the end of the calculation, the system
displays a navigation summary.
Note: if you do not touch the screen,
this page will close after ten seconds
and guidance will start automatically
if there is no restriction affecting your
journey.
To confirm your destination and acti-
vate guidance, press button Go.
On mapSelect
2
For safety reasons, carry
out these operations when
the vehicle is stationary.
Move around the map to position
the cursor on your destination,
then confirm by pressing “Select”:
the system calculates the route.
Pop-up menu 2
Select a destination as described
previously and then press 2 to
access the following functions:
– “Places around the cursor”;
– “Add to address book”;
– “Information”. “Places around cursor”
This function enables you to find
points of interest around the se-
lected position. You can search,
filter, sort and view all the results
found by the system on the map.
“Add to address book”
This function allows you to save
the selected position in the ad-
dress book.
“Information”
This function enables you to fund
details (address, latitude and lon-
gitude) on the selected position.
Page 45 of 130

2.13
“Event types”
Select this option to open a list of traf-
fic incident types. For each type of in-
cident:
– press On on line Consider event so that the system takes into account
each incident of the type selected
when calculating the route.
– press “On” on line “Visible” to show the incident on the route.
Note: to obtain the traffic information
service, you will need a paid subscrip-
tion.
Note: the rest of the options given
below are only available if this function
is activated.
“Detour”
Activate this option to enable the navi-
gation system to use traffic information
in real time to calculate your route.
If incidents are affecting your route, the
navigation system may suggest a diver-
sion.
You can choose the period of delay
from which you wish the system to sug-
gest a diversion.
The system can, depending on your se-
lection, either suggest the diversion or
follow it automatically.
TRAFFIC (1/2)
Precautions regarding
navigation
Use of the navigation
system does not in any way
replace the responsibility or vigi-
lance of the driver when driving the
vehicle.
“Traffic” menu
From the home screen, press Menu,
Navigation then Traffic to access up-
dated road and traffic information from
the best local sources.
“Traffic” uses information broadcast
over TMC (Traffic Message Channel)
on the FM band. This service indicates
events in the form of dots on the map. It
covers the main routes.
Traffic settings
Press the pop-up menu button, then
Settings to access the following set-
tings:
“Traffic”
Activate this option to receive traffic in-
formation. If you have subscribed to the
on-line service, you can benefit from
real-time information with better cover-
age. If not, you will receive TMC traffic
information.
The availability of the “Traffic” serv-
ices may vary.
Page 46 of 130
2.14
TRAFFIC (2/2)
Traffic display
The navigation system indicates traffic
incidents:
– with an alternate color on the map;
– by displaying traffic icons on the map.
A traffic icon is displayed on the naviga-
tion screen to show you whether traf-
fic incidents are announced. When an
incident occurs on your route, an icon
indicates the type of upcoming incident
on your route.
Precautions regarding
navigation
Use of the navigation
system does not in any way
replace the responsibility or vigi-
lance of the driver when driving the
vehicle.
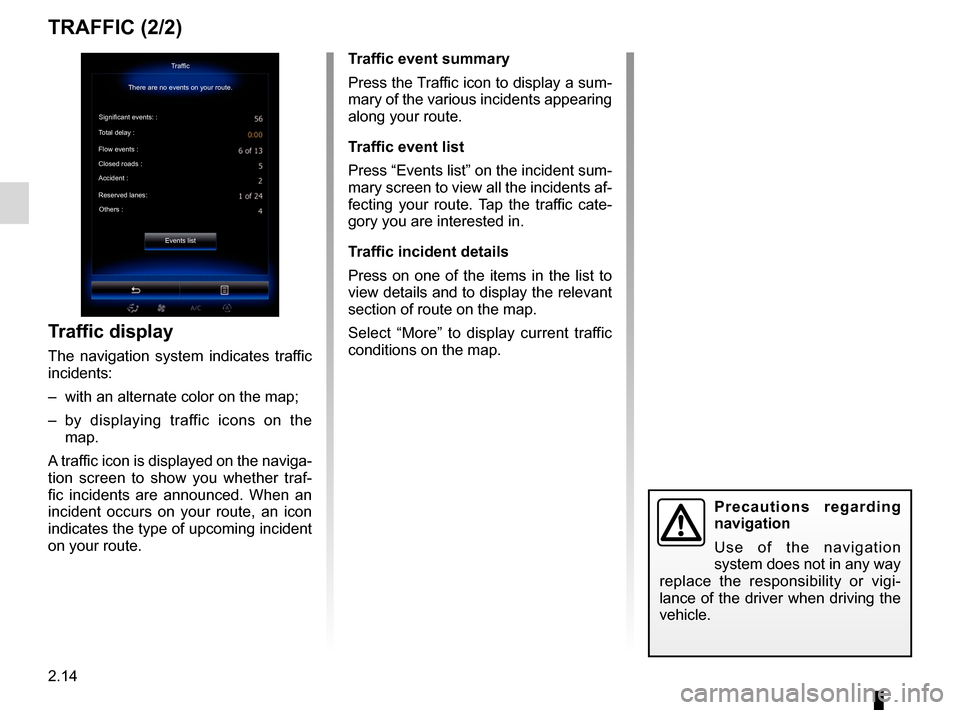
Traffic event summary
Press the Traffic icon to display a sum-
mary of the various incidents appearing
along your route.
Traffic event list
Press “Events list” on the incident sum-
mary screen to view all the incidents af-
fecting your route. Tap the traffic cate-
gory you are interested in.
Traffic incident details
Press on one of the items in the list to
view details and to display the relevant
section of route on the map.
Select “More” to display current traffic
conditions on the map.Traffic
There are no events on your route.
Significant events: :
Total delay :
Flow events :
Closed roads :
Accident :
Reserved lanes: Others :
Events list
Page 47 of 130
2.15
ROUTE (1/4)
Edit route
Current GPS Position
Add
Precautions regarding
navigation
Use of the navigation
system does not in any way
replace the responsibility or vigi-
lance of the driver when driving the
vehicle.
Add
Add
Go
1
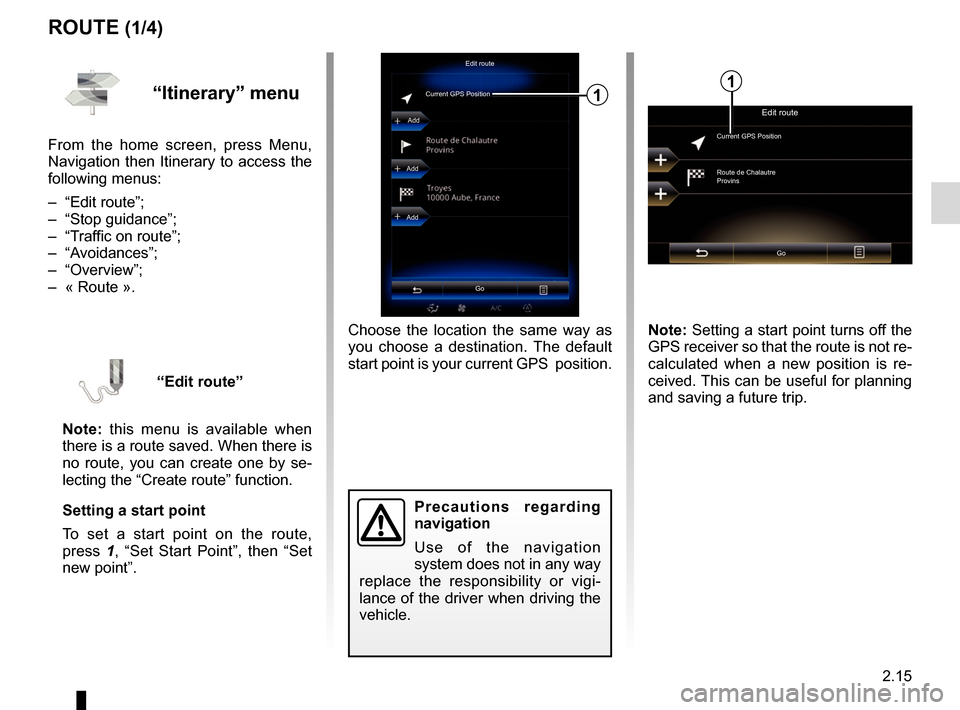
Choose the location the same way as
you choose a destination. The default
start point is your current GPS position.
“Itinerary” menu
From the home screen, press Menu,
Navigation then Itinerary to access the
following menus:
– “Edit route”;
– “Stop guidance”;
– “Traffic on route”;
– “Avoidances”;
– “Overview”;
– « Route ».
“Edit route”
Note: this menu is available when
there is a route saved. When there is
no route, you can create one by se-
lecting the “Create route” function.
Setting a start point
To set a start point on the route,
press 1, “Set Start Point”, then “Set
new point”.
Edit route
Current GPS Position
Route de Chalautre
Provins
Go
Note: Setting a start point turns off the
GPS receiver so that the route is not re-
calculated when a new position is re-
ceived. This can be useful for planning
and saving a future trip.
1
Page 48 of 130
2.16
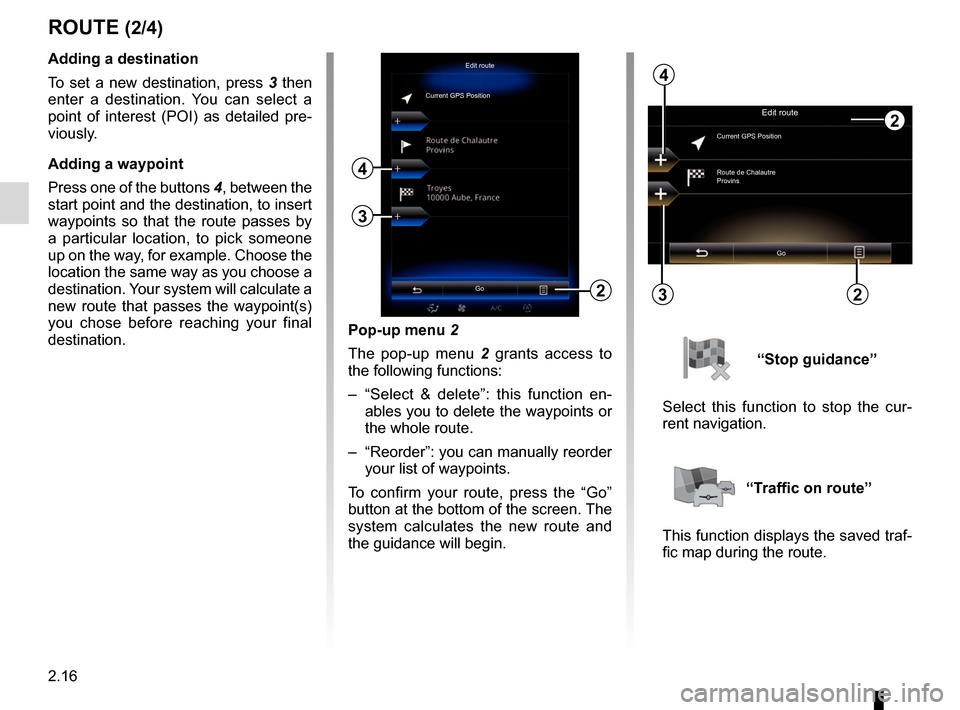
Pop-up menu 2
The pop-up menu 2 grants access to
the following functions:
– “Select & delete”: this function en- ables you to delete the waypoints or
the whole route.
– “Reorder”: you can manually reorder your list of waypoints.
To confirm your route, press the “Go”
button at the bottom of the screen. The
system calculates the new route and
the guidance will begin.
ROUTE (2/4)
2
Edit route
Current GPS PositionAdding a destination
To set a new destination, press 3 then
enter a destination. You can select a
point of interest (POI) as detailed pre-
viously.
Adding a waypoint
Press one of the buttons 4, between the
start point and the destination, to insert
waypoints so that the route passes by
a particular location, to pick someone
up on the way, for example. Choose the
location the same way as you choose a
destination. Your system will calculate a
new route that passes the waypoint(s)
you chose before reaching your final
destination.
3
4
Edit route
Current GPS Position
Route de Chalautre
Provins
Go
3
4
“Stop guidance”
Select this function to stop the cur-
rent navigation.
“Traffic on route”
This function displays the saved traf-
fic map during the route.
Go22