Page 36 of 130
2.4
– “Vehicle gallery”: you can change the default position
marker. Scroll through the different
markets (3D vehicles) by pressing
the left and right arrows located at
the top of the screen.
To select a marker, press “Back” below the required vehicle.
– “Landmarks”: when this func- tion is activated, the map shows
3D representations of landmarks,
3D artistic representations or 3D
models of prominent or well-known
sites.
– “Buildings”: when this function is activated, the map shows town/
cities in 3D as well as artistic rep-
resentations in 3D or 3D block rep-
resentations of all urban buildings
including the actual building size
and position on the map.
– “Elevations”: when this function is activated, the map shows a 3D
representation of the surrounding
area.
MAP (3/4)
For safety reasons, carry
out these operations when
the vehicle is stationary.
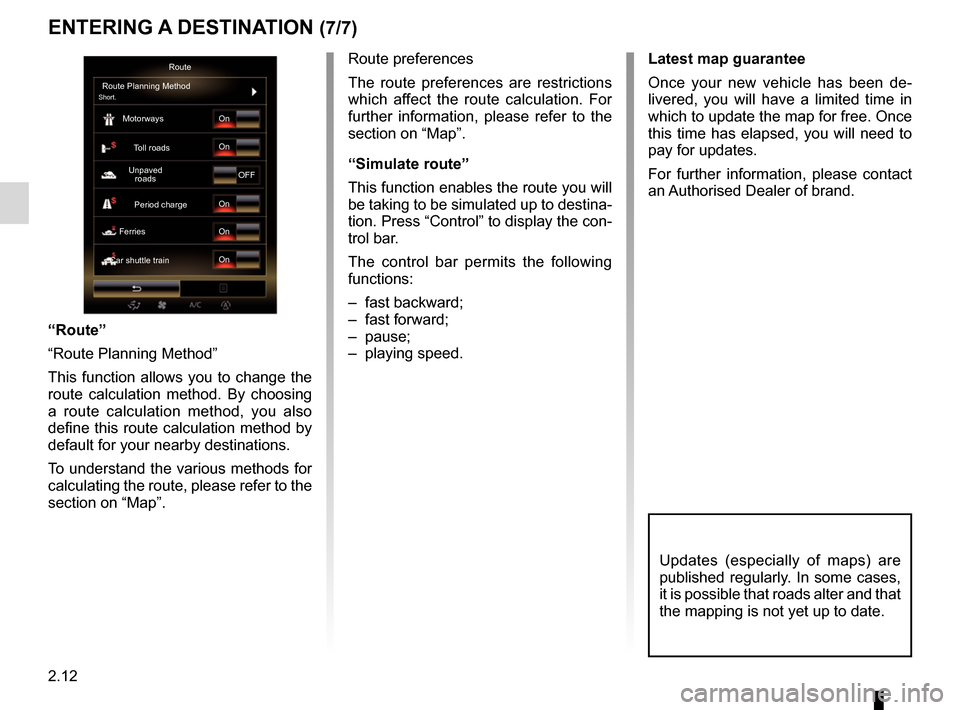
Route preferences
The route preferences are restric-tions which affect the route calcu-
lation.
You can activate or deactivate the following elements in the Route
menu:
– “Motorways”: whether to in- clude or exclude motorways along
the route.
– “Toll roads”: whether to include or exclude roads where you have
to pay tolls using toll gates or simi-
lar solutions.
– “Period charge”: whether to in- clude or exclude roads along the
route which have a periodic charge
valid for a certain amount of time.
– “Ferries”: whether to include or exclude ferries (including motorail
trains) along the route.
– “Car shuttle train”: whether or not to include rail freight (transpor-
tation by rail) along the route.
– “Unpaved roads”: whether to include or exclude unpaved roads
along the route. “Map settings”
This menu lets you set the following
items:
– “Route summary”: when acti-
vated, this function allows users
to zoom out and get an overview
of their surroundings when an up-
coming manoeuvre is some dis-
tance away. When you are ap-
proaching the next change of
direction the system returns to the
normal view mode.
– “Automatic motorway view”: choose to activate or disable the
display of the motorway signs.
– “Viewpoint”: select the view re- quired during navigation (“Low”,
“Normal” or “High”).
– “Map colour”: select the re- quired map display mode (“Auto”,
“Day” or “Night”).
Page 43 of 130
2.11
ENTERING A DESTINATION (6/7)
“Route Alternatives”
This option allows you to change the
route calculation methods from the fol-
lowing three proposals (to the right of
the screen):
– “Fast”
– “Economical”;
– “Short”.
“Itinerary”
In the upper part of the screen there
are three tabs (Normal, Road list, and
Summary) enabling you to preview the
route to your destination.
OverviewGo
Short.
5
Pop-up menu 5
Press 5 before the end of the ten
second period to access the following
menus:
– “Route Alternatives”;
– “Itinerary”;
– “Route”;
– “Simulate route”;
– “Add route to address book”.
Route summary
The screen has two areas:
– Zone 3 shows the calculation method
used;
– the journey zone 4 shows a route
summary (distance, journey time,
traffic and restrictions affecting your
journey).
To start guidance to your destination,
press the “Go” button at the bottom of
the screen.
4
Overview
GoShort.3
Page 44 of 130
2.12
Latest map guarantee
Once your new vehicle has been de-
livered, you will have a limited time in
which to update the map for free. Once
this time has elapsed, you will need to
pay for updates.
For further information, please contact
an Authorised Dealer of brand.Route
Route Planning Method
Short.
Motorways
Period charge
Toll roads
Ferries Unpaved
roads
Car shuttle train On
On
OFF
On
On
On
Updates (especially of maps) are
published regularly. In some cases,
it is possible that roads alter and that
the mapping is not yet up to date.
ENTERING A DESTINATION (7/7)
Route preferences
The route preferences are restrictions
which affect the route calculation. For
further information, please refer to the
section on “Map”.
“Simulate route”
This function enables the route you will
be taking to be simulated up to destina-
tion. Press “Control” to display the con-
trol bar.
The control bar permits the following
functions:
– fast backward;
– fast forward;
– pause;
– playing speed.
“Route”
“Route Planning Method”
This function allows you to change the
route calculation method. By choosing
a route calculation method, you also
define this route calculation method by
default for your nearby destinations.
To understand the various methods for
calculating the route, please refer to the
section on “Map”.
Page 49 of 130
2.17
– “Specific road”: to avoid a road on your route. For example, you can
skip a road where you expect heavy
traffic, but the Traffic system has not
warned you about it.
– “Restore original route”: to cancel detours you set previously.
In all cases you are presented with a
map screen, where you can see the
avoided section, the detour and the es-
timated change in length and duration
and the duration in relation to your ini-
tially calculated route.
To confirm your settings, press “Accept”.
ROUTE (3/4)
OverviewShort.
Go
“Avoidances”
To avoid certain sections of the route
in the event of a traffic jam not flagged
up by the system, select “Avoidances”
from the “Itinerary” menu.
You can choose to avoid the follow-
ing elements:
– “Specific sections”: to avoid a cer- tain type of road on the route. For
example, you can skip a section of
motorway or a ferry.
– “Guidance portion”: to indicate a preferred distance over which the
saved route should be avoided.
The screen displays the distance,
the avoided section of the route
and the detour on the map. You
can also see the estimated route
length and duration change com-
pared to the original route on the
top of the screen.
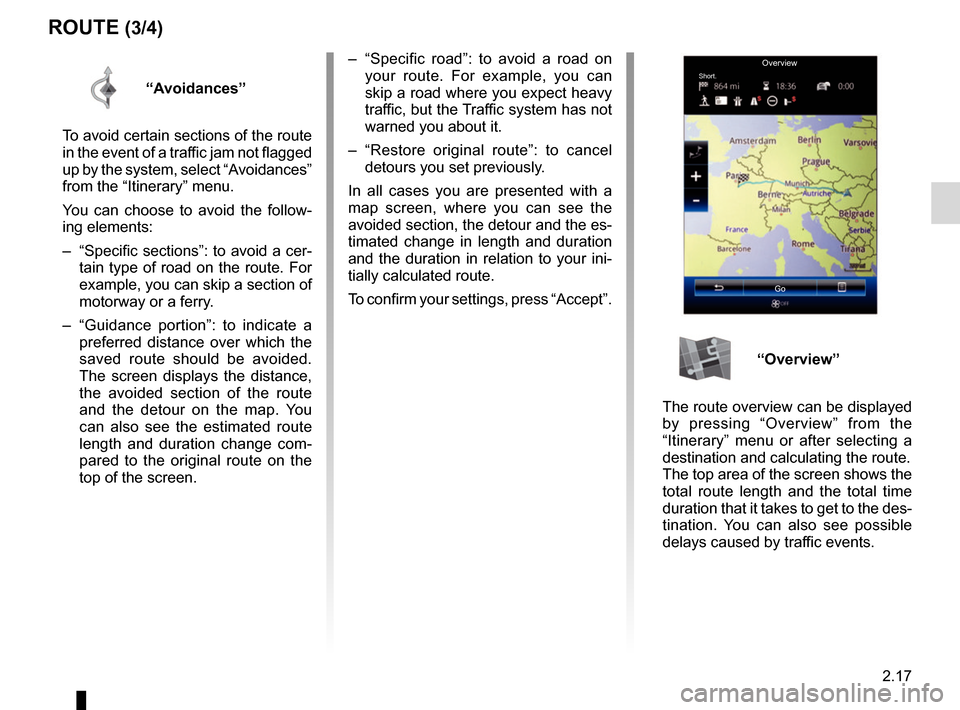
“Overview”
The route overview can be displayed
by pressing “Overview” from the
“Itinerary” menu or after selecting a
destination and calculating the route.
The top area of the screen shows the
total route length and the total time
duration that it takes to get to the des-
tination. You can also see possible
delays caused by traffic events.
Page 59 of 130
3.5
“Settings”
From this menu, you can activate or de-
activate the following elements:
– “AM";
– “Radio text”;
– “Region”;
– “TA / I-Traffic”;
”AM“
This menu enables you to activate/de-
activate the band AM.
“Radio text”
(Text information)
Some FM radio stations broadcast
text information relating to their pro-
grammes (e.g. song titles).
Note: This information is only available
for certain radio stations.
LISTENING TO THE RADIO (4/8)
“Region”
The frequency of an “FM” radio station
may change depending on the geo-
graphical area.
Activate this function to continue listen-
ing to the same radio station while driv-
ing. The audio system will automatically
track frequency changes without inter-
ruption.
Note: Stations in the same network
sometimes broadcast different pro-
grammes or use different programme
service names.“TA / I-Traffic”
(Traffic information)
When this function is activated, your
audio system makes it possible to auto-
matically receive traffic bulletins when
they are broadcast on certain FM radio
stations (depending on the country).
If the “Region” function is activated,
the “Region” function always has
priority over the “AF" function.
Page 60 of 130
3.6
LISTENING TO THE RADIO (5/8)
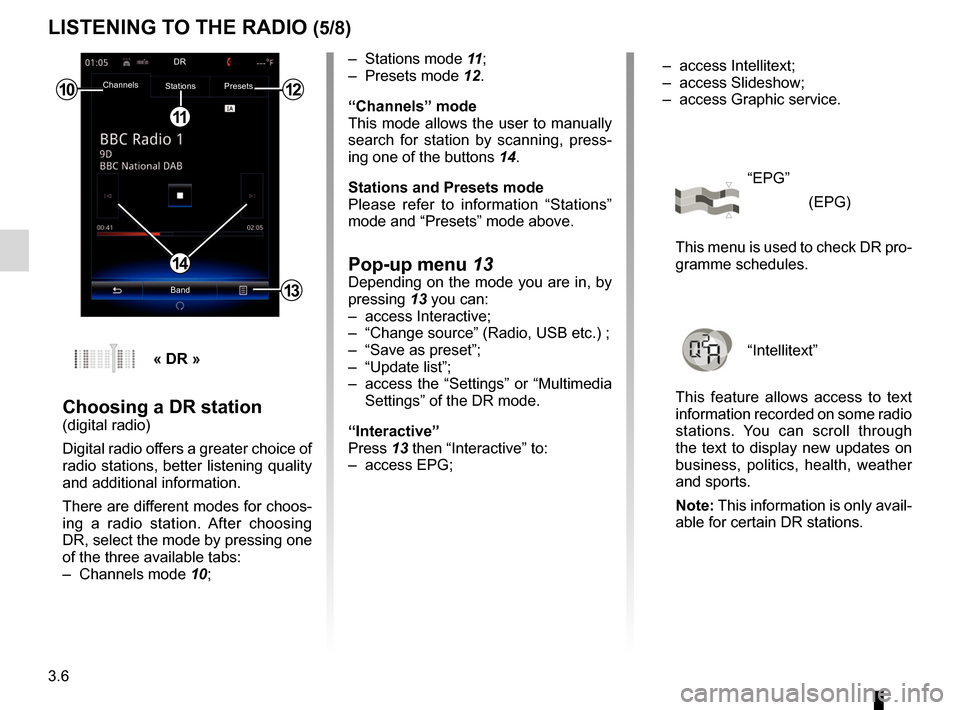
– Stations mode 11;
– Presets mode 12.
“Channels” mode
This mode allows the user to manually
search for station by scanning, press-
ing one of the buttons 14.
Stations and Presets mode
Please refer to information “Stations”
mode and “Presets” mode above.
Pop-up menu 13Depending on the mode you are in, by
pressing 13 you can:
– access Interactive;
– “Change source” (Radio, USB etc.) ;
– “Save as preset”;
– “Update list”;
– access the “Settings” or “Multimedia Settings” of the DR mode.
“Interactive”
Press 13 then “Interactive” to:
– access EPG;
10
11
12
14
13
Channels Stations Presets
BandDR
« DR »
Choosing a DR station(digital radio)
Digital radio offers a greater choice of
radio stations, better listening quality
and additional information.
There are different modes for choos-
ing a radio station. After choosing
DR, select the mode by pressing one
of the three available tabs:
– Channels mode
10; – access Intellitext;
– access Slideshow;
– access Graphic service.
“EPG”
(EPG)
This menu is used to check DR pro-
gramme schedules.
“Intellitext”
This feature allows access to text
information recorded on some radio
stations. You can scroll through
the text to display new updates on
business, politics, health, weather
and sports.
Note: This information is only avail-
able for certain DR stations.
Page 61 of 130
3.7
“Graphic service”
This menu is used to see the web-
site provided by the current station
when you have a connection.
“Slideshow”
This menu is used to see images
provided by the station in slide-
show.
Storing a station
From “Channels” mode or “Stations”
mode, press 13 then “Save as preset”.
You can also give a long press on one
of the preset buttons until you hear a
beep.
You can store up to 12 stations per
band.
“Update list”
Select this menu to update the list of
radio stations.
LISTENING TO THE RADIO (6/8)
13
Channels Stations Presets
BandDR
You can also access this menu by
pressing
15.
Note: The slideshow 15 is dis-
played when Timeshift function
(direct control) is deactivated.
“Change source”
This function allows you to change the
audio source (Radio, USB, AUX, etc.).
Channels Stations Presets
BandDR
15
Channels Stations Presets
Band
13
Page 67 of 130
3.13
PHOTO (2/2)
“Settings”
From the settings, you can:
– change the display time for each photo in the slideshow;
– active/deactivate animation effect between each photo in the slide-
show.
Once the settings have been made,
press 4 to save your changes and
return to the previous screen.
Note: The slideshow animation effect is
activated by default.Pop-up menu 5
From the photo display screen, press 5
to:
– get detailed information of photos (title, file type, date, path, etc.);
– set the photo as a user profile;
– Accessing settings
5
Holiday photos.jpg
4
Tulipes_02.jpg
54
Photo playback is only possible
when the vehicle is stationary.
Note: For more information on compat-
ible photo formats, please consult an
authorised dealer.