2017 RENAULT MEGANE pedal
[x] Cancel search: pedalPage 193 of 346

2.81
AUTOMATIC TRANSMISSION (3/3)
Parking the vehicle
When the vehicle is stopped, move the
lever to position P while keeping your
foot on the brake pedal: the gearbox is
in neutral and the drive wheels are me-
chanically locked by the driveshaft.
Apply the handbrake or, depending
on the vehicle, ensure that the elec-
tronic parking brake is applied.
When activated, in the event that the
lever is stuck in P, depress the brake
paddle. It is possible to free the lever
manually. To do this, unclip the base of
the lever, then insert a tool (rigid rod)
into the slot 4 and press simultaneously
on the button 2 in order to unlick the
lever.
Contact an authorised dealer as soon
as possible.
Operating faults
– when driving , if the “CHECK AUTO
GEARBOX ” message appears on
the instrument panel, it indicates a
fault.
Contact your approved Dealer as
soon as possible;
– when driving, if the message
“Gearbox overheating” appears on
the instrument panel, stop as soon
as possible to let the gearbox cool
down and wait for the message to
disappear;
– If a vehicle with an automatic
gearbox breaks down, refer to the
information on “Towing” in Section 5.
For safety reasons, do not
switch off the ignition before
the vehicle has come to a
complete standstill.
An impact to the under-
side of the vehicle while
manoeuvring (e.g.: strik-
ing a post, raised kerb or
other street furniture) may result in
damage to the vehicle (e.g.: defor-
mation of an axle).
To avoid any risk of accident, have
your vehicle checked by an ap-
proved Dealer.
4
2
Page 223 of 346

3.29
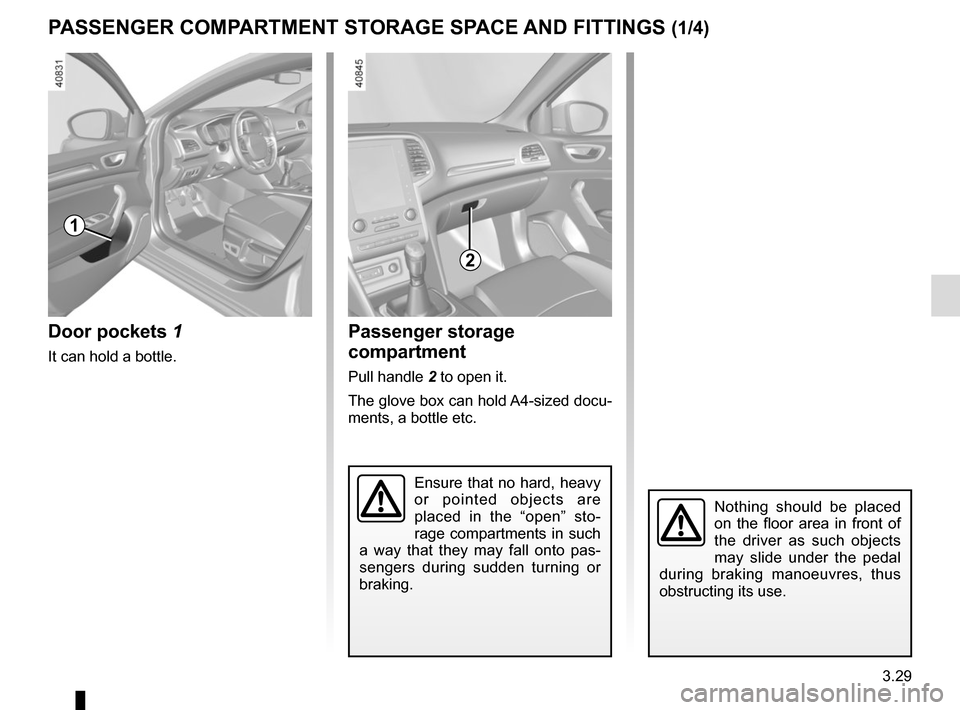
Door pockets 1
It can hold a bottle.
PASSENGER COMPARTMENT STORAGE SPACE AND FITTINGS (1/4)
1
Nothing should be placed
on the floor area in front of
the driver as such objects
may slide under the pedal
during braking manoeuvres, thus
obstructing its use.
Ensure that no hard, heavy
or pointed objects are
placed in the “open” sto-
rage compartments in such
a way that they may fall onto pas-
sengers during sudden turning or
braking.
2
Passenger storage
compartment
Pull handle 2 to open it.
The glove box can hold A4-sized docu-
ments, a bottle etc.
Page 225 of 346

3.31
PASSENGER COMPARTMENT STORAGE SPACE AND FITTINGS (3/4)
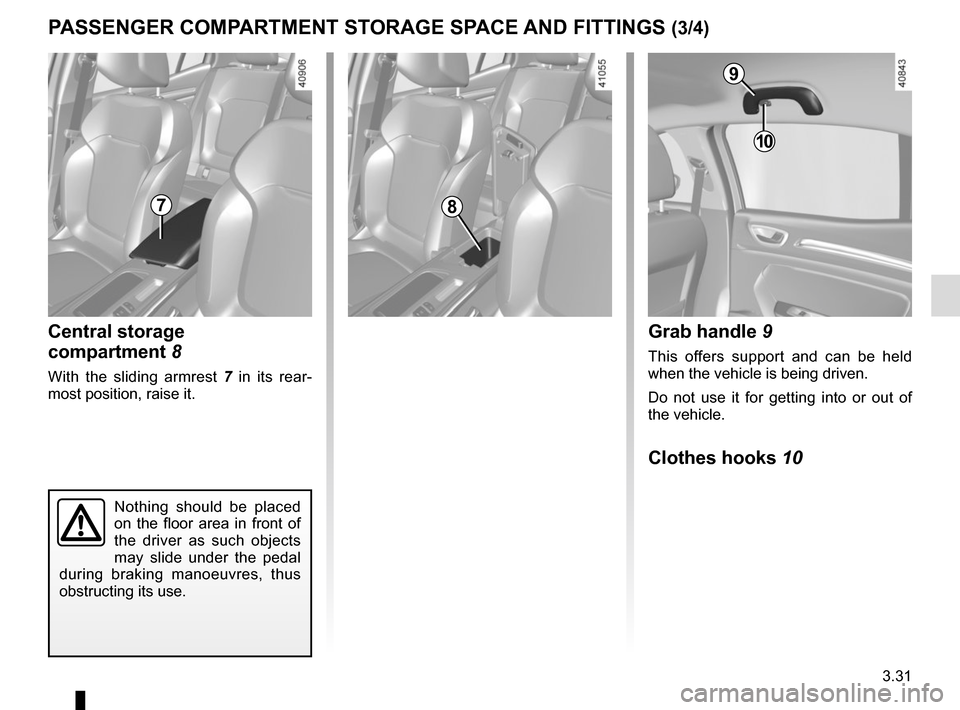
Central storage
compartment 8
With the sliding armrest 7 in its rear-
most position, raise it.
78
Grab handle 9
This offers support and can be held
when the vehicle is being driven.
Do not use it for getting into or out of
the vehicle.
Clothes hooks 10
9
10
Nothing should be placed
on the floor area in front of
the driver as such objects
may slide under the pedal
during braking manoeuvres, thus
obstructing its use.
Page 270 of 346

4.18
You are strongly recom-
mended not to use high-
pressure or spray cleaning
equipment inside the pas-
senger compartment: use of such
equipment could impair the correct
functioning of the electrical or elec-
tronic components in the vehicle, or
have other detrimental effects.
INTERIOR TRIM MAINTENANCE (2/2)
You should not:
You are strongly advised not to po-
sition objects such as deodorants,
scents, etc. near air vents, as this could
damage your dashboard trim.
Removal/replacing removable
equipment originally fitted in
the vehicle
If you need to remove equipment in
order to clean the passenger com-
partment (for example, mats), always
ensure that they are correctly refitted
and are the right way around (the driv-
er’s mat should be fitted on the driver’s
side, etc.) and fit them with the compo-
nents supplied with the equipment (for
example, the driver mat should always
be fixed using the pre-fitted mounting
components).
With the vehicle stationary, always
ensure that nothing will impede driving
(anything obstructing the pedals, heel
wedged by the mat etc.).
Page 276 of 346

5.6
TYRE PRESSURE KIT (3/3)
3
If a minimum pressure of 1.8 bar is
not reached after 15 minutes, repair
is not possible; do not drive the ve-
hicle but contact an approved dealer.Once the tyre is correctly inflated,
remove the kit: slowly unscrew the in-
flation end piece
3 to prevent any prod-
uct spatter and store the container in
plastic packaging to prevent product
leaks.
– Affix the driving recommendation label (located under the container) to
the dashboard where the driver can
see it.
– Put the kit away.
– At the end of this initial inflation op- eration, air will still escape from the
tyre. You must drive a short distance
in order to seal the hole.
– Start immediately and drive at be- tween 12 and 40 mph (20 and
60 km/h) in order to distribute the
product evenly in the tyre and, after
driving for 2 miles (3 km), stop and
check the pressure.
– If the pressure is greater than 1.3 bar but less than the recommended
pressure, re-adjust it (refer to the
label affixed to the edge of the driv-
er’s door), otherwise contact an ap-
proved dealer: repair is not possible.
Please be aware that a
poorly tightened or miss-
ing valve cap can make the
tyres less airtight and may
lead to pressure loss.
Always use valve caps identical to
those fitted originally and tighten
them fully.
Following repair with the kit,
do not travel further than
120 miles (200 km). In addi-
tion, reduce your speed and
under no circumstances exceed
48 mph (80 km/h). The sticker,
which you must affix in a prominent
position on the dashboard, reminds
you of this.
Depending on the country or local
legislation, a tyre repaired with the
inflation kit may need to be replaced.
Nothing should be placed
around the driver’s feet
as such objects may slide
under the pedals during
sudden braking manoeuvres and
obstruct their use.
Precautions when using the
kit
The kit should not be operated for more
than 15 consecutive minutes.
Page 304 of 346

5.34
ACCESSORIES
Electrical and electronic accessories
Before installing this type of accessory (particularly for transmitters\
/receivers: frequency bandwidth, power level, po-
sition of the aerial, etc.), make sure it is compatible with your vehic\
le. You can get advice from an authorised dealer.
Connect accessories with a maximum power of 120 Watts only. Fire hazard. When several accessory sockets are
used at the same time, the total power of the connected accessories must\
not exceed 180 watts.
No work may be carried out on the vehicle’s electrical or radio circuits, except by authorised dealers: an incorre\
ctly connecte d
system may result in damage being caused to the electrical equipment and\
/or the components connected to it.
If the vehicle is fitted with any aftermarket electrical equipment, make\
sure that the installation is correctly protected by a fuse.
Establish the rating and position of this fuse.
Using the diagnostic socket
The use of electronic accessories on the diagnostic socket may cause ser\
ious disturbance to the vehicle’s electronic systems.
For your safety we recommend that you use only electronic accessories ap\
proved by the manufacturer, consult an Approved
Dealer. Serious accident risk.
Use of transmitting/receiving devices (telephones, CB equipment etc.).\
Telephones and CB equipment with integrated aerials may cause interferenc\
e to the electronic systems originally fitted to the
vehicle: it is advisable only to use equipment with an external aerial. \
Furthermore, we remind you of the need to conform
to the legislation in force concerning the use of such equipment.
Fitting aftermarket accessories
If you wish to install accessories on the vehicle: please contact an aut\
horised dealer. Also, to ensure the correct operation o f
your vehicle, and to avoid any risk to your safety, we recommend that you use only accessories specifically designed for y\
our
vehicle, which are the only accessories for which the manufacturer will \
provide a warranty.
If you are using an anti-theft device, only attach it to the brake pedal\
.
Obstructions to the driver
On the driver’s side, only use mats suitable for the vehicle, attached with the pre-fi\
tted components, and check the fitting re gu-
larly. Do not lay one mat on top of another. There is a risk of wedging the pedals.
Page 307 of 346

5.37
TOWING: breakdown recovery (1/2)
Before towing, put the gearbox in neu-
tral, unlock the steering column and re-
lease the parking brake.
For vehicles fitted with an automatic
gearbox, if it is not possible to put the
gear lever into position N, please con-
sult an authorised dealer.
Steering column unlocking
Insert the key into the ignition or, de-
pending on the vehicle, having the
RENAULT card on you, press the
engine start button for 2 seconds.
Reposition the lever to neutral (posi-
tion N for vehicles fitted with an auto-
matic gearbox).
The column is unlocked, the acces-
sory functions are supplied: the vehi-
cle lights can be used (indicators, brake
lights etc.). At night the vehicle must
have its lights on.
Depending on the vehicle, once you
have finished towing, press the engine
start button twice (risk of running down
the battery). The speed specified by current legis-
lation for towing must always be ob-
served. If your vehicle is the towing
vehicle, do not exceed the maximum
towing weight for your vehicle (refer
to the information on “Weights” in
Section 6).
Towing a vehicle with an
automatic gearbox
Transport the vehicle on a trailer or tow
it with the front wheels off the ground.
In exceptional circumstances
, you
may tow it with all four wheels on the
ground, only in a forward gear, with the
gear in neutral position N over a maxi-
mum distance of 50 miles and not ex-
ceeding a speed of 15 mph (25 km/h).
1
2
Do not remove the key from
the ignition when the vehi-
cle is being towed.
If the lever is stuck in P , even though
you are depressing the brake pedal, the
lever can be released manually.
To do this, unclip the base of the lever,
then insert a tool (with a hard rod to it)
into the slot 1 and press the button 2
at the same time in order to unlock the
lever.
Contact an authorised dealer as soon
as possible.