2017 RENAULT KANGOO front seat
[x] Cancel search: front seatPage 7 of 260

1.1
Section 1: Getting to know your vehicle
Key, radio frequency remote control: general information, use, deadlocking . . . . . . . . . . . . . . . . . . 1.2
Doors . . . . . . . . . . . . . . . . . . . . . . . . . . . . . . . . . . . . \
. . . . . . . . . . . . . . . . . . . . . . . . . . . . . . . . . . . . . 1.7
Locking/unlocking the doors . . . . . . . . . . . . . . . . . . . . . . . . . . . . . . . . . . . .\
. . . . . . . . . . . . . . . . . . . 1.12
Automatic locking when driving . . . . . . . . . . . . . . . . . . . . . . . . . . . . . . . . . . . . \
. . . . . . . . . . . . . . . . . 1.14
Headrests/Front seats . . . . . . . . . . . . . . . . . . . . . . . . . . . . . . . . . . . . \
. . . . . . . . . . . . . . . . . . . . . . . . 1.15
Front seats. . . . . . . . . . . . . . . . . . . . . . . . . . . . . . . . . . . . \
. . . . . . . . . . . . . . . . . . . . . . . . . . . . . . . . . 1.19
Roof flap . . . . . . . . . . . . . . . . . . . . . . . . . . . . . . . . . . . .\
. . . . . . . . . . . . . . . . . . . . . . . . . . . . . . . . . . 1.22
Swivelling partition . . . . . . . . . . . . . . . . . . . . . . . . . . . . . . . . . . . . \
. . . . . . . . . . . . . . . . . . . . . . . . . . . 1.24
Seat belts. . . . . . . . . . . . . . . . . . . . . . . . . . . . . . . . . . . . \
. . . . . . . . . . . . . . . . . . . . . . . . . . . . . . . . . . 1.25
Methods of restraint in addition to the front seat belts . . . . . . . . . . . . . . . . . . . . . . . . . . . . . . . . . . . . 1.29
Side protection devices . . . . . . . . . . . . . . . . . . . . . . . . . . . . . . . . . . . . \
. . . . . . . . . . . . . . . . . . . . . . . 1.32
Additional methods of restraint . . . . . . . . . . . . . . . . . . . . . . . . . . . . . . . . . . . .\
. . . . . . . . . . . . . . . . . 1.33
Child safety: General information . . . . . . . . . . . . . . . . . . . . . . . . . . . . . . . . . . . .\
. . . . . . . . . . . . . . . 1.34 Choosing a child seat mounting . . . . . . . . . . . . . . . . . . . . . . . . . . . . . . . . . . . . \
. . . . . . . . . . . 1.37
Fitting a child seat . . . . . . . . . . . . . . . . . . . . . . . . . . . . . . . . . . . .\
. . . . . . . . . . . . . . . . . . . . . 1.39
Deactivating/activating the front passenger airbag . . . . . . . . . . . . . . . . . . . . . . . . . . . . . . . . 1.46
Steering wheel . . . . . . . . . . . . . . . . . . . . . . . . . . . . . . . . . . . . \
. . . . . . . . . . . . . . . . . . . . . . . . . . . . . . 1.49
Driving position . . . . . . . . . . . . . . . . . . . . . . . . . . . . . . . . . . . .\
. . . . . . . . . . . . . . . . . . . . . . . . . . . . . 1.50
Warning lights . . . . . . . . . . . . . . . . . . . . . . . . . . . . . . . . . . . .\
. . . . . . . . . . . . . . . . . . . . . . . . . . . . . . 1.54
Displays and indicators . . . . . . . . . . . . . . . . . . . . . . . . . . . . . . . . . . . .\
. . . . . . . . . . . . . . . . . . . . . . . 1.58
Trip computer and warning system . . . . . . . . . . . . . . . . . . . . . . . . . . . . . . . . . . . . \
. . . . . . . . . . . . . . 1.61
Clock and outdoor temperature . . . . . . . . . . . . . . . . . . . . . . . . . . . . . . . . . . . . \
. . . . . . . . . . . . . . . . . 1.70
Rear view mirrors . . . . . . . . . . . . . . . . . . . . . . . . . . . . . . . . . . . .\
. . . . . . . . . . . . . . . . . . . . . . . . . . . 1.72
Audible and visual signals . . . . . . . . . . . . . . . . . . . . . . . . . . . . . . . . . . . . \
. . . . . . . . . . . . . . . . . . . . . 1.74
External lighting and signals . . . . . . . . . . . . . . . . . . . . . . . . . . . . . . . . . . . .\
. . . . . . . . . . . . . . . . . . . 1.75
Headlight beam adjustment . . . . . . . . . . . . . . . . . . . . . . . . . . . . . . . . . . . . \
. . . . . . . . . . . . . . . . . . . . 1.78
Windscreen wipers/washers . . . . . . . . . . . . . . . . . . . . . . . . . . . . . . . . . . . .\
. . . . . . . . . . . . . . . . . . . 1.80
Fuel tank . . . . . . . . . . . . . . . . . . . . . . . . . . . . . . . . . . . .\
. . . . . . . . . . . . . . . . . . . . . . . . . . . . . . . . . . 1.83
Page 21 of 260

1.15
FRONT HEADRESTS (1/3)
To refit the headrest
First, check that the headrest rods are
clean and correctly aligned.
Pull the tab 2 forwards.
Insert the headrest rods in the holes,
with the notches facing forwards (tilt the
seat backwards if necessary).
Guide the headrest down to the desired
height.
Headrest A
To raise the headrest
Pull it upwards to the required height.
To lower the headrest
Pull the tab 2 forwards, gently lift the
headrest to unlock it and guide it down
to the required height.
To remove the headrest
Raise it to its highest position. Press
button 1 and lift the headrest to release
it.
A
The headrest is an impor-
tant safety component:
ensure that it is in place
and in the correct position.
The distance between your head
and the headrest should be as small
as possible. The top of your head
should be in line with the top of the
headrest.
1
2
Page 22 of 260

1.16
To remove the headrest
Raise it to its highest position. Press
button 4 and lift the headrest to release
it.
Note: when the headrest is removed,
take care not to change the positions
of the rods.
To refit the headrest
If the setting of the rods has been al-
tered, pull them fully upwards. Take
care to ensure they are clean and cor-
rectly aligned and, if there are any prob-
lems, check that the notches are facing
forwards.
Insert the headrest rods into the holes
(tilt the seatback backwards if neces-
sary).
Lower the headrest until it locks, press
button 3 and lower the headrest as far
as possible.
FRONT HEADRESTS (2/3)
Headrest B
To raise the headrest
Pull it upwards to the required height.
To lower the headrest
Press button 3 and guide the headrest
down to the desired height.
The headrest is an impor-
tant safety component:
ensure that it is in place
and in the correct position.
The distance between your head
and the headrest should be as small
as possible. The top of your head
should be in line with the top of the
headrest.
3
B
4
Page 25 of 260

1.19
ðHeated seats
With the engine running, activate
switch 5; a warning light comes on.
To tilt the seatback
Depending on the seat, lower or lift
lever 2 and tilt the seatback until it
reaches the required position.
To move forwards or
backwards
Depending on the seat, lift bar 1 or
handle 4 to release it. Release the
handle at the desired position and
make sure that it is locked.
Adjusting the height of the
driver’s seat
Move lever 3 as many times as neces-
sary:
– upwards to raise the seat,
– downwards to lower the seat.
FRONT SEATS (1/3)
1
2
534
2
For safety reasons, carry out any adjustments when the vehicle is not
being driven.
We would advise you not to recline the seatbacks too far to ensure that
the effectiveness of the seat belts is not reduced.
Make sure that the seatbacks are correctly locked in place.
Nothing should be placed on the floor (area in front of driver) as suc\
h objects may
slide under the pedal during braking manoeuvres, thus obstructing its us\
e.
Page 26 of 260

1.20
– make sure that there is nothing which will prevent the seat from moving;
– tilt headrest 5 so as to position it
under the dashboard.
The seat locks automatically; make
sure it is correctly locked.Flat positionDepending on the vehicle, the seatback
on the passenger side may be folded
down onto the seat base to create a flat
position.
– Hold handle 4 and move the seat as
far back as possible;
– lower the headrest fully;
– hold the top of the seatback to lower it;
– pull lever 2 and pull the seatback
down and forwards (the seat base
will be positioned on the floor);
Be sure to hold the seat-
back when placing it in the
flat position. Risk of injury.
Maximum weight on the seat in the
flat position: 80 kg, with the weight
evenly distributed.
FRONT SEATS (2/3)
4
2
2
5
For safety reasons, carry
out any adjustments when
the vehicle is not being
driven.Put your hand on the front
of the seat base when repo-
sitioning it. Risk of trapping.
Repositioning the seatMake sure that nothing prevents the
seat from moving.
– Pull lever 2 and lift the seatback, en-
suring it is correctly locked;
– reposition the seat base, placing your hand on the front of the seat
base.
When the rear bench seat is folded
down, move the front seats carefully.
Page 27 of 260

1.21
FRONT SEATS (3/3)
Version with front bench seat
for two
The seatbacks can be folded down (in
one or two sections).
To fold down the seatbacks
Pull on handles 6 and 7 to release
the seatbacks and lower seatbacks A
and B.
To refit the seatbacks
Refit the seatbacks and click them back
into place.
For safety reasons, carry
out any adjustments when
the vehicle is not being
driven.
To avoid all risk of injury,
ensure that nobody is in
the proximity of the moving
parts. When moving the
seat, make sure that nothing inter-
feres with the moving parts and their
locking.
8
Front seats
Operating faults
(depending on vehicle)
If the sliding side door does not work,
lower handle 8, hold it while the seat-
back tilts and slide the seat forwards.
To place the seat into the comfort posi-
tion, slide it rearwards.
Adjust the seat and make sure that it is
correctly locked.
AB
6
7
Page 30 of 260

1.24
To rotate the partition
– Unlock the seat base by moving handle 1 downwards;
– lift the front passenger seat base vertically (arrow);
– lower headrest 2 to its lowest setting;
– unlock the seatback by moving handle 1 downwards again and po-
sition the seatback horizontally. To
make the manoeuvre easier, rotate
the headrest 2 ; – Pivot the moving section 90 degrees,
lock it at point 5 and lower catch 3.
Note: before refitting the swivelling
section in its original position, check
that locking point 4 is clean.
– unlock the swivelling section by lift-
ing catch 3;
– reposition the seat base, proceeding in reverse order.
The swivelling section must
always be locked when the
vehicle is driven. Risk of
injury.
SWIVELLING PARTITION
When moving the swivelling parti-
tion, ensure the seat belt is not dam-
aged. Hold it aside when you rotate
the partition.
1
23
4
5
Maximum weight on the seat in
table position is 80 kg. The weight
must be evenly distributed.
Page 32 of 260
1.26
SEAT BELTS (2/4)
™Front seat belt reminder
warning light
It remains on when the engine
is started if your seat belt is not fas-
tened. An audible warning sounds at a
low volume for 30 seconds, then at a
high volume for 90 seconds.
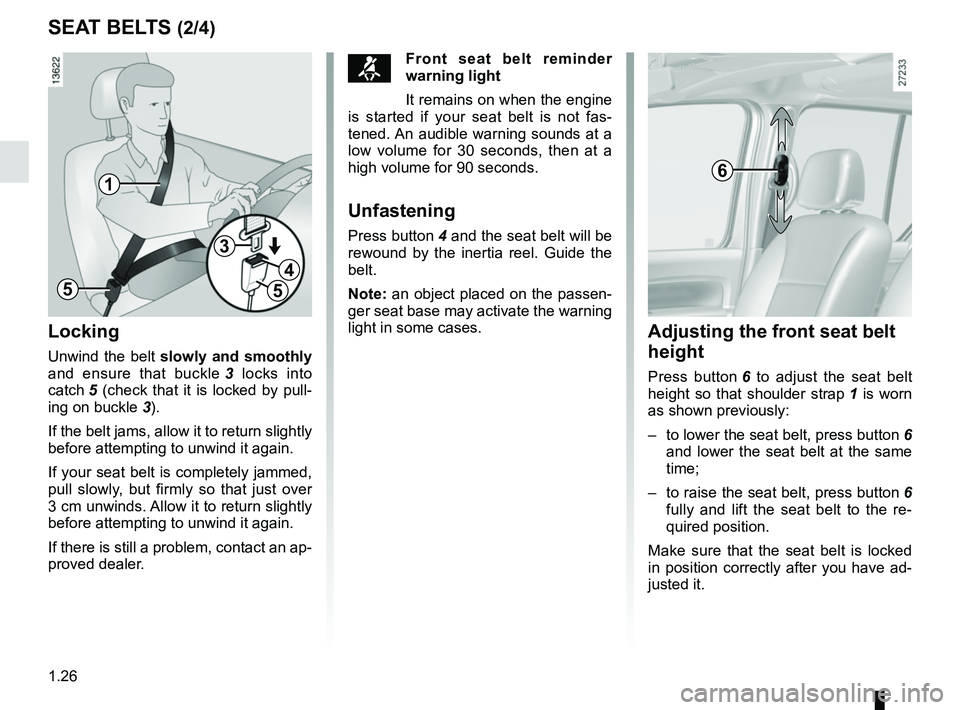
Unfastening
Press button 4 and the seat belt will be
rewound by the inertia reel. Guide the
belt.
Note: an object placed on the passen-
ger seat base may activate the warning
light in some cases.
6
Adjusting the front seat belt
height
Press button 6 to adjust the seat belt
height so that shoulder strap 1 is worn
as shown previously:
– to lower the seat belt, press button 6 and lower the seat belt at the same
time;
– to raise the seat belt, press button 6
fully and lift the seat belt to the re-
quired position.
Make sure that the seat belt is locked
in position correctly after you have ad-
justed it.
Locking
Unwind the belt slowly and smoothly
and ensure that buckle 3 locks into
catch 5 (check that it is locked by pull- ing on buckle 3).
If the belt jams, allow it to return slightly
before attempting to unwind it again.
If your seat belt is completely jammed,
pull slowly, but firmly so that just over
3 cm unwinds. Allow it to return slightly
before attempting to unwind it again.
If there is still a problem, contact an ap-
proved dealer.
1
5
3
4
5