Page 87 of 300

1.81
Using the portable naviga-
tion system at night in the
windscreen area below the
camera may disturb the op-
eration of the “automatic main beam
headlights” system (risk of reflection
on the windscreen).
Activation/deactivation
To activate the automatic main beam
headlights:
– turn ring 3 until the AUTO symbol is
opposite mark 2;
– push stalk 1.
Warning light
comes on the in-
strument panel.
To deactivate the automatic main
beam headlights:
– pull stalk 1;
– or turn ring 3 to a position other than AUTO.
Warning light
goes out on the
instrument panel.
Note: make sure the windscreen is not
obscured (dirt, mud, snow, condensa-
tion etc.).
EXTERIOR LIGHTING AND SIGNALS (3/6)
56
– repeatedly press the control 6 up or
down until you reach the “Automatic
main beam headlights” menu, then
press the switch 5 OK;
– press the 5 OK switch again to acti-
vate or deactivate the function.
Vehicles not fitted with a navigation
system
– With the vehicle at a standstill, press
and hold the switch 5 OK to access
the settings menu;
– repeatedly press the control 6 up or
down until you reach the “Aides à la
conduite” menu. Press the switch 5
OK;
3
12
Page 123 of 300

2.19
DRIVING ADVICE, ECO-DRIVING (1/5)
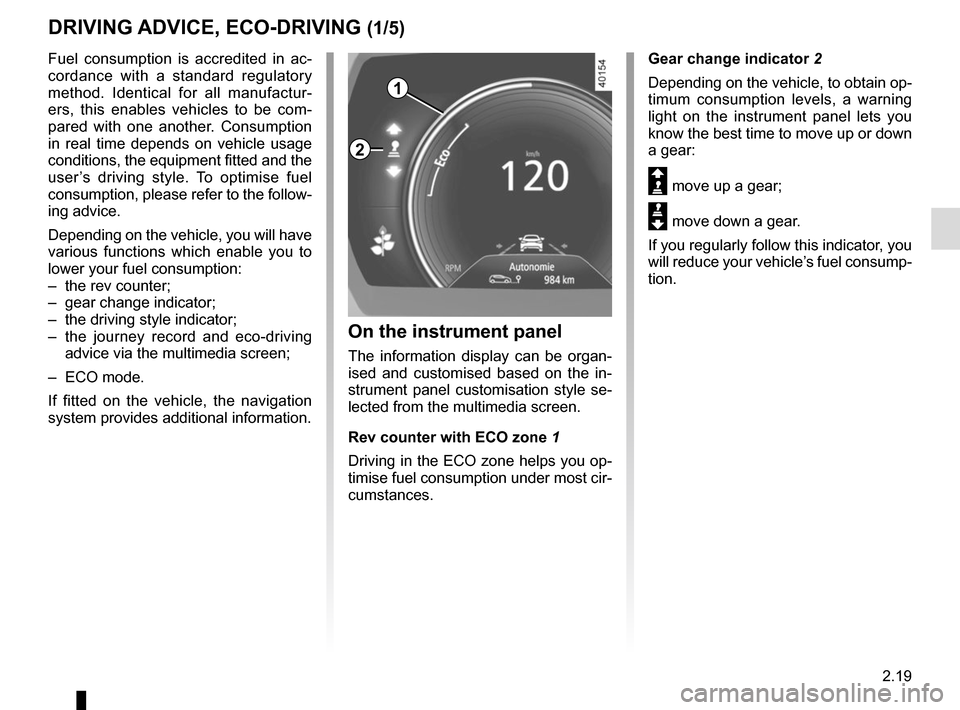
1
Gear change indicator 2
Depending on the vehicle, to obtain op-
timum consumption levels, a warning
light on the instrument panel lets you
know the best time to move up or down
a gear:
Š move up a gear;
‰ move down a gear.
If you regularly follow this indicator, you
will reduce your vehicle’s fuel consump-
tion.
Fuel consumption is accredited in ac-
cordance with a standard regulatory
method. Identical for all manufactur-
ers, this enables vehicles to be com-
pared with one another. Consumption
in real time depends on vehicle usage
conditions, the equipment fitted and the
user’s driving style. To optimise fuel
consumption, please refer to the follow-
ing advice.
Depending on the vehicle, you will have
various functions which enable you to
lower your fuel consumption:
– the rev counter;
– gear change indicator;
– the driving style indicator;
– the journey record and eco-driving
advice via the multimedia screen;
– ECO mode.
If fitted on the vehicle, the navigation
system provides additional information.
On the instrument panel
The information display can be organ-
ised and customised based on the in-
strument panel customisation style se-
lected from the multimedia screen.
Rev counter with ECO zone 1
Driving in the ECO zone helps you op-
timise fuel consumption under most cir-
cumstances.
2
Page 125 of 300

2.21
DRIVING ADVICE, ECO-DRIVING (3/5)
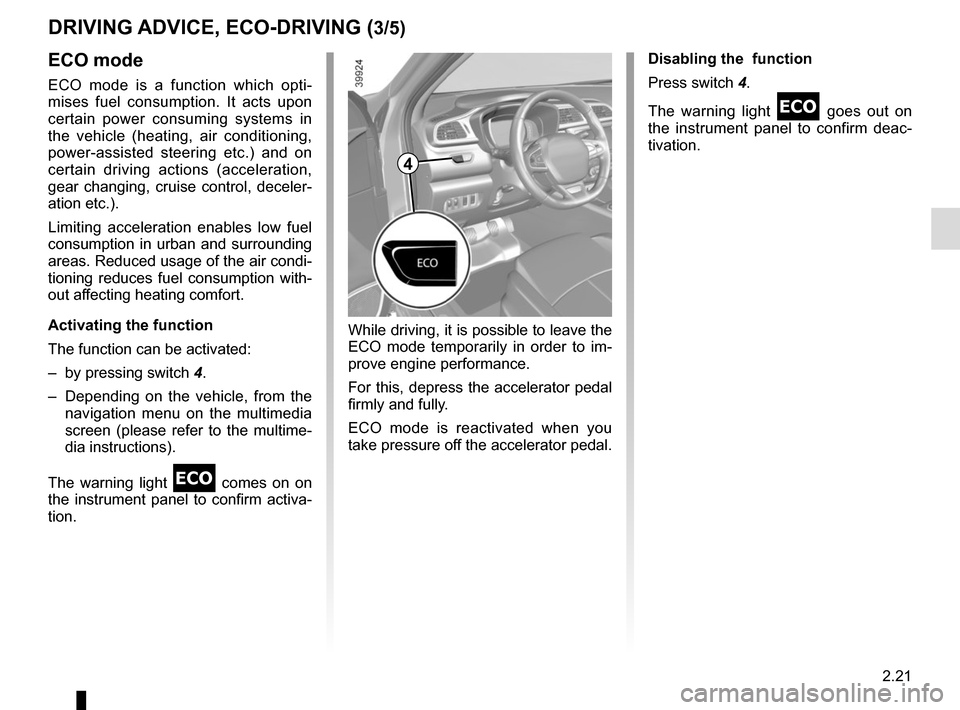
ECO mode
ECO mode is a function which opti-
mises fuel consumption. It acts upon
certain power consuming systems in
the vehicle (heating, air conditioning,
power-assisted steering etc.) and on
certain driving actions (acceleration,
gear changing, cruise control, deceler-
ation etc.).
Limiting acceleration enables low fuel
consumption in urban and surrounding
areas. Reduced usage of the air condi-
tioning reduces fuel consumption with-
out affecting heating comfort.
Activating the function
The function can be activated:
– by pressing switch 4.
– Depending on the vehicle, from the navigation menu on the multimedia
screen (please refer to the multime-
dia instructions).
The warning light
comes on on
the instrument panel to confirm activa-
tion. Disabling the function
Press switch 4.
The warning light
goes out on
the instrument panel to confirm deac-
tivation.
While driving, it is possible to leave the
ECO mode temporarily in order to im-
prove engine performance.
For this, depress the accelerator pedal
firmly and fully.
ECO mode is reactivated when you
take pressure off the accelerator pedal.
4
Page 130 of 300

2.26
TYRE PRESSURE MONITORING SYSTEM (1/3)
Resetting the standard level
for the tyre pressures
This should be done:
– when the standard tyre pressure needs to be changed to adapt to
usage conditions (empty, carrying a
load, motorway driving, etc.);
– after swapping a wheel (however this practice is not recommended);
– after changing a wheel.
It should always be done after checking
the tyre pressure of all four tyres when
cold.
Tyre pressures must correspond to the
current usage of the vehicle (empty,
carrying a load, motorway driving, etc.).213
Resetting can also be done from the
multifunction screen 3 if your vehi-
cle is fitted with a navigation system.
Select the menu “Vehicle”, “Tyre
pressure”.
If the vehicle is equipped with the func-
tion, this system monitors the tyre pres-
sure.
Operating principle
Each wheel (except for the emergency
spare wheel) has a sensor in the infla-
tion valve which periodically measures
the tyre pressure.
The system displays the current pres-
sures on the instrument panel 1 and
alerts the driver in the event of insuffi-
cient pressure. Resetting procedure
With the ignition on:
– repeatedly and briefly press con-
trol 2 to select the tyre pressure dis-
play and the “Tyre pressure” func-
tion;
– press and hold (around 3 seconds) the button 2 to launch the reset. The
flashing tyres followed by the mes-
sages “Learning TP initiated” and
then “Tyres location in progress” in-
dicates that the reset request for the
tyre pressure reference value has
been acknowledged.
Reset can take several minutes of driv-
ing.
If the resetting is followed by short
trips, the message “Tyres location in
progress” can remain displayed after
successive restarts.
Note
The standard tyre pressure cannot be
less than that recommended and indi-
cated on the door frame.
Page 139 of 300

2.35
Activating or deactivating the
system
For vehicles fitted with a navigation
system
On the multifunction screen 5, select
the “Vehicle” menu, “Driving assist-
ance”, and “Active braking”, and then
choose “ON” or “OFF”.
DRIVING CORRECTION DEVICES AND AIDS (7/10)
Press the switch 7 OK again to activate
or deactivate the function:
= function activated
< function deactivated
The warning light
is displayed on
the instrument panel when the system
is deactivated. This system is reacti-
vated each time the ignition is switched
on.
Conditions for non-activation of the
system
The system does not activate:
– when the gear lever is in neutral;
– when the parking brake is activated;
– while cornering;
– for 4-wheel drive vehicles, when Electronic Stability Programme
(ESC) with understeer and trac-
tion control are deactivated (please
see “Electronic Stability Programme
(ESC) with understeer and traction
control” above). Warning light
comes on.
5
8
7
For vehicle not fitted with a
navigation system
– With the vehicle at a standstill, press and hold the switch 7 OK to access
the settings menu,
– repeatedly press the control 8 up or
down until you reach the “Driving as-
sistance” menu. Press the switch 7
OK;
– repeatedly press control 8 up or down
until you reach the “Active braking”
menu, then press the switch 7 OK.
You can access menu “Driving as-
sistance” directly from button 6
.
6
Page 148 of 300
2.44
LANE DEPARTURE WARNING (2/3)
The function is set to notify the
driver if:
– the vehicle speed is greater than ap-proximately 45 mph (70 km/h);
and
– lines are detected and the visibility indicators 4 are green.
The function triggers an alert if a line
is crossed without the direction indica-
tors being activated. The function alerts
the driver through a beep and the indi-
cator the line crossed switches to red
on the instrument panel.Activation/deactivation
Vehicles fitted with a navigation
system
From the multifunction screen 2: select
“Vehicle”, “Driving assistance”, “Lane
departure warning” then choose “ON”
or “OFF”.
Vehicles not fitted with a navigation
system
Press the switch 3.
Operation
With the function activated, the grey
visibility indicators 4 for the left and
right lines are displayed on the instru-
ment panel.
You can access menu “Driving as-
sistance” directly from button 1
.
2
3
4
1
Page 149 of 300

2.45
265
Adjustment
Vehicles fitted with a navigation
system
From the multifunction screen 2, select
“Vehicle”, “Driving assistance”, “Lane
departure warning settings”.
– Volume: adjust the alert volume to one of five levels;
– sensitivity: adjust the sensitivity level for line detection. To do this select:
– “Low” line detected upon cross-
ing;
– “Average” line detected on ap-
proach;
– “high” line detected nearby.
Vehicles not fitted with a navigation
system
– With the vehicle at a standstill, press and hold the switch 5 OK to access
the settings menu;
– repeatedly press the control 6 up or
down until you reach the “Driving as-
sistance” menu. Press the switch 5
OK;
– repeatedly press control 6 up or
down until you reach the “Lane de-
parture warning settings” menu, then
press the switch 5 OK.
– Volume: adjust the alert volume to one of three levels;
– sensitivity: adjust the sensitivity level for line detection. To do this select:
– “Low” line detected upon cross-
ing;
– “Average” line detected on ap-
proach;
– “high” line detected nearby.
Operating faults
In the event of a malfunction, a mes-
sage “Lane departure warning check” is
displayed on the instrument panel, and
the visibility indicators for the left and
right lines disappear from the instru-
ment panel.
Consult an approved dealer.
LANE DEPARTURE WARNING (3/3)
Conditions for non-activation
of alerts
– Direction indicators activated for less than around 2 seconds prior to de-
parting from the lane;
– very fast lane departure;
– driving continuously on a line;
– on bends, the function allows for slightly cutting the bend;
– hazard warning lights activated;
– ...
Page 151 of 300
2.47
Activation/deactivation
Vehicles fitted with a navigation
system
On the multifunction screen 3, select
the “Vehicle” menu, “Driving assist-
ance”, and “Driving assistance”, and
then choose “ON” or “OFF”.
You can access menu “Driving as-
sistance” directly from button 2
.
Vehicles not fitted with a navigation
system
– With the vehicle at a standstill, press
and hold the switch 4 OK to access
the settings menu;
– repeatedly press the control 5 up or
down until you reach the “Driving as-
sistance” menu. Press the switch 4
OK;
BLIND SPOT WARNING (2/4)
– repeatedly press control 5 up or
down until you reach the “Blind spot
alert” menu, then press the switch 4
OK.
– Press the switch 4 OK again to acti-
vate or deactivate the function.
2
3
45
When the engine is started, the system
remembers its position when the igni-
tion was last switched off.