2017 RENAULT FLUENCE display
[x] Cancel search: displayPage 25 of 96

GB.23
1
Voice control main menu Destination
Exit Help Phone Applications
Central icon
Depending on the system status, differ-
ent central icons can be displayed:
– “Micro” icon: the system is ready to
receive your voice commands;
– “Loading” icon: the system is loading data;
– “Loudspeaker” icon: the system is giving you information via its voice
synthesizer.
Voice recognition indicator 1
The voice recognition indicator 1 is
made up of colour markers and a cen-
tral icon.
USING VOICE RECOGNITION (2/6)
Colour markers
The colour markers are used to opti-
mise voice recognition:
– green marker: optimal voice recogni- tion;
– orange marker: good voice recogni- tion;
– red marker: average voice recogni- tion.
Page 31 of 96
GB.29
ENTERING A DESTINATION (2/5)
For safety reasons, carry
out these operations when
the vehicle is stationary.
Enter an “Address”
This section enables you to enter a
full or partial address: country, town,
street and number.
On first use, the system asks you to
choose the destination country.
Depending on the various version,
you can enter the name of the de-
sired town or its postcode using the
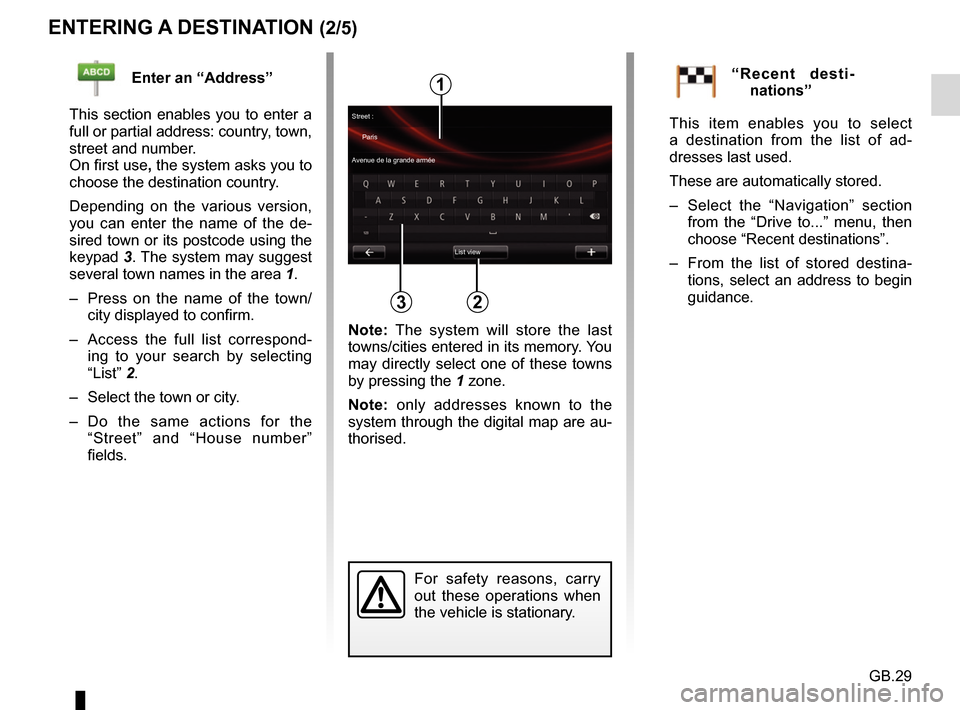
keypad 3. The system may suggest
several town names in the area 1.
– Press on the name of the town/ city displayed to confirm.
– Access the full list correspond- ing to your search by selecting
“List” 2.
– Select the town or city.
– Do the same actions for the “Street” and “House number”
fields.“Recent desti-nations”
This item enables you to select
a destination from the list of ad-
dresses last used.
These are automatically stored.
– Select the “Navigation” section from the “Drive to...” menu, then
choose “Recent destinations”.
– From the list of stored destina- tions, select an address to begin
guidance.
2
1
3
Street :
Paris
Avenue de la grande armée
List view
Note: The system will store the last
towns/cities entered in its memory. You
may directly select one of these towns
by pressing the 1 zone.
Note: only addresses known to the
system through the digital map are au-
thorised.
Page 32 of 96
GB.30
ENTERING A DESTINATION (3/5)
“TomTom Places”
This service enables you to quickly
search for a Point of Interest using a
key word, and to make that location
a destination.
– Select the “Navigation” section from the “Drive to...” menu, then
choose “TomTom Places”.
– Enter a keyword using the touch- pad, then confirm.
– From the list of elements found, select an address to begin guid-
ance.
Note: this icon is only displayed if
you have a subscription in the coun-
try where the LIVE Services are
available (please see the section on
“Navigation Services” in this docu-
ment).“Charging station”
This menu enables you to find a
charging station for your electric ve-
hicle and to plan your route to this
location.
Note: You can manage your per-
sonal stations in the “EV set-
tings” menu. Please refer to the
“Navigation settings” section.
Note: Personal recharging stations
are stored in the navigation system,
whereas the generic list of recharg-
ing stations is stored on the SD card.
Only the list on the map SD can be
updated and only the personal re-
charging stations can be managed
from the navigation system.“Point of Interest ” (POI)
A point of interest (POI) is a service,
establishment or even a tourist area
close to a location (start point, desti-
nation city, en route, etc.).
POIs are classed in different catego-
ries, e.g. restaurants, museums, car
parks, etc.
There are several options to find a
point of interest:
– category;
– the name of the desired POI.
Select the “Drive to...” section from
the Navigation menu, then “Point of
Interest” and confirm.
Page 33 of 96
GB.31
ENTERING A DESTINATION (4/5)
Confirming the destination
Once the destination information has
been entered, the system displays a
route summary for confirmation. Once
you have confirmed the route, the
system will calculate the itinerary. By
default, the calculation is done by se-
lecting the fastest route.
Note: The calculation criterion can be
changed in the settings.
At the end of the calculation, the system
displays the navigation summary and
suggests two options:
– “+” enables you to see details of the journey in various forms (refer to the
information on “Route information”
in the “Guidance” section) - change
itinerary and save itinerary.
– “Done” activates guidance.
For safety reasons, carry
out these operations when
the vehicle is stationary.
Search by POI category
– Select the “Navigation” section from the “Drive to...” menu, then
choose “Point of Interest”.
– Select the search area: “POI nearby”, “In town” or “Near
Home”.
– Select your desired category type.
Then enter a town name and launch
the search by selecting “Done”.
Search by POI name
Enter the name of a POI you want to
find. The system will start the search
automatically.“Point on map”
This function allows you to define a
destination from the map. From the
Navigation menu, select “Drive to...”,
then “Point on map”.
Move around the map to position
the cursor on your destination, then
confirm: the system calculates the
route.
“Latitude Longitude”
This function allows you to define a
destination using latitude and longi-
tude values.
Page 34 of 96
GB.32
ENTERING A DESTINATION (5/5)
Note: if you do not confirm, this page
will close after ten seconds and guid-
ance will start automatically.
Note: depending on the vehicle charge
level, if you can reach your destination,
guidance is launched – if the charge
level is too low, the system offers to
search for a recharging terminal on the
way.
Note: “ IQ Routes™” is a function which
optimises the journey time using statis-
tical data and calculates routes based
on the average traffic levels on that day
and time. To activate or deactivate this
function, refer to the “Navigation set-
tings” section.
Latest map guarantee
After delivery of your new vehicle you
have about 60 days in which to update
the map free of charge.
Once this time has elapsed, you will
need to pay for updates.
For more information, please see an
Authorised Dealer.54
Go to...ConfirmLIVE
Magny-les-hameaux 0:15 h
8.5 km
The quickest way IQ Routes
1 Janvier, 0:32
Summary of selected route
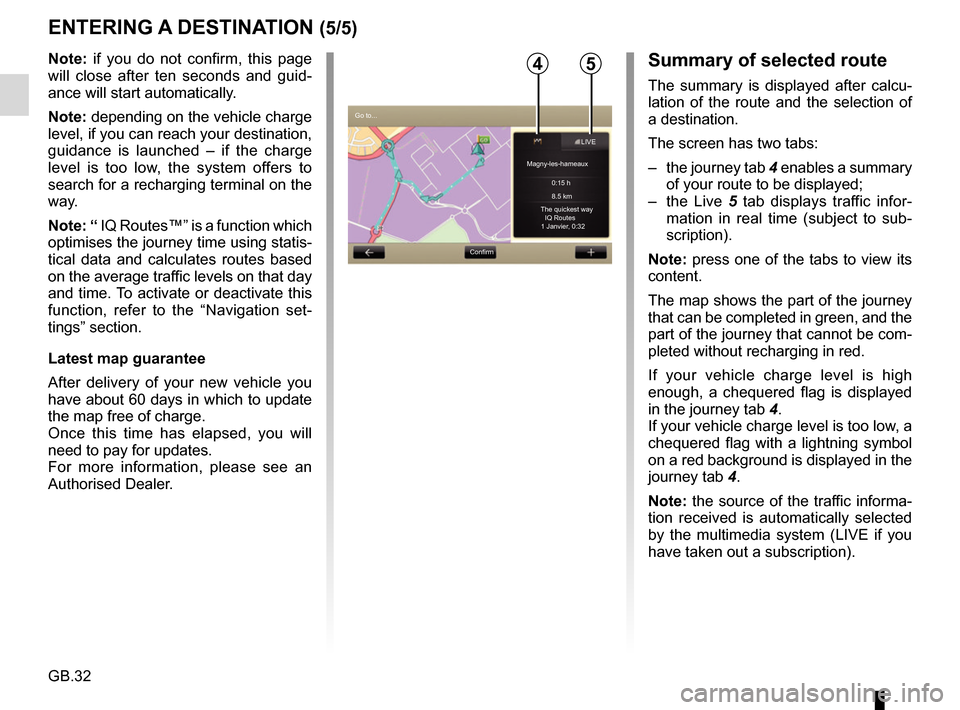
The summary is displayed after calcu-
lation of the route and the selection of
a destination.
The screen has two tabs:
– the journey tab 4 enables a summary
of your route to be displayed;
– the Live 5 tab displays traffic infor-
mation in real time (subject to sub-
scription).
Note: press one of the tabs to view its
content.
The map shows the part of the journey
that can be completed in green, and the
part of the journey that cannot be com-
pleted without recharging in red.
If your vehicle charge level is high
enough, a chequered flag is displayed
in the journey tab 4.
If your vehicle charge level is too low, a
chequered flag with a lightning symbol
on a red background is displayed in the
journey tab 4.
Note: the source of the traffic informa-
tion received is automatically selected
by the multimedia system (LIVE if you
have taken out a subscription).
Page 36 of 96
GB.34
READING A MAP
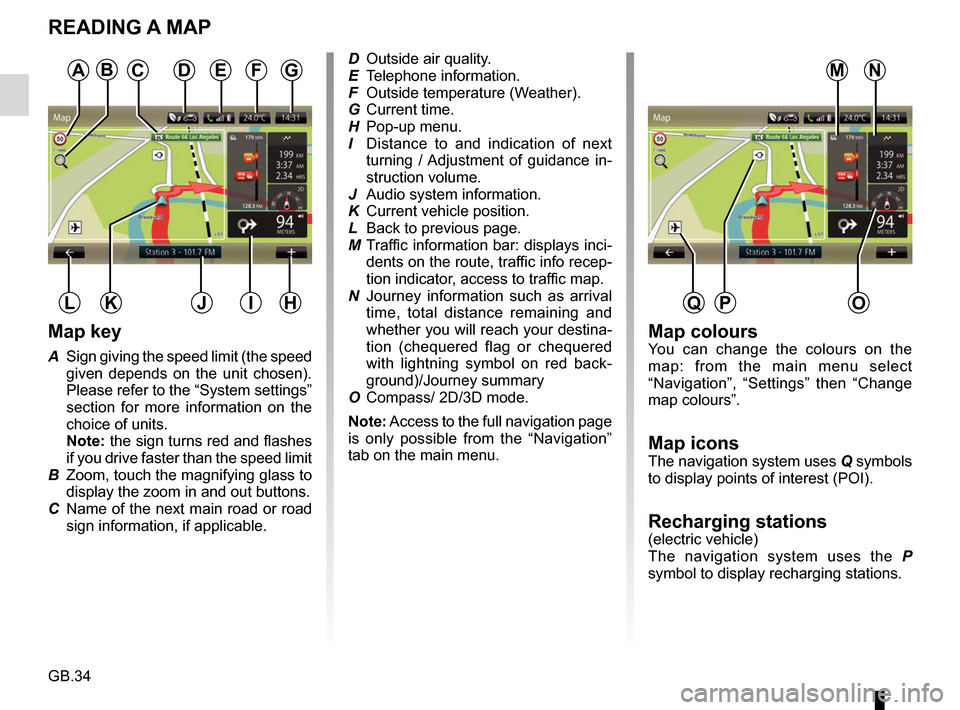
Map key
A Sign giving the speed limit (the speed given depends on the unit chosen).
Please refer to the “System settings”
section for more information on the
choice of units.
Note: the sign turns red and flashes
if you drive faster than the speed limit
B Zoom, touch the magnifying glass to display the zoom in and out buttons.
C Name of the next main road or road sign information, if applicable.
A
HJK
Map coloursYou can change the colours on the
map: from the main menu select
“Navigation”, “Settings” then “Change
map colours”.
Map iconsThe navigation system uses Q symbols
to display points of interest (POI).
Recharging stations(electric vehicle)
The navigation system uses the P
symbol to display recharging stations.
DFG
IL
ED Outside air quality.
E Telephone information.
F Outside temperature (Weather).
G Current time.
H Pop-up menu.
I Distance to and indication of next turning / Adjustment of guidance in-
struction volume.
J Audio system information.
K Current vehicle position.
L Back to previous page.
M Traffic information bar: displays inci- dents on the route, traffic info recep-
tion indicator, access to traffic map.
N Journey information such as arrival time, total distance remaining and
whether you will reach your destina-
tion (chequered flag or chequered
with lightning symbol on red back-
ground)/Journey summary
O Compass/ 2D/3D mode.
Note: Access to the full navigation page
is only possible from the “Navigation”
tab on the main menu.
O
NMCB
PQ
Page 38 of 96
GB.36
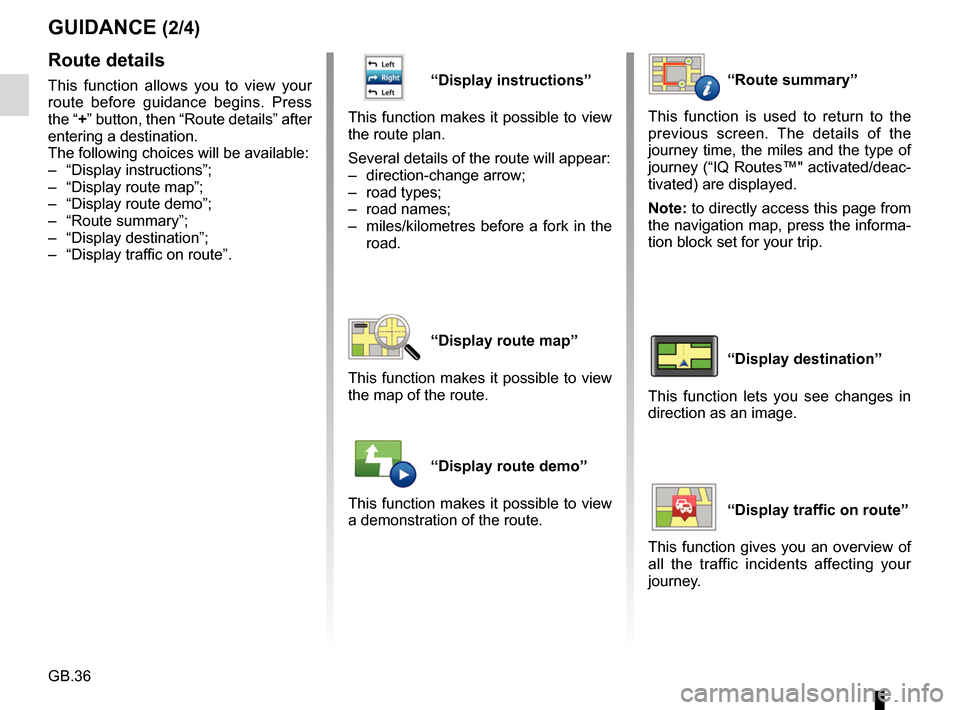
“Display instructions”
This function makes it possible to view
the route plan.
Several details of the route will appear:
– direction-change arrow;
– road types;
– road names;
– miles/kilometres before a fork in the road.
“Display route map”
This function makes it possible to view
the map of the route.
“Display route demo”
This function makes it possible to view
a demonstration of the route.
GUIDANCE (2/4)
“Route summary”
This function is used to return to the
previous screen. The details of the
journey time, the miles and the type of
journey (“IQ Routes™" activated/deac-
tivated) are displayed.
Note: to directly access this page from
the navigation map, press the informa-
tion block set for your trip.
“Display destination”
This function lets you see changes in
direction as an image.
“Display traffic on route”
This function gives you an overview of
all the traffic incidents affecting your
journey.
Route details
This function allows you to view your
route before guidance begins. Press
the “+” button, then “Route details” after
entering a destination.
The following choices will be available:
– “Display instructions”;
– “Display route map”;
– “Display route demo”;
– “Route summary”;
– “Display destination”;
– “Display traffic on route”.
Page 42 of 96
GB.40
Traffic Information Service
Options
To access the Traffic Information
Service options, from the main menu
press “Services”, “Navigation Services”,
then “HD Traffic™”.
“Minimise delays”
Select this option to alter your journey
based on the latest traffic information.
“Read traffic information”
This menu enables you to activate the
audio reading of traffic information.
“Display the map”
This menu enables you to explore the
map and keep up-to-date with the traf-
fic situation in your area. To access
the map, from the main menu, select
the Traffic Information Service then
“Display map”.
The map displays the last searched lo-
cation. Press the icon for an incident to
get more detailed information.
TRAFFIC INFORMATION (1/3)
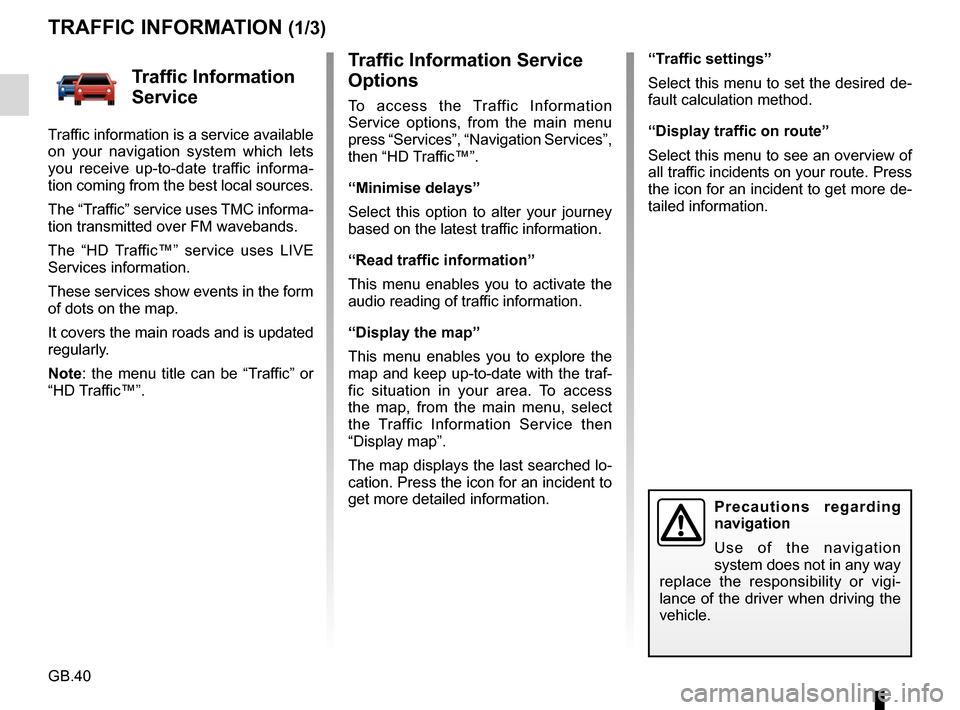
Precautions regarding
navigation
Use of the navigation
system does not in any way
replace the responsibility or vigi-
lance of the driver when driving the
vehicle.
Traffic Information
Service
Traffic information is a service available
on your navigation system which lets
you receive up-to-date traffic informa-
tion coming from the best local sources.
The “Traffic” service uses TMC informa-
tion transmitted over FM wavebands.
The “HD Traffic™” service uses LIVE
Services information.
These services show events in the form
of dots on the map.
It covers the main roads and is updated
regularly.
Note: the menu title can be “Traffic” or
“HD Traffic™”. “Traffic settings”
Select this menu to set the desired de-
fault calculation method.
“Display traffic on route”
Select this menu to see an overview of
all traffic incidents on your route. Press
the icon for an incident to get more de-
tailed information.