2017 RENAULT CLIO key
[x] Cancel search: keyPage 31 of 96
GB.29
ENTERING A DESTINATION (2/5)
For safety reasons, carry
out these operations when
the vehicle is stationary.
Enter an “Address”
This section enables you to enter a
full or partial address: country, town,
street and number.
On first use, the system asks you to
choose the destination country.
Depending on the various version,
you can enter the name of the de-
sired town or its postcode using the
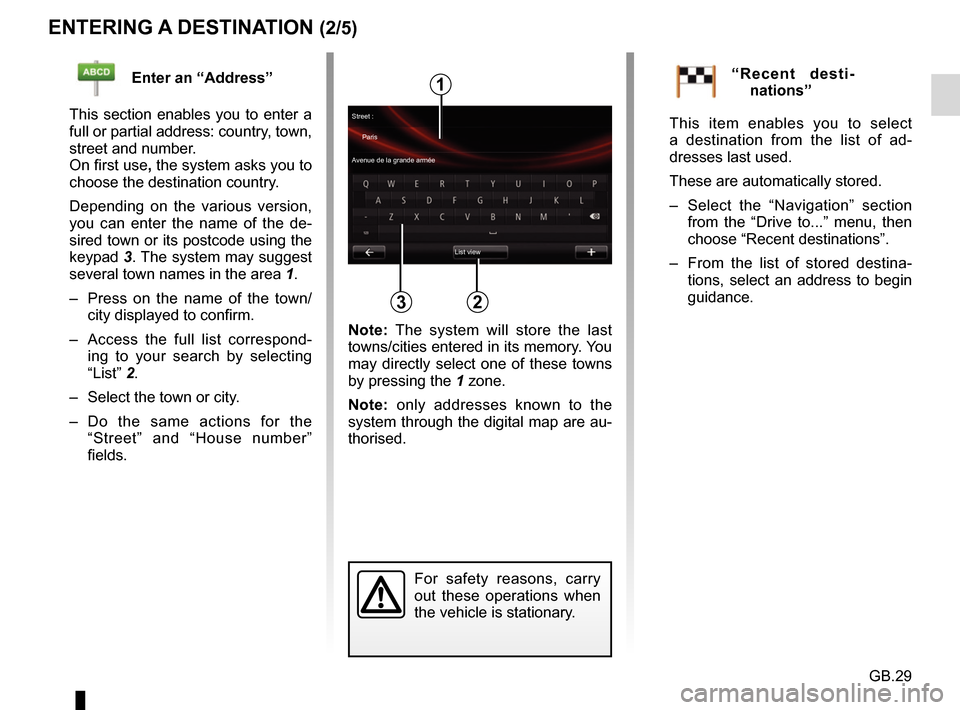
keypad 3. The system may suggest
several town names in the area 1.
– Press on the name of the town/ city displayed to confirm.
– Access the full list correspond- ing to your search by selecting
“List” 2.
– Select the town or city.
– Do the same actions for the “Street” and “House number”
fields.“Recent desti-nations”
This item enables you to select
a destination from the list of ad-
dresses last used.
These are automatically stored.
– Select the “Navigation” section from the “Drive to...” menu, then
choose “Recent destinations”.
– From the list of stored destina- tions, select an address to begin
guidance.
2
1
3
Street :
Paris
Avenue de la grande armée
List view
Note: The system will store the last
towns/cities entered in its memory. You
may directly select one of these towns
by pressing the 1 zone.
Note: only addresses known to the
system through the digital map are au-
thorised.
Page 32 of 96
GB.30
ENTERING A DESTINATION (3/5)
“TomTom Places”
This service enables you to quickly
search for a Point of Interest using a
key word, and to make that location
a destination.
– Select the “Navigation” section from the “Drive to...” menu, then
choose “TomTom Places”.
– Enter a keyword using the touch- pad, then confirm.
– From the list of elements found, select an address to begin guid-
ance.
Note: this icon is only displayed if
you have a subscription in the coun-
try where the LIVE Services are
available (please see the section on
“Navigation Services” in this docu-
ment).“Charging station”
This menu enables you to find a
charging station for your electric ve-
hicle and to plan your route to this
location.
Note: You can manage your per-
sonal stations in the “EV set-
tings” menu. Please refer to the
“Navigation settings” section.
Note: Personal recharging stations
are stored in the navigation system,
whereas the generic list of recharg-
ing stations is stored on the SD card.
Only the list on the map SD can be
updated and only the personal re-
charging stations can be managed
from the navigation system.“Point of Interest ” (POI)
A point of interest (POI) is a service,
establishment or even a tourist area
close to a location (start point, desti-
nation city, en route, etc.).
POIs are classed in different catego-
ries, e.g. restaurants, museums, car
parks, etc.
There are several options to find a
point of interest:
– category;
– the name of the desired POI.
Select the “Drive to...” section from
the Navigation menu, then “Point of
Interest” and confirm.
Page 36 of 96
GB.34
READING A MAP
Map key
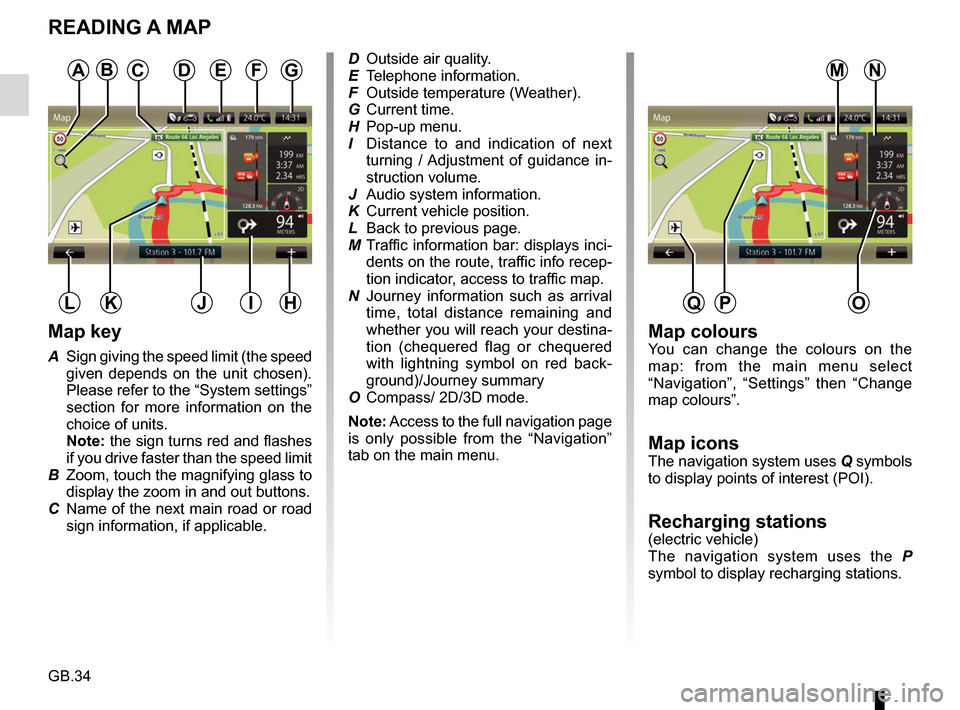
A Sign giving the speed limit (the speed given depends on the unit chosen).
Please refer to the “System settings”
section for more information on the
choice of units.
Note: the sign turns red and flashes
if you drive faster than the speed limit
B Zoom, touch the magnifying glass to display the zoom in and out buttons.
C Name of the next main road or road sign information, if applicable.
A
HJK
Map coloursYou can change the colours on the
map: from the main menu select
“Navigation”, “Settings” then “Change
map colours”.
Map iconsThe navigation system uses Q symbols
to display points of interest (POI).
Recharging stations(electric vehicle)
The navigation system uses the P
symbol to display recharging stations.
DFG
IL
ED Outside air quality.
E Telephone information.
F Outside temperature (Weather).
G Current time.
H Pop-up menu.
I Distance to and indication of next turning / Adjustment of guidance in-
struction volume.
J Audio system information.
K Current vehicle position.
L Back to previous page.
M Traffic information bar: displays inci- dents on the route, traffic info recep-
tion indicator, access to traffic map.
N Journey information such as arrival time, total distance remaining and
whether you will reach your destina-
tion (chequered flag or chequered
with lightning symbol on red back-
ground)/Journey summary
O Compass/ 2D/3D mode.
Note: Access to the full navigation page
is only possible from the “Navigation”
tab on the main menu.
O
NMCB
PQ
Page 47 of 96

GB.45
NAVIGATION SERVICES (2/2)
“TomTom Places”
The “TomTom Places” service lets you
quickly search for any point of interest
using a keyword and make it a desti-
nation.“Weather”
The weather service provides five-day
weather forecasts for the location of
your choice.
“Services Z.E.”
The Services Z.E. are reserved for
electric vehicles. Read the “Services
Z.E.” section for further details.
"Mon TomTom LIVE"
This service enables users to view the
expiry date of the subscribed services.
Users can renew their subscriptions
from R-Link Store or from the website
MyRenault by selecting one of the serv-
ices.
You must enter a valid e-mail address
for this service. An e-mail detailing the
subscription methods for the chosen
services will be sent to this address.
For further information, please refer to
the section on “Downloading and in-
stalling applications”.
Note: to find out more about the avai-
lability of LIVE services in your country,
please see an Authorised Dealer.
Page 59 of 96
GB.57
MEDIA
Playback
You can choose between playing all the
tracks or playing a single track.
When playing a track, you can:
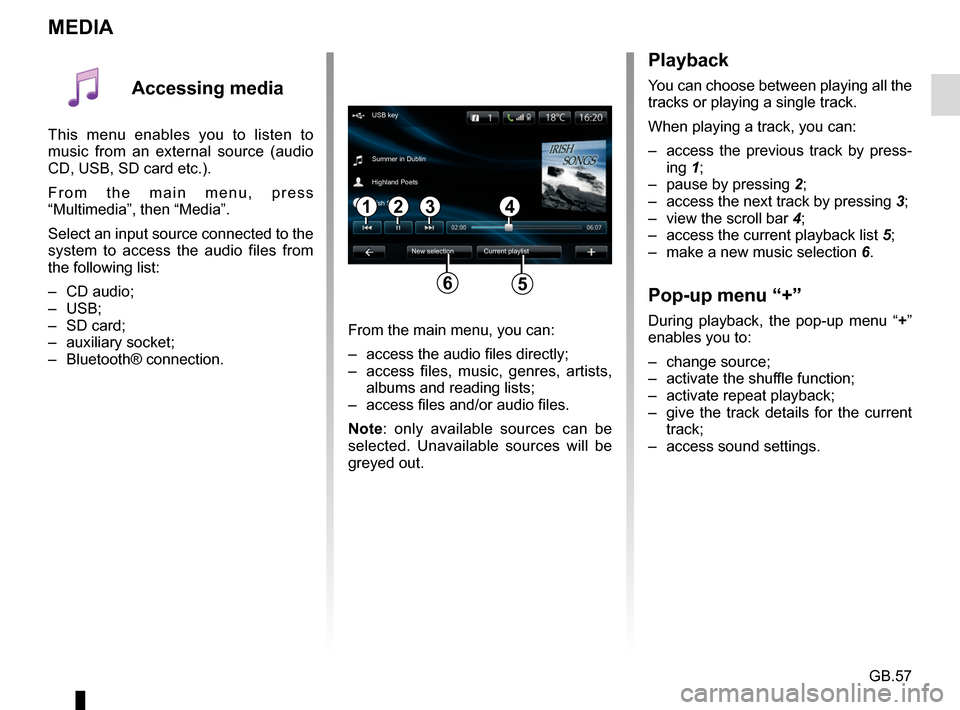
– access the previous track by press-ing 1;
– pause by pressing 2;
– access the next track by pressing 3;
– view the scroll bar 4;
– access the current playback list 5;
– make a new music selection 6.
Pop-up menu “+”
During playback, the pop-up menu “ +”
enables you to:
– change source;
– activate the shuffle function;
– activate repeat playback;
– give the track details for the current track;
– access sound settings.From the main menu, you can:
– access the audio files directly;
– access files, music, genres, artists, albums and reading lists;
– access files and/or audio files.
Note: only available sources can be
selected. Unavailable sources will be
greyed out.
34
New selection
USB key
Summer in Dublin
Highland Poets
Current playlist
Irish Songs
21
56
Accessing media
This menu enables you to listen to
music from an external source (audio
CD, USB, SD card etc.).
From the main menu, press
“Multimedia”, then “Media”.
Select an input source connected to the
system to access the audio files from
the following list:
– CD audio;
– USB;
– SD card;
– auxiliary socket;
– Bluetooth® connection.
Page 61 of 96
GB.59
Accessing videos
From the “Multimedia” menu, press
“Video” then select the source con-
nected (SD card, USB, etc.) to access
videos. The system offers you two op-
tions:
– “play all videos”;
– “play a video”.
Note: Some formats may not be read-
able by the system.
Options from folders
From the list of folders/videos, press “+”
to:
– change the source;
– access the settings.
Note: For more information on compat-
ible video formats, please consult an
Authorised Dealer.
VIDEO PLAYBACK
Playback
You can choose between playing all the
videos or playing a single video.
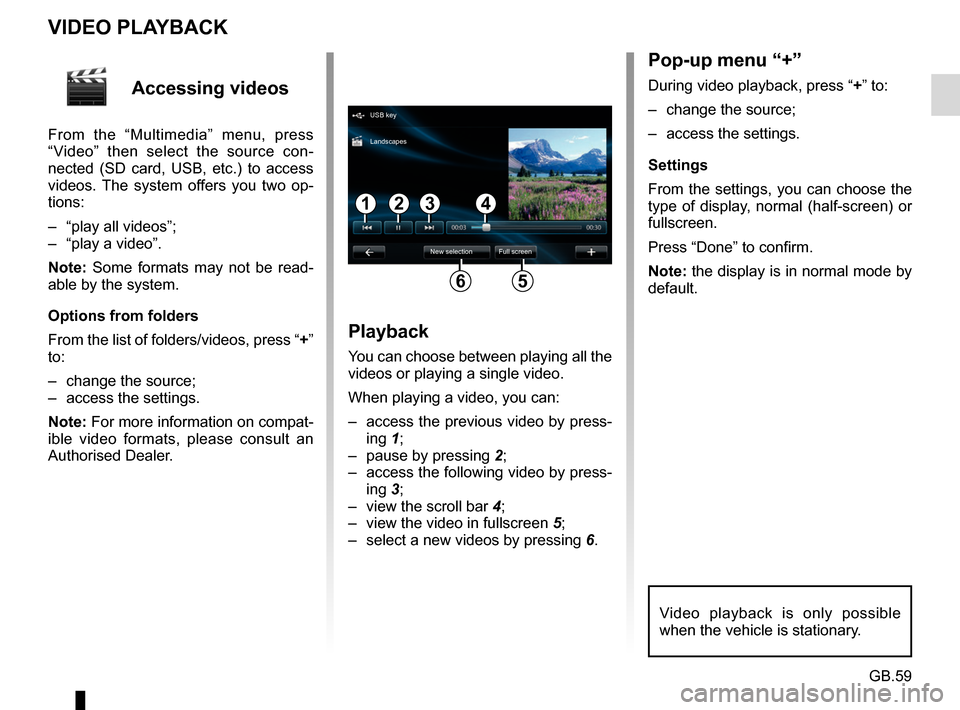
When playing a video, you can:
– access the previous video by press-ing 1;
– pause by pressing 2;
– access the following video by press- ing 3;
– view the scroll bar 4;
– view the video in fullscreen 5;
– select a new videos by pressing 6.
Pop-up menu “+”
During video playback, press “+” to:
– change the source;
– access the settings.
Settings
From the settings, you can choose the
type of display, normal (half-screen) or
fullscreen.
Press “Done” to confirm.
Note: the display is in normal mode by
default.
Video playback is only possible
when the vehicle is stationary.
1324
56
USB key
New selection Full screen
Landscapes
Page 68 of 96
GB.66
MAKING/RECEIVING A CALL (1/2)
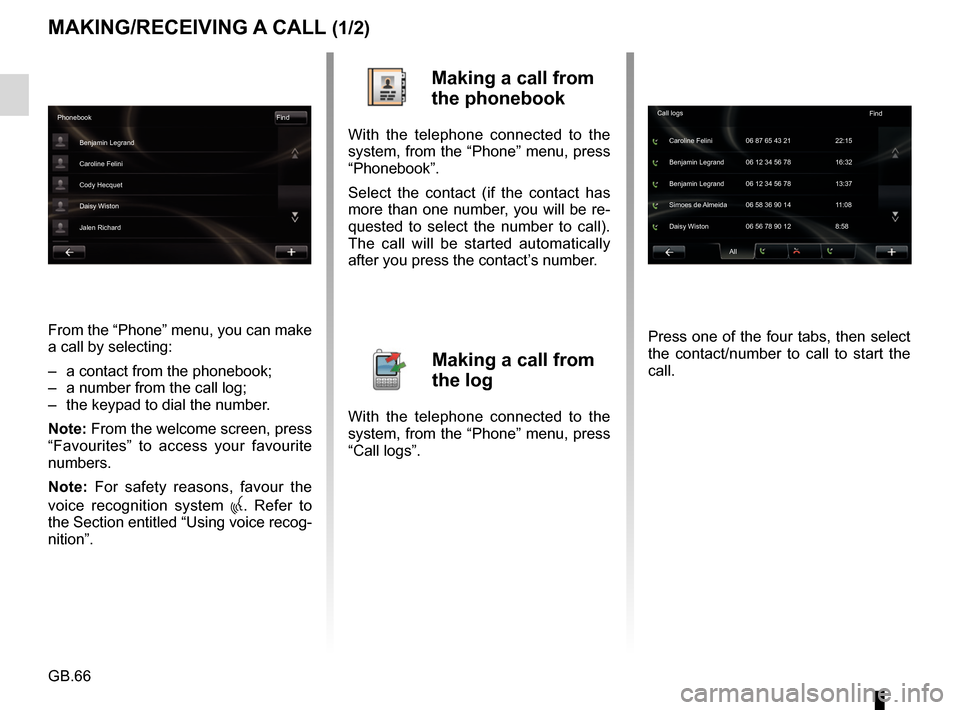
From the “Phone” menu, you can make
a call by selecting:
– a contact from the phonebook;
– a number from the call log;
– the keypad to dial the number.
Note: From the welcome screen, press
“Favourites” to access your favourite
numbers.
Note: For safety reasons, favour the
voice recognition system
. Refer to
the Section entitled “Using voice recog-
nition”.
Making a call from
the phonebook
With the telephone connected to the
system, from the “Phone” menu, press
“Phonebook”.
Select the contact (if the contact has
more than one number, you will be re-
quested to select the number to call).
The call will be started automatically
after you press the contact’s number.
Making a call from
the log
With the telephone connected to the
system, from the “Phone” menu, press
“Call logs”. Press one of the four tabs, then select
the contact/number to call to start the
call.
Phonebook
Find
Benjamin Legrand
Caroline Felini
Cody Hecquet
Daisy Wiston
Jalen Richard
All
Caroline Felini
Call logs
06 87 65 43 21 22:15
Benjamin Legrand 06 12 34 56 78 13:37 Benjamin Legrand 06 12 34 56 78 16:32
Simoes de Almeida 06 58 36 90 14 11:08
Daisy Wiston 06 56 78 90 12 8:58 Find
Page 69 of 96
GB.67
MAKING, RECEIVING A CALL (2/2)
Receiving a call
When receiving a call, the reception
screen is displayed with any informa-
tion available on the caller:
– the name of the contact (if the number is present in your handset
memory or the phonebook list);
– the caller’s number (if the number is not present in your handset
memory);
– “No Caller ID” (if the number cannot be viewed).
Pick up
To pick up a call, press “Pick up”.
Press “End call” to end the call.
You can also pick up or hang up using
the steering column control.
Reject a call
To reject in incoming call, press “Reject”,
the person calling you will be redi-
rected to your voicemail.
Place a call on hold
Please refer to the “During communica-
tion” section.
For safety reasons, carry
out these operations when
the vehicle is stationary.
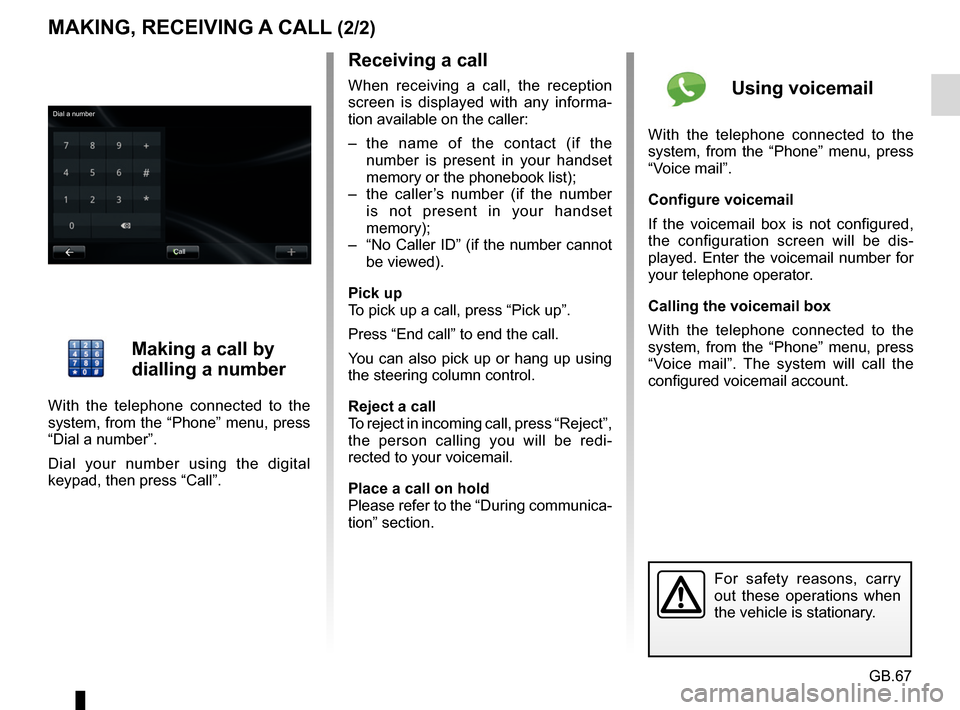
Making a call by
dialling a number
With the telephone connected to the
system, from the “Phone” menu, press
“Dial a number”.
Dial your number using the digital
keypad, then press “Call”.
Using voicemail
With the telephone connected to the
system, from the “Phone” menu, press
“Voice mail”.
Configure voicemail
If the voicemail box is not configured,
the configuration screen will be dis-
played. Enter the voicemail number for
your telephone operator.
Calling the voicemail box
With the telephone connected to the
system, from the “Phone” menu, press
“Voice mail”. The system will call the
configured voicemail account.
Call
Dial a number