2017 RENAULT ALASKAN weight
[x] Cancel search: weightPage 34 of 340
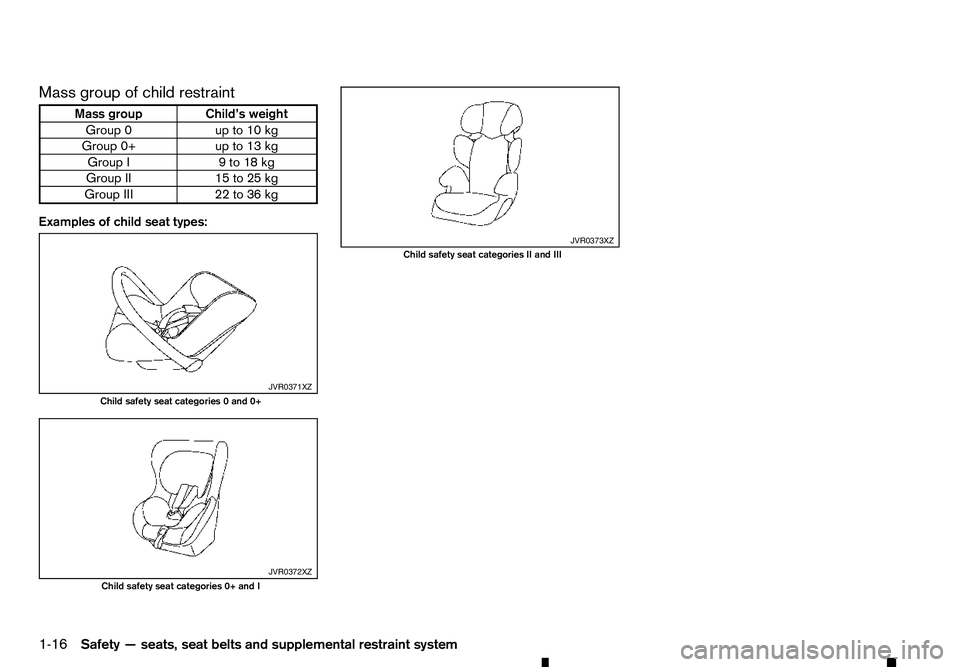
Mass group of child restraint
Mass group Child’s weight
Group 0u pto10kg
Group 0+ up to 13 kg
Group I9 to 18 kg
Group II 15 to 25 kg
Group III 22 to 36 kg
Examples of child seat types: JVR0371XZ
Child safety seat categories
0and 0+ JVR0372XZ
Child safety seat categories 0+ and I JVR0373XZ
Child safety seat categories II and III
1-16 Safety —seats, seat belts and supplemental restraint system
Page 35 of 340
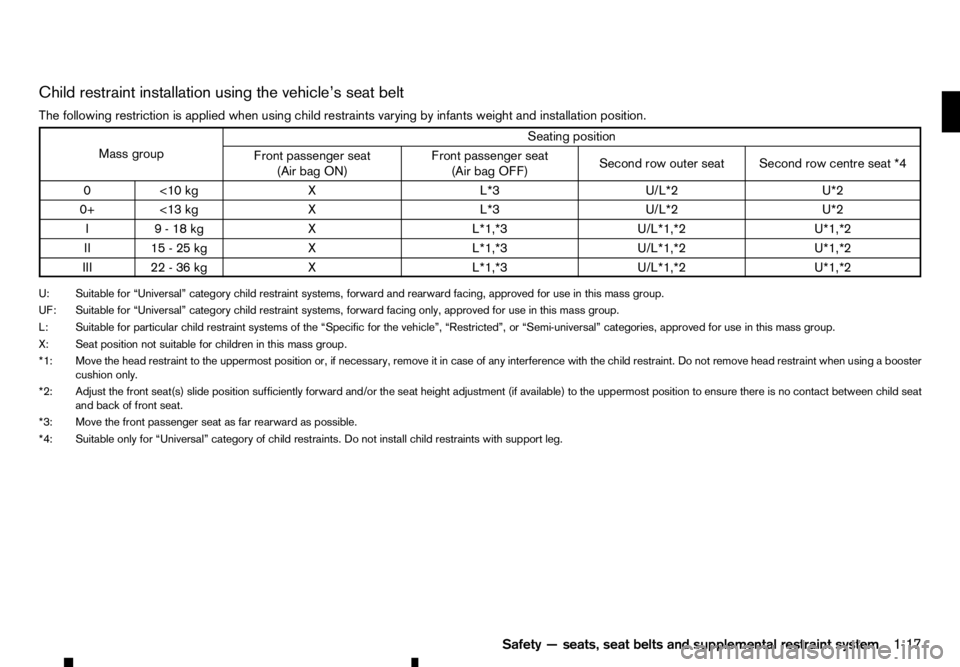
Child restraint installation using the vehicle’s seat belt
The following restriction is applied when using child restraints varying by infants weight and installation position. Mass group
Seating position
Front passenger seat (Air bag ON) Front passenger seat
(Air bag OFF) Second row outer seat Second row centre seat *4
0< 10 kg XL *3U/L*2 U*2
0+ <13 kg XL *3U/L*2 U*2
I9 -18kgX L*1,*3U/L*1,*2 U*1,*2
II 15 -25kgX L*1,*3U/L*1,*2 U*1,*2
III 22 -36kgX L*1,*3U/L*1,*2 U*1,*2
U: Suitable for “Universal” category child restraint systems, forward and rearward facing, approved for use in this mass group.
UF: Suitable for “Universal” category child restraint systems, forward facing only, approved for use in this mass group.
L: Suitable for particular child restraint systems of the “Specific for the vehicle”, “Restricted”, or “Semi-universal” categories, approved for use in this mass group. X: Seat position not suitable for children in this mass group.
*1: Move the head restraint to the uppermost position or, if necessary, remove it in case of any interference with the child restraint. Do not remove head restraint when using abooster
cushion only.
*2: Adjust the front seat(s) slide position sufficiently forward and/or the seat height adjustment (if available) to the uppermost position to ensure there is no contact between child seat and back of front seat.
*3: Move the front passenger seat as far rearward as possible.
*4: Suitable only for “Universal” category of child restraints. Do not install child restraints with support leg.
Safety—seats, seat belts and supplemental restraint system 1-17
Page 36 of 340
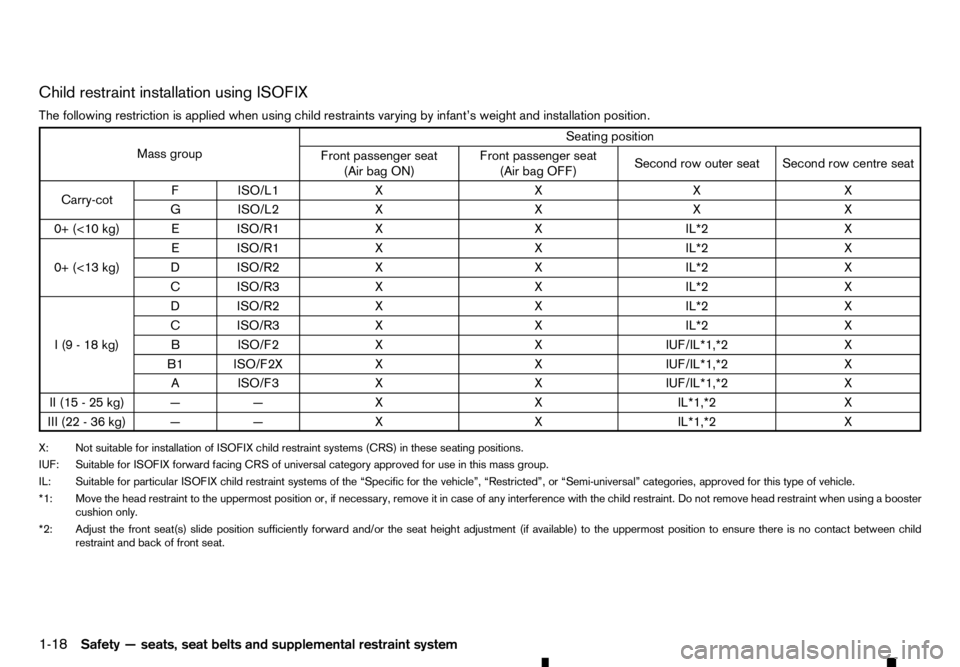
Child restraint installation using ISOFIX
The following restriction is applied when using child restraints varying by infant’s weight and installation position. Mass group
Seating position
Front passenger seat (Air bag ON) Front passenger seat
(Air bag OFF) Second row outer seat Second row centre seat
Carry-cot FI
SO/L1 XX XX
GI SO/L2 XX XX
0+ (<10 kg) EISO/R1 XX IL*2X
0+ (<13 kg) EI
SO/R1 XX IL*2X
DI SO/R2 XX IL*2X
CI SO/R3 XX IL*2X
I(9-18k g) DI
SO/R2 XX IL*2X
CI SO/R3 XX IL*2X
BI SO/F2 XX IUF/IL*1,*2X
B1 ISO/F2X XX IUF/IL*1,*2X
AI SO/F3 XX IUF/IL*1,*2X
II (15 -25kg) —— XX IL*1,*2X
III (22 -36kg) —— XX IL*1,*2X
X: Not suitable for installation of ISOFIX child restraint systems (CRS) in these seating positions.
IUF: Suitable for ISOFIX forward facing CRS of universal category approved for use in this mass group.
IL: Suitable for particular ISOFIX child restraint systems of the “Specific for the vehicle”, “Restricted”, or “Semi-universal” categories, approved for this type of vehicle.
*1: Move the head restraint to the uppermost position or, if necessary, remove it in case of any interference with the child restraint. Do not remove head restraint when using abooster
cushion only.
*2: Adjust the front seat(s) slide position sufficiently forward and/or the seat height adjustment (if available) to the uppermost position to ensure there is no contact between child restraint and back of front seat.
1-18 Safety —seats, seat belts and supplemental restraint system
Page 37 of 340
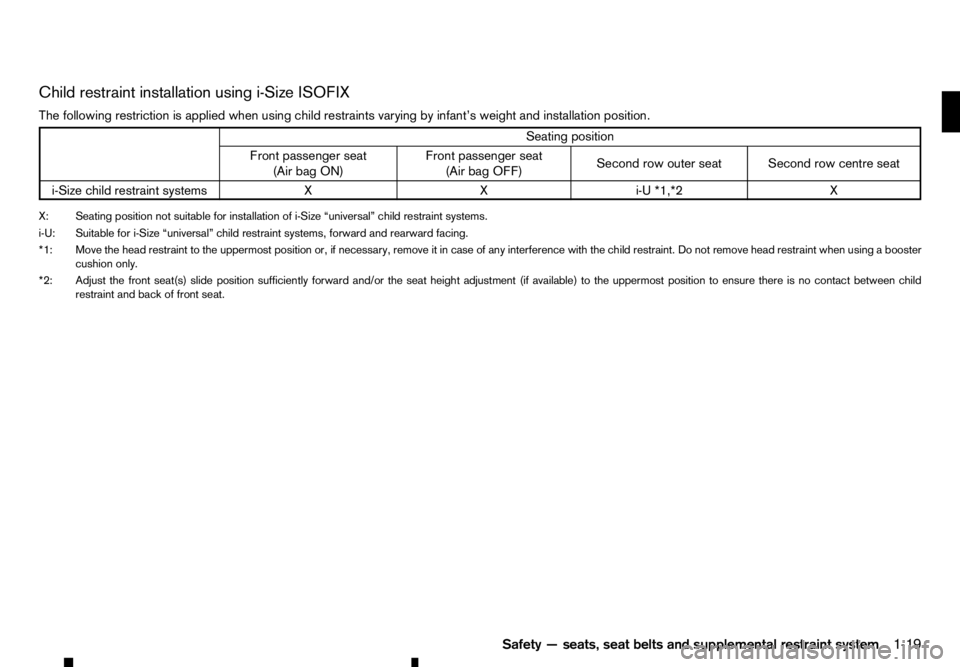
Child restraint installation using i-Size ISOFIX
The following restriction is applied when using child restraints varying by infant’s weight and installation position. Seating position
Front passenger seat (Air bag ON) Front passenger seat
(Air bag OFF) Second row outer seat Second row centre seat
i-Size child restraint systems XX i-U *1,*2X
X: Seating position not suitable for installation of i-Size “universal” child restraint systems.
i-U: Suitable for i-Size “universal” child restraint systems, forward and rearward facing.
*1: Move the head restraint to the uppermost position or, if necessary, remove it in case of any interference with the child restraint. Do not remove head restraint when using abooster
cushion only.
*2: Adjust the front seat(s) slide position sufficiently forward and/or the seat height adjustment (if available) to the uppermost position to ensure there is no contact between child restraint and back of front seat.
Safety—seats, seat belts and supplemental restraint system 1-19
Page 99 of 340

CAUTION
•
Do not use bottle holder for any other objects
that could be thrown about in the vehicle and
possibly injure people during sudden braking
or an accident.
• Do not use bottle holder for open liquid con-
tainers.
ROOF RAIL (where fitted)
Always evenly distribute the cargo on the tubular roof rail. The maximum total load is 100 kg (221 lb)
evenly distributed. WARNING
• Drive extra carefully when the vehicle is
loaded at or near the cargo carrying capacity,
especially if the significant portion of that load
is carried on the roof rail. •
Heavy loading of the roof rail has the potential
to affect the vehicle stability and handling dur-
ing sudden or unusual handling manoeuvres.
• Roof rail load should be evenly distributed.
• Do not exceed maximum roof rail load weight
capacity.
• Properly secure all cargo with ropes or straps
to help prevent it from sliding or shifting. In a
sudden stop or collision, unsecured cargo
could cause personal injury.
CAUTION
Use care when placing items on or removing
items from the roof rail. If you cannot comfort-
ably lift the items onto or off the roof rail from the
ground, use aladder or stool.
CARD HOLDER (where fitted)
Slide acard in the card holder jA. 1. To block out glare from the front, swing down the
sun visor ➀.
2. To block glare from the side, remove the sun visor from the centre mount and swing it to the
side ➁. JVI1 103XZ
JVI1240XZ SIC2872
SUN VISORS
Instruments and controls 2-41
Page 124 of 340

LOCKING AdBlue® FILLER LID
The AdBlue® filler lid is locked and unlocked using
the Keyless Entry System, see “Remote Control Key
system (where fitted)” earlier in this section for addi-
tional details.
AdBlue® FILLER CAP
The AdBlue® filler cap is anon-ratcheting type. Turn
the cap anticlockwise ➀to remove. Tighten the
cap clockwise ➁until tight.
CAUTION
If AdBlue® is spilled on the vehicle body, flush it
away with water to avoid paint damage. WARNING
• While driving, never allow anyone to ride in
the cargo area. Abrupt braking or stopping
could lead to personal injury or death.
• Do not drive the vehicle with the tailgate down.
• Properly secure all cargo with ropes or straps
to help prevent it from sliding or shifting. In a
sudden stop or collision, unsecured cargo
could cause personal injury.
TAILGATE
Locking or unlocking tailgate
(where fitted)
To lock the tailgate, insert the key to the tailgate key
cylinder and turn the key clockwise ➀.
To unlock the tailgate, turn the key anticlockwise ➁ . For Remote Control Key equipped models, see
“Mechanical key” earlier in this section for removing
the mechanical key.
Opening the tailgate
To open the tailgate, pull the tailgate handle ➀and
lower the tailgate. The support wires will hold the
gate open.
• The weight of the cargo load must be evenly dis-
tributed over both the front and the rear axles.
• All cargo should be securely fastened with ropes
or straps to prevent it from shifting or sliding
within the vehicle. WARNING
• Do not drive the vehicle with the tailgate down.
• While driving, never allow anyone to ride in
the cargo area. Abrupt braking or stopping
could lead to personal injury or death. NDI1647
SP A2696Z NP A1529
CARGO BED (where fitted)
3-20 Pre-driving checks and adjustments
Page 125 of 340
Closing the tailgate
When closing the tailgate, make sure that the latches
or levers are securely locked.
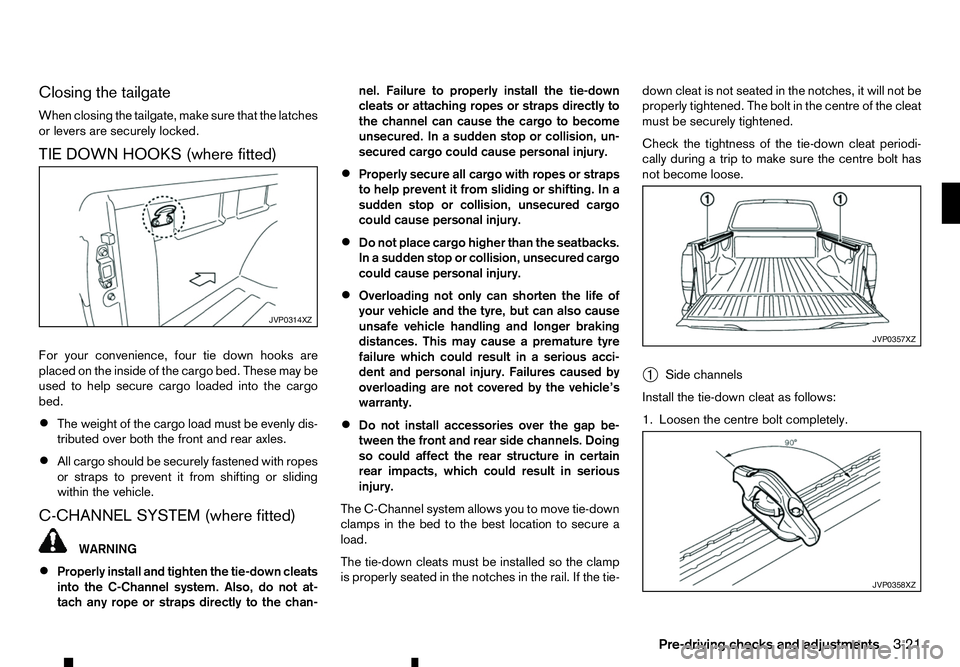
TIE DOWN HOOKS (where fitted)
For your convenience, four tie down hooks are
placed on the inside of the cargo bed. These may be
used to help secure cargo loaded into the cargo
bed.
• The weight of the cargo load must be evenly dis-
tributed over both the front and rear axles.
• All cargo should be securely fastened with ropes
or straps to prevent it from shifting or sliding
within the vehicle.
C-CHANNEL SYSTEM (where fitted) WARNING
• Properly install and tighten the tie-down cleats
into the C-Channel system. Also, do not at-
tach any rope or straps directly to the chan- nel. Failure to properly install the tie-down
cleats or attaching ropes or straps directly to
the channel can cause the cargo to become
unsecured. In
asudden stop or collision, un-
secured cargo could cause personal injury.
• Properly secure all cargo with ropes or straps
to help prevent it from sliding or shifting. In a
sudden stop or collision, unsecured cargo
could cause personal injury.
• Do not place cargo higher than the seatbacks.
In
as udden stop or collision, unsecured cargo
could cause personal injury.
• Overloading not only can shorten the life of
your vehicle and the tyre, but can also cause
unsafe vehicle handling and longer braking
distances. This may cause
apremature tyre
failure which could result in aserious acci-
dent and personal injury. Failures caused by
overloading are not covered by the vehicle’s
warranty.
• Do not install accessories over the gap be-
tween the front and rear side channels. Doing
so could affect the rear structure in certain
rear impacts, which could result in serious
injury.
The C-Channel system allows you to move tie-down
clamps in the bed to the best location to secure a
load.
The tie-down cleats must be installed so the clamp
is properly seated in the notches in the rail. If the tie- down cleat is not seated in the notches, it will not be
properly tightened. The bolt in the centre of the cleat
must be securely tightened.
Check the tightness of the tie-down cleat periodi-
cally during
atrip to make sure the centre bolt has
not become loose.
➀ Side channels
Install the tie-down cleat as follows:
1. Loosen the centre bolt completely. JVP0314XZ
JVP0357XZ
JVP0358XZ
Pre-driving checks and adjustments
3-21
Page 250 of 340

Your new vehicle was designed to be used primarily
to carry passengers and luggage.
Towing atrailer will place additional loads on your
vehicle’s engine, drive train, steering, braking and
other systems. The towing of atrailer will exagger-
ate other conditions such as sway caused by cross-
winds, rough road surfaces or passing trucks.
Your driving style and speed must be adjusted ac-
cording to the circumstances. Before towing a
trailer, see an approved dealer or qualified work-
shop for an explanation about the proper use of tow-
ing equipment.
OPERATING PRECAUTIONS
• Avoid towing
atrailer during the running-in pe-
riod.
• Before driving, make sure that the lighting sys-
tem of the trailer works properly.
• Observe the legal maximum speeds for trailer
operation.
• Avoid abrupt starts, accelerations and stops.
• Avoid sharp turns and lane changes.
• Always drive your vehicle at
amoderate speed.
• Follow the trailer manufacturer’s instructions.
• Choose proper coupling devices (trailer hitch,
safety chain, roof carrier, etc.) for your vehicle
and trailer. These devices are available from an
approved dealer or qualified workshop where
you can also obtain more detailed information
about trailer towing. •
Never allow the total trailer load (trailer weight
plus its cargo weight) to exceed the maximum
set for the vehicle and the coupling device. See
an approved dealer or qualified workshop for
more information.
• The trailer must be loaded so that heavy goods
are placed over the axle. The maximum allowable
vertical load on the trailer hitch must not be ex-
ceeded.
• Have your vehicle serviced more often than at
the intervals specified in
aseparate maintenance
booklet.
• Trailer towing requires more fuel than under nor-
mal circumstances because of
aconsiderable
increase in traction power and resistance.
While towing atrailer, check the engine coolant
temperature indicator to prevent the vehicle from
overheating.
TYRE PRESSURE
When towing atrailer, inflate the vehicle tyres to the
maximum recommended COLD tyre pressure (for
full loading) indicated on the tyre placard.
Do not tow atrailer when the vehicle is installed with
at emporary spare tyre or acompact spare tyre.
SAFETY CHAINS
Always use asuitable chain between the vehicle
and trailer. The chain should be crossed and should
be attached to the hitch, not to the vehicle bumper
or axle. Be sure to leave enough slack in the chain
to permit turning corners. TRAILER BRAKES
Ensure that trailer brakes are installed as required
by local regulations. Also check that all other trailer
equipment conforms to local regulations.
Always block the wheels on both the vehicle and
trailer when parking. Apply the hand brake on the
trailer where fitted. Parking on
asteep slope is not
recommended.
If parking on asteep slope is unavoidable, place the
shift lever in the P(Park) position (Automatic trans-
mission model), or in an appropriate position
(Manual transmission model), and turn the front
wheels towards the kerb.
TRAILER DETECTION (where fitted)
When towing atrailer with agenuine RENAULT tow
bar electrical kit and the turn signal switch is used,
the electrical system of the vehicle will detect the
additional electrical load of the trailer lighting. As a
result, the direction indicator tone will be different.
TRAILER TOWING
5-48
Starting and driving