Page 79 of 348

Activation
Remove the key or turn the ignition to the OFF/LOCK
position, and pull the multifunction lever toward the
steering wheel, within two minutes. Each time the lever is
pulled, the activation of the lights will be extended by 30
seconds. The activation of the lights can be extended to a
maximum of 210 seconds.
The warning light on the instrument panel will light up
and the corresponding message will appear in the Instru-
ment Cluster Display for as long as the function is acti-
vated. The warning light comes on when the lever is
operated and stays on until the function is automatically
deactivated. Each movement of the lever only increases the
amount of time the lights stay on.
Deactivation
Pull the multifunction lever toward the steering wheel and
hold it for more than two seconds.
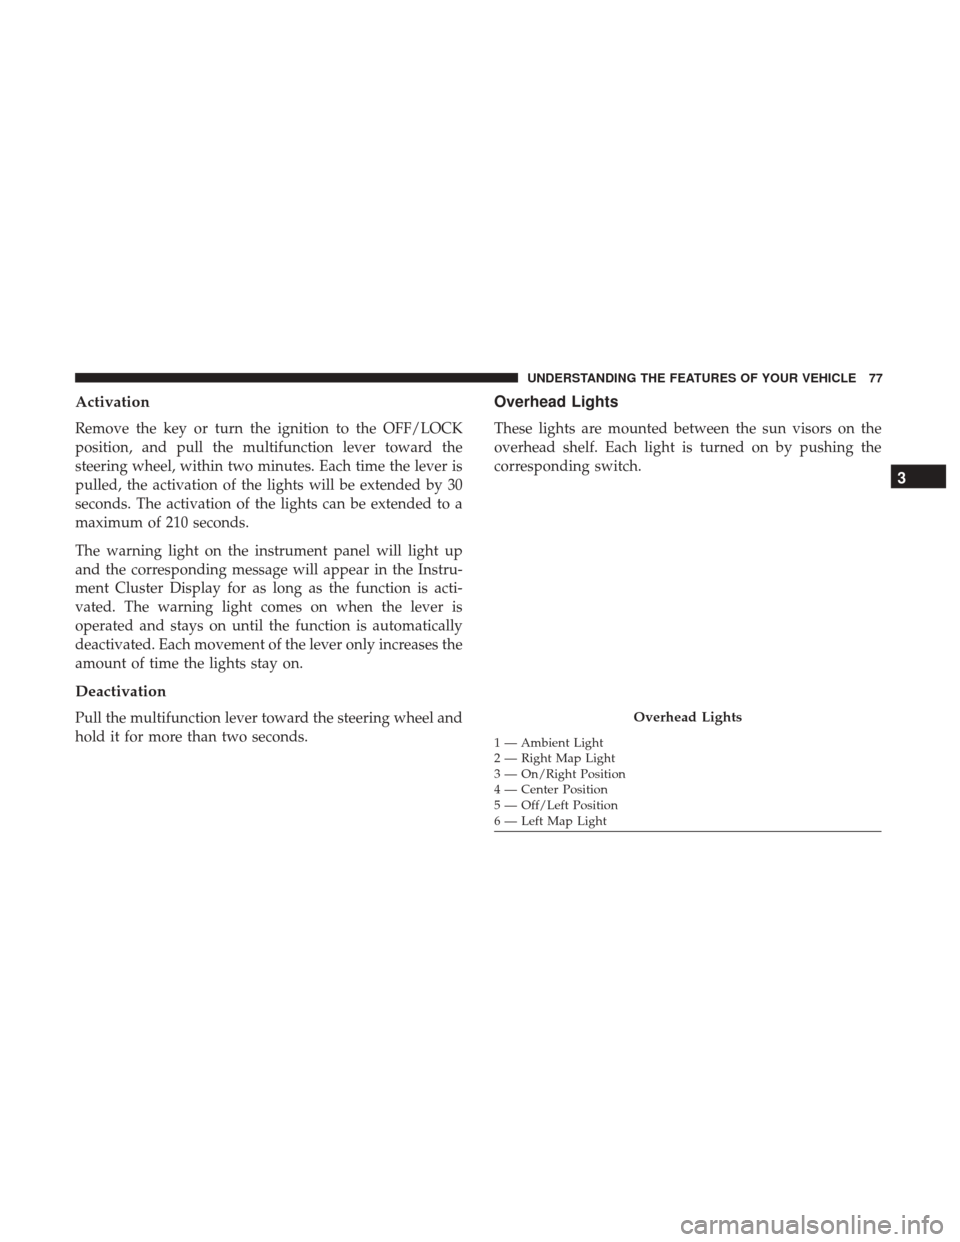
Overhead Lights
These lights are mounted between the sun visors on the
overhead shelf. Each light is turned on by pushing the
corresponding switch.
Overhead Lights
1 — Ambient Light
2 — Right Map Light
3 — On/Right Position
4 — Center Position
5 — Off/Left Position
6 — Left Map Light
3
UNDERSTANDING THE FEATURES OF YOUR VEHICLE 77
Page 83 of 348

Windshield Washer Operation
To use the washer, pull the windshield wiper/washer lever
toward the steering wheel to activate the washers. The
wipers will activate automatically for three cycles after the
lever is released. and then resume the intermittent interval
previously selected.
If the lever is pulled while in the off position, the wipers
will operate for three cycles, then turn off.
WARNING!
Sudden loss of visibility through the windshield could
lead to a collision. You might not see other vehicles or
other obstacles. To avoid sudden icing of the wind-
shield during freezing weather, warm the windshield
with the defroster before and during windshield
washer use.
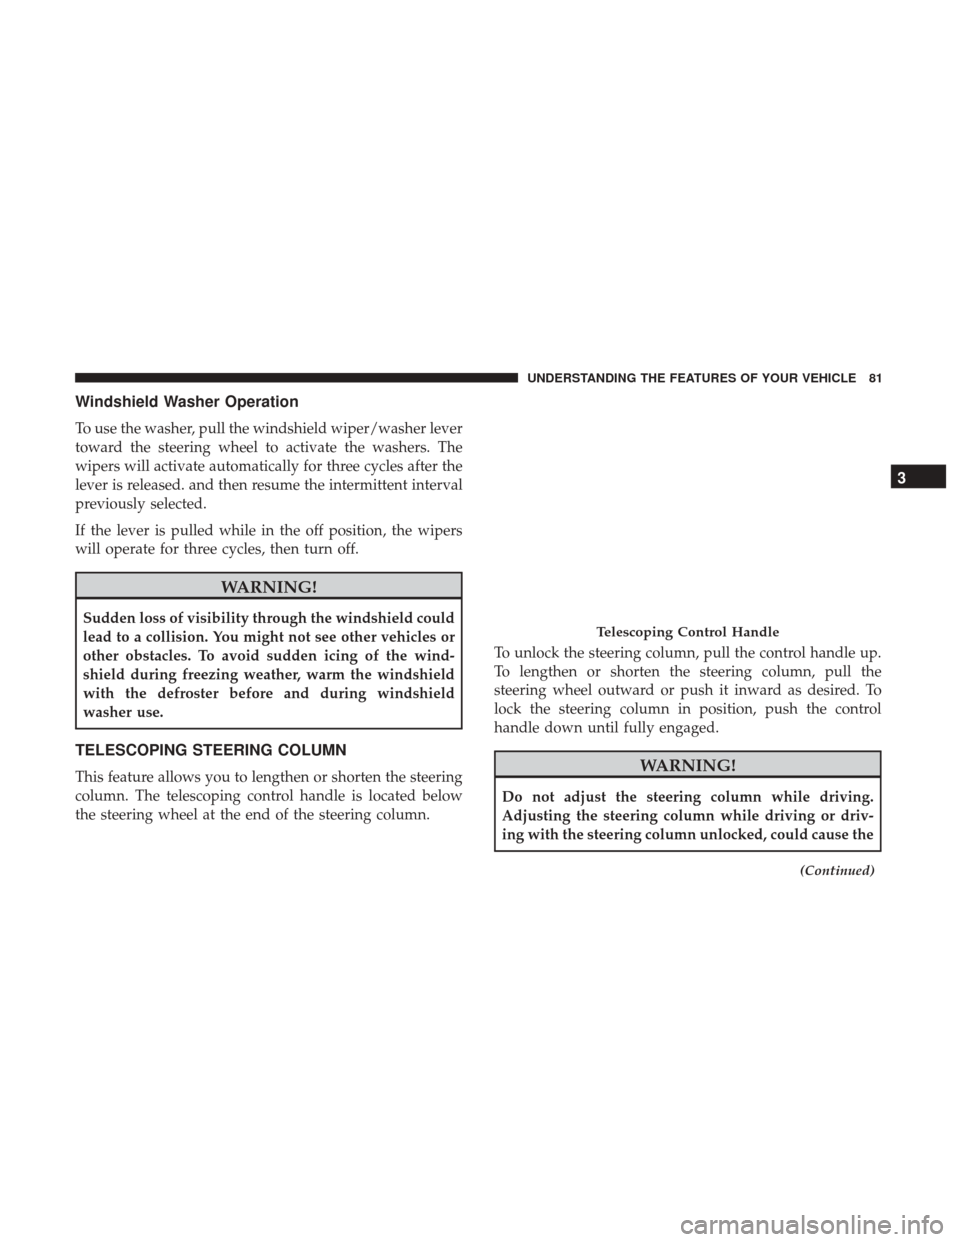
TELESCOPING STEERING COLUMN
This feature allows you to lengthen or shorten the steering
column. The telescoping control handle is located below
the steering wheel at the end of the steering column.To unlock the steering column, pull the control handle up.
To lengthen or shorten the steering column, pull the
steering wheel outward or push it inward as desired. To
lock the steering column in position, push the control
handle down until fully engaged.WARNING!
Do not adjust the steering column while driving.
Adjusting the steering column while driving or driv-
ing with the steering column unlocked, could cause the
(Continued)
Telescoping Control Handle
3
UNDERSTANDING THE FEATURES OF YOUR VEHICLE 81
Page 100 of 348

▫Clock .............................. .138
▫ USB Mode (MP3/WMA/AAC) ............138
� UCONNECT RADIOS ....................144
� UCONNECT SETTINGS ...................144
▫ Buttons On The Faceplate .................145
▫ Buttons On The Touchscreen ...............146
▫ Customer Programmable Features/Personal
Settings ............................. .146
� IPOD/USB/MP3 CONTROL — IF EQUIPPED . . . .155
▫ USB Charging Port ..................... .155
� STEERING WHEEL AUDIO CONTROLS .......156
▫ Radio Operation ....................... .156
� CD DISC MAINTENANCE .................156
� RADIO OPERATION AND MOBILE PHONES . . .157
▫ General Information ....................157 �
CLIMATE CONTROLS ....................157
▫ Manual Climate Control Overview ...........158
▫ Operating Tips ....................... .163
� UCONNECT VOICE RECOGNITION .........166
▫ Introducing Uconnect ....................166
▫ Get Started .......................... .166
▫ Basic Voice Commands ...................168
▫ Radio .............................. .169
▫ Media .............................. .169
▫ Phone .............................. .170
▫ Voice Text Reply ...................... .171
▫ General Information .................... .172
▫ Additional
Information ...................172
98 UNDERSTANDING YOUR INSTRUMENT PANEL
Page 109 of 348

Coolant Temperature Warning Light
Red TelltaleLight What It Means
Coolant Temperature Warning Light
This light warns of an overheated engine condition. If the light turns on while driving, safely pull
over and stop the vehicle. If the A/C system is on, turn it off. Also, shift the transmission into
NEUTRAL and idle the vehicle. If the temperature reading does not return to normal, turn the
engine off immediately and call for service.
NOTE:
As the coolant temperature gauge approaches
�H,�a Red Dot lamp located to the left of the “H”
will illuminate and a single chime will sound. Further overheating will cause the temperature
gauge to pass �H.�In this case, a continuous chime will sound until the engine is allowed to cool
or the 4 minute duration is expired, whichever comes first.
Brake Warning Light
Red Telltale Light What It Means
United States
Brake Warning Light
This light monitors various brake functions, including brake fluid level and parking brake appli-
cation. If the brake light turns on it may indicate that the parking brake is applied, that the brake
fluid level is low, or that there is a problem with the anti-lock brake system reservoir.
4
UNDERSTANDING YOUR INSTRUMENT PANEL 107
Page 110 of 348

Red TelltaleLight What It Means
Canada
If the light remains on when the parking brake has been disengaged, and the fluid level is at the
full mark on the master cylinder reservoir, it indicates a possible brake hydraulic system mal-
function or that a problem with the Brake Booster has been detected by the Anti-Lock Brake Sys-
tem (ABS) / Electronic Stability Control (ESC) system. In this case, the light will remain on until
the condition has been corrected. If the problem is related to the Brake Booster, the ABS pump
will run when applying the brake, and a brake pedal pulsation may be felt during each stop.
NOTE:
Brake Warning Light may illuminate due to excessive wear to brake pads.
The dual brake system provides a reserve braking capacity
in the event of a failure to a portion of the hydraulic
system. A leak in either half of the dual brake system is
indicated by the Brake Warning Light, which will turn on
when the brake fluid level in the master cylinder has
dropped below a specified level.
The light will remain on until the cause is corrected.
NOTE: The light may flash momentarily during sharp
cornering maneuvers, which change fluid level conditions.
The vehicle should have service performed, and the brake
fluid level checked.
If brake failure is indicated, immediate repair is necessary.
WARNING!
Driving a vehicle with the red brake light on is
dangerous. Part of the brake system may have failed. It
will take longer to stop the vehicle. You could have a
collision. Have the vehicle checked immediately.
Vehicles equipped with the Anti-Lock Brake System (ABS)
are also equipped with Electronic Brake Force Distribution
(EBD). In the event of an EBD failure, the Brake Warning
Light will turn on along with the ABS Light. Immediate
repair to the ABS system is required.
108 UNDERSTANDING YOUR INSTRUMENT PANEL
Page 113 of 348
Yellow TelltaleLight What It Means
•
License Plate Lights
The failure relating to these lights could be:
•One or more blown bulbs
• A blown protection fuse
• A break in the electrical connection
Vehicle Security Indicator Light
Yellow
Telltale Light What It Means
Vehicle Security Indicator Light
If during starting, the key code is not correctly recognized, the Vehicle Security Light comes on in the in-
strument panel. In this case, turn the key to OFF and then to ON/RUN; if it is still locked, try again with
the other keys that come with the vehicle. Contact an authorized dealer if you still cannot start the en-
gine.
If with the engine running, the warning light comes on, this means that the system is running a self-test
(for example for a voltage drop).
4
UNDERSTANDING YOUR INSTRUMENT PANEL 111
Page 119 of 348

Anti-Lock Brake (ABS) Indicator Light
Yellow TelltaleLight What It Means
Anti-Lock Brake (ABS) Indicator Light
This light monitors the Anti-Lock Brake System (ABS). The light will turn on when the ignition is
placed in the ON/RUN position and may stay on for as long as four seconds.
If the ABS light remains on or turns on while driving, then the Anti-Lock portion of the brake
system is not functioning and service is required. However, the conventional brake system will
continue to operate normally if the brake warning light is not on.
If the ABS light is on, the brake system should be serviced as soon as possible to restore the ben-
efits of Anti-Lock Brakes. If the ABS light does not turn on when the ignition is placed in the
ON/RUN position, have the light inspected by an authorized dealer.
Generic Warning Indicator Light
Yellow Telltale
Light What It Means
Generic Warning Indicator Light
The Generic Warning Light will illuminate if any of the following conditions occur: Oil Change
Request, Engine Oil Pressure Sensor Failure, External Light Failure, Fuel Cut-Off Not Available,
Parking Sensor Failure, DST System Failure.
4
UNDERSTANDING YOUR INSTRUMENT PANEL 117
Page 125 of 348

•Language
• Buzzer Volume
• Seat Belt Buzzer (*)
• (*) just available after SBR disable made by CHR
Service
• Service (Diesel Only)
• DRL - Daytime Running Lights (if equipped)
• Exit menu
NOTE:
• If equipped with Uconnect 5.0 radio, some customer
programmable features will display in the Uconnect
5.0 system. Refer to the radio supplement for further
Uconnect 5.0 information.
• The clock setting and Uconnect 5.0 clock setting pro-
cedure can be done through the radio or the Instru-
ment Cluster Display.
Selecting An Option Of The Main Menu Without Submenu
1. Briefly push and release the MODEbutton to select the
main menu option to set. 2. Push and release the
UPorDOWNarrow
button (by single pushes) to select the new setting.
3. Briefly push and release the MODEbutton to store the
new setting and go back to the main menu option
previously selected.
Selecting An Option Of The Main Menu With Submenu
1. Briefly push and release the MODEbutton to display
the first submenu option.
2. Push and release the UP
orDOWNarrow
button (by single pushes) to scroll through all the
submenu options.
3. Briefly push and release the MODEbutton to select the
displayed submenu option and to open the relevant
setup menu.
4. Push and release the UP
orDOWNarrow
button (by single pushes) to select the new setting for
this submenu option.
5. Briefly push and release the MODEbutton to store the
new setting and go back to the previously selected
submenu option.
4
UNDERSTANDING YOUR INSTRUMENT PANEL 123