Page 234 of 536

• Transmission Cool Ready To Drive
• Trailer Brake Disconnected
• Service Transmission
• Service Shifter
• Engage Park Brake To Prevent Rolling
• Transmission Too Cold Idle With Engine On
• Washer Fluid Low
The Reconfigurable Telltales section is divided into the
white telltales area on the right, yellow telltales in the
middle, and red telltales on the left.
Battery Saver On/Battery Saver Mode Message —
Electrical Load Reduction Actions — If Equipped
This vehicle is equipped with an Intelligent Battery Sensor
(IBS) to perform additional monitoring of the electrical
system and status of the vehicle battery.
In cases when the IBS detects charging system failure, or
the vehicle battery conditions are deteriorating, electrical
load reduction actions will take place to extend the driving
time and distance of the vehicle. This is done by reducing
power to or turning off non-essential electrical loads. Load reduction is only active when the engine is running.
It will display a message if there is a risk of battery
depletion to the point where the vehicle may stall due to
lack of electrical supply, or will not restart after the current
drive cycle.
When load reduction is activated, the message “Battery
Saver On” or “Battery Saver Mode” will appear in the
instrument cluster.
These messages indicate the vehicle battery has a low state
of charge and continues to lose electrical charge at a rate
that the charging system cannot sustain.
NOTE:
• The charging system is independent from load reduc-
tion. The charging system performs a diagnostic on the
charging system continuously.
• If the Battery Charge Warning Light is on it may indicate
a problem with the charging system. Refer to “Battery
Charge Warning Light” in “Understanding Your Instru-
ment Panel” for further information.232 UNDERSTANDING YOUR INSTRUMENT PANEL
Page 240 of 536

Options, Trailer Brake, Audio, Compass Settings, Phone/
Bluetooth, SiriusXM Setup (if equipped), Restore Settings,
Clear Personal Data and System Information.
NOTE: Only one category may be selected at a time.
When making a selection, press the button on the touch-
screen to enter the desired mode. Once in the desired
mode, press and release the preferred setting until the
button is highlighted. Once the setting is complete, either
press the back arrow or the “Done” button on the touch-
screen or the Back button on the faceplate to return to the
previous menu. Pressing the Up or Down Arrow buttons on the touchscreen on the right side of the screen will allow
you to toggle up or down through the list of available
settings.
NOTE: All settings should be changed with the ignition in
the RUN position.
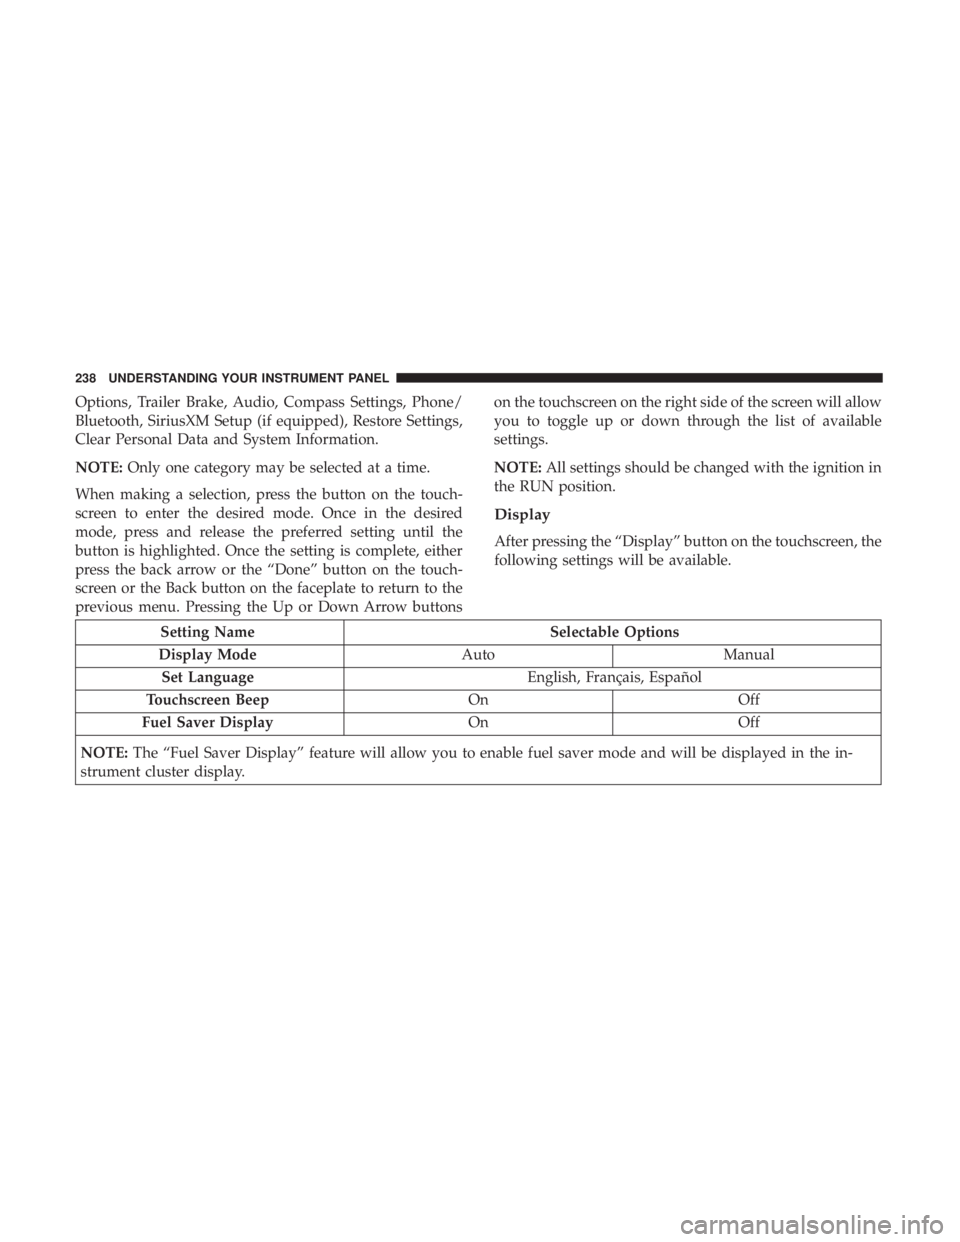
Display
After pressing the “Display” button on the touchscreen, the
following settings will be available.
Setting Name Selectable Options
Display Mode Auto Manual
Set Language English, Français, Español
Touchscreen Beep On Off
Fuel Saver Display On Off
NOTE: The “Fuel Saver Display” feature will allow you to enable fuel saver mode and will be displayed in the in-
strument cluster display. 238 UNDERSTANDING YOUR INSTRUMENT PANEL
Page 249 of 536
Engine Off Options
After pressing the “Engine Off Options” button on the
touchscreen, the following settings will be available:
Setting Name Selectable Options
Easy Exit Seats —
If Equipped
Headlight Off Delay 0 sec 30 sec 60 sec 90 sec
Engine Off Power
Delay 0 sec 45 sec 5 min 10 min
Trailer Brake
After pressing the “Trailer Brake” button on the touch-
screen, the following settings will be available:
Setting Name Selectable Options
Trailer Select Trailer 1 Trailer 2 Trailer 3 Trailer 4
Trailer Brake Type Light Electric Heavy Electric Light EOH Heavy EOH 4UNDERSTANDING YOUR INSTRUMENT PANEL 247
Page 257 of 536

Customer Programmable Features — Uconnect
8.4/8.4 NAV Personal Settings
Press the “Apps” button on the touchscreen then press the
“Settings” button on the touchscreen to display the settings
menu screen. In this mode the Uconnect system allows you
to access programmable features that may be equipped
such as Display, Voice, Clock, Safety & Driving Assistance,
Lights, Doors & Locks, Auto-On Comfort (if equipped),
Engine Off Options, Trailer Brake, Audio, Phone/
Bluetooth, SiriusXM Setup (if equipped), Restore Settings,
Clear Personal Data and System Information.
NOTE: Only one category may be selected at a time. When making a selection, press the button on the touch-
screen to enter the desired mode. Once in the desired
mode, press and release the preferred setting until a
check-mark appears next to the setting, showing that
setting has been selected. Once the setting is complete,
either press the back arrow button on the touchscreen or
the Back button on the faceplate to return to the previous
menu or press the “X” button on the touchscreen to close
out of the settings screen. Pressing the Up or Down Arrow
buttons on the touchscreen on the right side of the screen
will allow you to toggle up or down through the list of
available settings.
NOTE: All settings should be changed with the ignition in
the RUN position. 4UNDERSTANDING YOUR INSTRUMENT PANEL 255
Page 269 of 536

Engine Off Options
After pressing the “Engine Off Options” button on the
touchscreen, the following settings will be available:
Setting Name Selectable Options
Engine Off Power Delay +–
NOTE: When the “Engine Off Power Delay” feature is selected, the power window switches, radio, Uconnect phone
system (if equipped), DVD video system (if equipped), power sunroof (if equipped), and power outlets will remain
active for up to 10 minutes after the ignition is cycled to OFF. Opening either front door will cancel this feature.
Headlight Off Delay +“ –
NOTE: When the “Headlight Off Delay” feature is selected, the driver can choose to have the headlights remain on
for 0, 30, 60, or 90 seconds when exiting the vehicle.
Trailer Brake
After pressing the “Trailer Brake” button on the touch-
screen, the following settings will be available:
Setting Name Selectable Options
Trailer Select Trailer 1 Trailer 2 Trailer 3 Trailer 4
Trailer Brake Type Light Electric Heavy Electric Light EOH Heavy EOH 4UNDERSTANDING YOUR INSTRUMENT PANEL 267
Page 319 of 536

STARTING AND OPERATINGCONTENTS � STARTING PROCEDURES ................ .321
▫ Normal Starting ....................... .321
▫ Automatic Transmission ................. .321
▫ Keyless Enter-N-Go — Ignition ............ .322
▫ Normal Starting ....................... .322
▫ Extreme Cold Weather (Below –20°F or �29°C) . .323
▫ If Engine Fails To Start ................. .323
▫ After Starting ......................... .324
� ENGINE BLOCK HEATER — IF EQUIPPED .... .324
� AUTOMATIC TRANSMISSION ............. .325
▫ Key Ignition Park Interlock ............... .326
▫ Brake/Transmission Shift Interlock System . . . .327
▫ Six–Speed Automatic Transmission —
If Equipped ......................... .327 � POWER TAKE OFF OPERATION — IF EQUIPPED
(CHASSIS CAB ONLY) ................... .336
▫ Stationary Mode ...................... .336
▫ Mobile Mode ......................... .337
� FOUR-WHEEL DRIVE OPERATION —
IF EQUIPPED ......................... .338
▫ Manually Shifted Transfer Case — If Equipped . .338
▫ Electronically Shifted Transfer Case
(Four-Position Switch) — If Equipped ....... .342
� LIMITED-SLIP DIFFERENTIAL ............. .346
� DRIVING ON SLIPPERY SURFACES ......... .347
▫ Acceleration .......................... .347
▫ Traction ............................. .347
� DRIVING THROUGH WATER ............. .348
▫ Flowing/Rising Water .................. .3485
Page 320 of 536

▫ Shallow Standing Water ................. .348
� POWER STEERING ..................... .349
▫ Power Steering Fluid Check .............. .350
� PARKING BRAKE ...................... .350
� BRAKE SYSTEM ....................... .352
▫ Hydraulic Brake Assist .................. .352
� ELECTRONIC BRAKE CONTROL SYSTEM .... .353
▫ Electronic Brake Force Distribution (EBD) ..... .353
▫ Brake System Warning Light .............. .353
▫ Anti-Lock Brake System (ABS) ............ .353
▫ Anti-Lock Brake Warning Light ............ .354
▫ Brake Assist System (BAS) ............... .355
▫ Hill Start Assist (HSA) .................. .355
▫ Traction Control System (TCS) ............ .358
▫ Electronic Stability Control (ESC) .......... .358
▫ Electronic Roll Mitigation (ERM) .......... .362
▫ Trailer Sway Control (TSC) — If Equipped . . . .362 ▫ Hill Descent Control (HDC) — If Equipped . . . .363
� TIRE SAFETY INFORMATION ............. .365
▫ Tire Markings ........................ .365
▫ Tire Identification Number (TIN) ........... .369
▫ Tire Terminology And Definitions .......... .370
▫ Tire Loading And Tire Pressure ........... .371
� TIRES — GENERAL INFORMATION ........ .376
▫ Tire Pressure ......................... .376
▫ Tire Inflation Pressures ................. .377
▫ T ir e Pressures For High Speed Operation .... .378
▫ Tire Maintenance And Replacement ......... .378
▫ Radial Ply Tires ....................... .378
▫ Tire Types ........................... .379
▫ Run Flat Tires — If Equipped ............. .380
▫ Spare Tires — If Equipped ............... .380
▫ Tire Spinning ........................ .382
▫ Tread Wear Indicators .................. .383318 STARTING AND OPERATING
Page 323 of 536

STARTING PROCEDURES
Before starting your vehicle, adjust your seat, adjust both
inside and outside mirrors, and fasten your seat belt.
The starter should not be operated for more than 10-second
intervals. Waiting a few seconds between such intervals
will protect the starter from overheating.
WARNING!• When leaving the vehicle, always make sure the
keyless ignition node is in the � OFF � mode, remove
the key fob from the vehicle and lock the vehicle.
• Never leave children alone in a vehicle, or with access
to an unlocked vehicle. Allowing children to be in a
vehicle unattended is dangerous for a number of
reasons. A child or others could be seriously or fatally
injured. Children should be warned not to touch the
parking brake, brake pedal or the gear selector.
• Do not leave the key fob in or near the vehicle, or in a
location accessible to children, and do not leave the
ignition of a vehicle equipped with Keyless Enter-N-Go
in the ACC or ON/RUN mode. A child could operate
power windows, other controls, or move the vehicle. (Continued) WARNING! (Continued)• Do not leave children or animals inside parked
vehicles in hot weather. Interior heat build-up may
cause serious injury or death.
Normal Starting
Normal starting of either a warm or cold engine is obtained
without pumping or pressing the accelerator pedal. Cycle
the ignition to the START position and release when the
engine starts. If the engine fails to start within 10 seconds,
cycle the ignition to the OFF position, wait five seconds,
then repeat the “Normal Starting” procedure.
Automatic Transmission
Start the engine with the gear selector in the NEUTRAL or
PARK. Apply the brake before shifting into any driving
range.
NOTE: This vehicle is equipped with a transmission
shift interlocking system. The brake pedal must be
pressed to shift out of PARK. 5STARTING AND OPERATING 321