Page 102 of 542

�ELECTRICAL POWER OUTLETS ............172
� AUXILIARY SWITCHES — IF EQUIPPED ......177
� CIGAR LIGHTER AND ASH RECEIVER — IF
EQUIPPED ........................... .177
� POWER INVERTER — IF EQUIPPED .........177
� CUPHOLDERS ........................ .179
▫ Front Seat Cupholders (40–20–40 Seats) .......179
▫ Front Instrument Panel Cupholders —
Floor Storage Bin ...................... .179
▫ Rear Cupholders — If Equipped ............179
� STORAGE ............................ .180
▫ Glove Compartment .....................180
▫ Door Storage ......................... .182▫
Center Storage Compartment — If Equipped . . .183
▫ Seatback Storage ...................... .185
▫ Storage (Regular Cab) ....................186
▫ Storage and Seats (Crew Cab/Quad Cab) ......186
▫ Plastic Grocery Bag Retainers
(Regular Cab Models) ...................187
� REAR WINDOW FEATURES ...............187
▫ Rear Window Defroster ..................187
▫ Power Sliding Rear Window — If Equipped . . .188
▫ Manual Sliding Rear Window — If Equipped . .188
� FOLD FLAT LOAD FLOOR — IF EQUIPPED . . . .189
100 UNDERSTANDING THE FEATURES OF YOUR VEHICLE
Page 174 of 542

WARNING!(Continued)
use a garage door opener without these safety fea-
tures. Call toll-free 1-800-355-3515 or, on the Internet
at HomeLink.com for safety information or assis-
tance.
General Information
This device complies with FCC rules Part 15 and Industry
Canada RSS-210. Operation is subject to the following two
conditions:
1. This device may not cause harmful interference, and
2.
This device must accept any interference received, includ-
ing interference that may cause undesired operation.
NOTE:
•The transmitter has been tested and it complies with
FCC and IC rules. Changes or modifications not ex-
pressly approved by the party responsible for compli-
ance could void the user ’s authority to operate the
device.
• The term IC before the certification/registration number
only signifies that Industry Canada technical specifica-
tions were met.
ELECTRICAL POWER OUTLETS
The auxiliary 12 Volt (13 Amp) power outlets can provide
power for in-cab accessories designed for use with the
standard “cigar lighter” plug. The 12 Volt power outlets
and USB Port (Charge Only) have a cap attached to the
outlet indicating “12V DC,” together with either a key
symbol, battery symbol, or USB symbol.
A key symbol indicates that the key must be in the
ON/RUN or ACC positions for the outlet to provide
power. The battery symbol indicates that the outlet is
connected to the battery, and can provide power at all
times.
NOTE: To ensure proper operation, a Mopar knob and
element must be used.
CAUTION!
• Do not exceed the maximum power of 160 Watts
(13 Amps) at 12 Volts. If the 160 Watts (13 Amps)
power rating is exceeded, the fuse protecting the
system will need to be replaced.
(Continued)
172 UNDERSTANDING THE FEATURES OF YOUR VEHICLE
Page 175 of 542
CAUTION!(Continued)
•Power outlets are designed for accessory plugs only.
Do not insert any other object in the power outlets as
this will damage the outlet and blow the fuse. Im-
proper use of the power outlet can cause damage not
covered by your New Vehicle Limited Warranty.
The auxiliary power outlets can be found in the following
locations:
• Lower left and lower right of the center stack when
equipped with a bench seat.
•Center console when equipped with bucket seats.
Power Outlets — Center Stack
1 — Power Outlet
2 — USB Port (Charge Only)
3
UNDERSTANDING THE FEATURES OF YOUR VEHICLE 173
Page 179 of 542

CAUTION!(Continued)
•After the use of high power draw accessories, or long
periods of the vehicle not being started (with acces-
sories still plugged in), the vehicle must be driven a
sufficient length of time to allow the generator to
recharge the vehicle’s battery.
AUXILIARY SWITCHES — IF EQUIPPED
There can be up to five auxiliary switches located in the
lower switch bank of the instrument panel which can be
used to power various electronic devices and PTO (Power
Take Off) – If Equipped. If Power Take Off is equipped, it
will take the place of the fifth Auxiliary switch. Connec-
tions to the switches are found under the hood in the
connectors attached to the auxiliary Power Distribution
Center.
You have the ability to configure the functionality of the
auxiliary switches via the instrument cluster display. All
switches can now be configured for setting the switch type
operation to latching or momentary, power source of either
battery or ignition, and ability to hold last state across key
cycles. NOTE:
Holding last state conditions are met when switch
type is set to latching and power source is set to ignition.
For further information on using the auxiliary switches,
please refer to the Ram Body Builders Guide by accessing
www.rambodybuilder.com and choosing the appropriate
links.
CIGAR LIGHTER AND ASH RECEIVER — IF
EQUIPPED
A removable ash receiver and cigar lighter are available.
For vehicles with a bench seat, the cupholder tray can be
used to hold the ash receiver.
For vehicles equipped with a floor console, the cupholders
may be used.
POWER INVERTER — IF EQUIPPED
A 115 Volt (150 Watts Maximum) outlet is located on the
center stack of the instrument panel, to the right of the
radio. This outlet can power cellular phones, electronics
and other low power devices requiring power up to
150 Watts. Certain high-end video game consoles will
exceed this power limit, as will most power tools.
3
UNDERSTANDING THE FEATURES OF YOUR VEHICLE 177
Page 235 of 542
Setting NamesSetting Names Abbreviated
(Left Submenu Layer) Sub-Menus
(Right Submenu Layer)
23 Commercial Settings Commercial
•Aux Switches
• Power Take-Off
• PIN Setup
• ParkSense Setup
24 Aero Ride Height Mode Aero ModeOn; Off
25 Tire/Jack Mode Tire/Jack Mode On; Off
26 Transport Mode Transport Mode On; Off
27 Wheel Alignment Mode Wheel AlignmentOn; Off
28 Horn w/ Remote Lower Horn w/ Rmt LwrOn; Off
29 Lights w/ Remote Lower Lights w/ Rmt LwrOn; Off
30 Trailer Select Trailer SelectTrailer 1; Trailer 2; Trailer 3;
Trailer 4
31 Brake Type Brake TypeLight Electric; Heavy Electric;
Light EOH; Heavy EOH
4
UNDERSTANDING YOUR INSTRUMENT PANEL 233
Page 255 of 542
Setting NameSelectable Options
AUX Volume Offset — If Equipped On
Off
NOTE:
The “AUX Volume Offset” feature provides the ability to tune the audio level for portable devices connected through
the AUX input. Loudness — IfEquipped On
Off
NOTE:
The “Loudness” feature improves sound quality at lower volumes.
4
UNDERSTANDING YOUR INSTRUMENT PANEL 253
Page 275 of 542

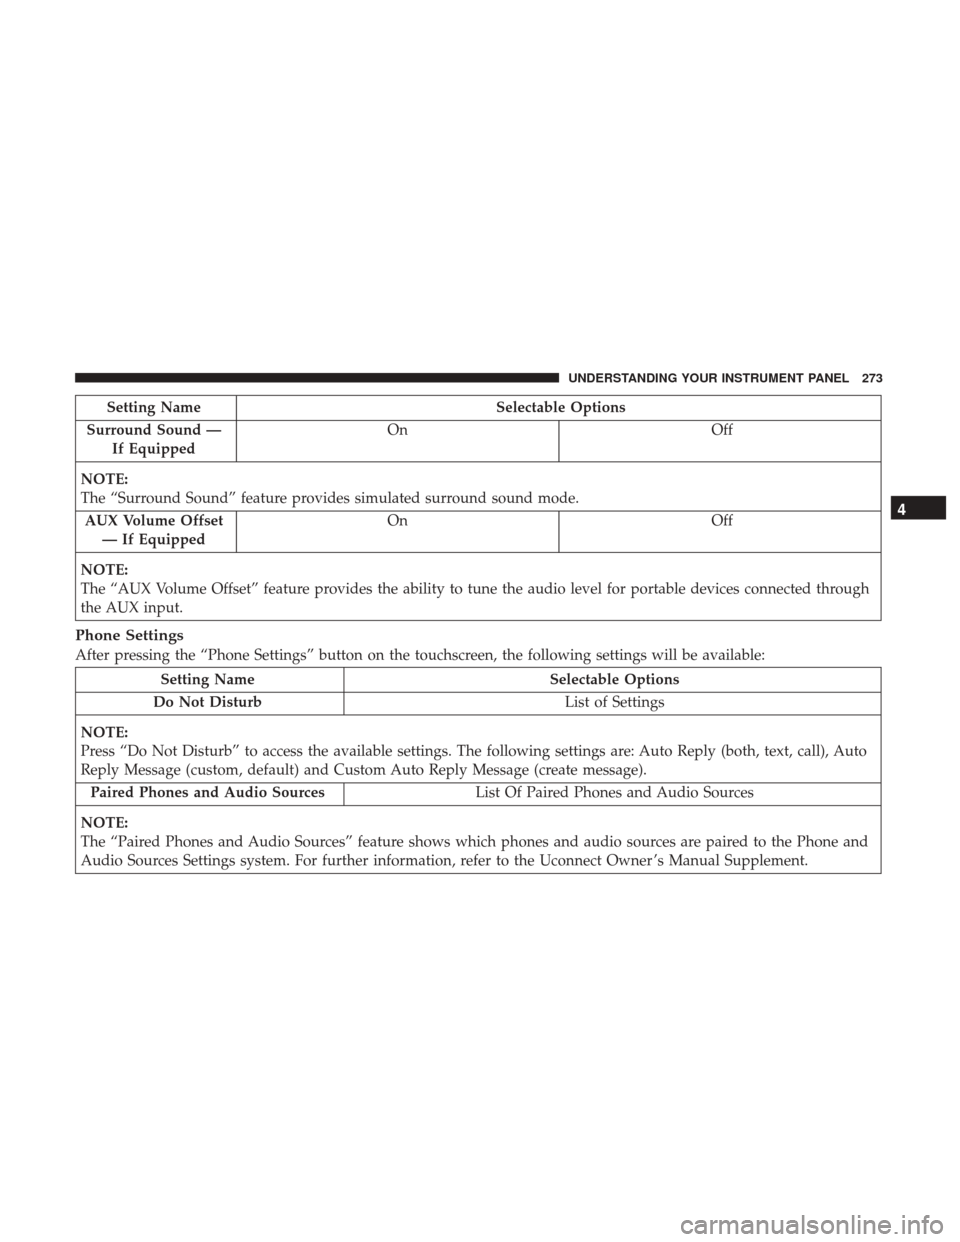
Setting NameSelectable Options
Surround Sound — If Equipped On
Off
NOTE:
The “Surround Sound” feature provides simulated surround sound mode. AUX Volume Offset — If Equipped On
Off
NOTE:
The “AUX Volume Offset” feature provides the ability to tune the audio level for portable devices connected through
the AUX input.
Phone Settings
After pressing the “Phone Settings” button on the touchscreen, the following settings will be available:
Setting Name Selectable Options
Do Not Disturb List of Settings
NOTE:
Press “Do Not Disturb” to access the available settings. The following settings are: Auto Reply (both, text, call), Auto
Reply Message (custom, default) and Custom Auto Reply Message (create message). Paired Phones and Audio Sources List Of Paired Phones and Audio Sources
NOTE:
The “Paired Phones and Audio Sources” feature shows which phones and audio sources are paired to the Phone and
Audio Sources Settings system. For further information, refer to the Uconnect Owner ’s Manual Supplement.
4
UNDERSTANDING YOUR INSTRUMENT PANEL 273
Page 278 of 542

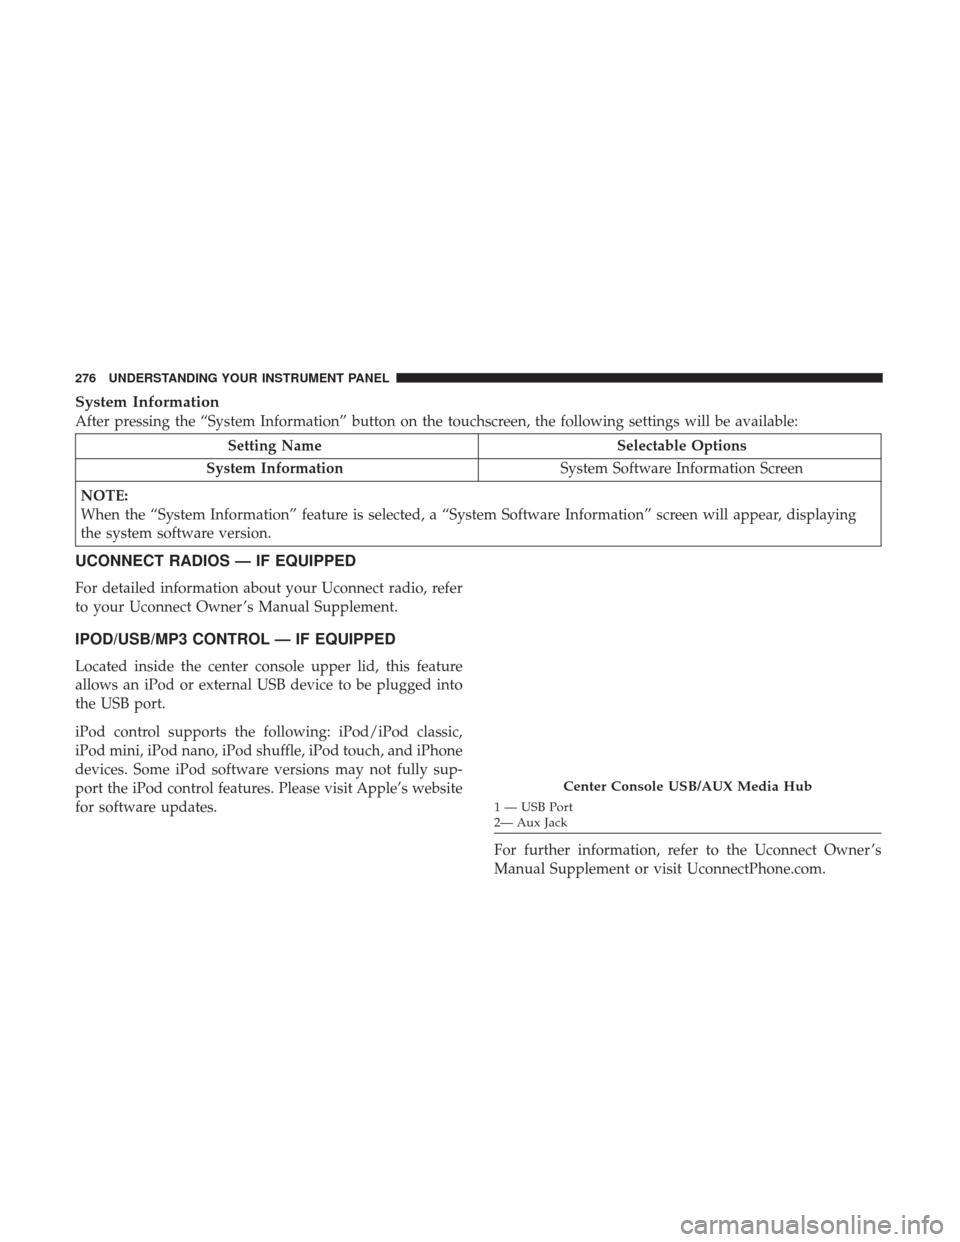
System Information
After pressing the “System Information” button on the touchscreen, the following settings will be available:
Setting NameSelectable Options
System Information System Software Information Screen
NOTE:
When the “System Information” feature is selected, a “System Software Information” screen will appear, displaying
the system software version.
UCONNECT RADIOS — IF EQUIPPED
For detailed information about your Uconnect radio, refer
to your Uconnect Owner ’s Manual Supplement.
IPOD/USB/MP3 CONTROL — IF EQUIPPED
Located inside the center console upper lid, this feature
allows an iPod or external USB device to be plugged into
the USB port.
iPod control supports the following: iPod/iPod classic,
iPod mini, iPod nano, iPod shuffle, iPod touch, and iPhone
devices. Some iPod software versions may not fully sup-
port the iPod control features. Please visit Apple’s website
for software updates.
For further information, refer to the Uconnect Owner ’s
Manual Supplement or visit UconnectPhone.com.
Center Console USB/AUX Media Hub
1 — USB Port
2— Aux Jack
276 UNDERSTANDING YOUR INSTRUMENT PANEL