Page 164 of 542

When enabled, active guide lines are overlaid on the image
to illustrate the width of the vehicle and its projected
backup path based on the steering wheel position. The
active guide lines will show separate zones that will help
indicate the distance to the rear of the vehicle.
NOTE:For further information about how to access and
change the programmable features of the ParkView Rear
Backup Camera, refer to “Uconnect Settings” in “Under-
standing Your Instrument Panel” for further information.
The following table shows the approximate distances for
each zone:
Zones Distance to the rear of
the vehicle
Red 0 - 1 ft (0 - 30 cm)
Yellow 1 ft - 6.5 ft (30 cm - 2m)
Green 6.5 ft or greater (2 m or
greater)
WARNING!
Drivers must be careful when backing up even when
using the ParkView Rear Back Up Camera. Always
check carefully behind your vehicle, and be sure to
check for pedestrians, animals, other vehicles, obstruc-
tions, or blind spots before backing up. You are re-
sponsible for the safety of your surroundings and must
continue to pay attention while backing up. Failure to
do so can result in serious injury or death.
CAUTION!
•To avoid vehicle damage, ParkView should only be
used as a parking aid. The ParkView camera is
unable to view every obstacle or object in your drive
path.
• To avoid vehicle damage, the vehicle must be driven
slowly when using ParkView to be able to stop in
time when an obstacle is seen. It is recommended
that the driver look frequently over his/her shoulder
when using ParkView.
NOTE: If snow, ice, mud, or any foreign substance builds
up on the camera lens, clean the lens, rinse with water, and
dry with a soft cloth. Do not cover the lens.
162 UNDERSTANDING THE FEATURES OF YOUR VEHICLE
Page 195 of 542

UNDERSTANDING YOUR INSTRUMENT PANEL
CONTENTS
�INSTRUMENT PANEL FEATURES ...........195
� INSTRUMENT CLUSTER ..................196
� WARNING AND INDICATOR LIGHTS ........200
▫ Red Telltale Indicator Lights ...............201
▫ Yellow Telltale Indicator Lights .............208
▫ Green Telltale Indicator Lights ..............219
▫ Blue Telltale Indicator Lights ...............221
▫ White Telltale Indicator Lights ..............222
� INSTRUMENT CLUSTER DISPLAY ...........223
▫ Instrument Cluster Display Controls .........223
▫ Instrument Cluster Display Screens ..........225
▫ Oil Life Reset ......................... .227
▫ Instrument Cluster Display Selectable Menu
Items .............................. .228▫
Instrument Cluster Display Messages .........235
▫ Battery Saver On/Battery Saver Mode Message —
Electrical Load Reduction Actions —
If Equipped ......................... .237
� CYBERSECURITY ....................... .239
� UCONNECT SETTINGS ...................240
▫ Buttons On The Faceplate .................241
▫ Buttons On The Touchscreen ...............242
▫ Customer Programmable Features —
Uconnect 5.0 Personal Settings ..............242
▫ Customer Programmable Features —
Uconnect 8.4/8.4 NAV Personal Settings ......259
� UCONNECT RADIOS — IF EQUIPPED ........276
� IPOD/USB/MP3 CONTROL — IF EQUIPPED . . . .276
� STEERING WHEEL AUDIO CONTROLS — IF
EQUIPPED ........................... .2774
Page 225 of 542

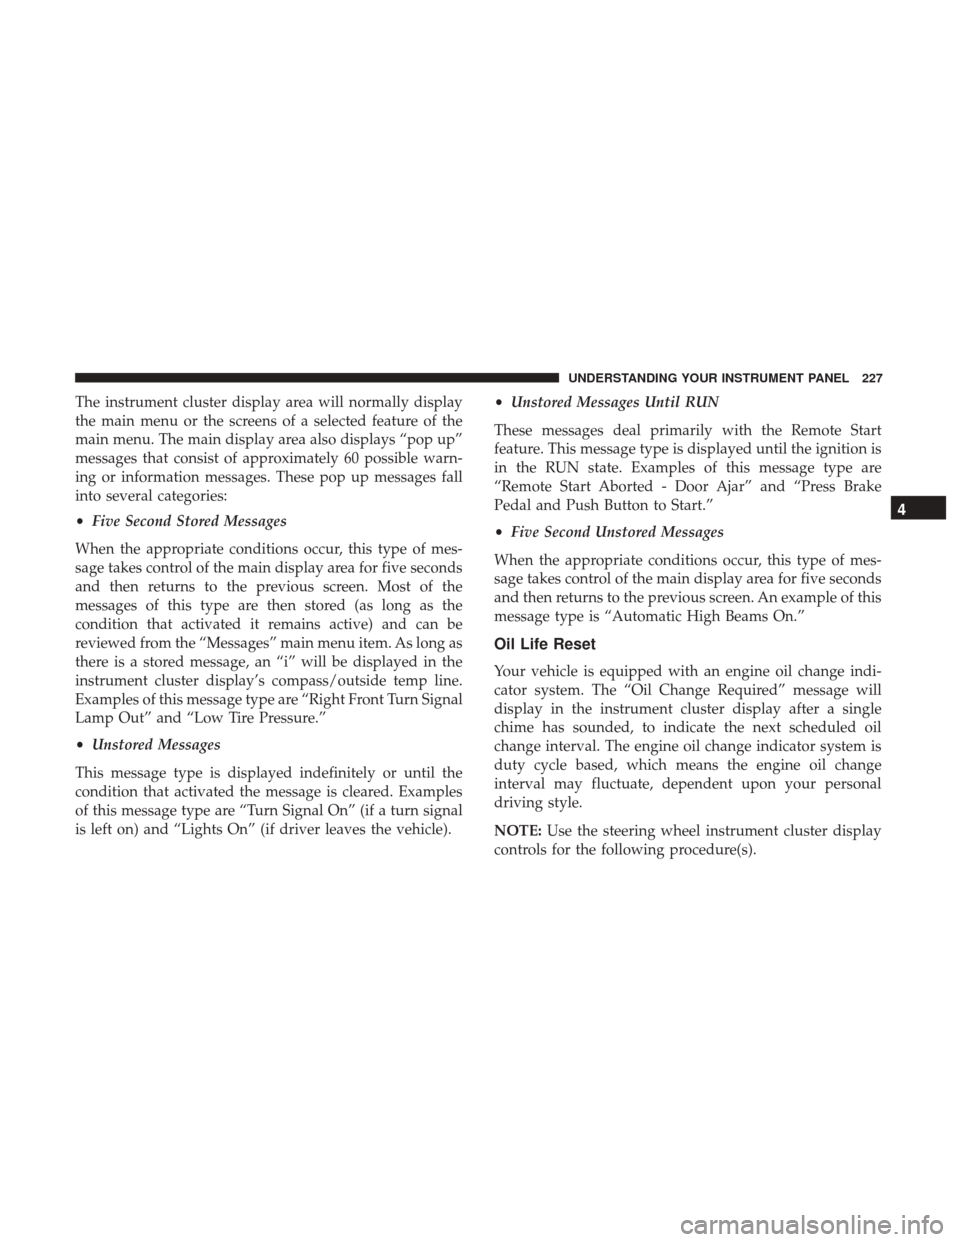
INSTRUMENT CLUSTER DISPLAY
Your vehicle may be equipped with an instrument cluster
display, which offers useful information to the driver. With
the ignition in the STOP/OFF position, opening/closing of
a door will activate the display for viewing, and display
the total miles (kilometers) in the odometer. Your instru-
ment cluster display is designed to display important
information about your vehicle’s systems and features.
Using a driver interactive display located on the instru-
ment panel, your instrument cluster display can show you
how systems are working and give you warnings when
they aren’t. The steering wheel mounted controls allow
you to scroll through and enter the main menus and
submenus. You can access the specific information you
want and make selections and adjustments.
Instrument Cluster Display Controls
The instrument cluster display features a driver-interactive
display that is located in the instrument cluster.
Base Instrument Cluster Display
4
UNDERSTANDING YOUR INSTRUMENT PANEL 223
Page 226 of 542
The instrument cluster display menu items may consist of
the following:
•Speedometer
• Vehicle Info
• Fuel Economy Info
• Trip A
• Trip B
• Audio •
Trailer Tow
• Stored Messages
• Screen Setup
• Vehicle Settings (Not Equipped with a Uconnect 5.0 &
8.4 radio)
The system allows the driver to select information by
pushing the following instrument cluster display control
buttons located on the left side of the steering wheel:
Premium Instrument Cluster Display
Instrument Cluster Display Control Buttons
224 UNDERSTANDING YOUR INSTRUMENT PANEL
Page 229 of 542

The instrument cluster display area will normally display
the main menu or the screens of a selected feature of the
main menu. The main display area also displays “pop up”
messages that consist of approximately 60 possible warn-
ing or information messages. These pop up messages fall
into several categories:
•Five Second Stored Messages
When the appropriate conditions occur, this type of mes-
sage takes control of the main display area for five seconds
and then returns to the previous screen. Most of the
messages of this type are then stored (as long as the
condition that activated it remains active) and can be
reviewed from the “Messages” main menu item. As long as
there is a stored message, an “i” will be displayed in the
instrument cluster display’s compass/outside temp line.
Examples of this message type are “Right Front Turn Signal
Lamp Out” and “Low Tire Pressure.”
• Unstored Messages
This message type is displayed indefinitely or until the
condition that activated the message is cleared. Examples
of this message type are “Turn Signal On” (if a turn signal
is left on) and “Lights On” (if driver leaves the vehicle). •
Unstored Messages Until RUN
These messages deal primarily with the Remote Start
feature. This message type is displayed until the ignition is
in the RUN state. Examples of this message type are
“Remote Start Aborted - Door Ajar” and “Press Brake
Pedal and Push Button to Start.”
• Five Second Unstored Messages
When the appropriate conditions occur, this type of mes-
sage takes control of the main display area for five seconds
and then returns to the previous screen. An example of this
message type is “Automatic High Beams On.”
Oil Life Reset
Your vehicle is equipped with an engine oil change indi-
cator system. The “Oil Change Required” message will
display in the instrument cluster display after a single
chime has sounded, to indicate the next scheduled oil
change interval. The engine oil change indicator system is
duty cycle based, which means the engine oil change
interval may fluctuate, dependent upon your personal
driving style.
NOTE: Use the steering wheel instrument cluster display
controls for the following procedure(s).
4
UNDERSTANDING YOUR INSTRUMENT PANEL 227
Page 252 of 542

Setting NameSelectable Options
Passive Entry — If Equipped On
Off
NOTE:
The “Passive Entry” feature allows you to lock and unlock the vehicle’s door(s) without having to push the key fob
lock or unlock buttons. It automatically unlocks the doors when the outside door handle is grabbed. Flash Lights With Lock On Off
NOTE:
When the “Flash Lights With Lock” feature is selected, the exterior lights will flash when the doors are locked or un-
locked with the key fob. This feature may be selected with or without the “Sound Horn With Lock” feature selected.
Auto Comfort Systems — If Equipped
After pressing the “Auto-On Comfort” button on the touchscreen, the following settings will be available:
Setting Name Selectable Options
Auto-On Driver Heated/Ventilated
Seat & Steering Wheel With Vehicle Start — If Equipped On
Off
NOTE:
When the “Auto-On Driver Heated/Ventilated Seat & Steering Wheel With Vehicle Start” feature is selected the driv-
er’s heated seat and heated steering wheel will automatically turn on when temperatures are below 40° F (4.4° C).
When temperatures are above 80° F (26.7° C) the driver vented seat will turn on.
250 UNDERSTANDING YOUR INSTRUMENT PANEL
Page 267 of 542

Setting NameSelectable Options
ParkView Backup Camera
NOTE:
Your vehicle may be equipped with the ParkView Rear Back Up Camera that allows you to see an on-screen image of
the rear surroundings of your vehicle whenever the gear selector is put into REVERSE. The image will be displayed
on the radio touchscreen display along with a caution note to “check entire surroundings” across the top of the
screen. After five seconds, this note will disappear. The ParkView camera is located on the rear of the vehicle above
the rear License plate. ParkView Backup Camera Active Guidelines On
Off
NOTE:
Your vehicle may be equipped with the ParkView Rear Back Up Camera Active Guidelines that allows you to see Ac-
tive (Dynamic) Guidelines which deflect with steering wheel angle over the ParkView Back up Camera display when-
ever the gear selector is put into REVERSE. The image will be displayed on the radio touchscreen display along with
a caution note to “check entire surroundings” across the top of the screen. After five seconds, this note will disappear. ParkView Backup Camera Delay On
Off
NOTE:
When the “ParkView Backup Camera Delay” feature is enabled, it will allow the ParkView Backup Camera display to
remain on while in drive for up to ten seconds, or 8 mph (12 km/h).
4
UNDERSTANDING YOUR INSTRUMENT PANEL 265
Page 272 of 542
Setting NameSelectable Options
Passive Entry — If Equipped
NOTE:
The “Passive Entry” feature allows you to lock and unlock the vehicle’s door(s) without having to push the key fob
lock or unlock buttons.
Personal Settings Linked To Key Fob — IfEquipped
NOTE:
•The “Personal Settings Linked To Key Fob” feature provides automatic driver seat positioning to enhance driver
mobility when entering and exiting the vehicle.
•The seat will return to the memorized seat location (if “Personal Settings Linked To Key Fob” is set to on) when
the key fob is used to unlock the door.
Auto Comfort Systems — If Equipped
After pressing the “Auto-On Comfort” button on the touchscreen, the following settings will be available:
Setting Name Selectable Options
Auto-On Driver Heated/
Ventilated Seat & Steering Wheel With Vehicle Start — If Equipped Off
Remote Start All Starts
270 UNDERSTANDING YOUR INSTRUMENT PANEL