Page 419 of 542

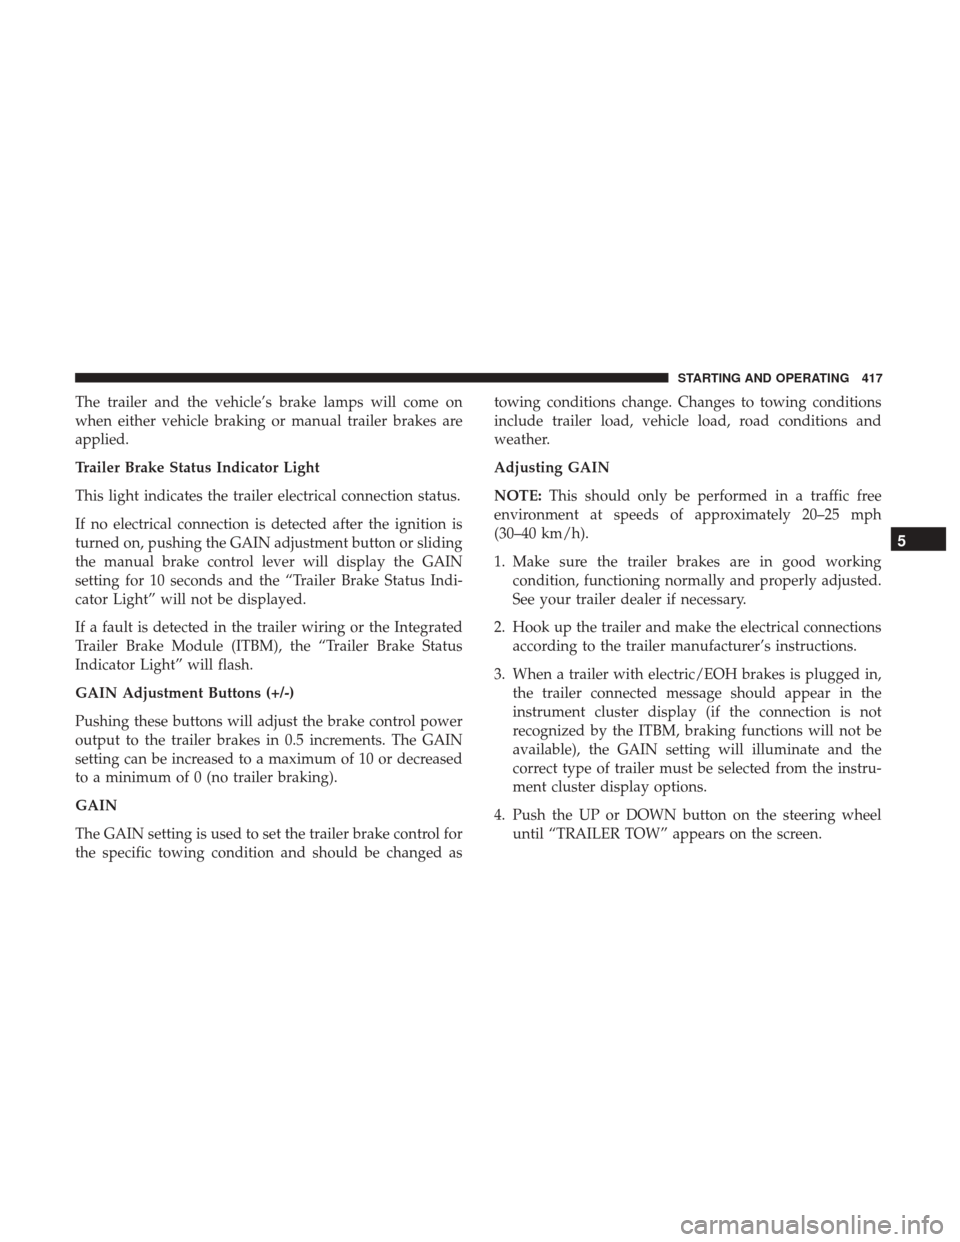
The trailer and the vehicle’s brake lamps will come on
when either vehicle braking or manual trailer brakes are
applied.
Trailer Brake Status Indicator Light
This light indicates the trailer electrical connection status.
If no electrical connection is detected after the ignition is
turned on, pushing the GAIN adjustment button or sliding
the manual brake control lever will display the GAIN
setting for 10 seconds and the “Trailer Brake Status Indi-
cator Light” will not be displayed.
If a fault is detected in the trailer wiring or the Integrated
Trailer Brake Module (ITBM), the “Trailer Brake Status
Indicator Light” will flash.
GAIN Adjustment Buttons (+/-)
Pushing these buttons will adjust the brake control power
output to the trailer brakes in 0.5 increments. The GAIN
setting can be increased to a maximum of 10 or decreased
to a minimum of 0 (no trailer braking).
GAIN
The GAIN setting is used to set the trailer brake control for
the specific towing condition and should be changed astowing conditions change. Changes to towing conditions
include trailer load, vehicle load, road conditions and
weather.
Adjusting GAIN
NOTE:
This should only be performed in a traffic free
environment at speeds of approximately 20–25 mph
(30–40 km/h).
1. Make sure the trailer brakes are in good working condition, functioning normally and properly adjusted.
See your trailer dealer if necessary.
2. Hook up the trailer and make the electrical connections according to the trailer manufacturer’s instructions.
3. When a trailer with electric/EOH brakes is plugged in, the trailer connected message should appear in the
instrument cluster display (if the connection is not
recognized by the ITBM, braking functions will not be
available), the GAIN setting will illuminate and the
correct type of trailer must be selected from the instru-
ment cluster display options.
4. Push the UP or DOWN button on the steering wheel until “TRAILER TOW” appears on the screen.
5
STARTING AND OPERATING 417
Page 420 of 542

5. Push the RIGHT arrow on the steering wheel to enter“TRAILER TOW”.
6. Push the UP or DOWN buttons until Trailer Brake Type appears on the screen.
7. Push the RIGHT arrow and then push the UP or DOWN buttons until the proper Trailer Brake Type appears on
the screen. 8. In a traffic-free environment, tow the trailer on a dry,
level surface at a speed of 20–25 mph (30–40 km/h) and
squeeze the manual brake control lever completely.
9. If the trailer wheels lockup (indicated by squealing tires), reduce the GAIN setting; if the trailer wheels turn
freely, increase the GAIN setting.
Repeat steps 8 and 9 until the GAIN setting is at a point just
below trailer wheel lockup. If towing a heavier trailer,
trailer wheel lockup may not be attainable even with the
maximum GAIN setting of 10.
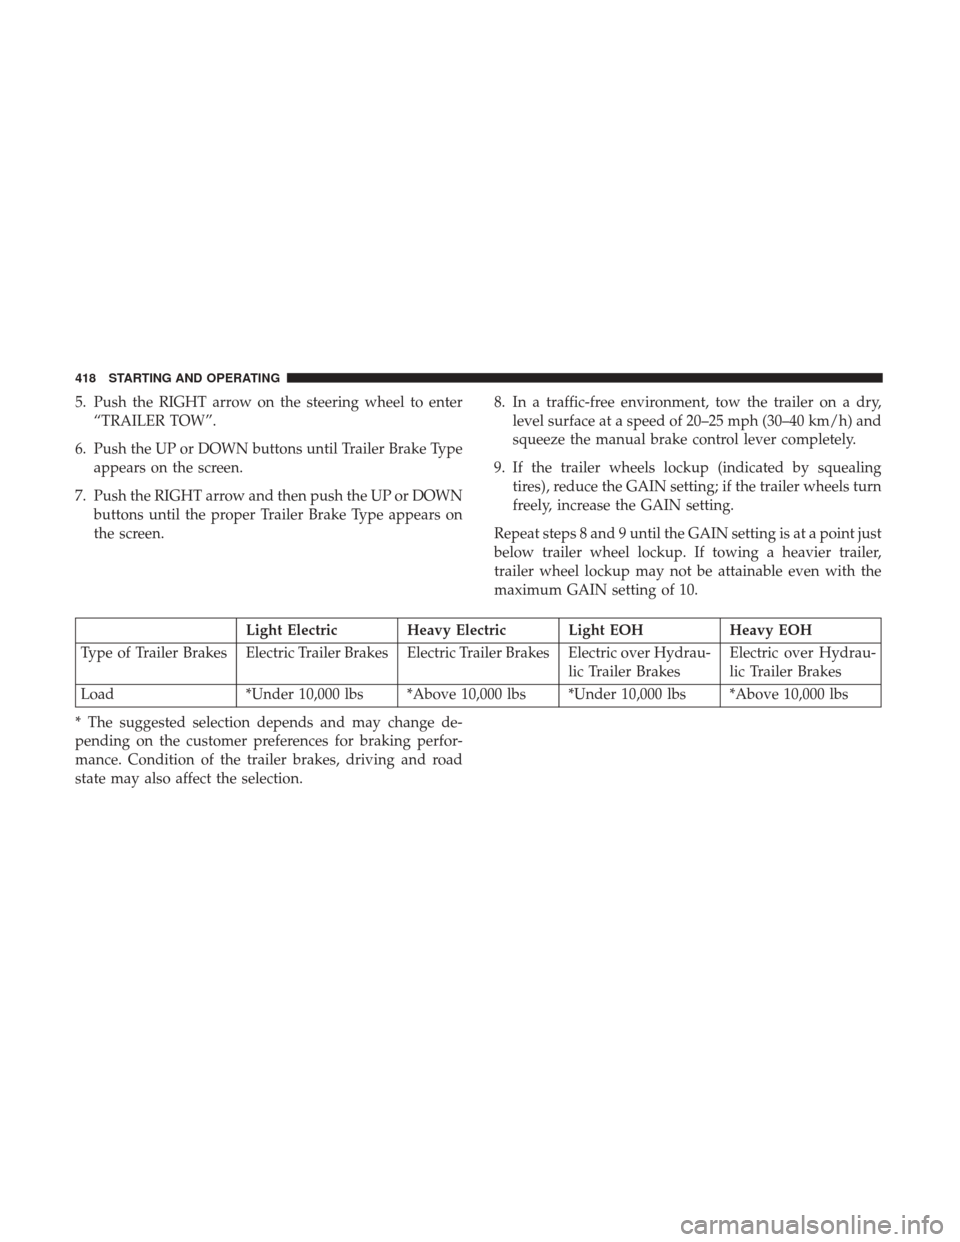
Light Electric Heavy Electric Light EOH Heavy EOH
Type of Trailer Brakes Electric Trailer Brakes Electric Trailer Brakes Electric over Hydrau- lic Trailer BrakesElectric over Hydrau-
lic Trailer Brakes
Load *Under 10,000 lbs *Above 10,000 lbs *Under 10,000 lbs *Above 10,000 lbs
* The suggested selection depends and may change de-
pending on the customer preferences for braking perfor-
mance. Condition of the trailer brakes, driving and road
state may also affect the selection.
418 STARTING AND OPERATING
Page 435 of 542

1 — 10 Bolt Pattern
2 — 8 Bolt Pattern
WARNING!
To avoid the risk of forcing the vehicle off the jack, do
not tighten the lug nuts fully until the vehicle has been
lowered. Failure to follow this warning may result in
personal injury.
JACKING AND TIRE CHANGING
WARNING!
•Do not attempt to change a tire on the side of the
vehicle close to moving traffic, pull far enough off
the road to avoid the danger of being hit when
operating the jack or changing the wheel.
• Being under a jacked-up vehicle is dangerous. The
vehicle could slip off the jack and fall on you. You
could be crushed. Never put any part of your body
under a vehicle that is on a jack.
• Never start or run the engine while the vehicle is on
a jack. If you need to get under a raised vehicle, take
it to a service center where it can be raised on a lift.
• The jack is designed to use as a tool for changing
tires only. The jack should not be used to lift the
vehicle for service purposes. The vehicle should be
jacked on a firm level surface only. Avoid ice or
slippery areas.
8/10 Lug Nuts/Bolts Torque Patterns
6
WHAT TO DO IN EMERGENCIES 433
Page 436 of 542

4500/5500 Models
These vehicles do not come equipped with a jack.
NOTE:Jacking and tire changing on 4500/5500 models
should be performed by an authorized dealer, or knowl-
edgeable service personnel with the appropriate heavy
duty equipment, like a tire service company.
Preparations For Jacking
1. Park the vehicle on a firm, level surface. Avoid ice or slippery areas.
WARNING!
Do not attempt to change a tire on the side of the
vehicle close to moving traffic, pull far enough off the
road to avoid the danger of being hit when operating
the jack or changing the wheel.
2. Turn on the Hazard Warning flasher.
3. Apply the parking brake. 4.
Place the gear selector into PARK (automatic transmis-
sion) or REVERSE (manual transmission). On 4-Wheel
drive vehicles, shift the transfer case to the “4L” position.
5. Turn OFF the ignition.
6. Block both the front and rear of the wheeldiagonally opposite of the jacking position.
For example, if changing the right front
tire, block the left rear wheel.
NOTE: Passengers should not remain in the vehicle when
the vehicle is being jacked.
434 WHAT TO DO IN EMERGENCIES
Page 437 of 542

Jacking Instructions
Instructions
WARNING!
Carefully follow these tire changing warnings to help
prevent personal injury or damage to your vehicle:
•Always park on a firm, level surface as far from the
edge of the roadway as possible before raising the
vehicle.
• Turn on the Hazard Warning flasher.
• Block the wheel diagonally opposite the wheel to be
raised.
• Apply the parking brake firmly and set an automatic
transmission in PARK; a manual transmission in
REVERSE.
• Never start or run the engine with the vehicle on a
jack.
• Do not let anyone sit in the vehicle when it is on a
jack.
• Do not get under the vehicle when it is on a jack. If
you need to get under a raised vehicle, take it to a
service center where it can be raised on a lift.
(Continued)
WARNING! (Continued)
•Only use the jack in the positions indicated and for
lifting this vehicle during a tire change.
• If working on or near a roadway, be extremely
careful of motor traffic.
• To assure that spare tires, flat or inflated, are securely
stowed, spares must be stowed with the valve stem
facing the ground.
Jack Warning Label
6
WHAT TO DO IN EMERGENCIES 435
Page 472 of 542
Front Prop Shaft Lubrication — Four-Wheel Drive
Models
Lubricate the front driveshaft grease fitting at each oil
change.The grease fitting is located at the rear of the front
driveshaft, near the centering mechanism of double cardan
joint. Refer to the “Maintenance Schedule” for the proper
maintenance intervals. Use Mopar Type MS-6560 (lithium-
based grease), or equivalent.
Front Drive Shaft Double Cardan JointDouble Cardan Joint
1 — Double Cardan Joint
2 — Grease Fitting
3 — Exploded View – Grease Fitting
470 MAINTAINING YOUR VEHICLE
Page 532 of 542

Introduction................................4
Inverter Outlet (115V) ...................... .177
Jack Location ............................ .433
Jump Starting ............................ .440
Key Fob Programming Additional Key Fobs .............19
Key Fob Battery Service (Remote Keyless Entry) .....25
Key Fob Programming (Remote Keyless Entry) ......22
Key Fob, Remote Keyless Entry .................22
Key-In Reminder ............................17
Keyless Enter-N-Go ..................... .34, 326
Lock The Vehicle’s Doors ................248, 268
Passive Entry ............................34
Passive Entry Programming ...........34, 248, 268
Keyless Entry System ........................22
Key, Replacement ...........................19
Keys ....................................11
Key, Sentry (Immobilizer) ......................18
Lane Change And Turn Signals .................135
Lane Change Assist ........................ .136
Latches ..................................96
Lead Free Gasoline ........................ .402Leaks, Fluid
...............................96
Life Of Tires ............................. .389
Light Bulbs ................................96
Lights ............................... .96, 127
AirBag ......................... .55, 94, 201
Automatic Headlights .....................128
Brake Assist Warning ..................... .366
Brake Warning ......................... .202
Bulb Replacement .....................500, 501
Cap Top Clearance ...................... .505
Cargo................................ .135
Center Mounted Stop ..................... .504
Courtesy/Reading .................133, 134, 164
Cruise ............................ .221, 222
Daytime Running ....................... .129
Engine Temperature Warning ................204
Exterior ................................96
Fog .............................. .131, 503
Four-Wheel Drive Indicator .................345
Hazar
d Warning Flasher ...................430
Headlights ............................ .128
High Beam ............................ .136
High Beam/Low Beam Select ................136
Hill Descent Control Indicator ...............368
Illuminated Entry .........................21
530 INDEX
Page:
< prev 1-8 9-16 17-24