2017 Peugeot Partner wiper
[x] Cancel search: wiperPage 60 of 260

58
Partner-2-VU_en_Chap04_Ergonomie_ed02-2016
2 Fast wipe
(heavy rain).
1
Normal wipe (moderate rain).
l
Intermittent wipe.
0
Of
f.
â
Single wipe
(press downwards).
In the
Intermittent position, the wiping
speed is in proportion to the vehicle
speed.
WIPERS
Manual wipingWhenever the ignition has been
switched off for more than one minute,
with the windscreen wiper stalk in
position 2, 1 or I, the stalk must be
reactivated.
-
Move the stalk to any position.
-
Return it to the desired position. Do not cover the rain sensor
,
located in the centre of the
windscreen, behind the mirror. Activation
Press the control downwards.
Activation of the function is
accompanied by a message in the
screen.
Deactivation
Place the windscreen wipers stalk in
position I, 1 or 2.
Deactivation of the function is
accompanied by a message in the
screen.
In the event of malfunction of the
automatic windscreen wipers, the
windscreen wipers will operate in
intermittent mode.
Contact a PEUGEOT dealer or a
qualified workshop to have the system
checked. In the AUTO position, the windscreen
wipers operate automatically and
adapt their speed to the intensity of the
rainfall.
When not in AUTO mode, for the
other positions, refer to the manual
windscreen wipers section.
The automatic rain sensitive
windscreen wipers function must
be reactivated by pressing the stalk
downwards, if the ignition has been
switched off for more than one minute.
When using an automatic car
wash, switch off the ignition to
avoid triggering the automatic
wiping.
In winter, it is advisable to wait for the
windscreen to completely clear of ice
before operating the automatic wipers.
Automatic wipers
Steering mounted controls
Page 61 of 260

59
Partner-2-VU_en_Chap04_Ergonomie_ed02-2016
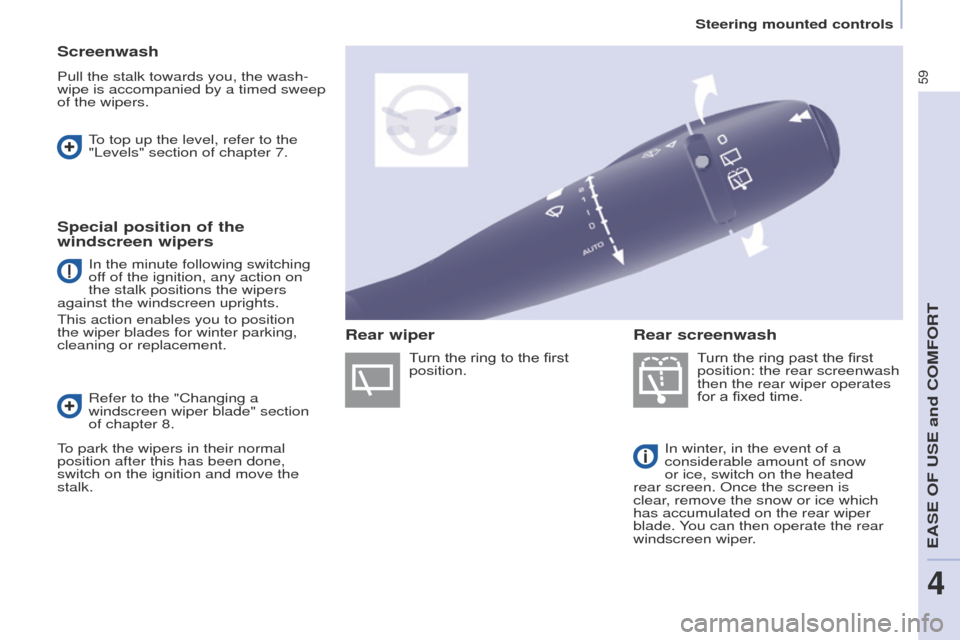
Screenwash
Pull the stalk towards you, the wash-
wipe is accompanied by a timed sweep
of the wipers.Turn the ring past the first
position: the rear screenwash
then the rear wiper operates
for a fixed time.
In winter, in the event of a
considerable amount of snow
or ice, switch on the heated
rear screen. Once the screen is
clear, remove the snow or ice which
has accumulated on the rear wiper
blade. You can then operate the rear
windscreen wiper.
To top up the level, refer to the
"Levels" section of chapter 7.
Special position of the
windscreen wipers
Refer to the "Changing a
windscreen wiper blade" section
of chapter 8.
To park the wipers in their normal
position after this has been done,
switch on the ignition and move the
stalk. Turn the ring to the first
position.
Rear screenwash
Rear wiper
In the minute following switching
off of the ignition, any action on
the stalk positions the wipers
against the windscreen uprights.
This action enables you to position
the wiper blades for winter parking,
cleaning or replacement.
Steering mounted controls
EASE OF USE and COMFORT
4
Page 62 of 260

60
Partner-2-VU_en_Chap04_Ergonomie_ed02-2016
TRIP COMPUTER
A
few definitions
Range: displays the distance which
can travelled with the remaining fuel
detected in the tank, basd on the
average consumption over the last few
miles (kilometres).
This displayed value may vary
significantly following a change in the
vehicle speed or the relief of the route. Current fuel consumption:
only
calculated and displayed above
20 mph (30 km/h).
Average fuel consumption: this is the
average fuel consumption since the
last trip computer zero reset.
Distance travelled: calculated since
the last trip computer zero reset.
Distance remaining to the
destination: calculated with reference to
the final destination, entered by the user.
If guidance is activated, the navigation
system calculates it as a current value.
Average speed: this is the average
speed calculated since the last trip
computer zero reset (ignition on).
Each press of the button, located at
the end of the wiper stalk, displays the
different trip computer information in
turn, depending on the screen.
When the required trip is displayed,
press the control for more than
two seconds. When the range falls below 20 miles
(30 km), dashes are displayed. After
filling with at least 10 litres of fuel, the
range is recalculated and is displayed
when it exceeds 60 miles (100 km).
If, whilst driving, dashes are displayed
continuously in place of the digits,
contact a PEUGEOT dealer.
The "vehicle" tab with the range,
current fuel consumption and the
remaining distance to run.
The "1" tab (trip 1) with the average
speed, the average fuel consumption
and the distance travelled in trip "1".
The "2" tab (trip 2) with the same
information for a 2
nd trip.
Reset
Steering mounted controls
Page 145 of 260

143
Partner-2-VU_en_Chap08_Aide-rapide_ed02-2016
ECONOMY MODE
After the engine has stopped, with
the key in the ignition position, certain
functions (windscreen wiper, electric
windows, courtesy lamps, audio
equipment, etc.) can only be used for a
cumulative duration of thirty minutes, to
prevent discharging of the battery.
Once the thirty minutes have elapsed,
the active functions are put on standby
and the battery warning lamp flashes
accompanied by a message in the
screen.
To resume the use of these functions
immediately, start the engine and let it
run for a few minutes.
The time available will then be double
the time for which the engine was left
running. However, this time will always
be between five and thirty minutes.
A flat battery will prevent the
engine from starting.
TEMPORARY PUNCTURE RE -
P
AIR KIT
The kit is located in one of the two
storage compartments located under
the front seats.
Vehicles supplied with a temporary
puncture repair kit do not have a spare
wheel or tooling (jack, wheelbrace, ...).
The temporary tyre repair kit consists
of a compressor and a bottle
(containing a sealant).
Using the kit
- Tick the deflated wheel on the speed limitation sticker then affix
the sticker to the vehicle's steering
wheel to remind you that a wheel is
in temporary use.
-
Clip the bottle
1 on the
compressor
2.
-
Connect the bottle
1 to the valve of
the tyre to be repaired.
-
T
ake care to unwind the
compressor pipe before connecting
it to the bottle.
-
Connect the power lead to one of
the vehicle's 12V sockets.
-
Switch on the compressor by
pressing button
A until the tyre
pressure reaches 2.0 bars. If this
pressure cannot be reached, the
tyre cannot be repaired.
-
Remove and store the compressor
.
-
Drive immediately
, for a few miles
(kilometres), at reduced speed, to
fill the puncture.
-
Adjust the pressure using the
compressor in accordance with the
recommendation for the vehicle and
check that the leak is filled correctly
(no further loss of pressure).
-
Drive at reduced speed (50
mph
[80 km/h]). The tyre must be
examined and repaired by a
specialist as soon as possible.
QUICK HELP
8
Changing a wheel
Page 159 of 260

157
Partner-2-VU_en_Chap08_Aide-rapide_ed02-2016
Dashboard fuses
Tilt the cover to gain access to the
fuses.Fuses
F Amperes
A Allocation
1 15Rear wiper
2 30 Central locking
3 5Airbags
4 10 Air conditioning, diagnostic socket, mirror control,
headlamp beam
5 30 Electric windows
6 30 Locks
7 5Rear courtesy lamp, front map reading lamp, roof
console
8 20 Audio equipment, screen, tyre under-inflation
detection, alarm and siren
9 30 Front and rear 12V socket
10 15Central column
11 15Low current ignition switch
12 15Rain and sunshine sensor, airbag
13 5Instrument panel
14 15Parking sensors, digital air conditioning controls,
hands-free kit
15 30 Locks
16 - Not used 17 40 Heated rear screen/mirrors
QUICK HELP
8
Changing a fuse
Page 161 of 260

159
Partner-2-VU_en_Chap08_Aide-rapide_ed02-2016
Fuses under the bonnet
After opening the bonnet, unclip and tilt
the box to gain access to the fuses.Fuses
F Amperes
A Allocation
1 20 Engine management
2 15Horn
3 10 Front and rear screenwash pump
4 20 LED
5 15 Engine components
6 10 Steering wheel angle sensor, DSC
7 10 Brake switch, clutch switch
8 25Starter motor
9 10 Headlamp beam motor, parc management unit
10 30 Engine components 11 40 Not used
12 30 Wipers
13 40 Built-in systems interface
14 30 Pump
15 10 Right-hand main beam headlamp
16 10 Left-hand main beam headlamp
17 15Right-hand dipped beam headlamp
18 15Left-hand dipped beam headlamp
QUICK HELP
8
Changing a fuse
Page 162 of 260

160
Partner-2-VU_en_Chap08_Aide-rapide_ed02-2016
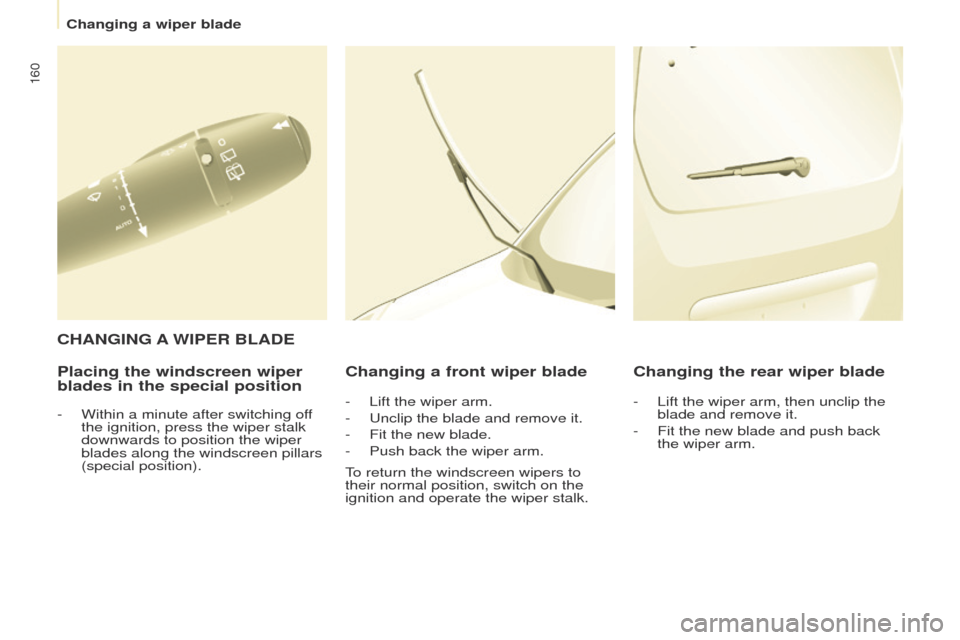
Placing the windscreen wiper
blades in the special positionChanging a front wiper blade Changing the rear wiper blade
C HANGING
A
WIPER BLADE
- Within a minute after switching of
f
the ignition, press the wiper stalk
downwards to position the wiper
blades along the windscreen pillars
(special position). -
Lift the wiper arm.
- Unclip the blade and remove it.
-
Fit the new blade.
-
Push back the wiper arm.
T
o return the windscreen wipers to
their normal position, switch on the
ignition and operate the wiper stalk. -
Lift the wiper arm, then unclip the
blade and remove it.
-
Fit the new blade and push back
the wiper arm.
Changing a wiper blade
Page 246 of 260

Audio and Telematics
244
Partner-2-VU_en_Chap10b_RD45_ed02-2016
Screen menu map(s)
Radio- CD
REG mode
CD repeat
Shuffle play
Vehicle config*
R wiper in rev
Options
Diagnostic
RDS options
View
Abandon
1
2
3
3
1
2
2
2
2
1
2
Screen A
* The settings vary according to the trim level of the vehicle.
Guide lighting
2
Units
Temperature: °Celsius / °Fahrenheit
Fuel consumption: KM/L - L/100 - MPG
1
2
2
Display adjust
Month
Day
Hour
Minutes Ye a r
12 H/24 H mode
Language
Italiano
Nederlands
Portuguès
Português do Brasil Français
Deutsch
Čeština English
Hr vatski Español
Magyar
1
2
2
2
2
2
2
2
1
2
2
2
2
2
2
2
2
2
2