Page 180 of 368

178
4008_en_Chap07_info-pratiques_ed01-2016
Advice on driving when towing
Distribution of loads
F Distribute the load in the trailer so that the heaviest items are as close as possible to
the axle and the nose weight approaches
the maximum permitted without exceeding
it.
Air density decreases with altitude, thus
reducing engine performance. Above
1
000 metres, the maximum towing load must
be reduced by 10
% of the gt
W a
nd so on for
every 1
000 metres of altitude.
For more information on Petrol weights or
Diesel weights and in particular the towed
loads which apply to your vehicle, refer to the
corresponding section.
Side wind
F take into account the increased sensitivity to side wind.
Cooling
towing a trailer on a slope increases the
temperature of the coolant.
As the fan is electrically controlled, its cooling
capacity is not dependent on the engine speed.
F
t
o l
ower the engine speed, reduce your
speed.
th
e maximum towed load on a long slope
depends on the gradient and the exterior
temperature.
In all cases, pay attention to the coolant
temperature.
F
I
f this message is displayed, stop your
vehicle as soon as it is safe to do so .
Braking
towing a trailer increases the braking distance.to l
imit heat build-up in the brakes, use of the
engine brake is recommended.
Ty r e s
F Check the tyre pressures of the towing vehicle and of the trailer, observing the
recommended pressures.
Lighting
F Check the lighting and signalling on the trailer and the adjustment of the vehicle's
headlamps.
For more information on Headlamp
adjustment , refer to the corresponding
section.
If the message flashes slowly, wait for the
engine to cool before topping up the level, if
necessary.
If the message flashes rapidly, contact a
P
e
uge
Ot
dealer or a qualified workshop
without delay.
the rear parking sensors will be
deactivated automatically when a
genuine P
e
uge
Ot
towbar is used.
Practical information
Page 190 of 368
188
4008_en_Chap07_info-pratiques_ed01-2016
Brake wear depends on the style
of driving, particularly in the case
of vehicles used in town, over short
distances. It may be necessary to have
the condition of the brakes checked,
even between vehicle services.
Brake pads
For information on checking brake
disc wear, contact a PeugeOt
dealer or a qualified workshop.
Brake disc wear Parking brake
If excessive travel or a loss of
effectiveness of this system is
noticed, the parking brake must be
checked, even between two services.
Only use products recommended by
P
e
uge
Ot
or products of equivalent
quality and specification.
In order to optimise the operation of
units as important as those in the
braking system, P
e
uge
Ot
selects and
offers very specific products.
After washing the vehicle, dampness,
or in wintry conditions, ice can form
on the brake discs and pads: braking
efficiency may be reduced. Make light
brake applications to dry and defrost
the brakes.
Checking this system must be done by a
P
e
uge
Ot
dealer or a qualified workshop.
un
less there is a leak in the circuit, a drop in
the brake fluid level indicates that the brake
pads are worn.
Practical information
Page 194 of 368
192
4008_en_Chap08_en-cas-de panne_ed01-2016
F If the specified pressure has not been
reached after about 10 minutes, this means
that the tyre is not repairable; contact a
P
e
uge
Ot
dealer or a qualified workshop
for roadside assistance.
F
R
emove the compressor and stow the kit.Do not operate the compressor for more
than 10 minutes continuously.
If the compressor seems extremely
hot, switch it off and disconnect it
immediately. Leave it to cool for at least
30 minutes.
As soon as possible after a repair using
the kit, go to a P
e
uge
Ot
dealer or a
qualified workshop.
Make sure that you tell the technician
that you have used the kit. After
checking, the technician will advise you
whether the tyre can be repaired or if it
must be replaced.
If the vehicle is fitted with under-
inflation detection, the under-inflation
warning lamp remains on until the
system has been reinitialised.
For more information on Under-
inflation detection
, refer to the
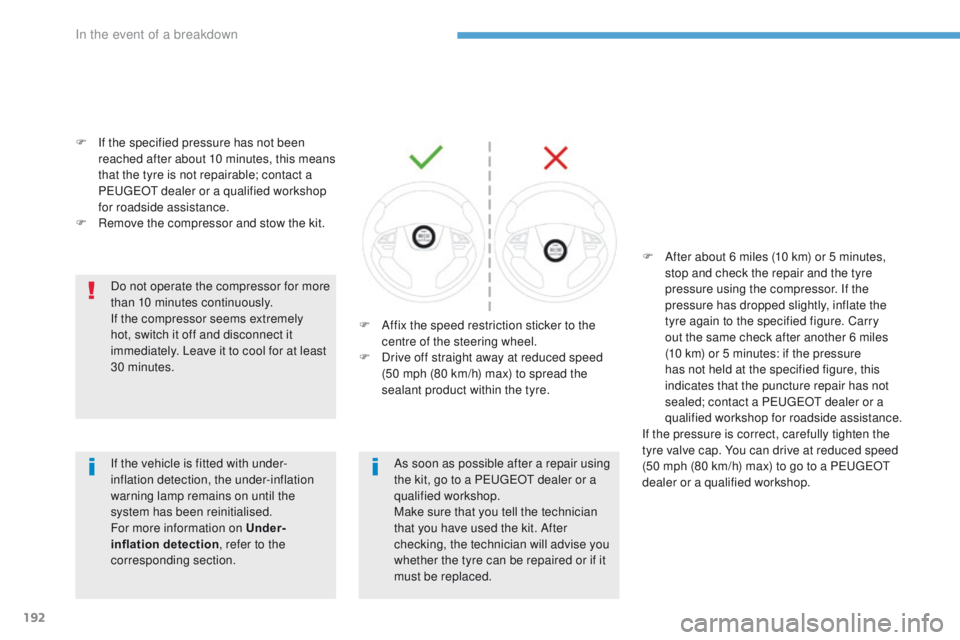
corresponding section. F
A
ffix the speed restriction sticker to the
centre of the steering wheel.
F
D
rive off straight away at reduced speed
(50 mph (80 km/h) max) to spread the
sealant product within the tyre. F
A
fter about 6 miles (10 km) or 5 minutes,
stop and check the repair and the tyre
pressure using the compressor. If the
pressure has dropped slightly, inflate the
tyre again to the specified figure. Carry
out the same check after another 6 miles
(10
km) or 5 minutes: if the pressure
has not held at the specified figure, this
indicates that the puncture repair has not
sealed; contact a P
e
uge
Ot
dealer or a
qualified workshop for roadside assistance.
If the pressure is correct, carefully tighten the
tyre valve cap. You can drive at reduced speed
(50 mph (80 km/h) max) to go to a P
e
uge
Ot
dealer or a qualified workshop.
In the event of a breakdown
Page 201 of 368
199
4008_en_Chap08_en-cas-de panne_ed01-2016
Changing a bulb
For bulbs that have alignment lugs
(H1, H7...) ensure that they are
fitted correctly for the best lighting
performance.
th
e headlamps have polycarbonate
lenses with a protective coating:
F
d
o not clean them using a dr y
or abrasive cloth, nor with a
detergent or solvent product,
F
u
se a sponge and soapy water,
F
w
hen using a high pressure washer
on persistent marks, do not keep
the lance directed towards the
lamps or their edges for too long,
so as not to damage their protective
coating and seals.
F
D
o not touch the bulb directly with
your fingers, use lint-free cloths.
Changing a bulb should only be done
after the headlamp has been switched
off for several minutes (risk of serious
burns).
It is imperative to use only anti-
ultraviolet (
uV
) type bulbs in order not
to damage the headlamp.
Always replace a failed bulb with a
new bulb with the same type and
specification.
Risk of electrocution
Replacement of the xenon bulbs
(D1S-35W) must be carried out by
a P
e
uge
Ot
dealer or a qualified
workshop.
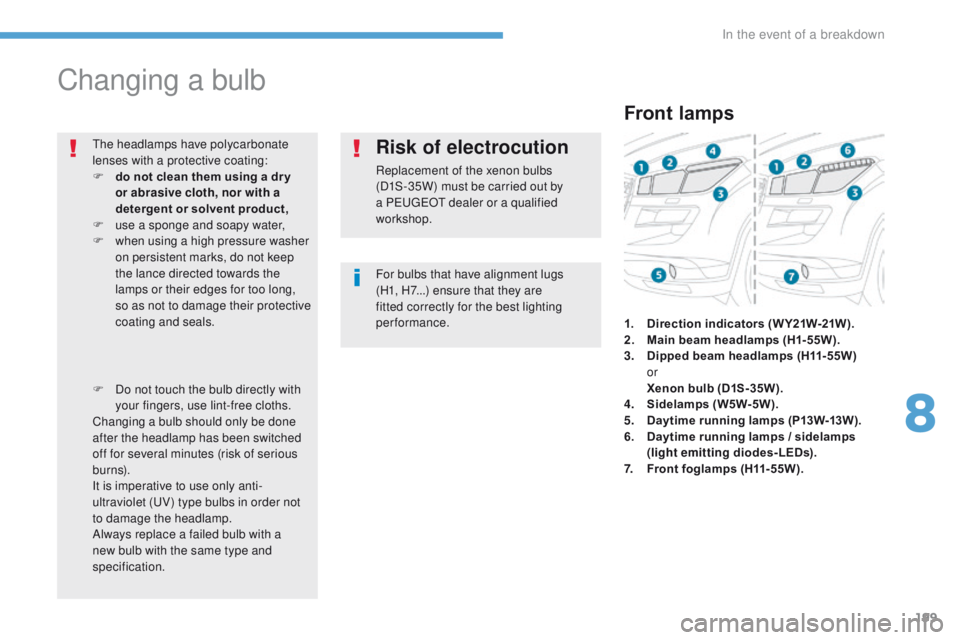
Front lamps
1. Direction indicators ( W Y21W-21W ).
2. M ain beam headlamps (H1-55W).
3.
D
ipped beam headlamps (H11-55W)
or
Xe
non bulb (D1S-35W).
4.
S
idelamps (W5W-5W).
5.
D
aytime running lamps (P13W-13W).
6.
D
aytime running lamps / sidelamps
(light emitting diodes-LEDs).
7.
F
ront foglamps (H11-55W).
8
In the event of a breakdown
Page 203 of 368
201
4008_en_Chap08_en-cas-de panne_ed01-2016
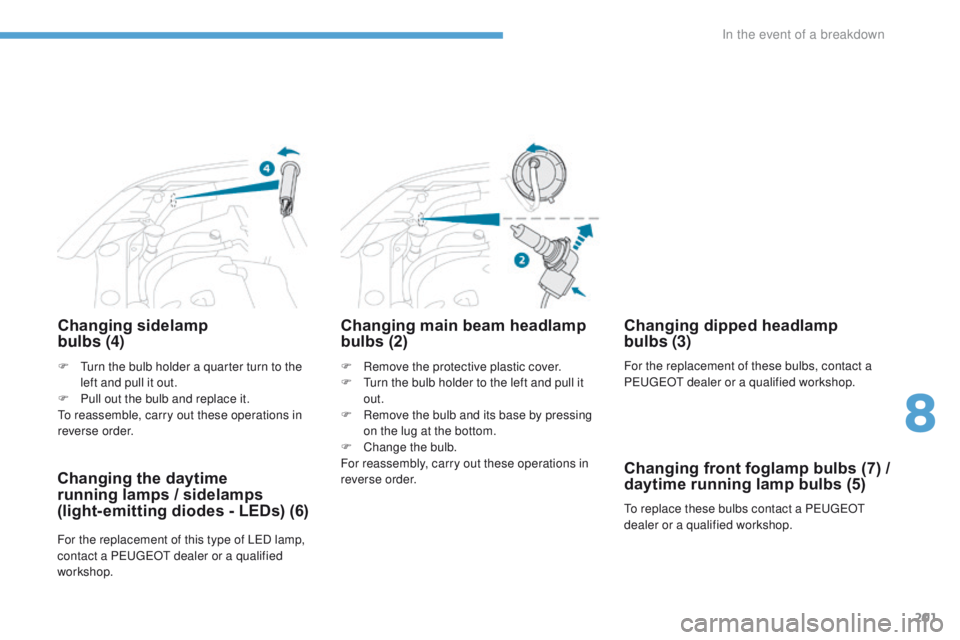
Changing sidelamp
bulbs (4)
F Remove the protective plastic cover.
F
tu rn the bulb holder to the left and pull it
out.
F
R
emove the bulb and its base by pressing
on the lug at the bottom.
F
C
hange the bulb.
For reassembly, carry out these operations in
reverse order.
Changing main beam headlamp
bulbs (2)
F turn the bulb holder a quarter turn to the left and pull it out.
F
P
ull out the bulb and replace it.
to r
eassemble, carry out these operations in
reverse order.
Changing the daytime
running lamps / sidelamps
(light- emitting diodes - LEDs) (6)
For the replacement of this type of LeD l amp,
contact a Pe ugeOt dealer or a qualified
workshop.
Changing dipped headlamp
bulbs (3)
For the replacement of these bulbs, contact a
Pe ugeOt dealer or a qualified workshop.
to r
eplace these bulbs contact a P
e
uge
Ot
dealer or a qualified workshop.
Changing front foglamp bulbs (7) /
daytime running lamp bulbs (5)
8
In the event of a breakdown
Page 204 of 368
202
4008_en_Chap08_en-cas-de panne_ed01-2016
F Push the repeater towards the rear to disengage it.
F
D isconnect the repeater connector.
F
C
hange the repeater unit.
to
reassemble, carry out these operations in reverse order.
Contact a P
e
uge
Ot
dealer or a qualified workshop to obtain replacement repeaters.
Changing direction indicator side repeaters
Door mirror spotlamps
You should contact a Pe ugeOt dealer or a qualified workshop for the replacement of the light
emitting diode - LeD .
In the event of a breakdown
Page 206 of 368
204
4008_en_Chap08_en-cas-de panne_ed01-2016
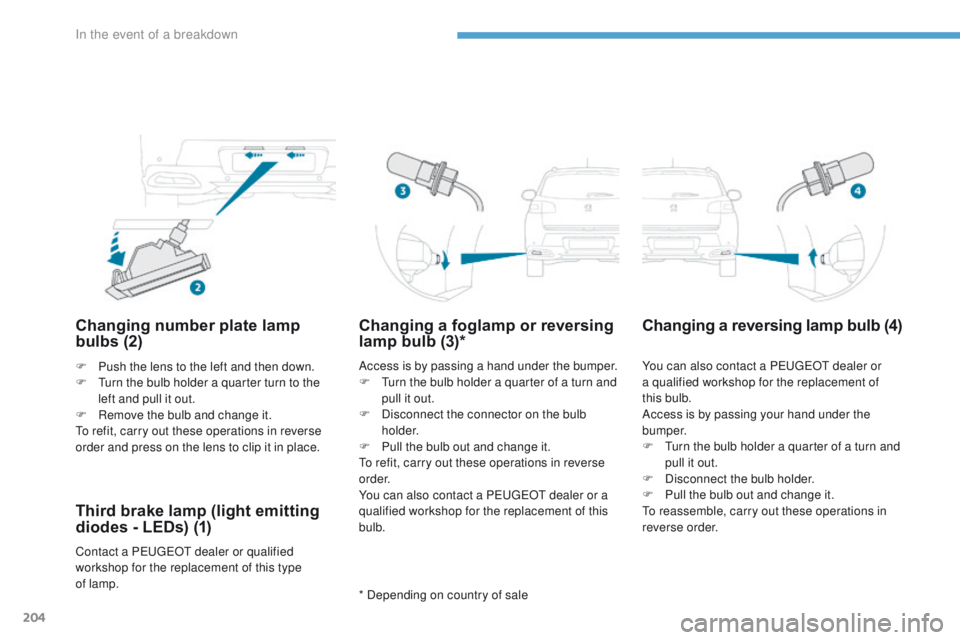
Changing number plate lamp
bulbs (2)
F Push the lens to the left and then down.
F
tu rn the bulb holder a quarter turn to the
left and pull it out.
F
R
emove the bulb and change it.
to r
efit, carry out these operations in reverse
order and press on the lens to clip it in place.
Third brake lamp (light emitting
diodes - LEDs) (1)
Contact a Pe ugeOt dealer or qualified
workshop for the replacement of this type
of
lamp.
Changing a foglamp or reversing
lamp bulb (3)*
* Depending on country of sale
Changing a reversing lamp bulb (4)
Access is by passing a hand under the bumper.
F tu rn the bulb holder a quarter of a turn and
pull it out.
F
D
isconnect the connector on the bulb
h o l d e r.
F
P
ull the bulb out and change it.
to r
efit, carry out these operations in reverse
o r d e r.
You can also contact a P
e
uge
Ot
dealer or a
qualified workshop for the replacement of this
bulb. You can also contact a Pe
ugeOt dealer or
a qualified workshop for the replacement of
this
bulb.
Access is by passing your hand under the
b u m p e r.
F
t
u
rn the bulb holder a quarter of a turn and
pull it out.
F
D
isconnect the bulb holder.
F
P
ull the bulb out and change it.
to r
eassemble, carry out these operations in
reverse order.
In the event of a breakdown
Page 208 of 368
206
4008_en_Chap08_en-cas-de panne_ed01-2016
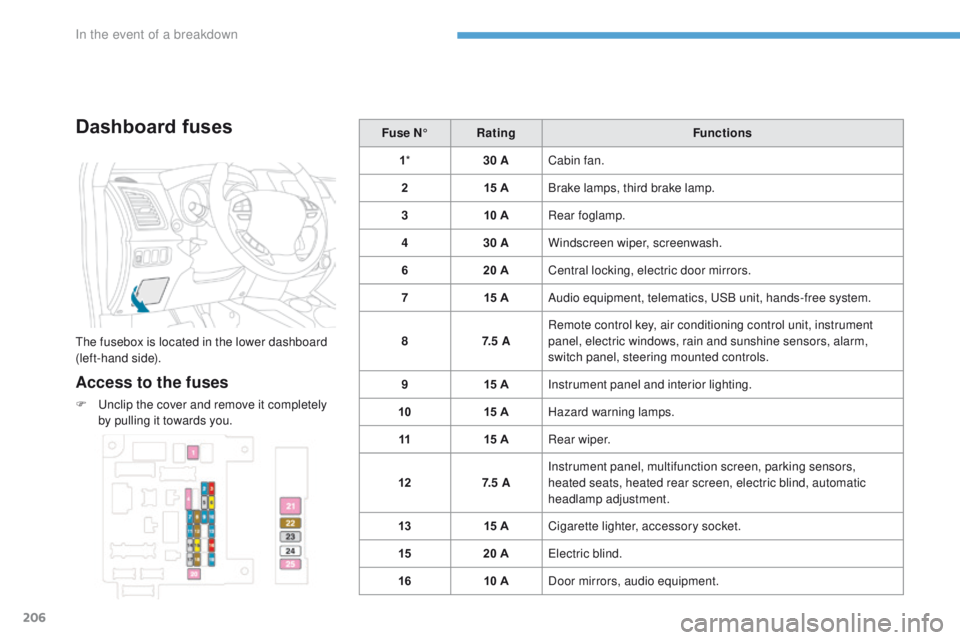
Dashboard fuses
the fusebox is located in the lower dashboard
(left-hand side).
Access to the fuses
F unclip the cover and remove it completely
by pulling it towards you. Fuse N°
Rating Functions
1 * 30 ACabin fan.
2 15 ABrake lamps, third brake lamp.
3 10 ARear foglamp.
4 30 AWindscreen wiper, screenwash.
6 20 ACentral locking, electric door mirrors.
7 15 AAudio equipment, telematics, u
S
B unit, hands-free system.
8 7. 5 ARemote control key, air conditioning control unit, instrument
panel, electric windows, rain and sunshine sensors, alarm,
switch panel, steering mounted controls.
9 15 AInstrument panel and interior lighting.
10 15 AHazard warning lamps.
11 15 ARear wiper.
12 7. 5 AInstrument panel, multifunction screen, parking sensors,
heated seats, heated rear screen, electric blind, automatic
headlamp adjustment.
13 15 ACigarette lighter, accessory socket.
15 20 A
ele
ctric blind.
16 10 ADoor mirrors, audio equipment.
In the event of a breakdown