2017 Peugeot 308 boot
[x] Cancel search: bootPage 92 of 392
90
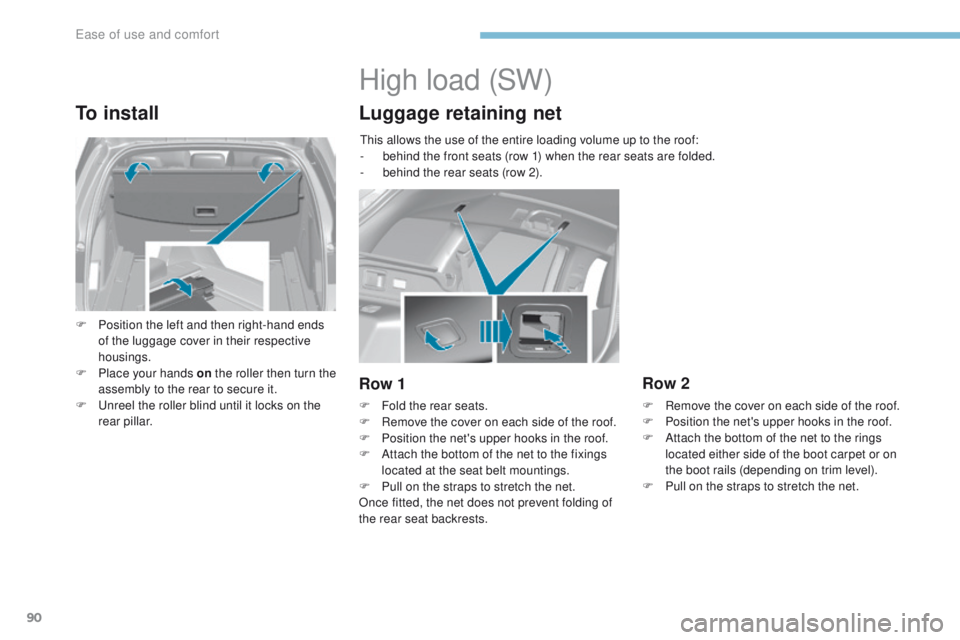
To install
F Position the left and then right-hand ends of the luggage cover in their respective
housings.
F
P
lace your hands on the roller then turn the
assembly to the rear to secure it.
F
u
n
reel the roller blind until it locks on the
rear pillar.
High load (SW)
Luggage retaining net
Row 1
F Fold the rear seats.
F R emove the cover on each side of the roof.
F
P
osition the net's upper hooks in the roof.
F
A
ttach the bottom of the net to the fixings
located at the seat belt mountings.
F
P
ull on the straps to stretch the net.
Once fitted, the net does not prevent folding of
the rear seat backrests.
Row 2
F Remove the cover on each side of the roof.
F P osition the net's upper hooks in the roof.
F
A
ttach the bottom of the net to the rings
located either side of the boot carpet or on
the boot rails (depending on trim level).
F
P
ull on the straps to stretch the net.
th
is allows the use of the entire loading volume up to the roof:
-
b
ehind the front seats (row 1) when the rear seats are folded.
-
b
ehind the rear seats (row 2).
Ease of use and comfort
Page 94 of 392
92
In order for these systems to be fully effective, follow the operation and maintenance
guidelines below:
F t
o o
btain an even air distribution, take care not to obstruct the exterior air intake grilles
located at the base of the windscreen, the nozzles, the vents and the air outlets, as well
as the air extractor located in the boot.
F
D
o not cover the sunshine sensor, located on the dashboard; this is used for regulation
of the air conditioning system.
F
O
perate the air conditioning system for at least 5 to 10 minutes, once or twice a month
to keep it in per fect working order.
F
e
n
sure that the passenger compartment filter is in good condition and have the filter
elements replaced regularly.
W
e recommend the use of a combined passenger compartment filter. t
h
anks to its
special active additive, it contributes to the purification of the air breathed by the
occupants and the cleanliness of the passenger compartment (reduction of allergic
symptoms, bad odours and greasy deposits).
F
t
o e
nsure correct operation of the air conditioning system, you are also advised to have
it checked regularly as recommended in the warranty and maintenance record.
F
I
f the system does not produce cold air, switch it off and contact a P
e
uge
Ot
dealer or
a qualified workshop.
Recommendations for ventilation and air conditioning
If after an extended stop in sunshine,
the interior temperature is very high, first
ventilate the passenger compartment for
a few moments.
Put the air flow control at a setting high
enough to quickly change the air in the
passenger compartment.
th
e air conditioning system does not
contain chlorine and does not present
any danger to the ozone layer.
th
e condensation created by the air
conditioning results in a discharge
of water under the vehicle which is
perfectly normal.
When towing the maximum load on a steep gradient in high temperatures, switching off the
air conditioning increases the available engine power and so improves the towing ability.
Stop & Start
the heating and air conditioning
systems only work when the engine is
running.
to m
aintain a comfortable temperature
in the passenger compartment, you can
temporarily deactivate the Stop & Start
system.
For more information on Stop & Star t ,
refer to the corresponding section.
ease of use and comfort
Page 115 of 392
113
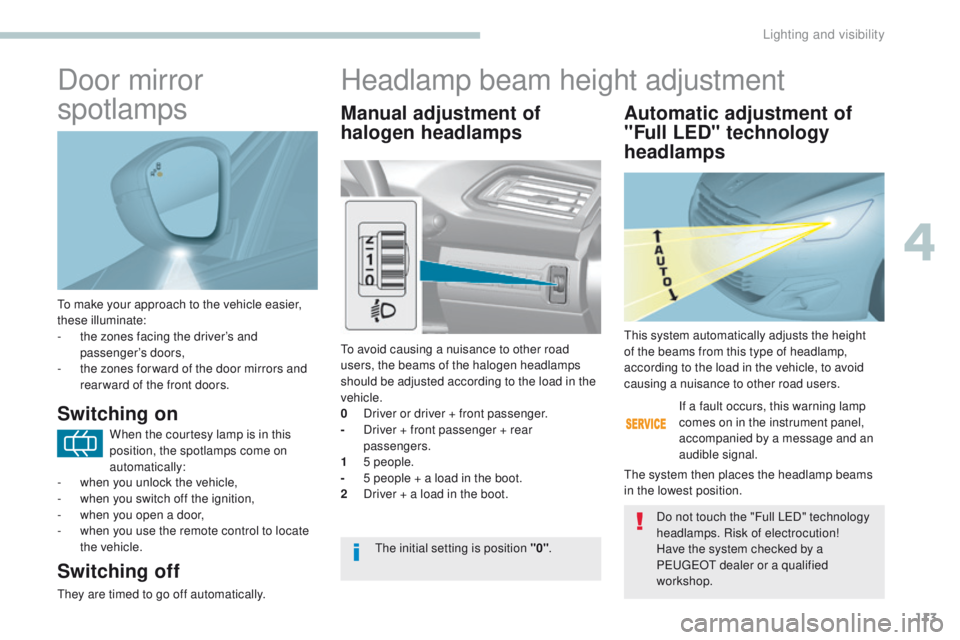
to make your approach to the vehicle easier,
these illuminate:
-
t
he zones facing the driver’s and
passenger’s doors,
-
t
he zones for ward of the door mirrors and
rear ward of the front doors.
Door mirror
spotlamps
Switching on
Switching off
they are timed to go off automatically.
Manual adjustment of
halogen headlamps Automatic adjustment of
"Full LED" technology
headlamps
to avoid causing a nuisance to other road
users, the beams of the halogen headlamps
should be adjusted according to the load in the
vehicle.
0
D
river or driver + front passenger.
-
D
river + front passenger + rear
passengers.
1
5
people.
-
5 p
eople + a load in the boot.
2
D
river + a load in the boot. If a fault occurs, this warning lamp
comes on in the instrument panel,
accompanied by a message and an
audible signal.th
is system automatically adjusts the height
of the beams from this type of headlamp,
according to the load in the vehicle, to avoid
causing a nuisance to other road users.
th
e system then places the headlamp beams
in the lowest position.
th
e initial setting is position "0" .Do not touch the "Full L
eD
" technology
headlamps. Risk of electrocution!
Have the system checked by a
P
e
uge
Ot
dealer or a qualified
workshop.
Headlamp beam height adjustment
When the courtesy lamp is in this
position, the spotlamps come on
automatically:
-
w
hen you unlock the vehicle,
-
w
hen you switch off the ignition,
-
w
hen you open a door,
-
w
hen you use the remote control to locate
the vehicle.
4
Lighting and visibility
Page 117 of 392
115
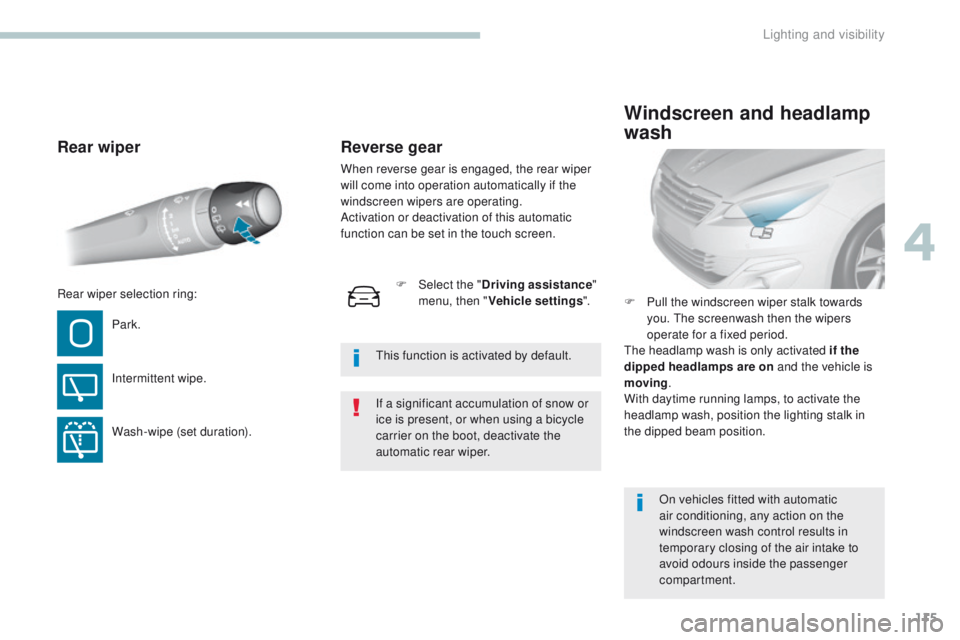
Rear wiper
Park.
Intermittent wipe.
Wash-wipe (set duration).F
P
ull the windscreen wiper stalk towards
you. the screenwash then the wipers
operate for a fixed period.
th
e headlamp wash is only activated if the
dipped headlamps are on and the vehicle is
moving .
With daytime running lamps, to activate the
headlamp wash, position the lighting stalk in
the dipped beam position.
Windscreen and headlamp
wash
On vehicles fitted with automatic
air conditioning, any action on the
windscreen wash control results in
temporary closing of the air intake to
avoid odours inside the passenger
compartment.
Rear wiper selection ring:
If a significant accumulation of snow or
ice is present, or when using a bicycle
carrier on the boot, deactivate the
automatic rear wiper.
th
is function is activated by default.
F
Sel
ect the "
Driving assistance "
menu, then " Vehicle settings ".
Reverse gear
When reverse gear is engaged, the rear wiper
will come into operation automatically if the
windscreen wipers are operating.
Activation or deactivation of this automatic
function can be set in the touch screen.
4
Lighting and visibility
Page 142 of 392
140
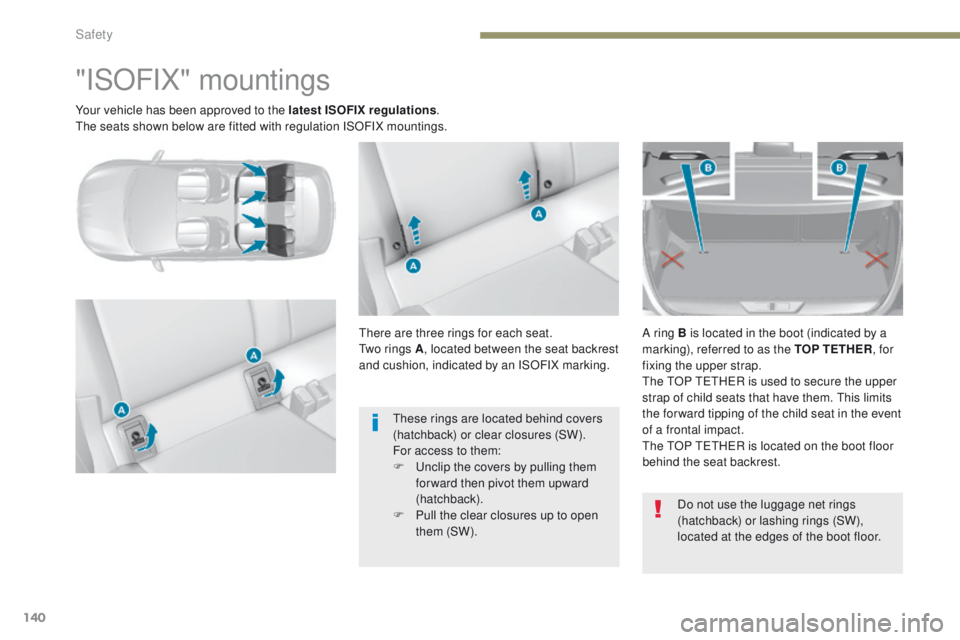
Your vehicle has been approved to the latest ISOFIX regulation s.th
e seats shown below are fitted with regulation ISOFIX mountings.
"ISOFIX" mountings
there are three rings for each seat.tw o rings A , located between the seat backrest
and cushion, indicated by an ISOFIX marking. A ring B is located in the boot (indicated by a
marking), referred to as the TOP TETHER
, for
fixing the upper strap.
th
e t
O
P tet
HeR i
s used to secure the upper
strap of child seats that have them.
t
h
is limits
the for ward tipping of the child seat in the event
of a frontal impact.
th
e t
O
P tet
HeR i
s located on the boot floor
behind the seat backrest.
Do not use the luggage net rings
(hatchback) or lashing rings (SW),
located at the edges of the boot floor.
th
ese rings are located behind covers
(hatchback) or clear closures (SW).
For access to them:
F
u
n
clip the covers by pulling them
forward then pivot them upward
(hatchback).
F
P
ull the clear closures up to open
them (SW).
Safety
Page 143 of 392
141
the incorrect installation of a child seat
in a vehicle compromises the child's
protection in the event of an accident.
Observe strictly the fitting instructions
provided with the child seat.
to s
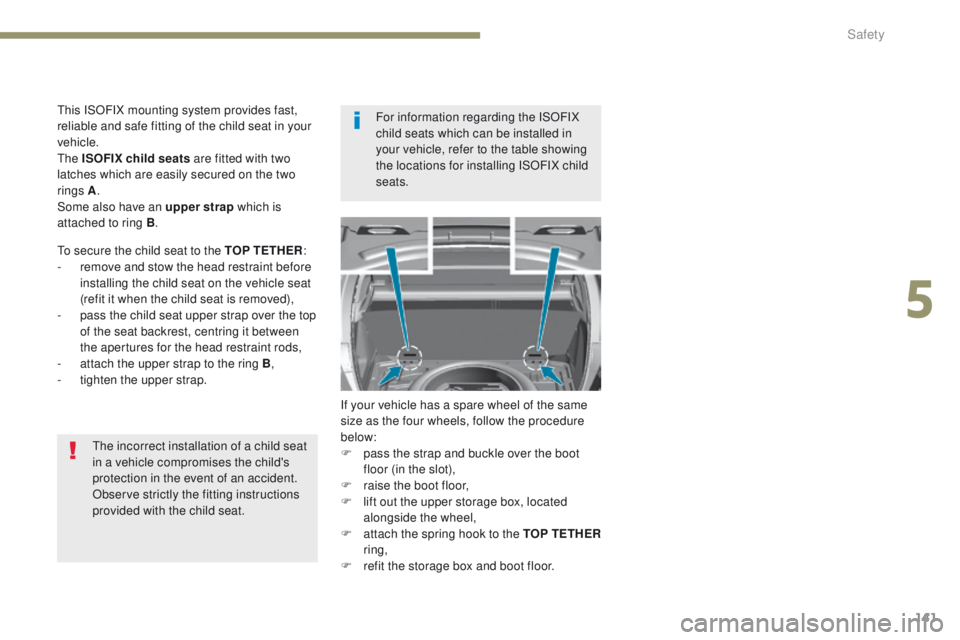
ecure the child seat to the TOP TETHER
:
-
r
emove and stow the head restraint before
installing the child seat on the vehicle seat
(refit it when the child seat is removed),
-
p
ass the child seat upper strap over the top
of the seat backrest, centring it between
the apertures for the head restraint rods,
-
a
ttach the upper strap to the ring B,
-
t
ighten the upper strap.
If your vehicle has a spare wheel of the same
size as the four wheels, follow the procedure
below:
F p ass the strap and buckle over the boot
floor (in the slot),
F
r
aise the boot floor,
F
l
ift out the upper storage box, located
alongside the wheel,
F
a
ttach the spring hook to the TOP TETHER
ring,
F
r
efit the storage box and boot floor.
th
is ISOFIX mounting system provides fast,
reliable and safe fitting of the child seat in your
vehicle.
th
e ISOFIX child seats are fitted with two
latches which are easily secured on the two
rings A .
Some also have an upper strap which is
attached to ring B . For information regarding the ISOFIX
child seats which can be installed in
your vehicle, refer to the table showing
the locations for installing ISOFIX child
seats.
5
Safety
Page 222 of 392
220
"Multimedia"
Multimedia support, hands-free kit, DVD player,
driving aids, vehicle tracking system, ...
Accessories
A wide range of accessories and genuine parts is available from the PeugeOt dealer network.th
ese accessories and parts are all suitable for your vehicle and benefit from Pe ugeOt' s recommendation and warranty.
"Transport solutions"
Boot liners, roof bars, bicycle carrier on roof
bars, ski carrier, roof box, towbar harness, ...
to
w bar, which mst be fitted by P
e
uge
Ot
dealer or a qualified workshop.
Conversion kits
You can obtain an "en terprise" kit to convert a
trade vehicle to a private car and vice-versa.
"Styling"
alloy wheels from 15 inch to 18 inch, finishers
for wheels, door sills, gear lever knobs, ...
"Ligne S": 16 and 17 inch alloy wheels, body
kit, stickers, interior and exterior mirror shells,
gear lever knob, door sills, mats*, …
"Comfort"
Door deflectors, side blinds and rear blind,
cigarette lighter, boot dividers, coat hanger
fixed to head restraint, front centre armrest,
under shelf storage, front and rear parking
sensors, styling mudflaps, window film, boot
management system, ...
*
t
o a
void any risk of jamming of the pedals:
-
e
nsure that the mat is positioned and
secured correctly,
-
n
ever fit one mat on top of another.
"Security and safety"
Anti-theft alarm, window engraving, wheel
security bolts, child seats and booster
cushions, breathalyzer, first aid kit, warning
triangle, high visibility jacket, stolen vehicle
tracking system, temporary puncture repair kit,
snow chains, non-slip covers, front foglamps
kit, dog guard, ...
"Protection"
Mats*, seat covers compatible with lateral
airbags, mud flaps, side protection rubbing
strips, bumper protection rubbing strips,
bumper protectors, boot sill finishers, boot
mat,
...
Practical information
Page 237 of 392
235
Recommendations on storage
Never store bottles of AdBlue® in your
vehicle.
AdBlue
® freezes at about -11°C and
deteriorates above 25°C. It is recommended
that bottles be stored in a cool area and
protected from direct sunlight.
un
der these conditions, the fluid can be kept
for at least a year.
If the additive has frozen, it can be used once
it has completely thawed out.
Procedure
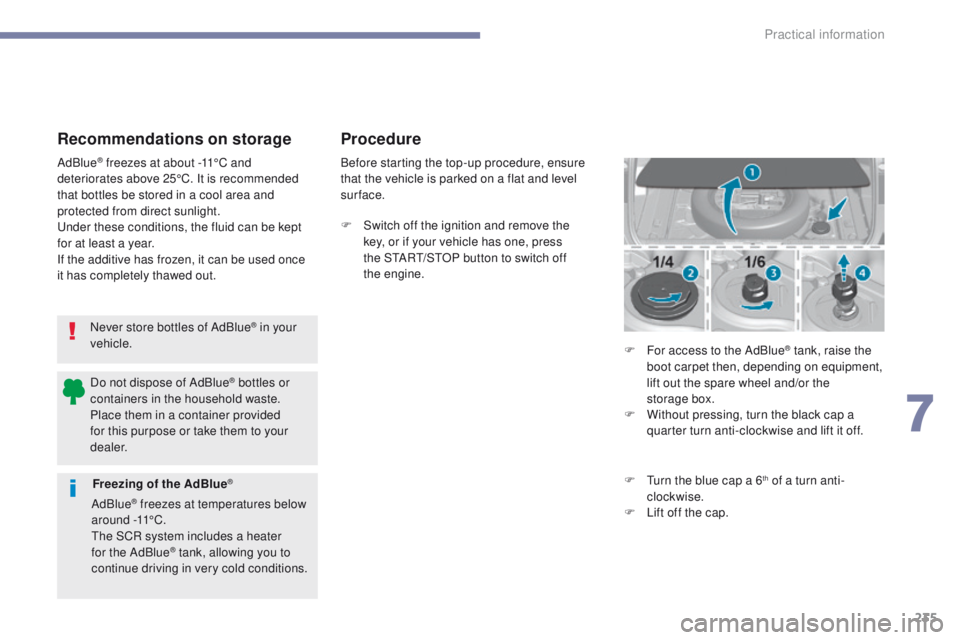
Before starting the top-up procedure, ensure
that the vehicle is parked on a flat and level
sur face.
F
S
witch off the ignition and remove the
key, or if your vehicle has one, press
the S
tA
R
t/
S
tO
P button to switch off
the
engine. F
F
or access to the AdBlue
® tank, raise the
boot carpet then, depending on equipment,
lift out the spare wheel and/or the
storage
box.
F
W
ithout pressing, turn the black cap a
quarter turn anti-clockwise and lift it off.
F
t
u
rn the blue cap a 6
th of a turn anti-
clockwise.
F
L
ift off the cap.
Freezing of the AdBlue®
AdBlue® freezes at temperatures below
around -11°C.
th
e SCR system includes a heater
for the AdBlue
® tank, allowing you to
continue driving in very cold conditions.
Do not dispose of AdBlue
® bottles or
containers in the household waste.
Place them in a container provided
for this purpose or take them to your
dealer.
7
Practical information