Page 214 of 392
212
F With the ignition on and the vehicle stationary, press this
button for about 3 seconds then
release it, an audible signal
confirms the reinitialisation.
Screen A Operating fault
the flashing and then fixed illumination of the
under-inflation warning lamp accompanied
by illumination of the Service warning lamp
indicates a fault with the system.
A message appears, accompanied by an
audible signal.
In this case, under-inflation monitoring of the
tyres is no longer assured.
Have the system checked by a P
e
uge
Ot
dealer or a qualified workshop.
Before doing anything to the system,
the pressures of the four tyres must be
checked and the system reinitialised.
Screen A (without audio system)
Driving
Page 221 of 392

219
System which manages the duration of use of certain functions to conserve a sufficient level of
charge in the battery.
After the engine has stopped, you can still use functions such as the audio and telematics
system, windscreen wipers, dipped beam headlamps, courtesy lamps, etc. for a maximum
combined duration of about forty minutes.
energy economy mode
Switching to economy
mode
A message appears in the instrument panel
screen indicating that the vehicle has switched
to economy mode and the active functions are
put on standby.
If a telephone call is being made at this time, it
will be maintained for around 10 minutes with
the Bluetooth hands-free system of your audio
system.
Exiting economy mode
these functions are reactivated automatically
next time the vehicle is driven.
In order to restore the use of these functions
immediately, start the engine and let it run:
-
f
or less than ten minutes, to use the
equipment for approximately five minutes,
-
f
or more than ten minutes, to use the
equipment for up to approximately
thirty
minutes.
Let the engine run for the duration specified to
ensure that the battery charge is sufficient.
Do not repeatedly and continuously restart the
engine in order to charge the battery.
A flat battery prevents the engine from starting.
Load reduction mode
System which manages the use of certain
functions according to the level of charge
remaining in the battery.
When the vehicle is being driven, the load
reduction function temporarily deactivates
certain functions, such as the air conditioning,
the heated rear screen...
th
e deactivated functions are reactivated
automatically as soon as conditions permit.
For more information on the 12 V
battery , refer to the corresponding
section.
7
Practical information
Page 266 of 392
264
Dashboard fuses
the fusebox is placed in the lower dashboard
(left-hand side).Fuse
N° Rating
(A) Functions
F4 5
em
ergency and assistance calls.
F6 A or B 15Audio system, touch screen, CD player, navigation.
F11 5"Keyless
e
n
try and starting" system
F13 10Front 12 V accessory socket.
F14 1012 V accessory socket in the boot.
F16 3
gl
ove box lamp, rear courtesy lamp.
F17 3Vanity mirror lamp, front courtesy lamp.
F19 5Instrument panel.
F21 10Multifunction screen, air conditioning.
F22 5Reversing camera, parking sensors.
F24 3Rain and sunshine sensor
F25 5Airbags.
F28 A or B 15Audio system (battery +).
F30 20Rear wiper.
F31 30Locks.
F32 10Hi-Fi amplifier.
F33 3Memorisation of driving positions.
F34 5
el
ectric power steering.
F35 3Seat belts not fastened display.
F
u
n
clip the cover by pulling at top left, then
right.
Version 1 (Full)
Access to the fuses
In the event of a breakdown
Page 267 of 392
265
Version 2 (Eco)
FuseN° Rating
(A) Functions
F9 5
em
ergency and assistance calls.
F13 5Reversing camera and parking sensors
F15 1512 V accessory socket.
F16 15Cigarette lighter.
F17 15Audio system.
F18 20
to
uch screen, CD player, audio and navigation system.
F19 5Rain, sunshine sensor.
F20 5Airbags.
F21 5Instrument panel.
F22/F24 30Interior, exterior, front and rear locks.
F23 5
gl
ove box lamp, vanity mirror, front and rear courtesy lamps.
F25/F27 15Front/rear screenwash pump.
F26 15Horn.
F30 15Rear wiper.
8
In the event of a breakdown
Page 271 of 392

269
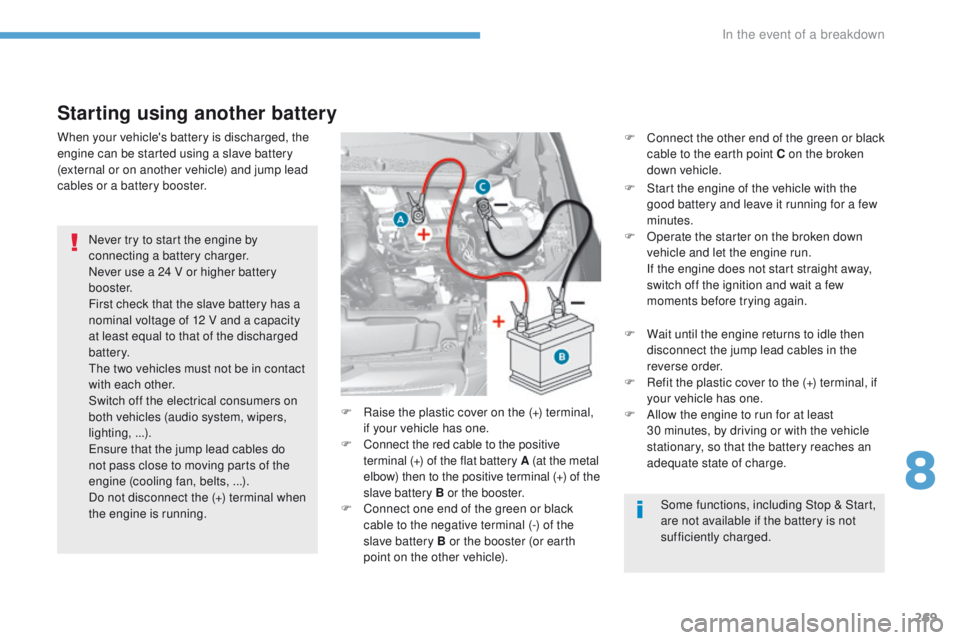
Starting using another battery
Never try to start the engine by
connecting a battery charger.
Never use a 24 V or higher battery
b o o s t e r.
First check that the slave battery has a
nominal voltage of 12 V and a capacity
at least equal to that of the discharged
battery.
th
e two vehicles must not be in contact
with each other.
Switch off the electrical consumers on
both vehicles (audio system, wipers,
lighting, ...).
en
sure that the jump lead cables do
not pass close to moving parts of the
engine (cooling fan, belts, ...).
Do not disconnect the (+) terminal when
the engine is running. F
R
aise the plastic cover on the (+) terminal,
if your vehicle has one.
F
C
onnect the red cable to the positive
terminal (+) of the flat battery A (at the metal
elbow) then to the positive terminal
(+) of the
slave battery B or the booster.
F
C
onnect one end of the green or black
cable to the negative terminal (-) of the
slave battery B or the booster (or earth
point on the other vehicle).
When your vehicle's battery is discharged, the
engine can be started using a slave battery
(external or on another vehicle) and jump lead
cables or a battery booster.
Some functions, including Stop & Start,
are not available if the battery is not
sufficiently charged.
F
C
onnect the other end of the green or black
cable to the earth point C on the broken
down vehicle.
F
S
tart the engine of the vehicle with the
good battery and leave it running for a few
minutes.
F O perate the starter on the broken down
vehicle and let the engine run.
I
f the engine does not start straight away,
switch off the ignition and wait a few
moments before trying again.
F
W
ait until the engine returns to idle then
disconnect the jump lead cables in the
reverse order.
F
R
efit the plastic cover to the (+) terminal, if
your vehicle has one.
F
A
llow the engine to run for at least
30
minutes, by driving or with the vehicle
stationary, so that the battery reaches an
adequate state of charge.
8
In the event of a breakdown
Page 272 of 392

270
For optimum service life of the battery, it is
essential to maintain an adequate state of
charge.
In some circumstances it may be necessary to
charge the battery:
-
i
f you use your vehicle essentially for short
journeys,
-
i
f the vehicle is to be taken off the road for
several weeks.
Contact a P
e
uge
Ot
dealer or a qualified
workshop.
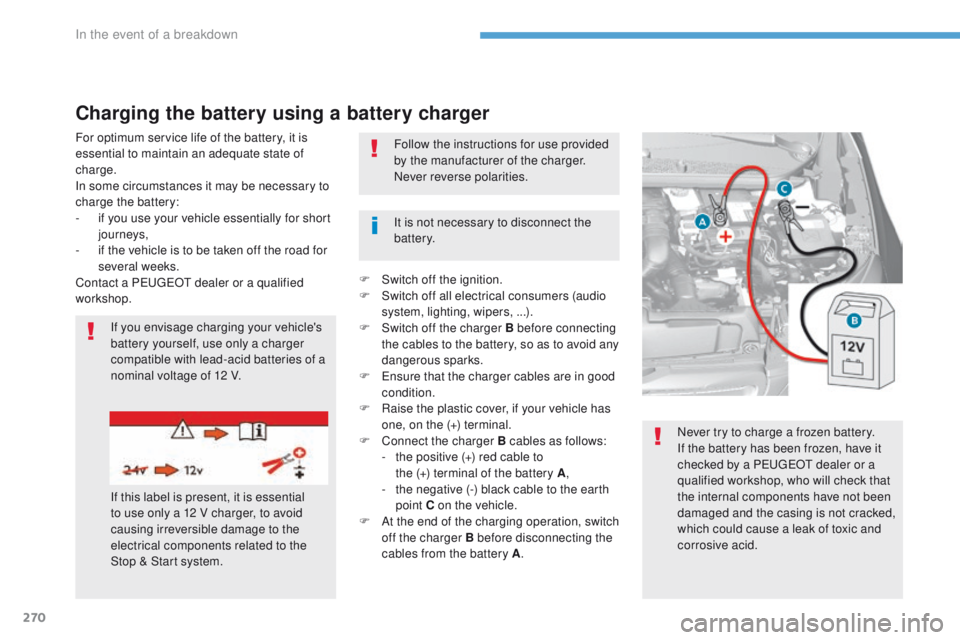
Charging the battery using a battery charger
If you envisage charging your vehicle's
battery yourself, use only a charger
compatible with lead-acid batteries of a
nominal voltage of 12 V.
If this label is present, it is essential
to use only a 12 V charger, to avoid
causing irreversible damage to the
electrical components related to the
Stop & Start system. It is not necessary to disconnect the
battery. Follow the instructions for use provided
by the manufacturer of the charger.
Never reverse polarities.
Never try to charge a frozen battery.
If the battery has been frozen, have it
checked by a P
e
uge
Ot
dealer or a
qualified workshop, who will check that
the internal components have not been
damaged and the casing is not cracked,
which could cause a leak of toxic and
corrosive acid.
F
S
witch off the ignition.
F
S
witch off all electrical consumers (audio
system, lighting, wipers, ...).
F S witch off the charger B before connecting
the cables to the battery, so as to avoid any
dangerous sparks.
F
e
n
sure that the charger cables are in good
condition.
F
R
aise the plastic cover, if your vehicle has
one, on the (+) terminal.
F
C
onnect the charger B cables as follows:
-
t
he positive (+) red cable to
the
(+) terminal of the battery A,
-
t
he negative (-) black cable to the earth
point C on the vehicle.
F
A
t the end of the charging operation, switch
off the charger B before disconnecting the
cables from the battery A .
In the event of a breakdown
Page 273 of 392

271
Do not apply excessive force on the
lever as locking will not be possible if
the clamp is not positioned correctly;
start the procedure again.
th
e Stop & Start system may not be
operational during the trip following the
first engine start.
In this case, the system will only be
available again after a continuous
period of immobilisation of the vehicle,
a period which depends on the ambient
temperature and the state of charge of
the battery (up to about 8 hours).
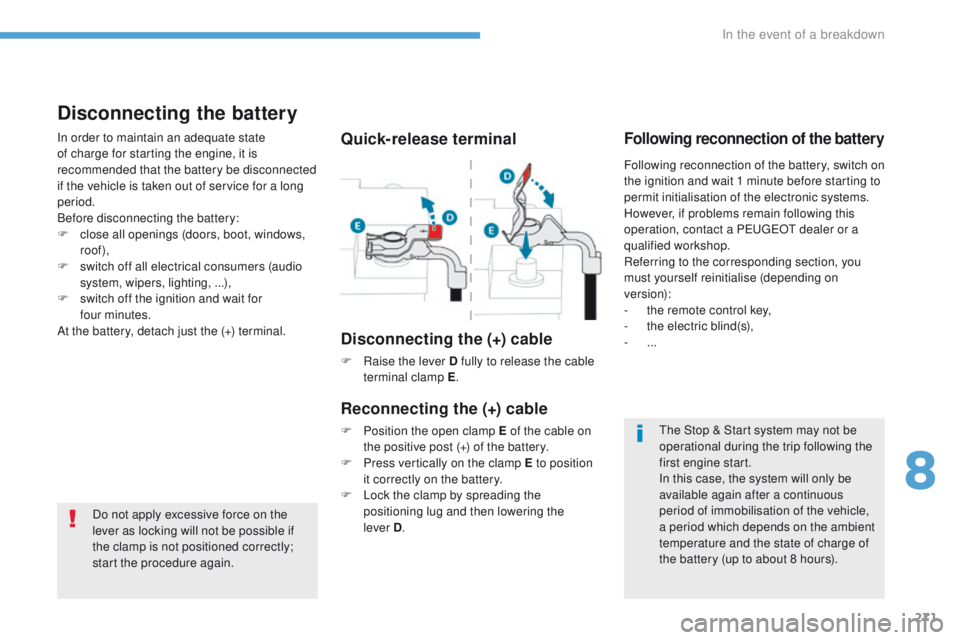
Quick-release terminal
Disconnecting the (+) cable
F Raise the lever D fully to release the cable terminal clamp E .
Reconnecting the (+) cable
F Position the open clamp E of the cable on
the positive post (+) of the battery.
F
P
ress vertically on the clamp E to position
it correctly on the battery.
F
L
ock the clamp by spreading the
positioning lug and then lowering the
lever
D.
Disconnecting the battery
In order to maintain an adequate state
of charge for starting the engine, it is
recommended that the battery be disconnected
if the vehicle is taken out of service for a long
period.
Before disconnecting the battery:
F
c
lose all openings (doors, boot, windows,
roof),
F
s
witch off all electrical consumers (audio
system, wipers, lighting, ...),
F
s
witch off the ignition and wait for
four
minutes.
At the battery, detach just the (+) terminal.Following reconnection of the battery
Following reconnection of the battery, switch on
the ignition and wait 1 minute before starting to
permit initialisation of the electronic systems.
However, if problems remain following this
operation, contact a P
e
uge
Ot
dealer or a
qualified workshop.
Referring to the corresponding section, you
must yourself reinitialise (depending on
version):
-
t
he remote control key,
-
t
he electric blind(s),
-
...
8
In the event of a breakdown
Page 295 of 392
293
DeNON equipment
the new DeNON Hi-Fi system in the
Pe ugeOt 308 is a tailored technological
solution comprising 9 speakers and a digital
amplifier.
th
e D
eN
ON technology offers efficient
components providing high per formance:
-
4 f
lexible membrane tweeters with
resonance chamber to minimise audio
distortion. 100% active at the front of the
vehicle.
-
4 C
osCone
tM woofers: a technology
allowing a high level of sensitivity and
speaker cone travel, generating high bass
performance despite a very flat form.
-
1 s
ub-woofer with a 100W speaker
installed under the boot floor, without
affecting the load volume of the boot.
-
1 C
lass-D 8 -way digital amplifier. Improved
control of running noises.
2 a
udio distribution settings available to
suit the number of occupants in the vehicle
(driver or passengers).
-
"
Digital Coloration" technology giving the
engine a more sporty and refined sound.
.
Audio and telematics