Page 8 of 566
6
3008-2_en_Chap00b_vue-ensemble_ed01-2016
Interior
Boot fittings 135 -140
- l oad space cover
-
1
2 V socket
-
b
oot lamp
-
a
djustable boot floor
-
l
ashing eyes
-
h
igh load retaining net
Warning triangle
3
07
Tools
309-311
Temporary puncture repair kit
3
12-316
Spare wheel
3
17-322
Child seats
1
77-192
ISOFIX mountings
1
86-189
i-Size child seats
1
90 -191A i r b a g s
172-176
Front seats
9
0 -97
Multipoint massage 9 8
Seat belts 1 68-171
Rear seats
1
30-132
Rear fittings
1
33-134
-
1
2 V socket
-
2
30 V / 50 Hz socket
-
r
ear armrest
-
sk
i flap Front fittings
1
19 -127
-
U
SB port
-
1
2 V socket
-
f
ront armrest
-
mats
Wireless charger
1
22-123
Scented air freshener
1
25-126
Glove box
1
20
Deactivating the passenger's front a i r b a g
17
4, 178 -181
Over view
Page 21 of 566

19
3008-2_en_Chap01_instruments-de-bord_ed01-2016
Warning / indicator lampStateCause Action / Observations
Passenger's
airbag system fixed in the seat belt
and passenger's front
airbag warning lamps
display. The control switch, located in the
glove box, has been placed in the
"ON"
position.
The passenger's front airbag is
activated. In this case, do not install a rear ward facing child seat
on this seat.
Move the control switch to the "OFF"
position to
deactivate the passenger's front airbag. In this case,
you can install a rear ward facing child seat, unless
there is a fault with the airbags (airbag warning
lamp
on).
Deactivation of
the automatic
functions of the
electric parking
brake
fixed.
The "automatic application" (on
switching off the engine) and
"automatic release" functions are
deactivated or faulty. Activate the function again or contact a PEUGEOT
dealer or a qualified workshop in the event of a fault.
For more information on the Electric parking brake
,
refer to the corresponding section.
Electric parking
brake
fixed.
The electric parking brake is applied. Release the parking brake to switch off the warning
lamp: with your foot on the brake pedal, briefly push
the parking brake control lever.
Observe the safety recommendations.
For more information on the Electric parking brake ,
refer to the corresponding section.
1
Instruments
Page 23 of 566

21
3008-2_en_Chap01_instruments-de-bord_ed01-2016
Warning / indicator lampStateCause Action / Observations
Stop & Star t fixed, accompanied
by the display of a
message. The Stop & Start system is
deactivated.
The engine will not cut out at the next stop in the
traffic.
Reactivate the system by pressing the button again.
For more information on Stop & Star t
, refer to the
corresponding section.
Passenger's
airbag system
fixed in the instrument
panel and/or seat belt
and front passenger's
airbag warning lamps
display. The control switch, located in the
glove box, is set to the OFF
position.
The passenger's front airbag is
deactivated. You can install a rear ward facing child seat, unless
there is a fault with the airbags (airbag warning lamp
o n).
Set the control to the "
ON" position to activate the
passenger's front airbag. In this case, do not install a
rearward facing child seat on this seat.
Deactivation indicator lamps
If one of the following indicator lamps comes on, this confirms that the corresponding system has been switched off intentionally.
This may be accompanied by the display of a message and an audible signal.
Distance aler t
/
Active Safety
Brake fixed, accompanied by
a message.
The system has been deactivated,
via the vehicle configuration menu in
the screen. For more information on the Distance alert
/ Active
Safety Brake system, refer to the corresponding
section.
Assisted Lane
Departure
Warning System fixed, accompanied
by the display of a
message. The system has been deactivated. There will be no correction of the vehicle's trajectory
should there be a change of direction.
For more information on the Assisted Lane
Departure Warning System, refer to the
corresponding section.
1
Instruments
Page 121 of 566
119
3008-2_en_Chap03_ergonomie-et-confort_ed01-2016
Front fittings
1. Grab handle
2. Sun visor
3.
C
ard holder
4.
S
torage compar tment below the
steering wheel
5.
I
lluminated glove box
6.
Doo
r pockets
7.
S
cented air freshener
8.
U
SB por t
9.
F
ront 12 V accessor y socket (120 W)
10.
S
torage compartment
or
C
D player
or
W
ireless charger
11.
S
torage compartment
12 .
C
up holder
13.
F
ront armrest with storage
compartment
14 .
R
ear 12 V accessor y socket (120 W)
15.
S
torage compartment
16.
2
30 V socket
3
Ease of use and comfort
Page 122 of 566

120
3008-2_en_Chap03_ergonomie-et-confort_ed01-2016
Cigarette lighter /
12 V accessory socket
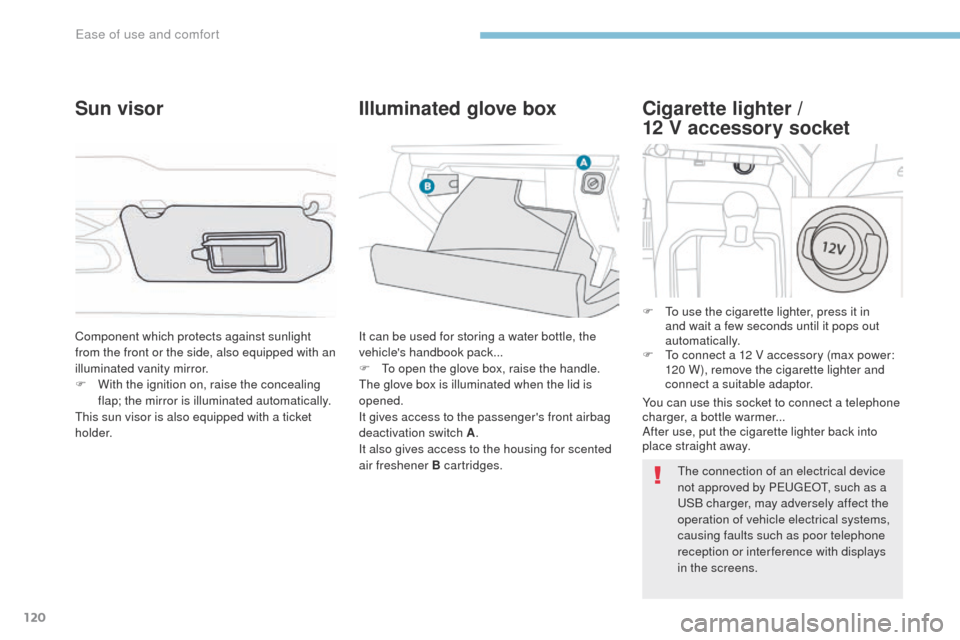
F To use the cigarette lighter, press it in
and wait a few seconds until it pops out
automatically.
F
T
o connect a 12 V accessory (max power:
120 W), remove the cigarette lighter and
connect a suitable adaptor.
Component which protects against sunlight
from the front or the side, also equipped with an
illuminated vanity mirror.
F
W
ith the ignition on, raise the concealing
flap; the mirror is illuminated automatically.
This sun visor is also equipped with a ticket
h o l d e r.
Sun visor Illuminated glove box
It can be used for storing a water bottle, the
vehicle's handbook pack...
F
T
o open the glove box, raise the handle.
The glove box is illuminated when the lid is
opened.
It gives access to the passenger's front airbag
deactivation switch A .
It also gives access to the housing for scented
air freshener B cartridges. The connection of an electrical device
not approved by PEUGEOT, such as a
USB charger, may adversely affect the
operation of vehicle electrical systems,
causing faults such as poor telephone
reception or inter ference with displays
in the screens.
You can use this socket to connect a telephone
charger, a bottle warmer...
After use, put the cigarette lighter
back into
place straight away.
Ease of use and comfort
Page 127 of 566

125
3008-2_en_Chap03_ergonomie-et-confort_ed01-2016
A complete air freshener system for the passenger compartment. It is supplied by a three-fragrance
cartridge.
This system operates only with the engine running.
Scented air freshener
Activation / Settings
Activation and adjustment of settings is done in
the touch screen:
-
e
ither directly in the Applications menu,
-
o
r by personalising an ambience for the
i-Cockpit Amplify function.
In the Applications menu: The scented air freshener is also
managed by the i-Cockpit Amplify
function.
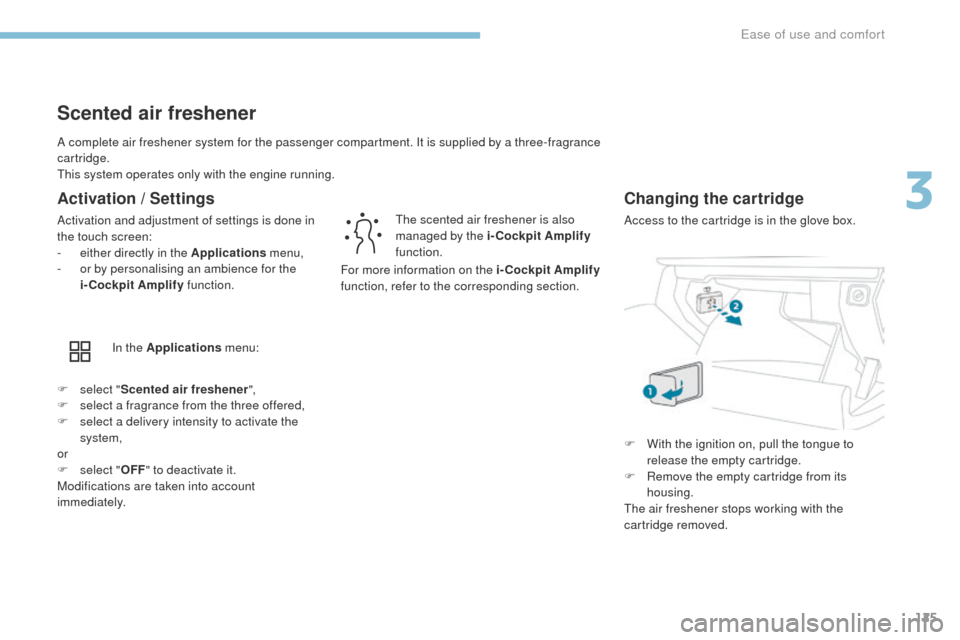
Changing the cartridge
Access to the cartridge is in the glove box.
F
s
elect " Scented air freshener ",
F
s
elect a fragrance from the three offered,
F
s
elect a delivery intensity to activate the
system,
or
F
s
elect " OFF" to deactivate it.
Modifications are taken into account
immediately. For more information on the i-Cockpit Amplify
function, refer to the corresponding section.
F
W
ith the ignition on, pull the tongue to
release the empty cartridge.
F
R
emove the empty cartridge from its
housing.
The air freshener stops working with the
cartridge removed.
3
Ease of use and comfort
Page 175 of 566
173
3008-2_en_Chap05_securite_ed01-2016
Front airbags
Deployment
The airbags are deployed, except the
passenger's front airbag if it is deactivated, in
the event of a serious front impact to all or part
of the front impact zone A, in the longitudinal
centreline of the vehicle on a horizontal plane
and directed from the front to the rear of the
vehicle.
The front airbag inflates between the thorax
and head of the front occupant of the vehicle
and the steering wheel, driver's side, and the
dashboard, passenger's side, to cushion their
for ward movement.
System which protects the driver and front
passenger in the event of a serious front impact
in order to limit the risk of injury to the head and
thorax.
The driver's airbag is fitted in the centre of the
steering wheel; the front passenger's airbag is
fitted in the dashboard above the glove box.
5
Safety
Page 313 of 566

311
3008-2_en_Chap08_en cas-de-panne_ed01-2016
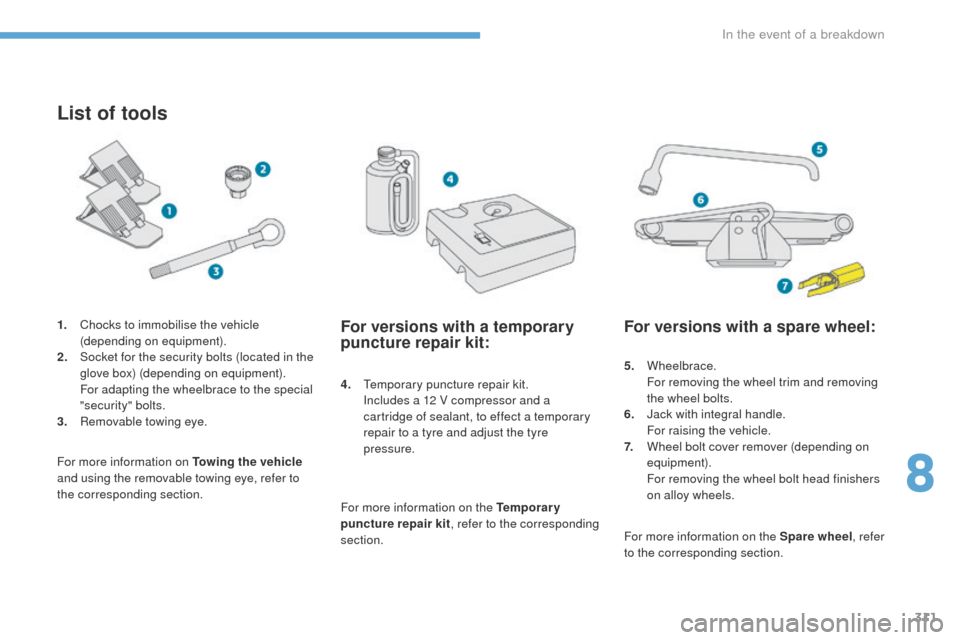
List of tools
4. Temporary puncture repair kit. Includes a 12 V compressor and a
cartridge of sealant, to effect a temporary
repair to a tyre and adjust the tyre
pressure.
For more information on Towing the vehicle
and using the removable towing eye, refer to
the corresponding section. 1.
C
hocks to immobilise the vehicle
(depending on equipment).
2.
S
ocket for the security bolts (located in the
glove box) (depending on equipment). F
or adapting the wheelbrace to the special
"security" bolts.
3.
R
emovable towing eye.
For versions with a temporary
puncture repair kit:
For more information on the Temporary
puncture repair kit , refer to the corresponding
section.
For versions with a spare wheel:
5. Wheelbrace. F
or removing the wheel trim and removing
the wheel bolts.
6.
J
ack with integral handle.
F
or raising the vehicle.
7.
W
heel bolt cover remover (depending on
equipment).
F
or removing the wheel bolt head finishers
on alloy wheels.
For more information on the Spare wheel , refer
to the corresponding section.
8
In the event of a breakdown