2017 Peugeot 3008 Hybrid 4 tailgate
[x] Cancel search: tailgatePage 138 of 566
136
3008-2_en_Chap03_ergonomie-et-confort_ed01-2016
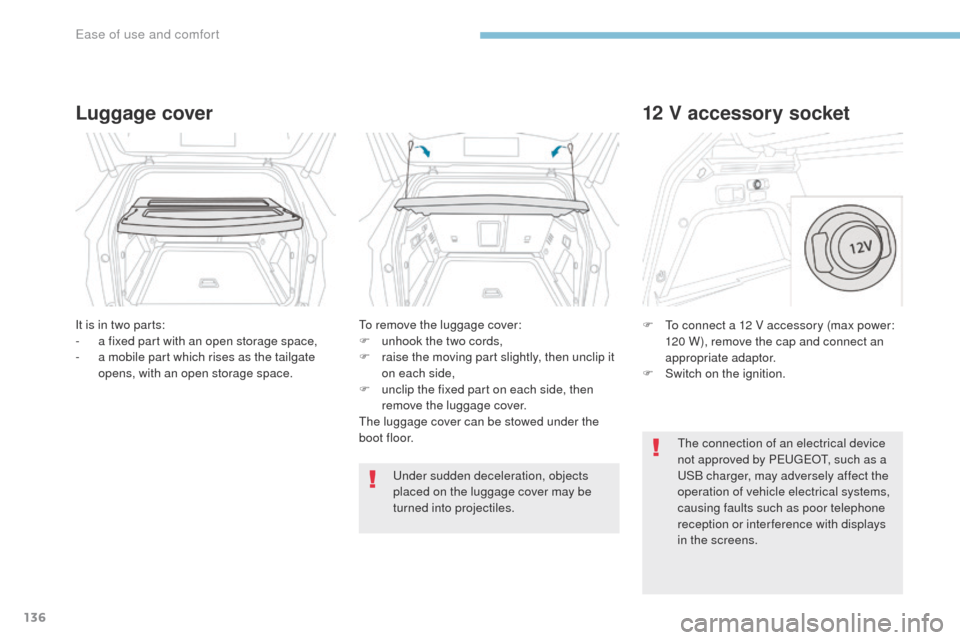
Luggage cover
It is in two parts:
- a f ixed part with an open storage space,
-
a m
obile part which rises as the tailgate
opens, with an open storage space. To remove the luggage cover:
F
u nhook the two cords,
F
r
aise the moving part slightly, then unclip it
on each side,
F
u
nclip the fixed part on each side, then
remove the luggage cover.
The luggage cover can be stowed under the
boot floor.
Under sudden deceleration, objects
placed on the luggage cover may be
turned into projectiles.
12 V accessory socket
F To connect a 12 V accessory (max power: 120 W), remove the cap and connect an
appropriate adaptor.
F
S
witch on the ignition.
The connection of an electrical device
not approved by PEUGEOT, such as a
USB charger, may adversely affect the
operation of vehicle electrical systems,
causing faults such as poor telephone
reception or inter ference with displays
in the screens.
Ease of use and comfort
Page 269 of 566

267
3008-2_en_Chap06_conduite_ed01-2016
Visiopark 1
Rear vision
To activate the camera, located in the tailgate,
engage reverse and keep the speed of the
vehicle below 6 mph (10 km/h).
The system is deactivated:
-
a
utomatically above about 6 mph
(10 km/h),
-
a
utomatically on opening the tailgate,
-
w
hen coming out of reverse (the image
remains displayed for 7 seconds),
-
b
y pressing the red cross in the top left-
hand corner of the touch screen.
AUTO mode
This mode is activated by default.
Using sensors in the rear bumper, the
automatic view changes from a rear view to a
view from above, as an obstacle is approached
during a manoeuvre.
Standard view
The area behind the vehicle is displayed in the
screen.
The blue lines represent the width of your
vehicle, with the mirrors unfolded; their
direction changes with the position of the
steering wheel.
The red line represents a distance of 30 cm
from the rear bumper, and the two blue lines,
1 m and 2 m respectively.
This view is available with AUTO mode or in the
view selection menu.
6
Driving
Page 271 of 566
269
3008-2_en_Chap06_conduite_ed01-2016
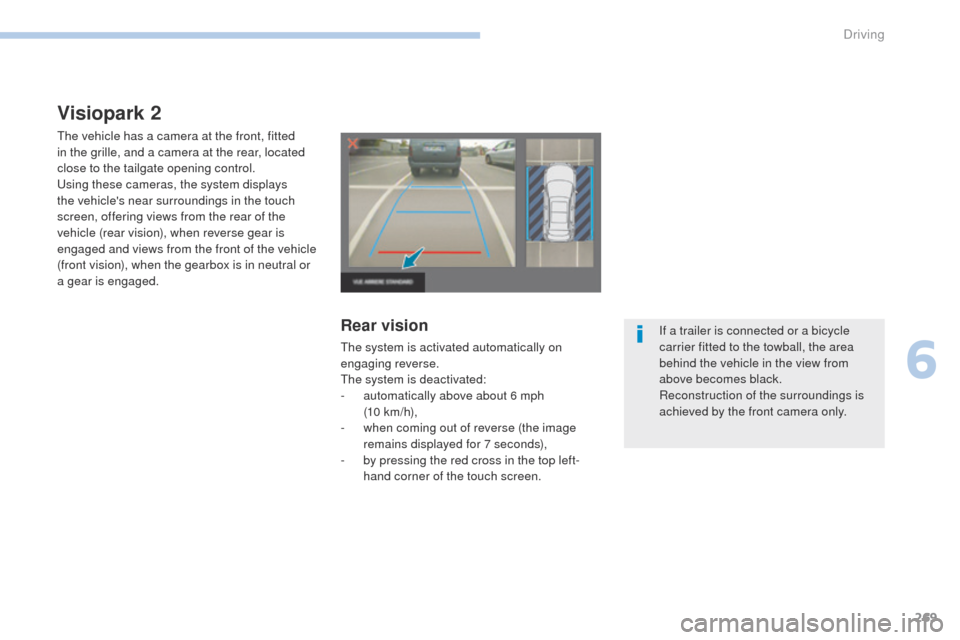
Visiopark 2
The vehicle has a camera at the front, fitted
in the grille, and a camera at the rear, located
close to the tailgate opening control.
Using these cameras, the system displays
the vehicle's near surroundings in the touch
screen, offering views from the rear of the
vehicle (rear vision), when reverse gear is
engaged and views from the front of the vehicle
(front vision), when the gearbox is in neutral or
a gear is engaged.
Rear vision
The system is activated automatically on
engaging reverse.
The system is deactivated:
-
a
utomatically above about 6 mph
(10 km/h),
-
w
hen coming out of reverse (the image
remains displayed for 7 seconds),
-
b
y pressing the red cross in the top left-
hand corner of the touch screen. If a trailer is connected or a bicycle
carrier fitted to the towball, the area
behind the vehicle in the view from
above becomes black.
Reconstruction of the surroundings is
achieved by the front camera only.
6
Driving
Page 309 of 566

307
3008-2_en_Chap08_en cas-de-panne_ed01-2016
Warning triangle
As a safety precaution, before leaving your vehicle to set up and install the triangle, switch on the hazard warning lamps and put on your high visibility
vest.
Storage compartment
A compartment for stowing a warning triangle is
provided in the tailgate interior trim.
F
O
pen the tailgate.
F
R
elease the cover by turning the fixing a
quarter turn anti-clockwise.
For other versions, refer to the
instructions provided with the triangle.
Assembling the triangle
For versions supplied with a triangle as original
equipment:
F
r
emove the triangle from its case,
F
u
nfold the legs,
F
o
pen out the two sides of the triangle,
F
c
lip together to complete the assembly.
Positioning the triangle
F Place the triangle behind the vehicle, as required by local legislation.
8
In the event of a breakdown
Page 330 of 566
328
3008-2_en_Chap08_en cas-de-panne_ed01-2016
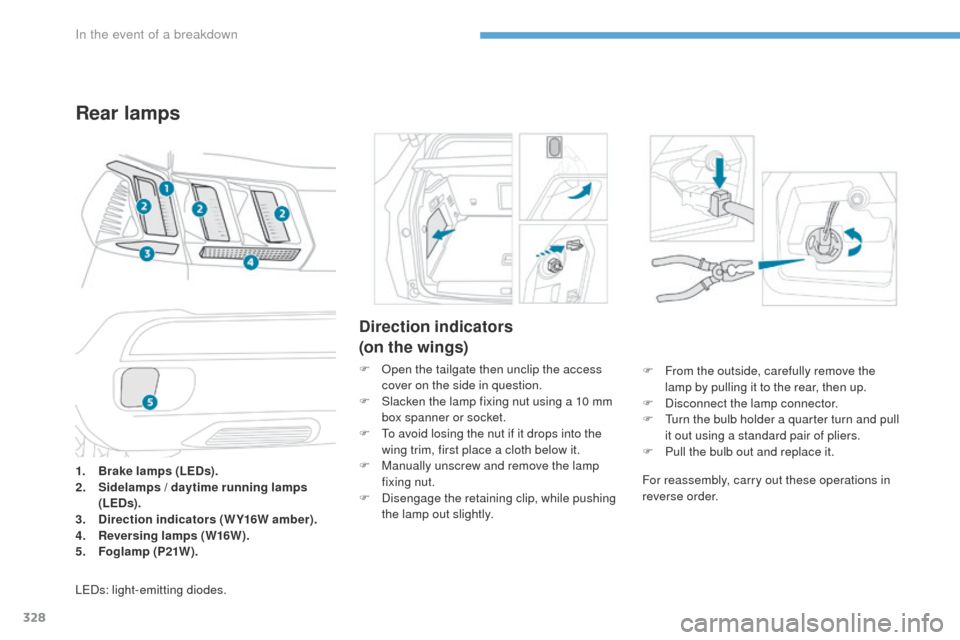
Direction indicators
(on the wings)
F Open the tailgate then unclip the access cover on the side in question.
F
S
lacken the lamp fixing nut using a 10 mm
box spanner or socket.
F
T
o avoid losing the nut if it drops into the
wing trim, first place a cloth below it.
F
M
anually unscrew and remove the lamp
fixing nut.
F
D
isengage the retaining clip, while pushing
the lamp out slightly.
Rear lamps
1. Brake lamps (LEDs).
2. Si delamps / daytime running lamps
(LEDs).
3.
D
irection indicators (WY16W amber).
4.
R
eversing lamps (W16W).
5.
F
oglamp (P21W).
LEDs: light-emitting diodes. F
F
rom the outside, carefully remove the
lamp by pulling it to the rear, then up.
F
D
isconnect the lamp connector.
F
T
urn the bulb holder a quarter turn and pull
it out using a standard pair of pliers.
F
P
ull the bulb out and replace it.
For reassembly, carry out these operations in
reverse order.
In the event of a breakdown
Page 331 of 566
329
3008-2_en_Chap08_en cas-de-panne_ed01-2016
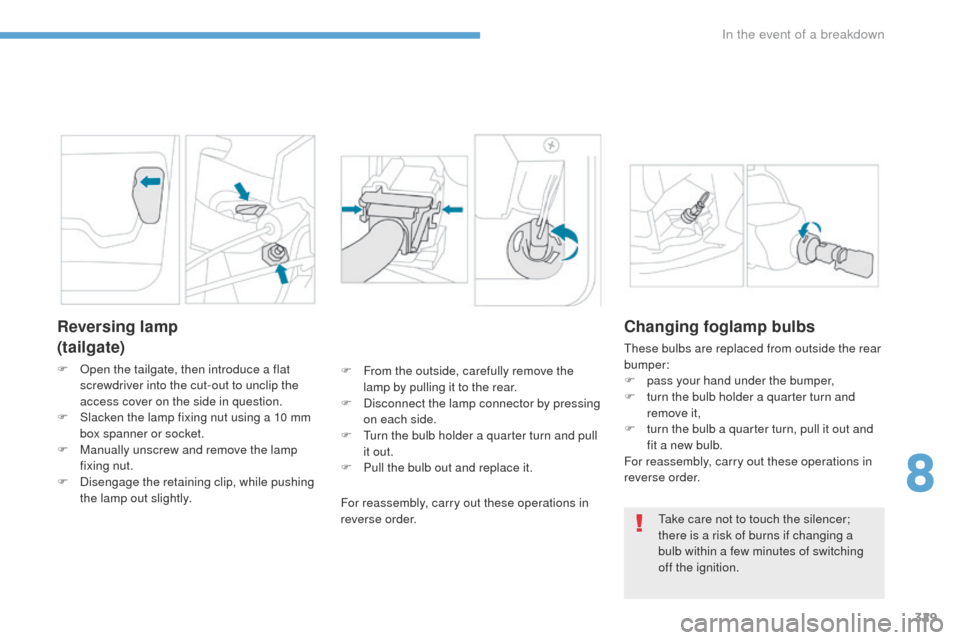
Reversing lamp
(tailgate)
F Open the tailgate, then introduce a flat screwdriver into the cut-out to unclip the
access cover on the side in question.
F
S
lacken the lamp fixing nut using a 10 mm
box spanner or socket.
F
M
anually unscrew and remove the lamp
fixing nut.
F
D
isengage the retaining clip, while pushing
the lamp out slightly. F
F rom the outside, carefully remove the
lamp by pulling it to the rear.
F
D
isconnect the lamp connector by pressing
on each side.
F
T
urn the bulb holder a quarter turn and pull
it out.
F
P
ull the bulb out and replace it.
For reassembly, carry out these operations in
reverse order.
Changing foglamp bulbs
These bulbs are replaced from outside the rear
bumper:
F
p
ass your hand under the bumper,
F
t
urn the bulb holder a quarter turn and
remove it,
F
t
urn the bulb a quarter turn, pull it out and
fit a new bulb.
For reassembly, carry out these operations in
reverse order.
Take care not to touch the silencer;
there is a risk of burns if changing a
bulb within a few minutes of switching
off the ignition.
8
In the event of a breakdown
Page 337 of 566
335
3008-2_en_Chap08_en cas-de-panne_ed01-2016
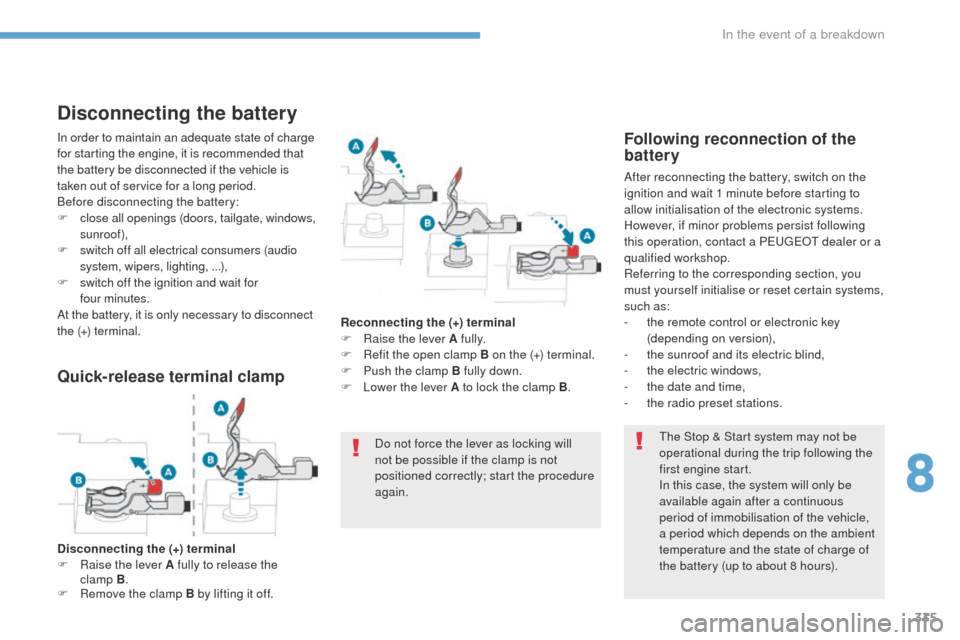
Disconnecting the battery
The Stop & Start system may not be
operational during the trip following the
first engine start.
In this case, the system will only be
available again after a continuous
period of immobilisation of the vehicle,
a period which depends on the ambient
temperature and the state of charge of
the battery (up to about 8 hours).
In order to maintain an adequate state of charge
for starting the engine, it is recommended that
the battery be disconnected if the vehicle is
taken out of service for a long period.
Before disconnecting the battery:
F
c
lose all openings (doors, tailgate, windows,
sunroof),
F
s
witch off all electrical consumers (audio
system, wipers, lighting, ...),
F
s
witch off the ignition and wait for
four
minutes.
At the battery, it is only necessary to disconnect
the (+) terminal.
Following reconnection of the
battery
After reconnecting the battery, switch on the
ignition and wait 1 minute before starting to
allow initialisation of the electronic systems.
However, if minor problems persist following
this operation, contact a PEUGEOT dealer or a
qualified workshop.
Referring to the corresponding section, you
must yourself initialise or reset certain systems,
such as:
-
t
he remote control or electronic key
(depending on version),
-
t
he sunroof and its electric blind,
-
t
he electric windows,
-
t
he date and time,
-
t
he radio preset stations.
Quick-release terminal clamp
Disconnecting the (+) terminal
F Ra ise the lever A fully to release the
clamp
B.
F
R
emove the clamp B by lifting it off. Reconnecting the (+) terminal
F
Ra
ise the lever A fully.
F
R
efit the open clamp B on the (+) terminal.
F
P
ush the clamp B fully down.
F
L
ower the lever A to lock the clamp B
.
Do not force the lever as locking will
not be possible if the clamp is not
positioned correctly; start the procedure
again.
8
In the event of a breakdown
Page 350 of 566

348
3008-2_en_Chap11_index-alpha_ed01-2016
Headlamps, automatic dipping ...............17, 149
Headlamps, automatic illumination
.................................. 141, 146 , 147
Headlamps, dipped beam
................17, 323-325
Headlamps, halogen
..................................... 324
Headlamps, main beam
................... 17,
323-325
Head restraints, front
...................................... 93
Head restraints, rear
..................................... 13 0
Heating
.................................... 10, 104 , 10 6 , 108
Hi-Fi system
.................................................. 12 2
Hill Assist Descent Control
.................................................. 20,
166
Hill start assist
............................................... 2
16
Horn ............................................................... 157Inflating tyres
..........................................
10, 345
Inflating tyres and accessories (using the kit)
..........................312
Instrument panel
..................... 12,
13, 40 , 42, 43
Intelligent Traction Control
........................................................ 16
1
ISOFIX
..........................................................187
Isofix mountings
...............................
.............18 6
i- Cockpit amplify function
................................. 98, 102 , 125, 217
Ignition
................
................................... 19 9, 201
Immobiliser, electronic
............................63, 197
Indicator, AdBlue
®
range
....................................................... 30, 37
Indicator, coolant temperature
.................................................. 32
Indicator, engine oil level
.................................................... 36, 40
Indicator lamps, operation
........................................... 17, 19 , 21
Indicator lamps, status
............................................................ 19
Indicators, direction
.............................. 14 4, 324 Jack
........
.......................................................
310
Jump starting
..............................
..................
333
I
J
Key ..................................................... 54, 63 , 64
Key, electronic ..................................... 58, 60-62
Keyless Entry and Starting
......................58, 61- 63 , 197, 200
Key not recognised
....................................... 202
Key with remote control
......................................................... 19
7
Kit, temporary puncture repair
................................................... 309, 312
K
Fuel .......................................................... 10, 283
Fuel consumption ............................................ 10
Fu
el tank ................................................ 281, 282
Fuses
............................................................. 331
Gauge, fuel .................................................... 281
Gearbox, automatic
....... 10,
2 11, 216 , 217, 219 , 302 , 332
Gearbox, manual
....10, 210 , 216 , 217, 219 , 302
Gear lever
..............................
.........................10
Gear lever, automatic gearbox
................
....................................... 2 11
Gear lever, manual gearbox
................
....................................... 210
Gear shift indicator
....................................... 218
Glove box
...................................................... 120
Grab handles
................................................ 11
9
G
Hands-free access ..........................................78
H ands-free tailgate ............................. 76,
78, 79
Hazard warning lamps
..........................157, 307
Headlamp adjustment
...................................145
H
Alphabetical index