2017 Peugeot 3008 Hybrid 4 roof
[x] Cancel search: roofPage 63 of 578
61
3008-2_en_Chap02_ouvertures_ed01-2016
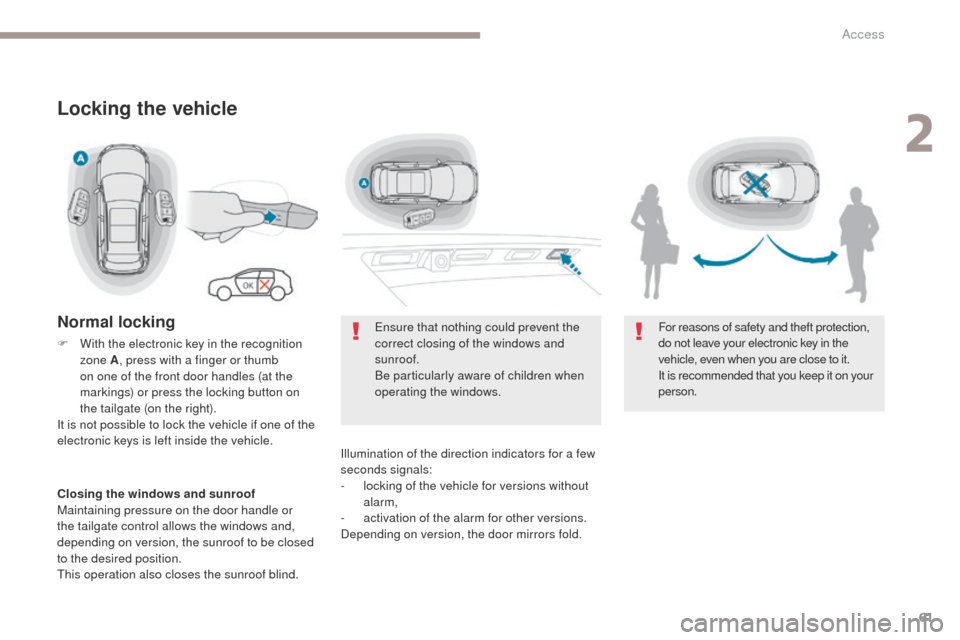
Ensure that nothing could prevent the
correct closing of the windows and
sunroof.
Be particularly aware of children when
operating the windows.
Illumination of the direction indicators for a few
seconds signals:
-
l
ocking of the vehicle for versions without
alarm,
-
a
ctivation of the alarm for other versions.
Depending on version, the door mirrors fold. For reasons of safety and theft protection,
do not leave your electronic key in the
vehicle, even when you are close to it.
It is recommended that you keep it on your
person.
Locking the vehicle
Normal locking
F With the electronic key in the recognition
zone A , press with a finger or thumb
on one of the front door handles (at the
markings) or press the locking button on
the tailgate (on the right).
It is not possible to lock the vehicle if one of the
electronic keys is left inside the vehicle.
Closing the windows and sunroof
Maintaining pressure on the door handle or
the tailgate control allows the windows and,
depending on version, the sunroof to be closed
to the desired position.
This operation also closes the sunroof blind.
2
Access
Page 74 of 578
72
3008-2_en_Chap02_ouvertures_ed01-2016
Locking the vehicle
with exterior perimeter
monitoring only
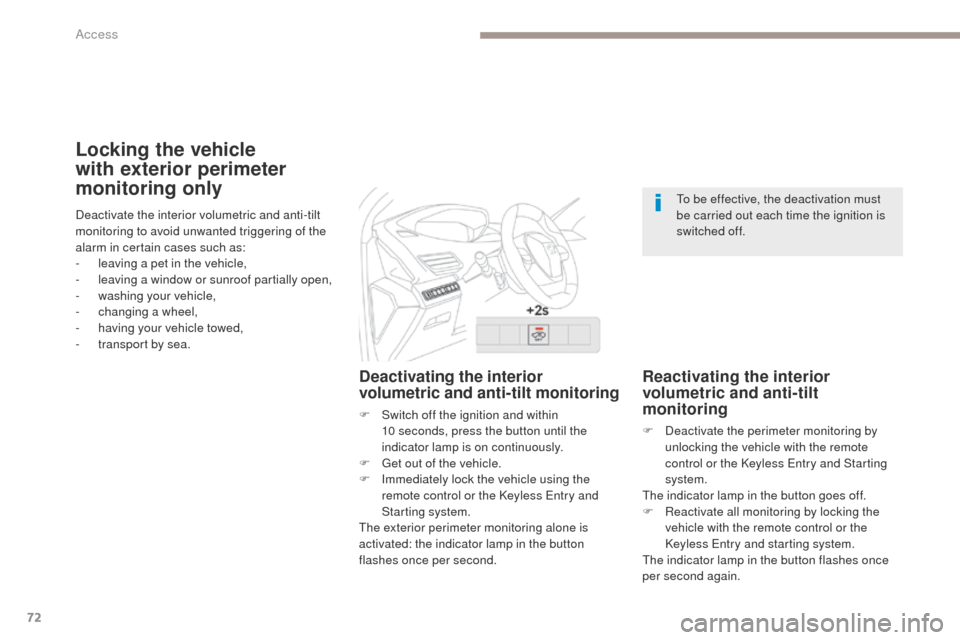
Deactivating the interior
volumetric and anti-tilt monitoring
F Switch off the ignition and within 10 seconds, press the button until the
indicator lamp is on continuously.
F
G
et out of the vehicle.
F
I
mmediately lock the vehicle using the
remote control or the Keyless Entry and
Starting system.
The exterior perimeter monitoring alone is
activated: the indicator lamp in the button
flashes once per second.
Reactivating the interior
volumetric and anti-tilt
monitoring
F Deactivate the perimeter monitoring by unlocking the vehicle with the remote
control or the Keyless Entry and Starting
system.
The indicator lamp in the button goes off.
F
R
eactivate all monitoring by locking the
vehicle with the remote control or the
Keyless Entry and starting system.
The indicator lamp in the button flashes once
per second again.
Deactivate the interior volumetric and anti-tilt
monitoring to avoid unwanted triggering of the
alarm in certain cases such as:
-
l
eaving a pet in the vehicle,
-
l
eaving a window or sunroof partially open,
-
w
ashing your vehicle,
-
c
hanging a wheel,
-
h
aving your vehicle towed,
-
t
ransport by sea. To be effective, the deactivation must
be carried out each time the ignition is
switched off.
Access
Page 86 of 578
84
3008-2_en_Chap02_ouvertures_ed01-2016
Panoramic opening sunroof
The control buttons for the sunroof and blind
can be used:
-
w
ith the ignition on, if the state of charge of
the battery is adequate,
-
w
ith the engine running,
-
i
n STOP mode of Stop & Start,
-
d
uring the 45 seconds after switching off
the ignition,
-
d
uring the 45 seconds after locking the
vehicle.
Opening
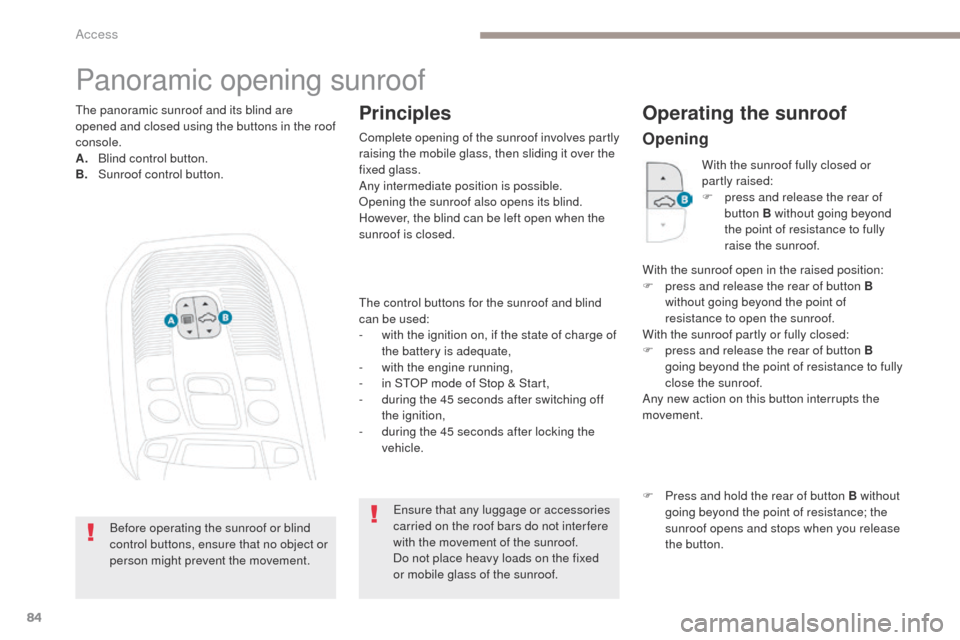
The panoramic sunroof and its blind are
opened and closed using the buttons in the roof
console.
A.
B
lind control button.
B.
S
unroof control button.
Ensure that any luggage or accessories
carried on the roof bars do not inter fere
with the movement of the sunroof.
Do not place heavy loads on the fixed
or mobile glass of the sunroof.
Before operating the sunroof or blind
control buttons, ensure that no object or
person might prevent the movement.Principles
Complete opening of the sunroof involves partly
raising the mobile glass, then sliding it over the
fixed glass.
Any intermediate position is possible.
Opening the sunroof also opens its blind.
However, the blind can be left open when the
sunroof is closed. With the sunroof fully closed or
partly raised:
F
p
ress and release the rear of
button B without going beyond
the point of resistance to fully
raise the sunroof.
With the sunroof open in the raised position:
F
p
ress and release the rear of button B
without going beyond the point of
resistance to open the sunroof.
With the sunroof partly or fully closed:
F
p
ress and release the rear of button B
going beyond the point of resistance to fully
close the sunroof.
Any new action on this button interrupts the
movement.
Operating the sunroof
F Press and hold the rear of button B without going beyond the point of resistance; the
sunroof opens and stops when you release
the button.
Access
Page 87 of 578
85
3008-2_en_Chap02_ouvertures_ed01-2016
If the sunroof is wet, following a shower
or washing the vehicle, wait until it is
completely dry before opening.
Do not operate the sunroof if it is
covered by snow or ice - Risk of
damage!
Use only plastic scrapers to remove
snow or ice.
Do not extend your head or arms
through the open sunroof when driving -
Risk of serious injury!
ClosingF press and hold the front of button B without going beyond the point of resistance; the
sunroof closes and stops when you release
the button.
Never leave the vehicle with the sunroof
open.
Anti-pinch system
If the sunroof encounters an obstacle when
closing, the movement is automatically
reversed.
The anti-pinch system is designed to be
effective at speeds of up to 75 mph (120 km/h).
Reinitialisation
Following reconnection of the battery or in
the event of a fault or jerky movement of
the sunroof, the opening sunroof must be
reinitialised:
F
p
ress the rear of button B until the sunroof
is fully open,
F
p
ress and hold the rear of button B again
for at least 3 seconds.
Check the condition of the sunroof
seals regularly (presence of dust or
deposits, dead leaves...).
Before using a car wash, first check that
the sunroof is closed. If using a high
pressure jet wash, keep the tip of the
lance at least 30 centimetres from the
seals.
With the sunroof partially or fully
open:
F
p
ress and release the front of
button B going beyond the point
of resistance to fully close the
sunroof.
Any new action on this button
interrupts the movement. With the sunroof partly or fully open:
F
p
ress and release the front of button
B
without going beyond the point of
resistance to close the sunroof to its raised
position.
F
p
ress and release the front of button B
again to fully close the sunroof.
With the sunroof fully or partly raised:
F
p
ress and release the front of button
B
without going beyond the point of
resistance to fully close the sunroof.
2
Access
Page 88 of 578
86
3008-2_en_Chap02_ouvertures_ed01-2016
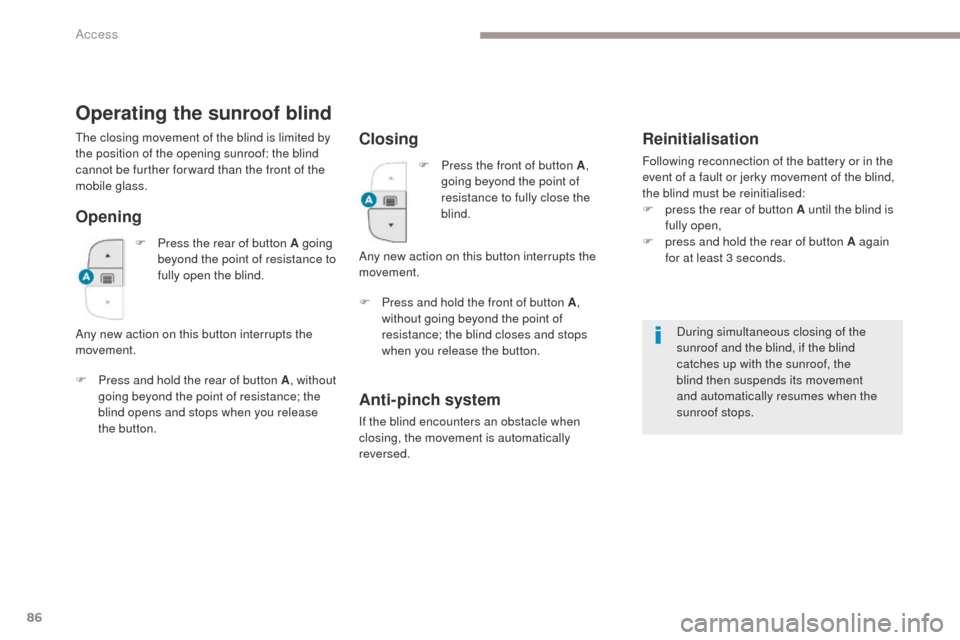
Operating the sunroof blind
Opening
F Press and hold the rear of button A, without
going beyond the point of resistance; the
blind opens and stops when you release
the button. During simultaneous closing of the
sunroof and the blind, if the blind
catches up with the sunroof, the
blind then suspends its movement
and automatically resumes when the
sunroof stops.
The closing movement of the blind is limited by
the position of the opening sunroof: the blind
cannot be further for ward than the front of the
mobile glass.
Closing
Any new action on this button interrupts the
movement.
Anti-pinch system
If the blind encounters an obstacle when
closing, the movement is automatically
reversed.
Reinitialisation
Following reconnection of the battery or in the
event of a fault or jerky movement of the blind,
the blind must be reinitialised:
F
p
ress the rear of button A until the blind is
fully open,
F
p
ress and hold the rear of button A again
for at least 3 seconds.
F
P
ress the rear of button A going
beyond the point of resistance to
fully open the blind.
Any new action on this button interrupts the
movement. F
P
ress the front of button A ,
going beyond the point of
resistance to fully close the
blind.
F
P
ress and hold the front of button
A ,
without going beyond the point of
resistance; the blind closes and stops
when you release the button.
Access
Page 89 of 578
87
3008-2_en_Chap02_ouvertures_ed01-2016
When locking the vehicle, pressing
and holding the locking button also
closes the windows and the sunroof
and then the blind. The movements
are interrupted when you release the
locking button.
Never leave the electronic key inside
the vehicle if you get out of the vehicle,
even for a short time.
If something is trapped when closing
the sunroof or blind, you should reverse
the movement of the sunroof or blind.
To do this, press the control button in
question.
The driver must ensure that passengers
use the sunroof and blind correctly.
Be particularly aware of children when
operating the sunroof or blind.
2
Access
Page 90 of 578
88
3008-2_en_Chap03_ergonomie-et-confort_ed01-2016
Driving position
Adopting a good driving position helps improve your comfort and protection.
It also optimises interior and exterior visibility as well as access to controls.
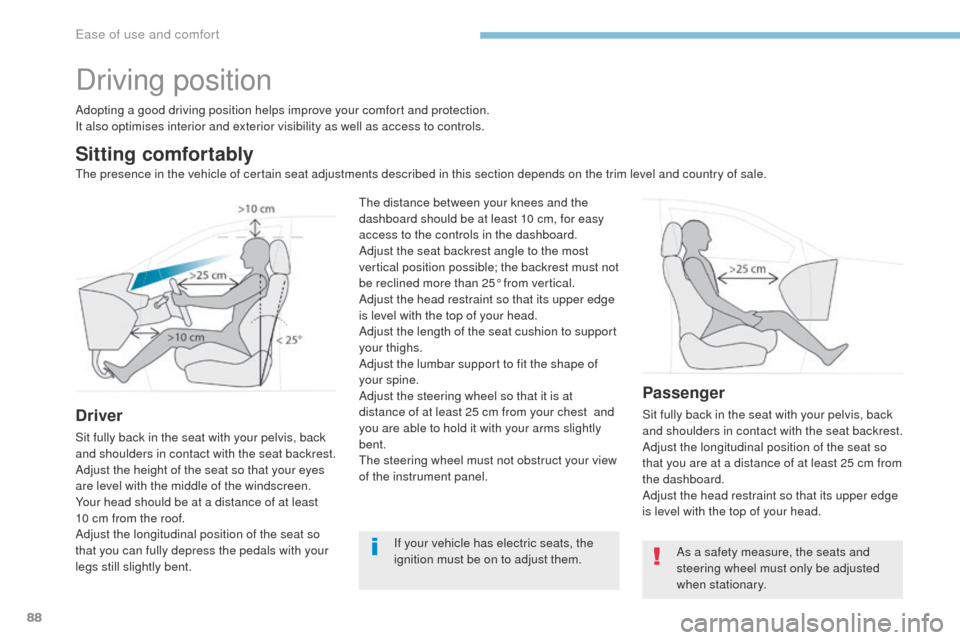
Sitting comfortably
Driver
Sit fully back in the seat with your pelvis, back
and shoulders in contact with the seat backrest.
Adjust the height of the seat so that your eyes
are level with the middle of the windscreen.
Your head should be at a distance of at least
10 cm from the roof.
Adjust the longitudinal position of the seat so
that you can fully depress the pedals with your
legs still slightly bent.
Passenger
Sit fully back in the seat with your pelvis, back
and shoulders in contact with the seat backrest.
Adjust the longitudinal position of the seat so
that you are at a distance of at least 25 cm from
the dashboard.
Adjust the head restraint so that its upper edge
is level with the top of your head.
If your vehicle has electric seats, the
ignition must be on to adjust them.
The distance between your knees and the
dashboard should be at least 10 cm, for easy
access to the controls in the dashboard.
Adjust the seat backrest angle to the most
vertical position possible; the backrest must not
be reclined more than 25° from vertical.
Adjust the head restraint so that its upper edge
is level with the top of your head.
Adjust the length of the seat cushion to support
your thighs.
Adjust the lumbar support to fit the shape of
your spine.
Adjust the steering wheel so that it is at
distance of at least 25 cm from your chest
and
you are able to hold it with your arms slightly
bent.
The steering wheel must not obstruct your view
of the instrument panel.
As a safety measure, the seats and
steering wheel must only be adjusted
when stationary.
The presence in the vehicle of certain seat adjustments described in this section depends on the trim level and country of sale.
Ease of use and comfort
Page 131 of 578
129
3008-2_en_Chap03_ergonomie-et-confort_ed01-2016
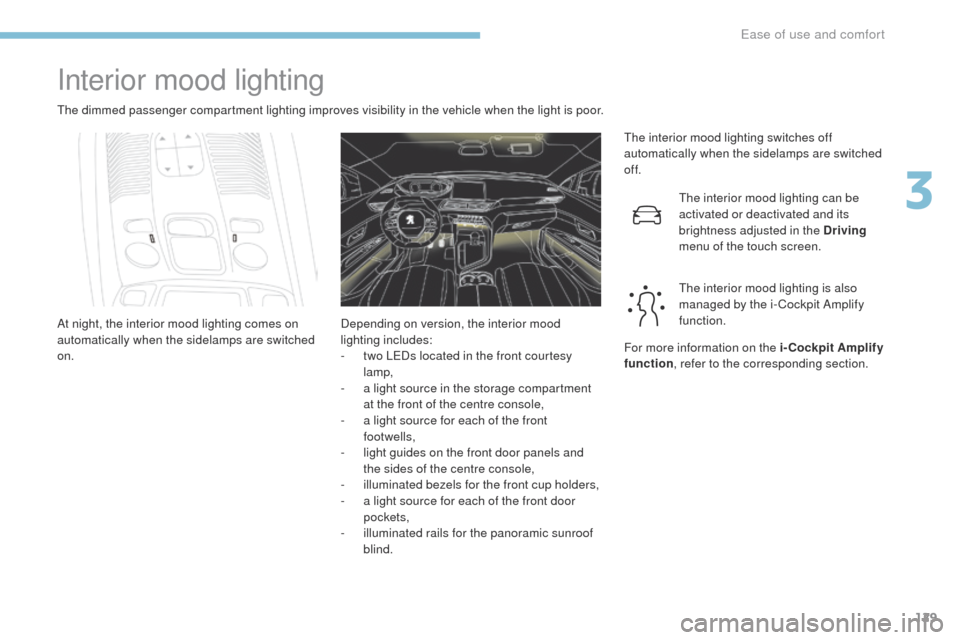
Interior mood lighting
The dimmed passenger compartment lighting improves visibility in the vehicle when the light is poor.The interior mood lighting switches off
automatically when the sidelamps are switched
of f.
At night, the interior mood lighting comes on
automatically when the sidelamps are switched
on. The interior mood lighting can be
activated or deactivated and its
brightness adjusted in the Driving
menu of the touch screen.
The interior mood lighting is also
managed by the i- Cockpit Amplify
function.
Depending on version, the interior mood
lighting includes:
-
t
wo LEDs located in the front courtesy
lamp,
-
a l
ight source in the storage compartment
at the front of the centre console,
-
a l
ight source for each of the front
footwells,
-
l
ight guides on the front door panels and
the sides of the centre console,
-
i
lluminated bezels for the front cup holders,
-
a l
ight source for each of the front door
pockets,
-
i
lluminated rails for the panoramic sunroof
blind. For more information on the i-Cockpit Amplify
function
, refer to the corresponding section.
3
Ease of use and comfort