2017 Peugeot 3008 Hybrid 4 lock
[x] Cancel search: lockPage 535 of 578
173
.
Audio and Telematics
Transversal-Peugeot_en_Chap03_RD6_ed01-2016
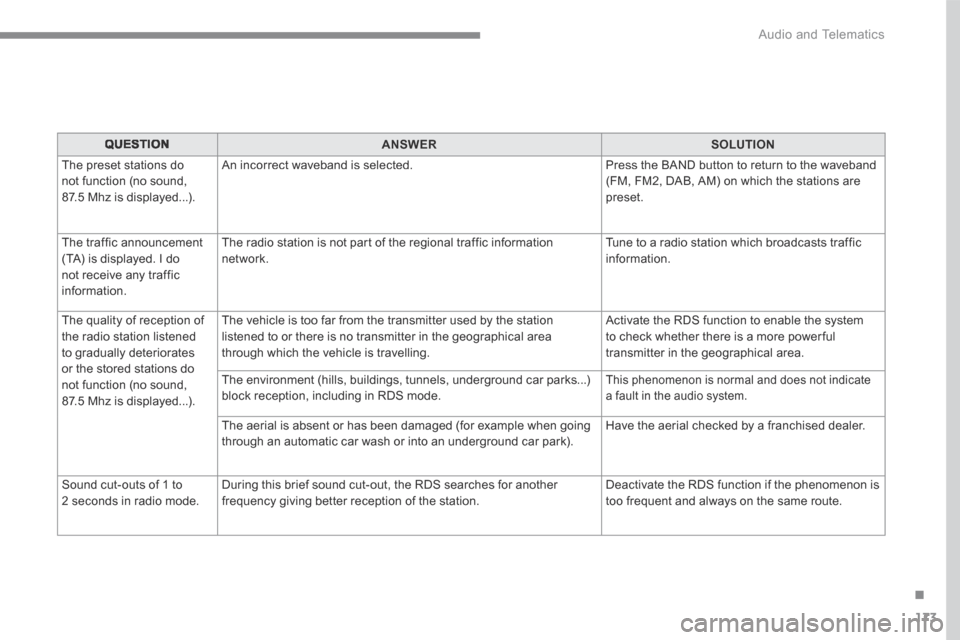
QUESTIONANSWERSOLUTION
The preset stations do not function (no sound, 87.5 Mhz is displayed...).
An incorrect waveband is selected. Press the BAND button to return to the waveband (FM, FM2, DAB, AM) on which the stations are preset.
The traffic announcement (TA) is displayed. I do not receive any traffic information.
The radio station is not part of the regional traffic information network. Tune to a radio station which broadcasts traffic information.
The quality of reception of the radio station listened to gradually deteriorates or the stored stations do not function (no sound, 87.5 Mhz is displayed...).
The vehicle is too far from the transmitter used by the station listened to or there is no transmitter in the geographical area through which the vehicle is travelling.
Activate the RDS function to enable the system to check whether there is a more power ful transmitter in the geographical area.
The environment (hills, buildings, tunnels, underground car parks...) block reception, including in RDS mode. This phenomenon is normal and does not indicate a fault in the audio system.
The aerial is absent or has been damaged (for example when going through an automatic car wash or into an underground car park). Have the aerial checked by a franchised dealer.
Sound cut-outs of 1 to 2 seconds in radio mode. During this brief sound cut-out, the RDS searches for another frequency giving better reception of the station. Deactivate the RDS function if the phenomenon is too frequent and always on the same route.
Page 543 of 578
3
Driver's cab
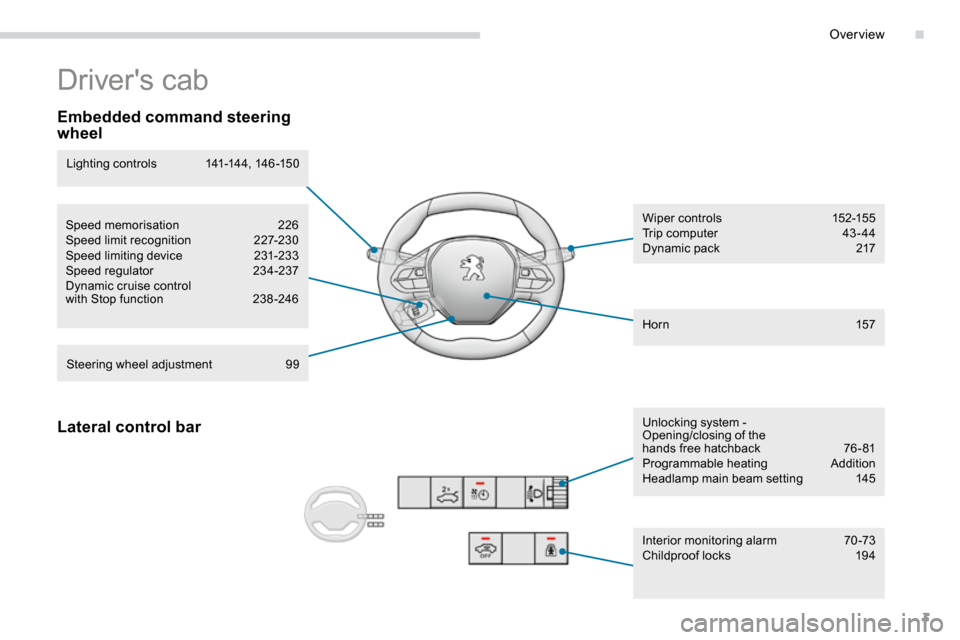
Embedded command steering
wheel
Lighting c ontrols 141-14 4, 14 6 -15 0
Speed memorisation 226
Speed limit recognition 227-230
Speed limiting device 231-233
Speed regulator 234-237
Dynamic cruise control
with Stop function 238-246
Steering wheel adjustment 99 Wiper c ontrols
152-15 5
Trip computer 43 - 44
Dynamic pack 217
Hor n 157
Lateral control barUnlocking system -
Opening/closing of the
hands free hatchback 76 - 81
Programmable heating Addition
Headlamp main beam setting 145
Interior monitoring alarm 70-73
Childproof locks 194
.
Over view
Page 544 of 578
4
Hands-free tailgate
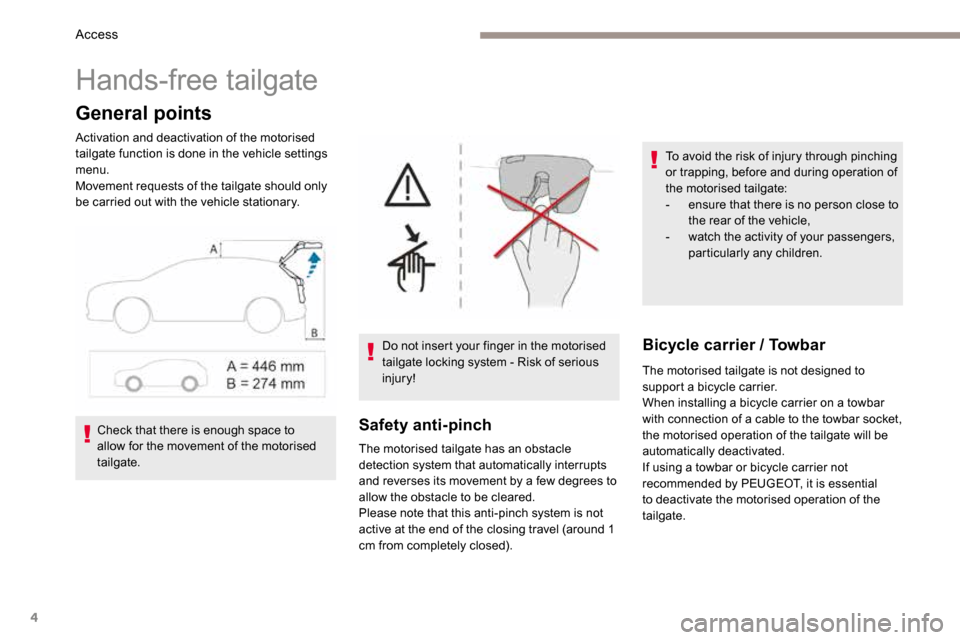
General points
Activation and deactivation of the motorised
tailgate function is done in the vehicle settings
menu.
Movement requests of the tailgate should only
be carried out with the vehicle stationary.
Safety anti-pinch
The motorised tailgate has an obstacle
detection system that automatically interrupts
and reverses its movement by a few degrees to
allow the obstacle to be cleared.
Please note that this anti-pinch system is not
active at the end of the closing travel (around 1
cm from completely closed).
Check that there is enough space to
allow for the movement of the motorised
tailgate. Do not insert your finger in the motorised
tailgate locking system - Risk of serious
injury!To avoid the risk of injury through pinching
or trapping, before and during operation of
the motorised tailgate:
-
ensure that there is no person close to
the rear of the vehicle,
- watch the activity of your passengers,
particularly any children.
Bicycle carrier / Towbar
The motorised tailgate is not designed to
support a bicycle carrier.
When installing a bicycle carrier on a towbar
with connection of a cable to the towbar socket,
the motorised operation of the tailgate will be
automatically deactivated.
If using a towbar or bicycle carrier not
recommended by PEUGEOT, it is essential
to deactivate the motorised operation of the
tailgate.
Access
Page 546 of 578
6
Hands-Free Access
Activation and deactivation of the
"Hands-Free Tailgate Access"
system is done in the Driving menu
of the touch screen.
This function is deactivated by default.
default, or to the position memorised
beforehand.
If motorised operation is not activated,
these actions release the tailgate.
The request to open the tailgate with one
of the controls A
, B or E enables you to
unlock the vehicle or the tailgate alone
beforehand, if selective unlocking of the
boot is activated.
Closing the tailgate with the "hands-free"
access function enables you to lock the
vehicle.
At any point, It is possible to interrupt the
operation of the tailgate.
Pressing one of these controls again
interrupts the movement in progress.
Following the interruption of a movement,
pressing one of these controls again
resumes the movement. Ensure that you are steady on your
feet before per forming the quick foot
movement.
Take care not to touch the exhaust system
which may be hot - Risk of burns!
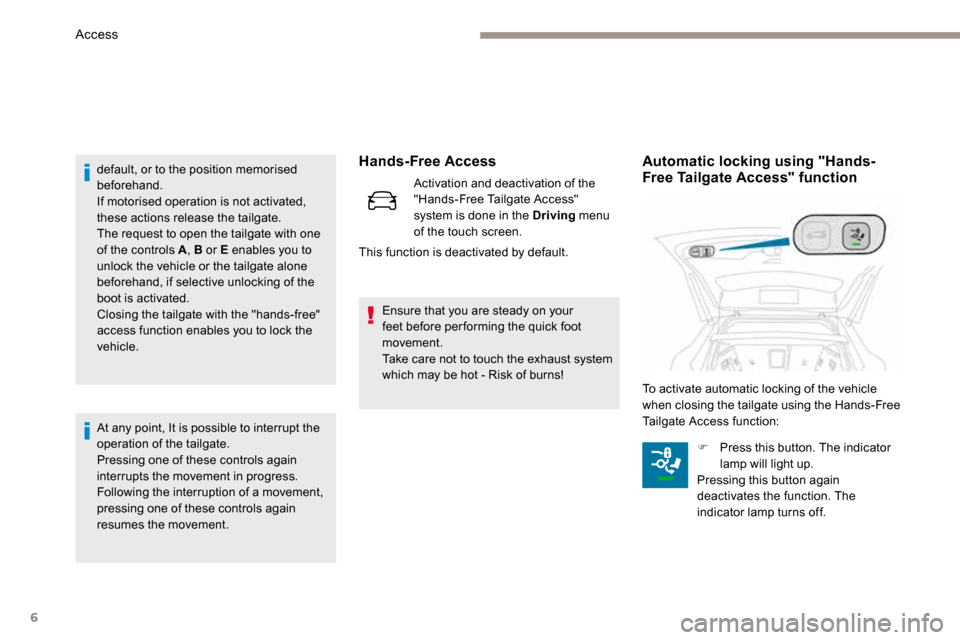
Automatic locking using "Hands-
Free Tailgate Access" function
To activate automatic locking of the vehicle
when closing the tailgate using the Hands-Free
Tailgate Access function:
F Press this button. The indicator
lamp will light up.
Pressing this button again
deactivates the function. The
indicator lamp turns off.
Access
Page 548 of 578
8
Precautions in use
In wintry conditions
In the event of an accumulation of snow
on the tailgate, clear the snow before
commanding a motorised opening of the
tailgate.
The formation of ice can block the tailgate
and prevent its opening: wait until the ice
melts with the heating of the passenger
compartment.When washing
When washing the vehicle in an automatic
car wash, don't forget to lock your vehicle
to avoid the risk of unexpected opening.
Recommendations related to the "Hands-Free Tailgate
Access" function
If several kicking movements to operate the
tailgate have no effect, wait a few seconds
before trying again.
The function automatically deactivates in heavy
rain or following a build-up of snow.
If it does not work, check that the electronic key
is not exposed to a source of electromagnetic
pollution (smartphone etc.).
The function may not work correctly with a
prosthetic leg.
The function may not work correctly if your
vehicle is fitted with a towbar. In some circumstances, the tailgate may open
or close by itself, particularly if:
-
you hitch or unhitch a trailer,
- you fit or remove a bicycle carrier,
- you load or unload bicycles from a bicycle
c a r r i e r,
- you place or lift something behind the
vehicle,
- an animal approaches the rear bumper,
- you are washing your vehicle,
- your vehicle is being serviced,
- you are accessing the spare wheel
(depending on version).
To avoid such operating problems, keep the
electronic key away from the sensor zone or
deactivate the "Hands-Free Tailgate Access"
function.
Access
Page 549 of 578
9
The programmable heating operates independently from the engine.
With the engine off, it preheats the coolant circuit to ensure optimal engine operating temperature
as soon as it is started up.
The programmable heating is switched on by the long range remote control. It may be immediate or
deferred thanks to a programming function.
Programmable heating
Always switch off the programmable heating when refuelling to avoid any risk of fire or
explosion.
The programmable heating is powered by the vehicle fuel tank. Before use, ensure that
the remaining quantity of fuel is sufficient. If the fuel tank is in its reser ve, we strongly
recommend you do not programme the heating.
To avoid the risks of intoxication or asphyxia, the programmable heating must not be used,
even for short periods, in a closed environment such as a garage or workshop which are not
equipped with an exhaust gas extraction system.
Do not park the vehicle on a flammable sur face (dry grass, dead leaves, paper, etc.) - risk of
fire!
The volumetric alarm movement detector
may be disrupted by the programmable
heating air flows when it is operating.
To avoid any untimely triggering of the
alarm when using the programmable
heating, it is advisable that the volumetric
monitoring is deactivated. Adapting the programmable heating
enables you to use it to preheat the
passenger compartment of your vehicle.
Contact a PEUGEOT dealer or a qualified
workshop.
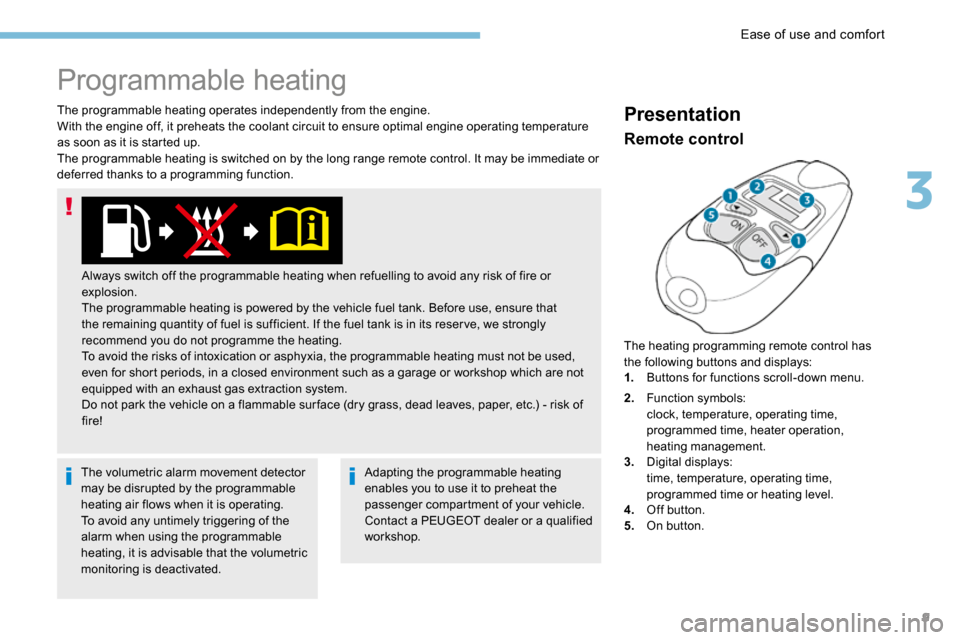
Presentation
The heating programming remote control has
the following buttons and displays:
1.
Buttons for functions scroll-down menu.
Remote control
2.Function symbols:
clock, temperature, operating time,
programmed time, heater operation,
heating management.
3. Digital displays:
time, temperature, operating time,
programmed time or heating level.
4. Off button.
5. On button.
3
Ease of use and comfort
Page 561 of 578
21
“ISOFIX” fastenings
Your vehicle has been approved according to
the latest ISOFIX regulations.
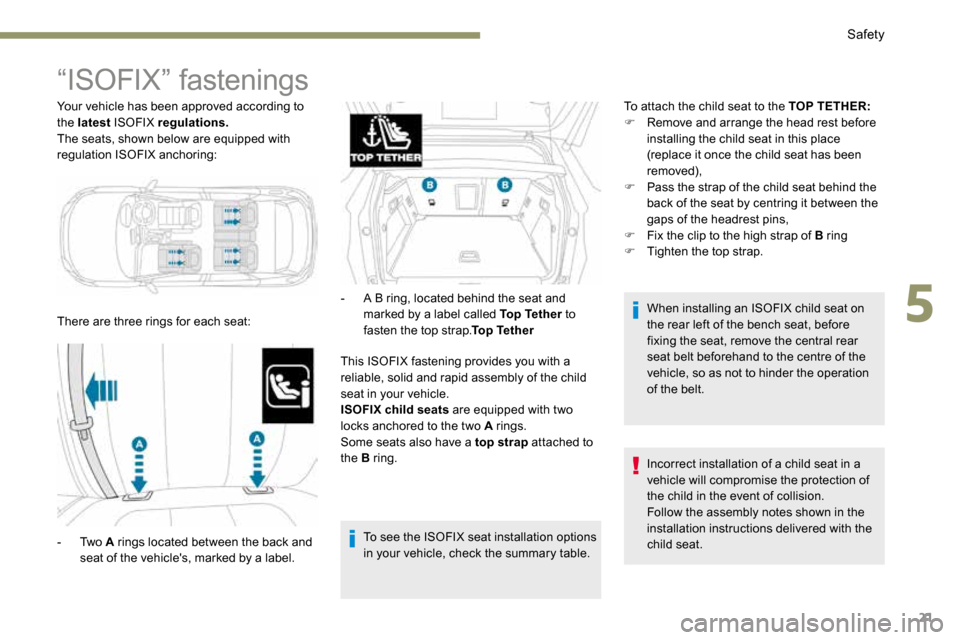
The seats, shown below are equipped with
regulation ISOFIX anchoring:
There are three rings for each seat:
This ISOFIX fastening provides you with a
reliable, solid and rapid assembly of the child
seat in your vehicle.
ISOFIX child seats are equipped with two
locks anchored to the two A rings.
Some seats also have a top strap attached to
the B ring. To attach the child seat to the TOP TETHER:
F Remove and arrange the head rest before
installing the child seat in this place
(replace it once the child seat has been
removed),
F Pass the strap of the child seat behind the
back of the seat by centring it between the
gaps of the headrest pins,
F Fix the clip to the high strap of B ring
F Tighten the top strap.
When installing an ISOFIX child seat on
the rear left of the bench seat, before
fixing the seat, remove the central rear
seat belt beforehand to the centre of the
vehicle, so as not to hinder the operation
of the belt.
Incorrect installation of a child seat in a
vehicle will compromise the protection of
the child in the event of collision.
Follow the assembly notes shown in the
installation instructions delivered with the
child seat.
To see the ISOFIX seat installation options
in your vehicle, check the summary table.
- Two
A rings located between the back and
seat of the vehicle's, marked by a label. -
A B ring, located behind the seat and
marked by a label called Top Tether to
fasten the top strap. Top Tether
5
Safety
Page 562 of 578
22
Summary table for the location of i-Size child seats
i-Size child seats are equipped with two locks anchored to the two A rings.
These i-Size child seats also have:
- either a top strap attached to the B ring
- or a stay resting on the vehicle’s floor, which is compatible with the i-Size approved seat
whose role is to prevent the child seat from toppling over in the event of collision.
For more information on ISOFIX fastening please refer to the corresponding column.
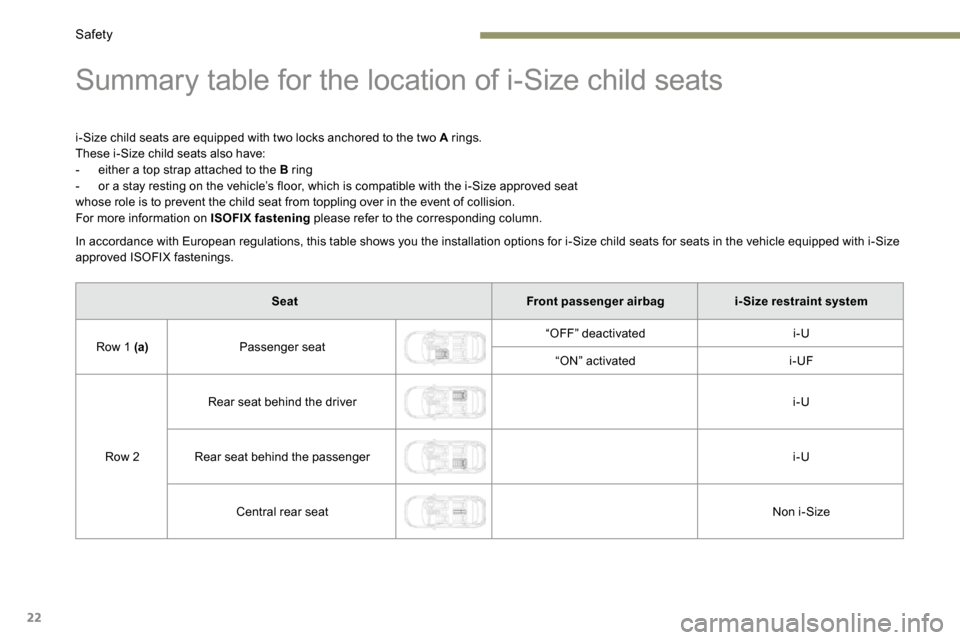
In accordance with European regulations, this table shows you the installation options for i-Size child seats for seats in the vehicle equipped with i-Size
approved ISOFIX fastenings.
Seat Front passenger airbagi- Size restraint system
Row 1 (a) Passenger seat “OFF” deactivated
i-U
“ON” activated i-UF
Row 2 Rear seat behind the driver
i-U
Rear seat behind the passenger i-U
Central rear seat Non i-Size
Safety