2017 NISSAN TITAN climate control
[x] Cancel search: climate controlPage 245 of 671
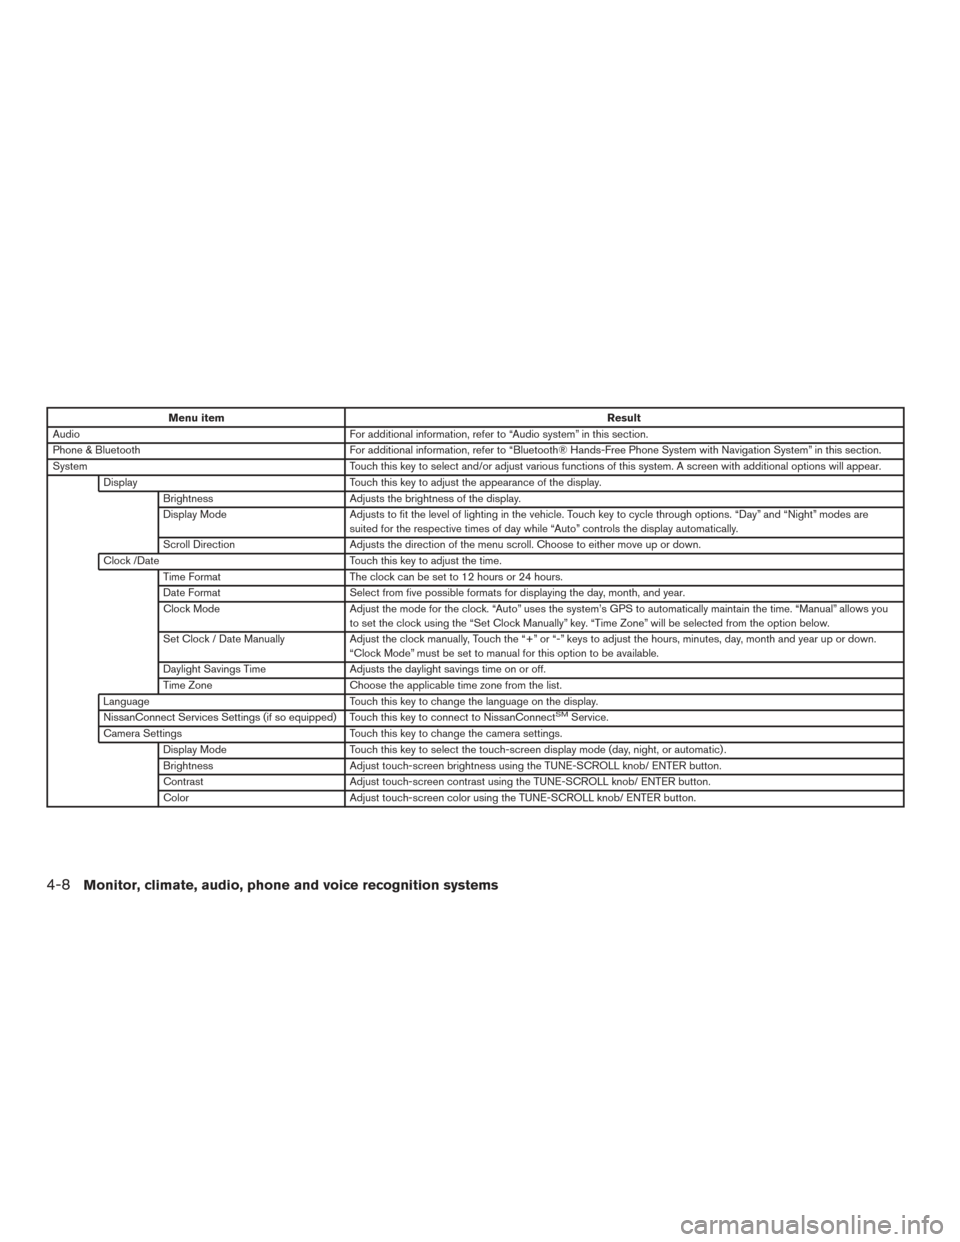
Menu itemResult
Audio For additional information, refer to “Audio system” in this section.
Phone & Bluetooth For additional information, refer to “Bluetooth® Hands-Free Phone System with Navigation System” in this section.
System Touch this key to select and/or adjust various functions of this system. A screen with additional options will appear.
Display Touch this key to adjust the appearance of the display.
Brightness Adjusts the brightness of the display.
Display Mode Adjusts to fit the level of lighting in the vehicle. Touch key to cycle through options. “Day” and “Night” modes are
suited for the respective times of day while “Auto” controls the display automatically.
Scroll Direction Adjusts the direction of the menu scroll. Choose to either move up or down.
Clock /Date Touch this key to adjust the time.
Time Format The clock can be set to 12 hours or 24 hours.
Date Format Select from five possible formats for displaying the day, month, and year.
Clock Mode Adjust the mode for the clock. “Auto” uses the system’s GPS to automatically maintain the time. “Manual” allows you
to set the clock using the “Set Clock Manually” key. “Time Zone” will be selected from the option below.
Set Clock / Date Manually Adjust the clock manually, Touch the “+” or “-” keys to adjust the hours, minutes, day, month and year up or down.
“Clock Mode” must be set to manual for this option to be available.
Daylight Savings Time Adjusts the daylight savings time on or off.
Time Zone Choose the applicable time zone from the list.
Language Touch this key to change the language on the display.
NissanConnect Services Settings (if so equipped) Touch this key to connect to NissanConnect
SMService.
Camera Settings Touch this key to change the camera settings.
Display Mode Touch this key to select the touch-screen display mode (day, night, or automatic) .
Brightness Adjust touch-screen brightness using the TUNE-SCROLL knob/ ENTER button.
Contrast Adjust touch-screen contrast using the TUNE-SCROLL knob/ ENTER button.
Color Adjust touch-screen color using the TUNE-SCROLL knob/ ENTER button.
4-8Monitor, climate, audio, phone and voice recognition systems
Page 246 of 671
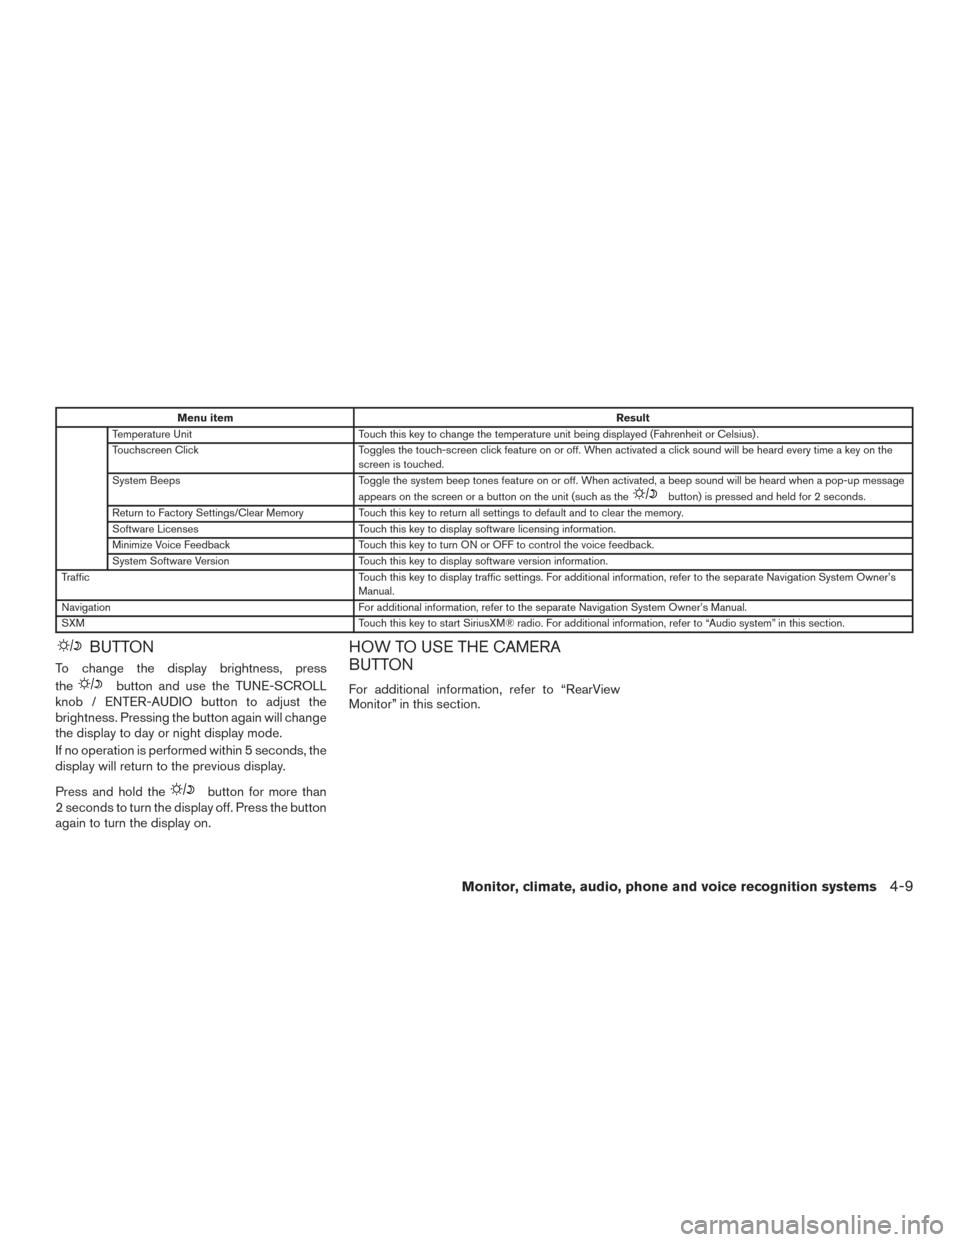
Menu itemResult
Temperature Unit Touch this key to change the temperature unit being displayed (Fahrenheit or Celsius) .
Touchscreen Click Toggles the touch-screen click feature on or off. When activated a click sound will be heard every time a key on the
screen is touched.
System Beeps Toggle the system beep tones feature on or off. When activated, a beep sound will be heard when a pop-up message
appears on the screen or a button on the unit (such as the
button) is pressed and held for 2 seconds.
Return to Factory Settings/Clear Memory Touch this key to return all settings to default and to clear the memory.
Software Licenses Touch this key to display software licensing information.
Minimize Voice Feedback Touch this key to turn ON or OFF to control the voice feedback.
System Software Version Touch this key to display software version information.
Traffic Touch this key to display traffic settings. For additional information, refer to the separate Navigation System Owner’s
Manual.
Navigation For additional information, refer to the separate Navigation System Owner’s Manual.
SXM Touch this key to start SiriusXM® radio. For additional information, refer to “Audio system” in this section.
BUTTON
To change the display brightness, press
the
button and use the TUNE-SCROLL
knob / ENTER-AUDIO button to adjust the
brightness. Pressing the button again will change
the display to day or night display mode.
If no operation is performed within 5 seconds, the
display will return to the previous display.
Press and hold the
button for more than
2 seconds to turn the display off. Press the button
again to turn the display on.
HOW TO USE THE CAMERA
BUTTON
For additional information, refer to “RearView
Monitor” in this section.
Monitor, climate, audio, phone and voice recognition systems4-9
Page 251 of 671
ADJUSTING THE SCREEN
The procedure for adjusting the display settings
of the screen differs depending on the type of
screen present on the vehicle.1. Firmly apply the brake and place the shift lever in R (Reverse) .
2. Press the
button on the control panel.
3. The screen will display the Night settings.
4. Turn the TUNE/SCROLL knob to adjust the setting up or down.
5. Press the
button again to access the
Auto settings. 6. Turn the TUNE/SCROLL knob to adjust the
setting up or down.
NOTE:
Do not adjust any of the display settings of
the RearView Monitor while the vehicle is
moving. Make sure the parking brake is
firmly applied.
REARVIEW MONITOR SYSTEM
LIMITATIONS
WARNING
Listed below are the system limitations for
RearView Monitor. Failure to operate the
vehicle in accordance with these system
limitations could result in serious injury or
death.
● The system cannot completely elimi-
nate blind spots and may not show ev-
ery object.
● Underneath the bumper and the corner
areas of the bumper cannot be viewed
on the RearView Monitor because of its
monitoring range limitation. The system
will not show small objects below the
bumper, and may not show objects
close to the bumper or on the ground. ●
Objects viewed in the RearView Moni-
tor differ from actual distance because
a wide-angle lens is used.
● Objects in the RearView Monitor will
appear visually opposite compared to
when viewed in the rearview and out-
side mirrors.
● Use the displayed lines as a reference.
The lines are highly affected by the
number of occupants, fuel level, vehicle
position, road conditions and road
grade.
● Make sure that the tailgate is securely
closed when backing up.
● Do not put anything on the rearview
camera. The rearview camera is in-
stalled on the tailgate.
● When washing the vehicle with high
pressure water, be sure not to spray it
around the camera. Otherwise, water
may enter the camera unit causing wa-
ter condensation on the lens, a mal-
function, fire or an electric shock.
● Do not strike the camera. It is a preci-
sion instrument. Otherwise, it may mal-
function or cause damage resulting in a
fire or an electric shock.LHA4296
4-14Monitor, climate, audio, phone and voice recognition systems
Page 261 of 671
If the shift lever is in the D (Drive) position, the
only available view is front view/front-side view
split screen.
The display will switch from the Around View®
Monitor screen when:● The shift lever is in the D (Drive) position and
the vehicle speed increases above approxi-
mately 6 mph (10 km/h)
● A different screen is selected.
ADJUSTING THE SCREEN
1. Firmly apply brake and place the shift lever in
R (Reverse) .
2. Press the
button on the control panel.
3. The screen will display the Night settings.
4. Turn the TUNE/SCROLL knob to adjust the setting up or down.
5. Press the
button again to access the
Auto settings.
6. Turn the TUNE/SCROLL knob to adjust the setting up or down. NOTE:
Do not adjust any of the display settings of
the Around View® Monitor while the ve-
hicle is moving. Make sure the parking
brake is firmly applied.
LHA4295
4-24Monitor, climate, audio, phone and voice recognition systems
Page 268 of 671
To turn the MOD system on or off:1. Using
buttons on the steering
wheel to select “Settings”.
2. Select “Driver Assistance” and press the ENTER button.
3. Select “Parking Aids”.
4. Toggle ON or OFF “Moving Object” using the ENTER button.
MOD can also be turned on or off by using the
Parking Sensor (sonar) System OFF Switch. For
additional information, refer to “Parking Sensor
(sonar) System OFF Switch” in the “Instruments
and controls” section of this manual.
MOD SYSTEM LIMITATIONS
WARNING
Listed below are the system limitations for
MOD. Failure to operate the vehicle in
accordance with these system limitations
could result in serious injury or death.
● Do not use the MOD system when tow-
ing a trailer. The system may not func-
tion properly. ●
Excessive noise (for example, audio
system volume or open vehicle window)
will interfere with the chime sound, and
it may not be heard.
● The MOD system performance will be
limited according to environmental con-
ditions and surrounding objects such
as:
– When there is low contrast between background and the moving objects.
– When there is a blinking source of light.
– When strong light such as another vehicle’s headlight or sunlight is
present.
– When camera orientation is not in its usual position, such as when a mirror
is folded.
– When there is dirt, water drops or snow on the camera lens.
– When the position of the moving ob- jects in the display is not changed.
● The MOD system might detect flowing
water droplets on the camera lens,
white smoke from the muffler, moving
shadows, etc. ●
The MOD system may not function
properly depending on the speed, direc-
tion, distance or shape of the moving
objects.
● If your vehicle sustains damage to the
parts where the camera is installed,
leaving it misaligned or bent, the sens-
ing zone may be altered and the MOD
system may not detect objects properly.
● When the temperature is extremely
high or low, the screen may not display
objects clearly. This is not a
malfunction.
Monitor, climate, audio, phone and voice recognition systems4-31
Page 270 of 671
WARNING
●The air conditioner cooling function op-
erates only when the engine is running.
● Do not leave children or adults who
would normally require the assistance
of others alone in your vehicle. Pets
should also not be left alone. They
could accidentally injure themselves or
others through inadvertent operation of
the vehicle. Also, on hot, sunny days,
temperatures in a closed vehicle could
quickly become high enough to cause
severe or possibly fatal injuries to
people or animals.
● Do not use the recirculation mode for
long periods as it may cause the interior
air to become stale and the windows to
fog up. NOTE:
● Odors from inside and outside the vehicle
can build up in the air conditioner unit. Odor
can enter the passenger compartment
through the vents.
● When parking, set the heater and air condi-
tioner controls to turn off air recirculation to
allow fresh air into the passenger compart-
ment. This should help reduce odors inside
the vehicle.
HEATER AND AIR CONDITIONER
(manual) (if so equipped)
Monitor, climate, audio, phone and voice recognition systems4-33
Page 271 of 671
CONTROLS
1.Fan speed control / system OFF dial /
air conditioning (A/C) button
2. Air flow control buttons
3. Temperature control dial / MAX A/C button 4.
Air recirculation button
5.
Outside mirror (if so equipped) de-
froster switch
6.
Front windshield defrost button
Fan control dial
Thefan control dial turns the fan on and off,
and controls fan speed.
Air flow control buttons
The air flow control buttons allow you to select
the air flow outlets.
MAX A/C — Air flows from center and side
vents with maximum cooling
(air conditioning) .
— Air flows from center and sidevents.
— Air flows from center and sidevents and foot outlets.
— Air flows mainly from footoutlets.
— Air flows from defroster out-lets and foot outlets.
— Air flows mainly from defrosteroutlets.
Temperature control dial
The temperature control dial allows you to adjust
the temperature of the outlet air. To lower the
temperature, turn the dial to the left. To increase
the temperature, turn the dial to the right.
LHA4127
4-34Monitor, climate, audio, phone and voice recognition systems
Page 272 of 671
Air recirculation button
ON position (Indicator light on)
Interior air is recirculated inside the vehicle.
Press the
button to the ON position when:
● driving on a dusty road.
● to prevent traffic fumes from entering pas-
senger compartment.
● for maximum cooling when using the air con-
ditioner.
OFF position (Indicator light off)
In OFF mode, the recirculation indicator will turn
on closing off the fresh air. If outside air is desired
in off mode, press the recirculation button until
the indicator turns off. In OFF mode, the mode
buttons can be selected to change the air vent
distribution (if recirculation is off) .
If fogging occurs, press the
front wind-
shield defrost button.
Air conditioner button
Start the engine, turn thefan control dial to
the desired position and press the
button
to turn on the air conditioner. To turn off the air
conditioner, press the
button again. The air conditioner cooling function oper-
ates only when the engine is running.
Outside mirror (if so equipped)
defroster switch
For additional information, refer to “Rear window
and / or outside mirror (if so equipped) defroster
switch” in the “Instruments and controls” section
of this manual.
HEATER OPERATION
Heating
This mode is used to direct heated air to the foot
outlets. Some air also flows from the defrost
outlets.
1. Press the
button to the OFF position
for normal heating. The indicator light on
the
button will go off.
2. Press the
air flow control button.
3. Turn the
fan control dial to the desired
position.
4. Turn the temperature control dial to the de- sired position between the middle and the
hot position.
Ventilation
This mode directs outside air to the side and
center vents.
1. Press the
button to the OFF position.
The indicator light on the
button will
go off.
2. Press the
air flow control button.
3. Turn the
fan control dial to the desired
position.
4. Turn the temperature control dial to the de- sired position.
Defrosting or defogging
This mode directs the air to the defrost outlets to
defrost/defog the windows.
1. Press the
defrost/defog button.
2. Turn the
fan control dial to the desired
position.
3. Turn the temperature control dial to the de- sired position between the middle and the
hot position.
● To quickly remove ice or fog from the win-
dows, turn the
fan control dial to the
highest setting and the temperature control
to the full HOT position.
Monitor, climate, audio, phone and voice recognition systems4-35