2017 NISSAN TITAN change wheel
[x] Cancel search: change wheelPage 366 of 671
5. Initiate the connecting process from thehandset. The system will display the mes-
sage: “Confirm on your Bluetooth device
that the pin XXXXXX is displayed”. If the PIN
is displayed on your Bluetooth® device, se-
lect “Yes/Pair” to complete the pairing pro-
cess.
For additional information, refer to the
Bluetooth® device’s Owner’s Manual.
VEHICLE PHONEBOOK
To access the vehicle phonebook:
1. Press the
button on the control panel.
2. Touch the “Phonebook” key.
3. Choose the desired entry from the displayed list.
4. The number of the entry will be displayed on the screen. Touch the number to initiate di-
aling.
NOTE:
To scroll quickly through the list, touch the
“A-Z” key in the upper right corner of the
screen. Turn the TUNE/SCROLL knob to
choose a letter or number and then press
ENTER. The list will move to the first entry
that begins with that number or letter.
MAKING A CALL
To make a call, follow the procedure below: 1. Press the
button on the control panel.
The “Phone” screen will appear on the dis-
play.
2. Select one of the following options to make a call:
● “Phonebook”: Select the name from an entry
stored in the vehicle phonebook.
● “Call Lists”: Select the name from the in-
coming, outgoing or missed.
● “Redial”: Dial the last outgoing call from the
vehicle.
● “
”: Input the phone number manually
using a keypad displayed on the screen. For
additional information, refer to “How to use
the touch-screen” in this section.
RECEIVING A CALL
When a call is placed to the connected phone,
the display will change to phone mode.
To accept the incoming call, either:
● Press the
button on the steering
wheel, or
● Touch the
icon on the screen. To reject the incoming call, either:
● Press the
button on the steering
wheel, or
● Touch the
icon on the screen.
DURING A CALL
While a call is active, the following options are
available on the screen:
● “Handset”
Select this option to switch control of the
phone call over to the handset.
● “Mute Mic.”
Select this option to mute the microphone.
Select again to unmute the microphone.
● Phone
icon
Select to end the phone call.
ENDING A CALL
To end a phone call, select the red phone
icon on the screen or press thebutton on
the steering wheel.
Monitor, climate, audio, phone and voice recognition systems4-129
Page 372 of 671
The NISSAN Voice Recognition system allows
hands-free operation of the systems equipped on
this vehicle, such as the phone and navigation
systems.
To operate NISSAN Voice Recognition, press
the
button located on the steering wheel.
When prompted, speak the command for the
system you wish to activate. The command given
is picked up by the microphone and performed
when it is properly recognized. NISSAN Voice
Recognition will provide a voice response as well
as a message in the center display to inform you
of the command results.
USING THE SYSTEM
Initialization
When the ignition switch is in the ON position,
NISSAN Voice Recognition is initialized, which
takes a few seconds. When completed, the sys-
tem is ready to accept voice commands. If
the
button is pressed before the initializa-
tion completes, the system will announce: “Voice
Recognition System not ready. Please wait.”
Giving voice commands
1. Press thebutton.
2. The system announces: “Please say a cat- egory like phone or a command like points of
interest followed by a brand name”. A list of
available commands is then spoken by the
system.
3. After the tone sounds and the face icon on the display changes, speak a command.
Available commands are discussed in this
section. 4. Voice and display feedback are provided
when the command is accepted.
● If the command is not recognized, the sys-
tem announces: “Command not recog-
nized”. Repeat the command in a clear voice.
● If you want to cancel the command or go
back to the previous menu of commands,
press the
button. The system will an-
nounce: “Canceling Voice Recognition” or
“Go back” depending on the current menu
level.
● Press the
button to move back
through the menus displayed on the screen.
● If you want to adjust the volume of the voice
feedback, use the volume control switches
on the steering wheel or the volume knob on
the control panel.
● The voice command screen can also be
accessed using the control panel display:
1. Press the [
] button.
2. Touch the “Voice Commands” key.
LHA3783
NISSAN VOICE RECOGNITION
SYSTEM (if so equipped)
Monitor, climate, audio, phone and voice recognition systems4-135
Page 382 of 671
●Since the spare tire is not equipped with
the TPMS, when a spare tire is mounted
or a wheel is replaced, tire pressure will
not be indicated, the TPMS will not
function and the low tire pressure warn-
ing light will flash for approximately
1 minute. The light will remain on after
1 minute. Have your tires replaced
and/or TPMS system reset as soon as
possible. It is recommended that you
visit a NISSAN dealer for this service.
● Replacing tires with those not originally
specified by NISSAN could affect the
proper operation of the TPMS.
● Do not inject any tire liquid or aerosol
tire sealant into the tires, as this may
cause a malfunction of the tire pressure
sensors.
CAUTION
Do not place metalized film or any metal
parts (antenna, etc.) on the windows. This
may cause poor reception of the signals
from the tire pressure sensors, and the
TPMS will not function properly. Some devices and transmitters may temporarily
interfere with the operation of the TPMS and
cause the low tire pressure warning light to illu-
minate.
Some examples are:
– Facilities or electric devices using similar radio
frequencies are near the vehicle.
– If a transmitter set to similar frequencies is being used in or near the vehicle.
– If a computer (or similar equipment) or a DC/AC converter is being used in or near the
vehicle.
Low tire pressure warning light may illuminate in
the following cases. ● If the vehicle equipped with a wheel and tire
without TPMS.
● If the TPMS has been replaced and the ID
has not been registered.
● If the wheel is not originally specified by
NISSAN.
FCC Notice:
For USA:
This device complies with Part 15 of the
FCC Rules. Operation is subject to the fol-
lowing two conditions: (1) This device may not cause harmful interference, and (2) this
device must accept any interference re-
ceived, including interference that may
cause undesired operation.
NOTE:
Changes or modification not expressly ap-
proved by the party responsible for compli-
ance could void the user’s authority to op-
erate the equipment.
For Canada:
This device complies with Industry Canada
license-exempt RSS standard(s) . Opera-
tion is subject to the following two condi-
tions: (1) this device may not cause harmful
interference, and (2) this device must ac-
cept any interference received, including
interference that may cause undesired op-
eration of the device.TPMS with Easy Fill Tire Alert
WARNING
After rotating the tires, do not use the
Easy Fill Tire Alert to adjust the tire pres-
sure. Instead use a gauge to adjust the
tires to the correct pressure in accordance
with Tire and Loading Information label.
Starting and driving5-5
Page 385 of 671
WARNING
The following actions can increase the
chance of losing control of the vehicle if
there is a sudden loss of tire air pressure.
Losing control of the vehicle may cause a
collision and result in personal injury.
●The vehicle generally moves or pulls in
the direction of the flat tire.
● Do not rapidly apply the brakes.
● Do not rapidly release the accelerator
pedal.
● Do not rapidly turn the steering wheel.
1. Remain calm and do not overreact.
2. Maintain a firm grip on the steering wheel with both hands and try to hold a straight
course.
3. When appropriate, slowly release the accel- erator pedal to gradually slow the vehicle.
4. Gradually steer the vehicle to a safe location off the road and away from traffic if possible.
5. Lightly apply the brake pedal to gradually stop the vehicle.
6. Turn on the hazard warning flashers and contact a roadside emergency service to
change the tire. For additional information, refer to “Changing a flat tire” in the “In case
of emergency” section of this manual.DRINKING ALCOHOL/DRUGS AND
DRIVING
WARNING
Never drive under the influence of alcohol
or drugs. Alcohol in the bloodstream re-
duces coordination, delays reaction time
and impairs judgement. Driving after
drinking alcohol increases the likelihood
of being involved in an accident injuring
yourself and others. Additionally, if you
are injured in an accident, alcohol can
increase the severity of the injury.
NISSAN is committed to safe driving. However,
you must choose not to drive under the influence
of alcohol. Every year thousands of people are
injured or killed in alcohol-related collisions. Al-
though the local laws vary on what is considered
to be legally intoxicated, the fact is that alcohol
affects all people differently and most people
underestimate the effects of alcohol.
Remember, drinking and driving don’t mix! That is
true for drugs (over-the-counter, prescription)
and illegal drugs, too. Don’t drive if your ability to
operate your vehicle is impaired by alcohol,
drugs, or some other physical condition.
DRIVING SAFETY PRECAUTIONS
Your NISSAN is designed for both normal and
off-road use. However, avoid driving in deep wa-
ter or mud as your NISSAN is mainly designed for
leisure use, unlike a conventional off-road ve-
hicle.
Remember that 2-wheel drive models are less
capable than 4-wheel drive models for rough
road driving and extrication when stuck in deep
snow or mud, or the like.
Please observe the following precautions:
WARNING
● Drive carefully when off the road and
avoid dangerous areas. Every person
who drives or rides in this vehicle
should be seated with their seat belt
fastened. This will keep you and your
passengers in position when driving
over rough terrain.
● Do not drive across steep slopes. In-
stead drive either straight up or straight
down the slopes. Off-road vehicles can
tip over sideways much more easily
than they can forward or backward.
5-8Starting and driving
Page 424 of 671
The transfer case 4WD shift switch is used to
select either 2WD or 4WD depending on the
driving conditions. There are three types of drive
modes available, 2WD, 4H and 4LO.
The 4WD shift switch electronically controls the
transfer case operation. Rotate the switch to
move between each mode, 2WD, 4H and 4LO.
To change into or out of 4LO, the vehicle
MUST be stationary, shift the shift lever to
(N) Neutral, and depress the brake pedal.
The switch must be pushed and turned to
select 4LO.
WARNING
●When parking, apply the parking brake
before stopping the engine and make
sure that the 4WD shift indicator light is
on and the ATP warning light goes off.
Otherwise, the vehicle could unexpect-
edly move even if the automatic trans-
mission is in the P position.
● The 4LO indicator light must stop blink-
ing and remain illuminated or turn off
before shifting the transmission into
gear. If the shift lever is shifted from the
“N” position to any other gear when the
4LO indicator light is blinking, the ve-
hicle may move unexpectedly.
CAUTION
● Never shift the 4WD shift switch be-
tween 4LO and 4H while driving.
● The 4H position provides greater trac-
tion. Avoid excessive speed, as it will
cause increased fuel consumption and
higher oil temperatures, and could
damage drivetrain components. Speeds
over 62 mph (100 km/h) in 4H is not
recommended.
● The 4LO position provides maximum
power and traction. Avoid raising ve-
hicle speed excessively, as the maxi-
mum speed is approximately 31 mph
(50 km/h).
● When driving straight, shift the 4WD
shift switch to the 2WD or 4H position.
Do not move the 4WD shift switch when
making a turn or reversing.
● Do not shift the 4WD shift switch (be-
tween 2WD and 4H) while driving on
steep downhill grades. Use the engine
brake and low automatic transmission
gears (D1 or D2) for engine braking.
● Do not operate the 4WD shift switch
(between 2WD and 4H) with the rear
wheels spinning. ●
Do not drive on dry hard surface roads
in the 4H or 4LO position. Driving on dry
hard surfaces in 4H or 4LO may cause
unnecessary noise and tire wear.
NISSAN recommends driving in the
2WD position under these conditions.
● The 4WD transfer case may not be
shifted between 4H and 4LO at low am-
bient temperatures and the transfer
4LO position indicator light may blink
even when the 4WD shift switch is
shifted. After driving for a while you can
change the 4WD transfer case between
4H and 4LO.
When driving on rough roads, ● Set the 4WD shift switch to 4H or 4LO.
● Drive carefully according to the road surface
conditions.
When the vehicle is stuck, ● Set the 4WD shift switch to 4H or 4LO.
● Place stones or wooden blocks under the
tires to free the vehicle.
Starting and driving5-47
Page 427 of 671
Warning light or warning message
Warning light (if soequipped) Warning message Warning light or warning
message comes on when:
Trip computer (if so
equipped) Vehicle information display
(if so equipped)
Illuminates 4WD ERROR4WD Error: See Owner’s
Manual There is a malfunction in
the 4–wheel drive system
— 4WD TIRES FRT & RR tire size differ-
ence: See Owner’s Manual The difference in wheel ro-
tation is large
The 4WD warning light comes on when the key
switch is turned to ON. It turns off soon after the
engine is started.
If any malfunction occurs in the 4WD system
when the key switch is ON, the warning light will
either remain illuminated or blink.
If the 4WD warning light comes on, the 4WD
shift indicator light goes out.
If the “4WD TIRES” warning message comes on,
change the 4WD shift switch into 2WD and do
not drive fast.
CAUTION
●
If the warning light or warning message
comes on during operation or rapidly
after stopping the vehicle for a while,
have your vehicle checked as soon as
possible. It is recommended that you
visit a NISSAN dealer for this service.
● Shifting between 4H and 4LO is not
recommended when the 4WD warning
light or warning message turns on.
●
When the warning light or warning mes-
sage comes on, the 2WD mode may be
engaged even if the 4WD shift switch is in
4H. Be especially careful when driving. If
corresponding parts are malfunctioning,
the 4WD mode will not be engaged even
if the 4WD shift switch is shifted.
5-50Starting and driving
Page 449 of 671
3. Park on a level surface and apply the parkingbrake. Move the shift lever to P (Park) .
4. Turn off the engine.
5. Raise the hood to warn other traffic and to signal professional road assistance person-
nel that you need assistance.
6. Have all passengers get out of the vehicle and stand in a safe place, away from traffic
and clear of the vehicle.
WARNING
●Make sure the parking brake is securely
applied and the shift lever is shifted into
P (Park) .
● Never change tires when the vehicle is
on a slope, ice or slippery areas. This is
hazardous.
● Never change tires if oncoming traffic is
close to your vehicle. Wait for profes-
sional road assistance.
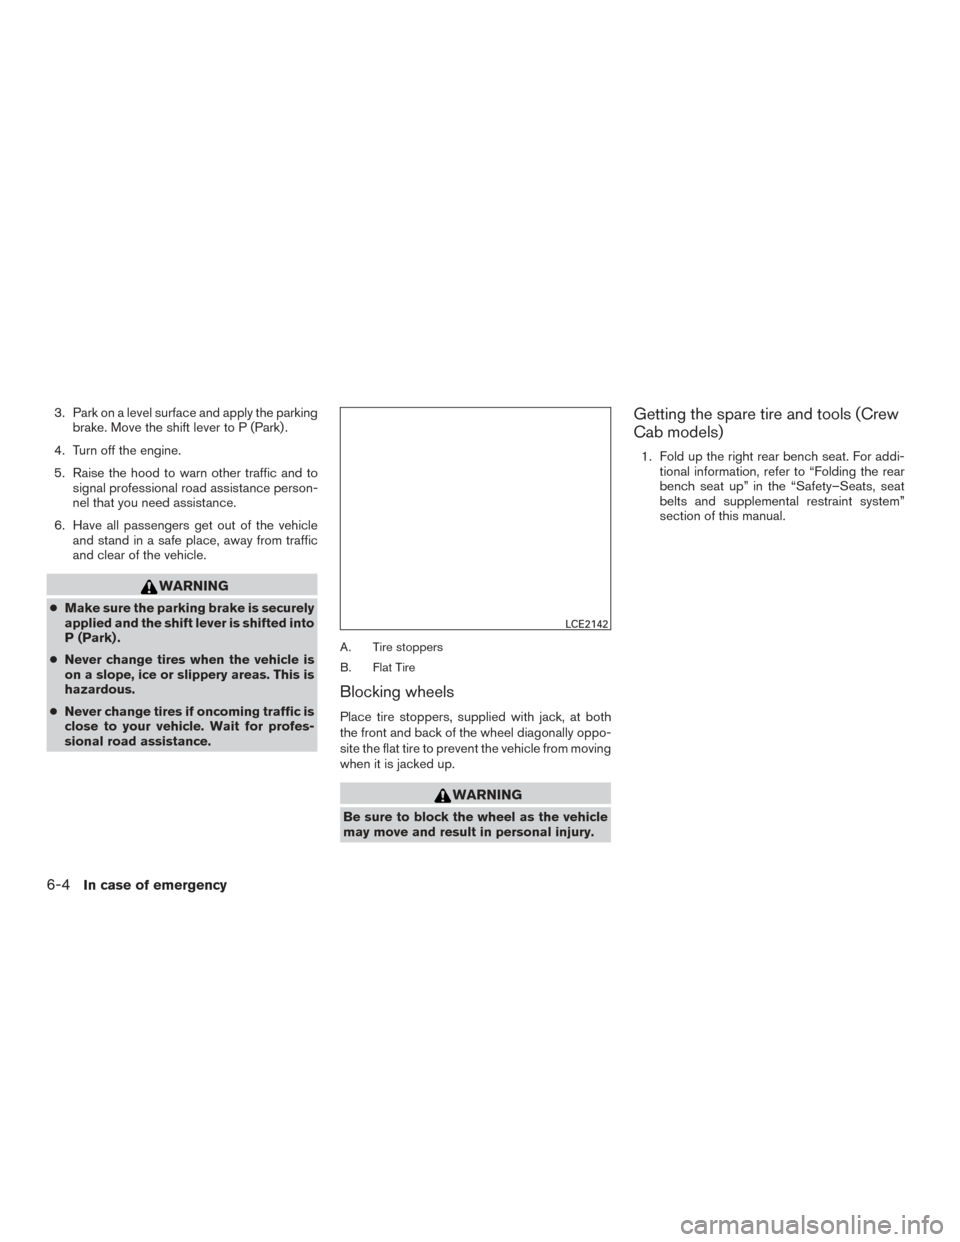
A. Tire stoppers
B. Flat Tire
Blocking wheels
Place tire stoppers, supplied with jack, at both
the front and back of the wheel diagonally oppo-
site the flat tire to prevent the vehicle from moving
when it is jacked up.
WARNING
Be sure to block the wheel as the vehicle
may move and result in personal injury.
Getting the spare tire and tools (Crew
Cab models)
1. Fold up the right rear bench seat. For addi- tional information, refer to “Folding the rear
bench seat up” in the “Safety–Seats, seat
belts and supplemental restraint system”
section of this manual.
LCE2142
6-4In case of emergency
Page 452 of 671
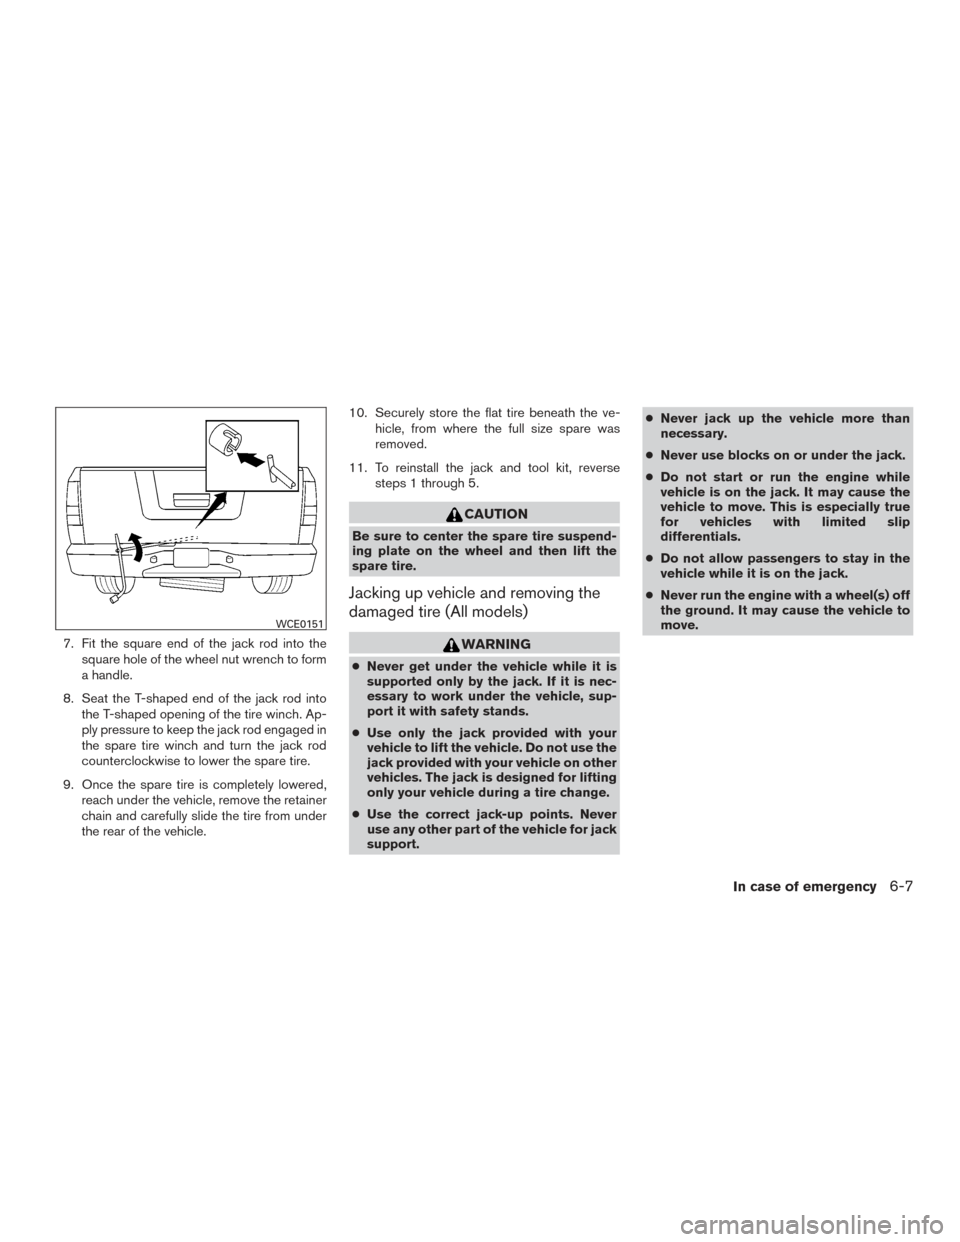
7. Fit the square end of the jack rod into thesquare hole of the wheel nut wrench to form
a handle.
8. Seat the T-shaped end of the jack rod into the T-shaped opening of the tire winch. Ap-
ply pressure to keep the jack rod engaged in
the spare tire winch and turn the jack rod
counterclockwise to lower the spare tire.
9. Once the spare tire is completely lowered, reach under the vehicle, remove the retainer
chain and carefully slide the tire from under
the rear of the vehicle. 10. Securely store the flat tire beneath the ve-
hicle, from where the full size spare was
removed.
11. To reinstall the jack and tool kit, reverse steps 1 through 5.
CAUTION
Be sure to center the spare tire suspend-
ing plate on the wheel and then lift the
spare tire.
Jacking up vehicle and removing the
damaged tire (All models)
WARNING
●Never get under the vehicle while it is
supported only by the jack. If it is nec-
essary to work under the vehicle, sup-
port it with safety stands.
● Use only the jack provided with your
vehicle to lift the vehicle. Do not use the
jack provided with your vehicle on other
vehicles. The jack is designed for lifting
only your vehicle during a tire change.
● Use the correct jack-up points. Never
use any other part of the vehicle for jack
support. ●
Never jack up the vehicle more than
necessary.
● Never use blocks on or under the jack.
● Do not start or run the engine while
vehicle is on the jack. It may cause the
vehicle to move. This is especially true
for vehicles with limited slip
differentials.
● Do not allow passengers to stay in the
vehicle while it is on the jack.
● Never run the engine with a wheel(s) off
the ground. It may cause the vehicle to
move.
WCE0151
In case of emergency6-7