2017 NISSAN SENTRA ECO mode
[x] Cancel search: ECO modePage 117 of 491
●The alarm automatically turns off after a pe-
riod of time. However, the alarm reactivates if
the vehicle is tampered with again. The alarm
can be shut off by unlocking the driver’s door
with the key, a request switch, by pressing
the
button on the key fob or Intelligent
Key or placing the ignition switch in the ON
or ACC position.
The alarm is activated by:
● opening a door without using the key, a
request switch, key fob or Intelligent Key
(even if the door is unlocked by using the
inside lock knob or the power door lock
switch) .
How to stop an activated alarm
The alarm stops only by unlocking the driver’s
door by pressing the
button on the key fob
or Intelligent Key, or by unlocking all doors with
any request switch (Intelligent Key models) or
placing the ignition switch in the ON or ACC
position.
NISSAN VEHICLE IMMOBILIZER
SYSTEM
The NISSAN Vehicle Immobilizer System will not
allow the engine to start without the use of a
registered key.
If the engine fails to start using a registered key
(for example, when interference is caused by
another registered key, an automated toll road
device or automatic payment device on the key
ring) , restart the engine using the following pro-
cedures:
1. Leave the ignition switch placed in the ON position for approximately 5 seconds.
2. Place the ignition switch in the OFF or LOCK position and wait approximately
10 seconds.
3. Repeat steps 1 and 2.
4. Restart the engine while holding the device (which may have caused the interference)
separate from the registered key.
If the no start condition re-occurs, NISSAN rec-
ommends placing the registered key on a sepa-
rate key ring to avoid interference from other
devices. FCC Notice:
For USA:
This device complies with part 15 of the
FCC Rules. Operation is subject to the fol-
lowing two conditions: (1) This device may
not cause harmful interference, and (2) this
device must accept any interference re-
ceived, including interference that may
cause undesired operation.
NOTE:
Changes or modifications not expressly ap-
proved by the party responsible for compli-
ance could void the user’s authority to op-
erate the equipment.
For Canada:
This device complies with Industry Canada
licence-exempt RSS standard(s) . Opera-
tion is subject to the following two condi-
tions: (1) this device may not cause inter-
ference, and (2) this device must accept any
interference, including interference that
may cause undesired operation of the de-
vice.
2-38Instruments and controls
Page 141 of 491
The HomeLink® Universal Transceiver provides
a convenient way to consolidate the functions of
up to three individual hand-held transmitters into
one built-in device.
HomeLink® Universal Transceiver:● Will operate most radio frequency devices
such as garage doors, gates, home and of-
fice lighting, entry door locks and security
systems.
● Is powered by your vehicle’s battery. No
separate batteries are required. If the vehi-
cle’s battery is discharged or is discon-
nected, HomeLink® will retain all program-
ming.
When the HomeLink® Universal Trans-
ceiver is programmed, retain the original
transmitter for future programming proce-
dures (Example: new vehicle purchases) .
Upon sale of the vehicle, the programmed
HomeLink® Universal Transceiver buttons
should be erased for security purposes. For
additional information, refer to “Program-
ming HomeLink®” in this section.WARNING
● Do not use the HomeLink® Universal
Transceiver with any garage door
opener that lacks safety stop and re-
verse features as required by federal
safety standards. (These standards be-
came effective for opener models
manufactured after April 1, 1982) . A ga-
rage door opener which cannot detect
an object in the path of a closing garage
door and then automatically stop and
reverse, does not meet current federal
safety standards. Using a garage door
opener without these features in-
creases the risk of serious injury or
death.
● During the programming procedure
your garage door or security gate will
open and close (if the transmitter is
within range) . Make sure that people or
objects are clear of the garage door,
gate, etc. that you are programming.
● Your vehicle’s engine should be turned
off while programming the HomeLink®
Universal Transceiver. Do not breathe
exhaust gases; they contain colorless
and odorless carbon monoxide. Carbon
monoxide is dangerous. It can cause
unconsciousness or death.
PROGRAMMING HOMELINK®
If you have any questions or are having difficulty
programming your HomeLink® buttons, refer to
the HomeLink® web site at: www.homelink.com
or call 1-800-355-3515.
NOTE:
Place the ignition switch in the ACC posi-
tion when programming HomeLink®. It is
also recommended that a new battery be
placed in the hand-held transmitter of the
device being programmed to HomeLink®
for quicker programming and accurate
transmission of the radio frequency.
HOMELINK® UNIVERSAL
TRANSCEIVER (if so equipped)
2-62Instruments and controls
Page 144 of 491
●position the hand-held transmitter with its
battery area facing away from the
HomeLink® surface.
● press and hold both the HomeLink® and
hand-held transmitter buttons without inter-
ruption.
● position the hand-held transmitter 1 -
3 inches (26 - 76 mm) away from the
HomeLink® surface. Hold the transmitter in
that position for up to 15 seconds. If
HomeLink® is not programmed within that
time, try holding the transmitter in another
position – keeping the indicator light in view
at all times.
If you have any questions or are having difficulty
programming your HomeLink® buttons, refer to
the HomeLink® web site at: www.homelink.com
or call 1-800-355-3515.
CLEARING THE PROGRAMMED
INFORMATION
The following procedure clears the programmed
information from both buttons. Individual buttons
cannot be cleared. However, individual buttons
can be reprogrammed. For additional informa-
tion, refer to “Reprogramming a single
HomeLink® button” in this section. To clear all programming:
1. Press and hold the two outer HomeLink® buttons until the indicator light begins to
flash in approximately 10 seconds. Do not
hold for longer than 20 seconds.
2. Release both buttons.
HomeLink® is now in the programming mode
and can be programmed at any time beginning
with “Programming HomeLink®” - Step 1.
REPROGRAMMING A SINGLE
HOMELINK® BUTTON
To reprogram a HomeLink® Universal Trans-
ceiver button, complete the following: 1. Press and hold the desired HomeLink® but- ton. DO NOT release the button.
2. The indicator light will begin to flash after 20 seconds. Without releasing the
HomeLink® button, proceed with “Pro-
gramming HomeLink®” - Step 1.
For questions or comments, contact HomeLink®
at: www.homelink.com or 1–800–355–3515
(except Mexico) .
The HomeLink® Universal Transceiver button
has now been reprogrammed. The new device
can be activated by pushing the HomeLink® button that was just programmed. This procedure
will not affect any other programmed HomeLink®
buttons.
IF YOUR VEHICLE IS STOLEN
If your vehicle is stolen, you should change the
codes of any non-rolling code device that has
been programmed into HomeLink®. Consult the
Owner’s Manual of each device or call the manu-
facturer or dealer of those devices for additional
information.
When your vehicle is recovered, you will
need to reprogram the HomeLink® Univer-
sal Transceiver with your new transmitter
information.
FCC Notice:
For USA:
This device complies with Part 15 of the
FCC Rules. Operation is subject to the fol-
lowing two conditions: (1) This device may
not cause interference, and (2) this device
must accept any interference received, in-
cluding interference that may cause unde-
sired operation.
Instruments and controls2-65
Page 184 of 491
Touch-screen maintenance
If you clean the display screen, use a dry, soft
cloth. If additional cleaning is necessary, use a
small amount of neutral detergent with a soft
cloth. Never spray the screen with water or de-
tergent. Dampen the cloth first and then wipe the
screen.
HOW TO USE THE BACK BUTTON
Press the BACK button to return to the previous
screen.
HOW TO USE THE [] BUTTON
For additional information about the “SiriusXM
Travel Link”, and “SiriusXM Traffic” features, refer
to the separate Navigation System Owner’s
Manual.
For additional information about the “My Apps”
key, refer to “NissanConnect
SMMobile Apps” in
this section.
For additional information about the “Voice Com-
mands” key, refer to “NISSAN Voice Recognition
System” in this section. To select and/or adjust several functions, fea-
tures and modes that are available for your ve-
hicle:
1. Press the [
] button.
2. Touch the “Settings” key.
3. Touch the desired item.
LHA3747LHA3748
Monitor, climate, audio, phone and voice recognition systems4-7
Page 185 of 491
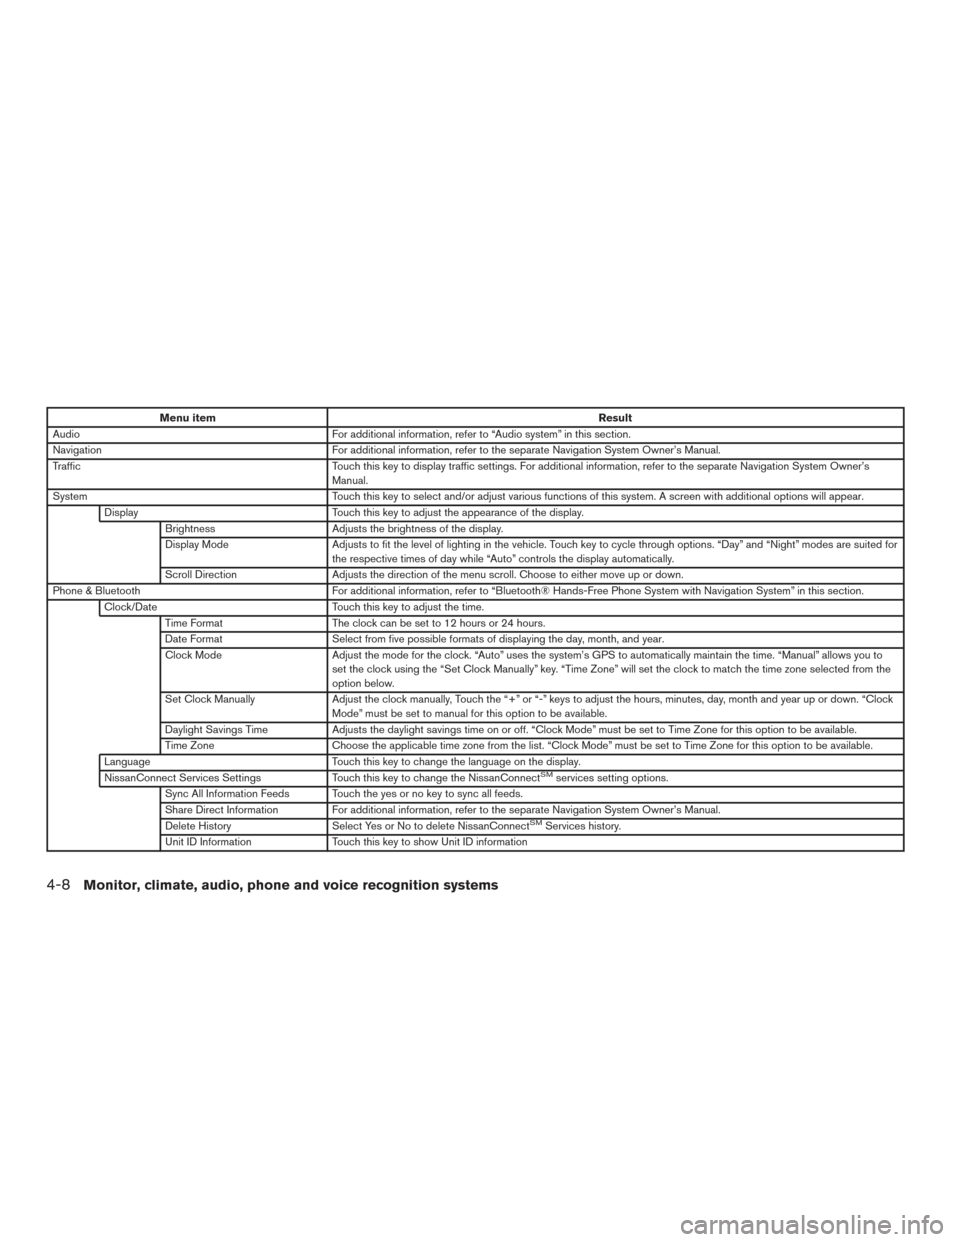
Menu itemResult
Audio For additional information, refer to “Audio system” in this section.
Navigation For additional information, refer to the separate Navigation System Owner’s Manual.
Traffic Touch this key to display traffic settings. For additional information, refer to the separate Navigation System Owner’s
Manual.
System Touch this key to select and/or adjust various functions of this system. A screen with additional options will appear.
Display Touch this key to adjust the appearance of the display.
Brightness Adjusts the brightness of the display.
Display Mode Adjusts to fit the level of lighting in the vehicle. Touch key to cycle through options. “Day” and “Night” modes are suited for
the respective times of day while “Auto” controls the display automatically.
Scroll Direction Adjusts the direction of the menu scroll. Choose to either move up or down.
Phone & Bluetooth For additional information, refer to “Bluetooth® Hands-Free Phone System with Navigation System” in this section.
Clock/Date Touch this key to adjust the time.
Time Format The clock can be set to 12 hours or 24 hours.
Date Format Select from five possible formats of displaying the day, month, and year.
Clock Mode Adjust the mode for the clock. “Auto” uses the system’s GPS to automatically maintain the time. “Manual” allows you to
set the clock using the “Set Clock Manually” key. “Time Zone” will set the clock to match the time zone selected from the
option below.
Set Clock Manually Adjust the clock manually, Touch the “+” or “-” keys to adjust the hours, minutes, day, month and year up or down. “Clock
Mode” must be set to manual for this option to be available.
Daylight Savings Time Adjusts the daylight savings time on or off. “Clock Mode” must be set to Time Zone for this option to be available.
Time Zone Choose the applicable time zone from the list. “Clock Mode” must be set to Time Zone for this option to be available.
Language Touch this key to change the language on the display.
NissanConnect Services Settings Touch this key to change the NissanConnect
SMservices setting options.
Sync All Information Feeds Touch the yes or no key to sync all feeds.
Share Direct Information For additional information, refer to the separate Navigation System Owner’s Manual.
Delete History Select Yes or No to delete NissanConnect
SMServices history.
Unit ID Information Touch this key to show Unit ID information
4-8Monitor, climate, audio, phone and voice recognition systems
Page 186 of 491
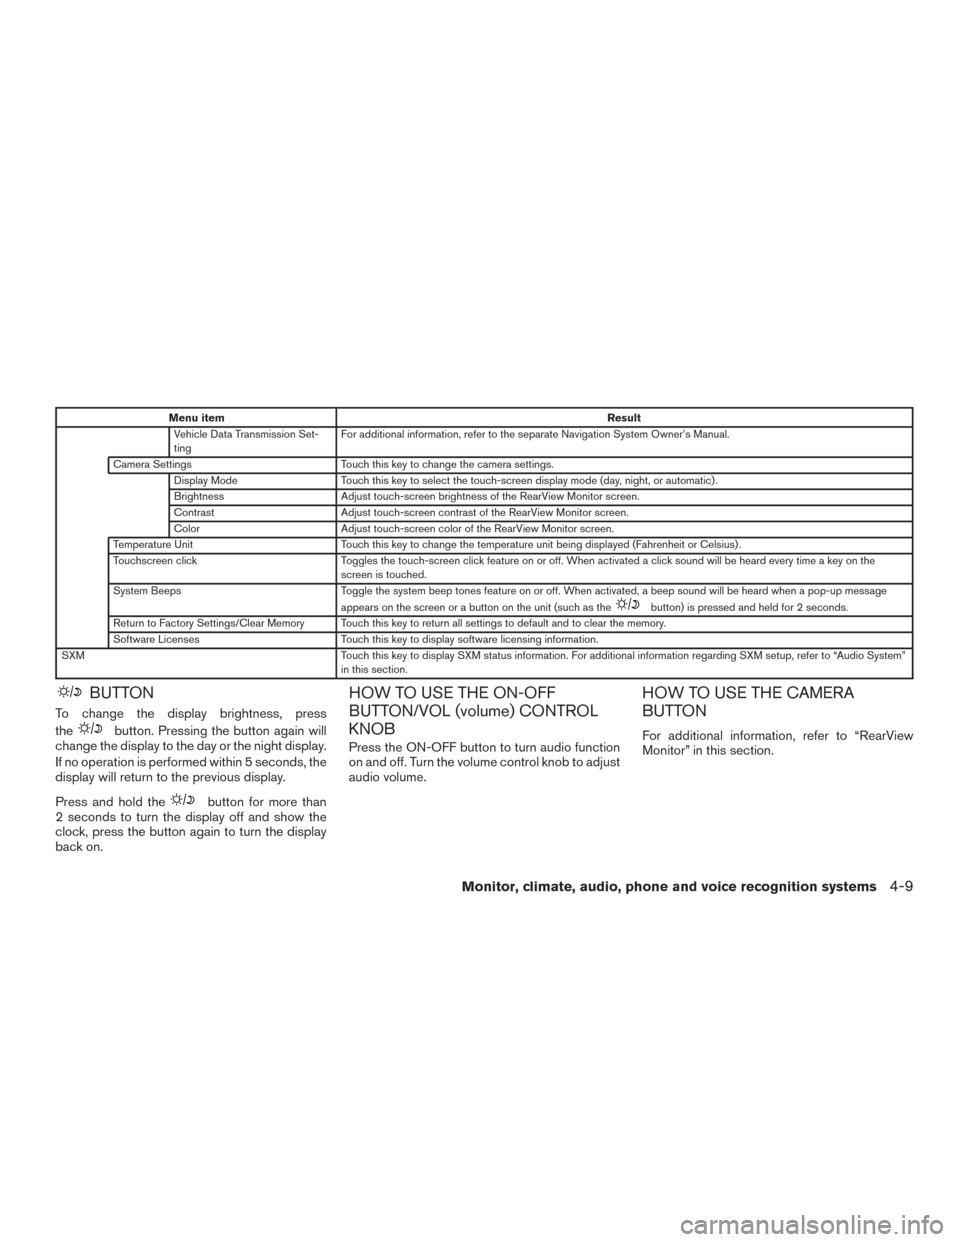
Menu itemResult
Vehicle Data Transmission Set-
ting For additional information, refer to the separate Navigation System Owner’s Manual.
Camera Settings Touch this key to change the camera settings.
Display Mode Touch this key to select the touch-screen display mode (day, night, or automatic) .
Brightness Adjust touch-screen brightness of the RearView Monitor screen.
Contrast Adjust touch-screen contrast of the RearView Monitor screen.
Color Adjust touch-screen color of the RearView Monitor screen.
Temperature Unit Touch this key to change the temperature unit being displayed (Fahrenheit or Celsius) .
Touchscreen click Toggles the touch-screen click feature on or off. When activated a click sound will be heard every time a key on the
screen is touched.
System Beeps Toggle the system beep tones feature on or off. When activated, a beep sound will be heard when a pop-up message
appears on the screen or a button on the unit (such as the
button) is pressed and held for 2 seconds.
Return to Factory Settings/Clear Memory Touch this key to return all settings to default and to clear the memory.
Software Licenses Touch this key to display software licensing information.
SXM Touch this key to display SXM status information. For additional information regarding SXM setup, refer to “Audio System”
in this section.
BUTTON
To change the display brightness, press
the
button. Pressing the button again will
change the display to the day or the night display.
If no operation is performed within 5 seconds, the
display will return to the previous display.
Press and hold the
button for more than
2 seconds to turn the display off and show the
clock, press the button again to turn the display
back on.
HOW TO USE THE ON-OFF
BUTTON/VOL (volume) CONTROL
KNOB
Press the ON-OFF button to turn audio function
on and off. Turn the volume control knob to adjust
audio volume.
HOW TO USE THE CAMERA
BUTTON
For additional information, refer to “RearView
Monitor” in this section.
Monitor, climate, audio, phone and voice recognition systems4-9
Page 191 of 491
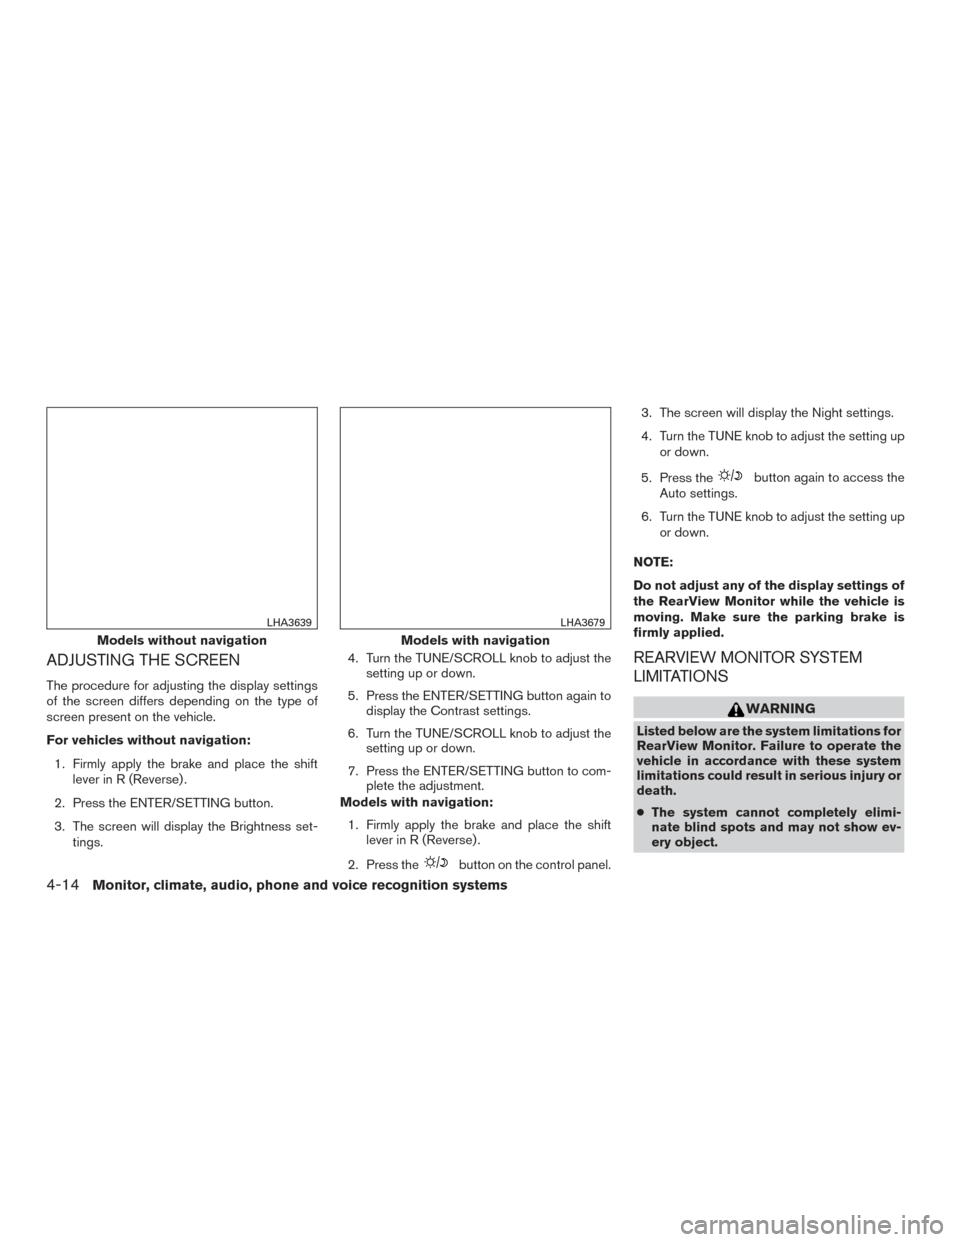
ADJUSTING THE SCREEN
The procedure for adjusting the display settings
of the screen differs depending on the type of
screen present on the vehicle.
For vehicles without navigation:1. Firmly apply the brake and place the shift lever in R (Reverse) .
2. Press the ENTER/SETTING button.
3. The screen will display the Brightness set- tings. 4. Turn the TUNE/SCROLL knob to adjust the
setting up or down.
5. Press the ENTER/SETTING button again to display the Contrast settings.
6. Turn the TUNE/SCROLL knob to adjust the setting up or down.
7. Press the ENTER/SETTING button to com- plete the adjustment.
Models with navigation:
1. Firmly apply the brake and place the shift lever in R (Reverse) .
2. Press the
button on the control panel. 3. The screen will display the Night settings.
4. Turn the TUNE knob to adjust the setting up
or down.
5. Press the
button again to access the
Auto settings.
6. Turn the TUNE knob to adjust the setting up or down.
NOTE:
Do not adjust any of the display settings of
the RearView Monitor while the vehicle is
moving. Make sure the parking brake is
firmly applied.
REARVIEW MONITOR SYSTEM
LIMITATIONS
WARNING
Listed below are the system limitations for
RearView Monitor. Failure to operate the
vehicle in accordance with these system
limitations could result in serious injury or
death.
● The system cannot completely elimi-
nate blind spots and may not show ev-
ery object.
Models without navigation
LHA3639
Models with navigation
LHA3679
4-14Monitor, climate, audio, phone and voice recognition systems
Page 194 of 491
WARNING
●The air conditioner cooling function op-
erates only when the engine is running.
● Do not leave children or adults who
would normally require the assistance
of others alone in your vehicle. Pets
should also not be left alone. They
could accidentally injure themselves or
others through inadvertent operation of
the vehicle. Also, on hot, sunny days,
temperatures in a closed vehicle could
quickly become high enough to cause
severe or possibly fatal injuries to
people or animals.
● Do not use the recirculation mode for
long periods as it may cause the interior
air to become stale and the windows to
fog up.
NOTE: ● Odors from inside and outside the vehicle
can build up in the air conditioner unit. Odor
can enter the passenger compartment
through the vents. ●
When parking, set the heater and air condi-
tioner controls to turn off air recirculation to
allow fresh air into the passenger compart-
ment. This should help reduce odors inside
the vehicle.
HEATER (manual) (if so equipped)
Monitor, climate, audio, phone and voice recognition systems4-17