Page 270 of 491

SymptomSolution
System fails to interpret the command correctly. 1. Ensure that the command is valid. For additional information, refer to “List of voice commands” in this section.
2. Ensure that the command is spoken after the tone.
3. Speak clearly without pausing between words and at a level appropriate to the ambient noise level in the vehicle.
4. Ensure that the ambient noise level is not excessive (for example, windows open or defroster on) . NOTE: If it is too
noisy to use the phone, it is likely that the voice commands will not be recognized.
5. If more than one command was said at a time, try saying the commands separately.
6. If the system consistently fails to recognize commands, the voice training procedure should be carried out to im-
prove the recognition response for the speaker. For additional information, refer to “Voice Adaptation (VA) mode” in
this section.
The system consistently selects the wrong entry from the
phone book. 1. Ensure that the phone book entry name requested matches what was originally stored. This can be confirmed by
using the “List Names” command. For additional information, refer to “Phonebook” in this section.
2. Replace one of the names being confused with a new name.
Monitor, climate, audio, phone and voice recognition systems4-93
Page 292 of 491

TROUBLESHOOTING GUIDE
The system should respond correctly to all voice
commands without difficulty. If problems are en-
countered, try the following solutions.
Where the solutions are listed by number, try
each solution in turn, starting with number 1, until
the problem is resolved.
SymptomSolution
System fails to interpret the command correctly. 1. Ensure that the command is valid. For additional information, refer to “Voice commands” in this section.
2. Ensure that the command is spoken after the tone.
3. Speak clearly without pausing between words and at a level appropriate to the ambient noise level in the vehicle.
4. Ensure that the ambient noise level is not excessive (for example, windows open or defroster on) . NOTE: If it is too
noisy to use the phone, it is likely that the voice commands will not be recognized.
5. If more than one command was said at a time, try saying the commands separately.
The system consistently selects the wrong entry from the
phone book. 1. Ensure that the phone book entry name requested matches what was originally stored. For additional information,
refer to “Vehicle phonebook” in this section.
2. Replace one of the names being confused with a new name.
3. Please speak both first and last name of contact to improve recognition accuracy.
Monitor, climate, audio, phone and voice recognition systems4-115
Page 400 of 491

8 Do-it-yourself
Maintenance precautions...........................8-2
Engine compartment check locations ................8-3
Engine cooling system .............................8-5
Checking engine coolant level ...................8-6
Changing engine coolant ........................8-6
Engine oil .........................................8-7
Checking engine oil level ........................8-7
Changing engine oil ............................8-8
Changing engine oil filter ........................8-9
Continuously Variable Transmission (CVT) fluid
(if so equipped) .................................. 8-11
Brake and clutch (if so equipped) fluid ..............8-11
Brake fluid .................................... 8-11
Clutch fluid (if so equipped) ....................8-12
Windshield-washer fluid ........................... 8-12
Windshield-washer fluid reservoir ...............8-12
Battery .......................................... 8-13
Jump starting ................................. 8-14
Variable voltage control system .....................8-15
Drive belt ........................................ 8-15
Spark plugs ...................................... 8-16
Replacing spark plugs ......................... 8-16
Air cleaner ....................................... 8-17In-cabin microfilter
............................. 8-17
Windshield wiper blades .......................... 8-18
Cleaning ..................................... 8-18
Replacing .................................... 8-18
Brakes .......................................... 8-20
Fuses ........................................... 8-20
Engine compartment ........................... 8-21
Passenger compartment .......................8-23
Battery replacement .............................. 8-24
Key fob (if so equipped) ........................ 8-25
NISSAN Intelligent Key® (if so equipped) ........8-26
Lights ........................................... 8-28
Headlights .................................... 8-28
Turn signal bulb ............................... 8-29
Fog lights (if so equipped) ......................8-29
Exterior
and interior lights ....................... 8-31
Wheels and tires ................................. 8-33
Tire pressure .................................. 8-33
Tire labeling ................................... 8-37
Types of tires .................................. 8-39
Tire chains .................................... 8-40
Changing wheels and tires .....................8-40
Page 402 of 491
MRA8DE engine
1. Engine oil filler cap
2. Brake and clutch (if so equipped) fluidreservoir
3. Air cleaner
4. Battery
5. Fuse and relay box
6. Engine coolant reservoir
7. Radiator cap
8. Engine oil dipstick
9. Drive belt location
10. Windshield-washer fluid reservoir
LDI2931
ENGINE COMPARTMENT CHECK
LOCATIONS
Do-it-yourself8-3
Page 403 of 491
MR16DDT engine
1. Engine oil filler cap
2. Brake and clutch (if so equipped) fluidreservoir
3. Air cleaner
4. Battery
5. Fuse and relay box
6. Engine coolant reservoir
7. Radiator cap
8. Engine oil dipstick
9. Drive belt location
10. Windshield-washer fluid reservoir
11. Relay box (DTRL) (if so equipped)
LDI3011
8-4Do-it-yourself
Page 419 of 491

If the brakes do not operate properly, have the
brakes checked. It is recommended that you visit
a NISSAN dealer for this service.
Self-adjusting brakes
Your vehicle is equipped with self-adjusting
brakes.
The front (and rear-if so equipped) disc-type
brakes self-adjust every time the brake pedal is
applied. The rear drum-type brakes (if so
equipped) self-adjust every time the parking
brake is applied.
WARNING
Have your brake system checked if the
brake pedal height does not return to nor-
mal. It is recommended that you visit a
NISSAN dealer for this service.
Brake pad wear indicators
The disc brake pads on your vehicle have audible
wear indicators. When a brake pad requires re-
placement, a high pitched scraping or screech-
ing sound will be heard when the vehicle is in
motion. The noise will be heard whether or not the
brake pedal is depressed. Have the brakes
checked as soon as possible if the wear indicator
sound is heard.Under some driving or climate conditions, occa-
sional brake squeak, squeal or other noise may
be heard. Occasional brake noise during light to
moderate stops is normal and does not affect the
function or performance of the brake system.
Proper brake inspection intervals should
be followed.
For additional information regard-
ing brake inspections, refer to the appropriate
maintenance schedule information in the
“NISSAN Service and Maintenance Guide”.
Two types of fuses are used. Type
�Ais used in
the fuse boxes in the engine compartment. Type
�Bis used in the passenger compartment fuse
box.
Type
�Afuses can be installed in the engine
compartment and passenger compartment fuse
boxes.
LDI0455
BRAKES FUSES
8-20Do-it-yourself
Page 420 of 491

If a type�Afuse is used to replace a type�Bfuse,
the type
�Afuse will not be level with the fuse
pocket as shown in the illustration. This will not
affect the performance of the fuse. Make sure the
fuse is installed in the fuse box securely.
Type
�Bfuses cannot be installed in the under
hood fuse boxes. Only use type
�Afuses in the
under hood fuse boxes.
NOTE:
Your vehicle may not be equipped with all
fuses listed on the fuse label.
ENGINE COMPARTMENT
WARNING
Never use a fuse of higher or lower amper-
age rating than that specified on the fuse
box cover. This could damage the electri-
cal system or electronic control units or
cause a fire. If any electrical equipment does not come on,
check for an open fuse.
1. Be sure the ignition switch and the headlight switch are OFF.
2. Open the engine hood.
3. Remove the fuse box cover by pushing the tab
�Aand lifting the cover up.
4. Remove the fuse with the fuse puller, which is located in the center of the fuse block in
the passenger compartment.
LDI0457LDI2172
Do-it-yourself8-21
Page 421 of 491
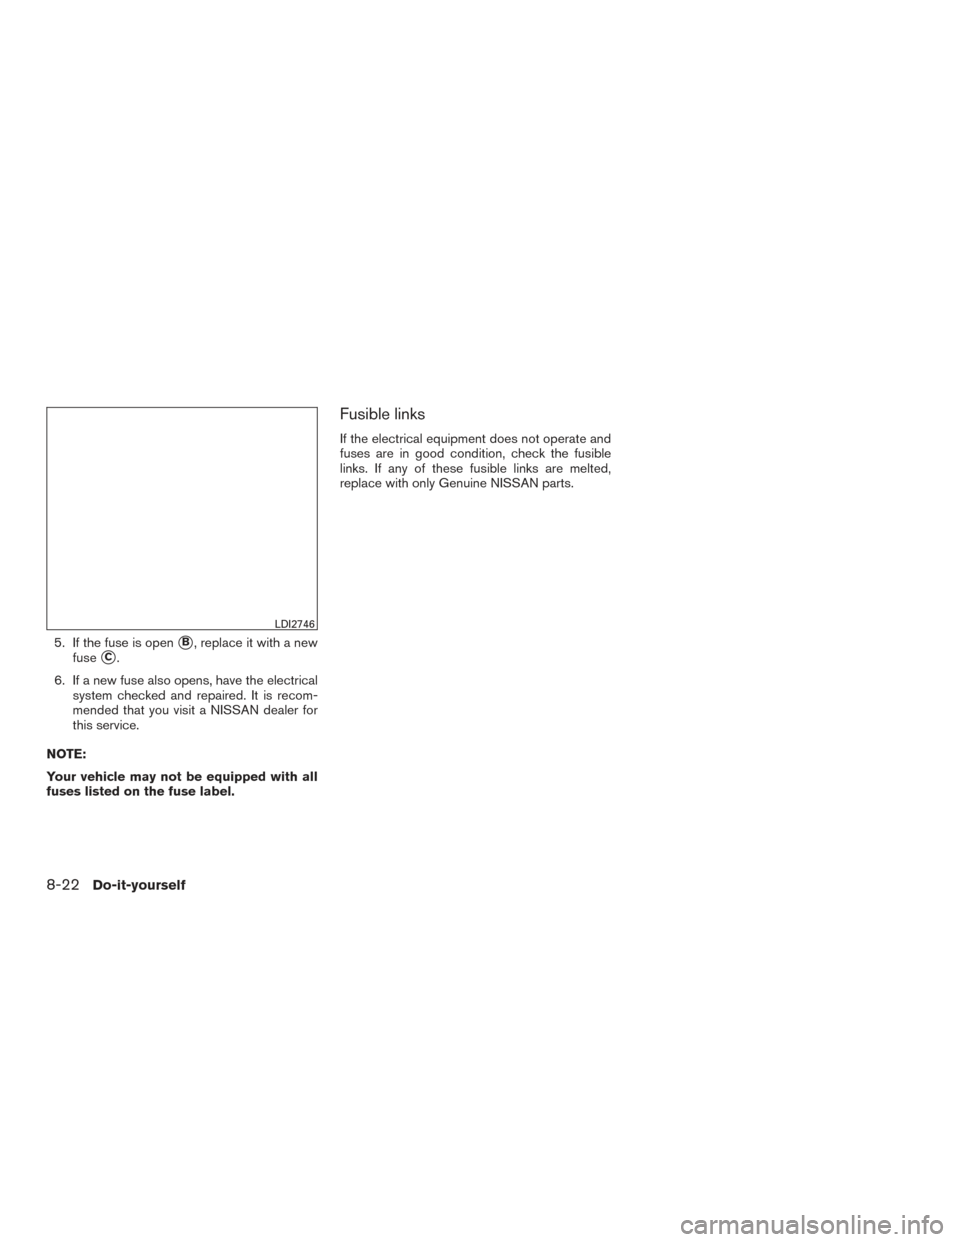
5. If the fuse is open�B, replace it with a new
fuse
�C.
6. If a new fuse also opens, have the electrical system checked and repaired. It is recom-
mended that you visit a NISSAN dealer for
this service.
NOTE:
Your vehicle may not be equipped with all
fuses listed on the fuse label.
Fusible links
If the electrical equipment does not operate and
fuses are in good condition, check the fusible
links. If any of these fusible links are melted,
replace with only Genuine NISSAN parts.
LDI2746
8-22Do-it-yourself
 fluidreservoir
3. Air cleaner
4. Battery
5. Fuse and relay box
6. Engine coolant reservoir
7. Radiator cap
8. Engine oil dip")
 fluidreservoir
3. Air cleaner
4. Battery
5. Fuse and relay box
6. Engine coolant reservoir
7. Radiator cap
8. Engine oil di")