2017 NISSAN ROGUE SPORT flat tire
[x] Cancel search: flat tirePage 295 of 512
5-10Starting and driving
3. When appropriate, slowly release theaccelerator pedal to gradually slow
the vehicle.
4. Gradually steer the vehicle to a safe location off the road and away from
traffic if possible.
5. Lightly apply the brake pedal to gra- dually stop the vehicle.
6. Turn on the hazard warning flashers and either contact a roadside emer-
gency service to change the tire or see
“Changing a flat tire” (P.6-4) of this
Owner’s Manual.
DRINKING ALCOHOL/DRUGS AND
DRIVING
WARNING
Never drive under the influence of
alcohol or drugs. Alcohol in the
bloodstream reduces coordination,
delays reaction time and impairs
judgement. Driving after drinking
alcohol increases the likelihood of
being involved in an accident injuring
yourself and others. Additionally, if
you are injured in an accident, alco-
hol can increase the severity of the
injury. NISSAN is committed to safe driving.
However, you must choose not to drive
under the influence of alcohol. Every year
thousands of people are injured or killed
in alcohol-related accidents. Although the
local laws vary on what is considered to
be legally intoxicated, the fact is that
alcohol affects all people differently and
most people underestimate the effects of
alcohol.
Remember, drinking and driving don’t
mix! And that is true for drugs, too (over-
the-counter, prescription, and illegal
drugs). Don’t drive if your ability to oper-
ate your vehicle is impaired by alcohol,
drugs, or some other physical condition.
DRIVING SAFETY PRECAUTIONS
Your vehicle is designed for both normal
and off-road use. However, avoid driving
in deep water or mud as your vehicle is
mainly designed for leisure use, unlike a
conventional off-road vehicle.
Remember that Two-Wheel Drive (2WD)
models are less capable than All-Wheel
Drive (AWD) models for rough road driving
and extrication when stuck in deep snow,
mud, or the like.
Please observe the following precautions:
WARNING
.
Drive carefully when off the road
and avoid dangerous areas. Every
person who drives or rides in this
vehicle should be seated with
their seat belt fastened. This will
keep you and your passengers in
position when driving over rough
terrain.
. Do not drive across steep slopes.
Instead drive either straight up or
straight down the slopes. Off-
road vehicles can tip over side-
ways much more easily than they
can forward or backward.
. Many hills are too steep for any
vehicle. If you drive up them, you
may stall. If you drive down them,
you may not be able to control
your speed. If you drive across
them, you may roll over.
. Do not shift ranges while driving
on downhill grades as this could
cause loss of control of the vehi-
cle.
. Stay alert when driving to the top
of a hill. At the top there could be
a drop-off or other hazard that
could cause an accident.
Page 302 of 512

JVS0404X
INTELLIGENT KEY BATTERY DIS-
CHARGE
If the battery of the Intelligent Key is
discharged, or environmental conditions
interfere with the Intelligent Key opera-
tion, start the engine according to the
following procedure:
1. Move the shift lever to the P (Park)position (for CVT models) or the shift
lever to the N (Neutral) position (for MT
models).
2. Firmly apply the foot brake.
3. Touch the ignition switch with the Intelligent Key as illustrated. (A chime
will sound.) 4. Push the ignition switch while depres-
sing the brake pedal within 10 sec-
onds after the chime sounds. The
engine will start.
After step 3 is performed, when the
ignition switch is pushed without depres-
sing the brake pedal, the ignition switch
position will change to ACC.
NOTE:
. When the ignition switch is pushed
to the ON position or the engine is
started by the above procedures, the
“Key Battery Low” warning appears
(on the Vehicle information display)
even if the Intelligent Key is inside
the vehicle. This is not a malfunction.
To turn off the warning, touch the
ignition switch with the Intelligent
Key again.
. If the “Key Battery Low” warning
appears (on the Vehicle information
display), replace the battery as soon
as possible. (See “Intelligent Key
battery replacement” (P.8-23).) .
Make sure the area around the vehicle
is clear.
. Check fluid levels such as engine oil,
coolant, brake fluid, and window
washer fluid as frequently as possible,
or at least whenever you refuel.
. Check that all windows and lights are
clean.
. Visually inspect tires for their appear-
ance and condition. Also check tires
for proper inflation.
. Lock all doors.
. Position seat and adjust head re-
straints.
. Adjust inside and outside mirrors.
. Fasten seat belts and ask all passen-
gers to do likewise.
. Check the operation of warning lights
when the ignition switch is placed in
the ON position. (See “Warning lights,
indicator lights and audible remin-
ders” (P.2-10).)
Starting and driving5-17
BEFORE STARTING THE ENGINE
Page 385 of 512

5-100Starting and driving
7. Avoid idling..Shutting off your engine when safefor stops exceeding 30-60 seconds
saves fuel and reduces emissions.
8. Buy an automated pass for toll roads.
.Automated passes permit drivers to use special lanes to maintain cruis-
ing speed through the toll and
avoid stopping and starting.
9. Winter warm up.
.Limit idling time to minimize impact to fuel economy.
.Vehicles typically need no morethan 30 seconds of idling at start-
up to effectively circulate the en-
gine oil before driving.
.Your vehicle will reach its ideal
operating temperature more
quickly while driving versus idling.
10. Keeping your vehicle cool.
.Park your vehicle in a covered parking area or in the shade when-
ever possible.
.When entering a hot vehicle, open- ing the windows will help to reduce
the inside temperature faster, re-
sulting in reduced demand on your
A/C system. .
Keep your engine tuned up.
. Follow the recommended scheduled
maintenance.
. Keep the tires inflated to the correct
pressure. Low tire pressure increases
tire wear and lowers fuel economy.
. Keep the wheels in correct alignment.
Improper alignment increases tire
wear and lowers fuel economy.
. Use the recommended viscosity en-
gine oil. (See “Engine oil and oil filter
recommendation” (P.10-5).) If any malfunction occurs in the Intelligent
4x4 system while the engine is running,
warning messages appear in the vehicle
information display.
INCREASING FUEL ECONOMY INTELLIGENT 4X4 (if so equipped)
Page 399 of 512
5-114Starting and driving
TIRE EQUIPMENT
SUMMER tires have a tread designed to
provide superior performance on dry
pavement. However, the performance of
these tires will be substantially reduced in
snowy and icy conditions. If you operate
your vehicle on snowy or icy roads,
NISSAN recommends the use of MUD &
SNOW or ALL SEASON tires on all four
wheels. It is recommended you consult a
NISSAN dealer for the tire type, size, speed
rating and availability information.
For additional traction on icy roads,
studded tires may be used. However,
some U.S. states and Canadian provinces
prohibit their use. Check local, state and
provincial laws before installing studded
tires.
Skid and traction capabilities of
studded snow tires, on wet or dry
surfaces, may be poorer than that of
non-studded snow tires.
Tire chains may be used. For details, see
“Tire chains” (P.8-36) of this manual.
All-Wheel Drive (AWD) model
If you install snow tires, they must also be
the same size, brand, construction and
tread pattern on all four wheels.
SPECIAL WINTER EQUIPMENT
It is recommended that the following
items be carried in the vehicle during
winter:
.A scraper and stiff-bristled brush to
remove ice and snow from the win-
dows and wiper blades.
. A sturdy, flat board to be placed under
the jack to give it firm support.
. A shovel to dig the vehicle out of
snow-drifts.
. Extra window washer fluid to refill the
reservoir tank.
DRIVING ON SNOW OR ICE
WARNING
.Wet ice (32°F, 0°C and freezing
rain), very cold snow or ice can be
slick and very hard to drive on.
The vehicle will have much less
traction or “grip” under these
conditions. Try to avoid driving
on wet ice until the road is salted
or sanded. .
Whatever the condition, drive
with caution. Accelerate and slow
down with care. If accelerating or
downshifting too fast, the drive
wheels will lose even more trac-
tion.
. Allow more stopping distance
under these conditions. Braking
should be started sooner than on
dry pavement.
. Allow greater following distances
on slippery roads.
. Watch for slippery spots (glare
ice). These may appear on an
otherwise clear road in shaded
areas. If a patch of ice is seen
ahead, brake before reaching it.
Try not to brake while on the ice,
and avoid any sudden steering
maneuvers.
. Do not use cruise control on
slippery roads.
. Snow can trap dangerous ex-
haust gases under your vehicle.
Keep snow clear of the exhaust
pipe and from around your vehi-
cle.
Page 400 of 512

6 In case of emergency
Hazard warning flasher switch ......................................... 6-2
Roadside assistance program ........................................... 6-2
Emergency engine shut off (models with push-
button ignition switch) ............................................................. 6-3
Flat tire ........................................................................\
.......................... 6-3Tire Pressure Monitoring System (TPMS) ........... 6-3
Changing a flat tire .............................................................. 6-4 Jump starting ........................................................................\
......... 6-9
Push starting ........................................................................\
........ 6-11
If your vehicle overheats .................................................... 6-11
Towing your vehicle ............................................................... 6-13
Towing recommended by NISSAN ..................... 6-14
Vehicle recovery (freeing a stuck vehicle) ...... 6-16
Page 402 of 512
To shut off the engine in an emergency
situation while driving, perform the fol-
lowing procedure:
.Rapidly push the push-button ignition
switch 3 consecutive times in less
than 1.5 seconds, or
. Push and hold the push-button igni-
tion switch for more than 2 seconds.TIRE PRESSURE MONITORING SYS-
TEM (TPMS)
This vehicle is equipped with the Tire
Pressure Monitoring System (TPMS). It
monitors tire pressure of all tires except
the spare. When the low tire pressure
warning light is lit, and the “Tire Pressure
Low - Add Air” warning message is
displayed in the vehicle information dis-
play, one or more of your tires is sig-
nificantly under-inflated. If the vehicle is
being driven with low tire pressure, the
TPMS will activate and warn you of it by
the low tire pressure warning light. This
system will activate only when the vehicle
is driven at speeds above 16 MPH (25
km/h). For more details, see “Warning
lights, indicator lights and audible remin-
ders” (P.2-10) and “Tire Pressure Monitor-
ing System (TPMS)” (P.5-5).
WARNING
.If the low tire pressure warning
light illuminates while driving,
avoid sudden steering maneu-
vers or abrupt braking, reduce
vehicle speed, pull off the road
to a safe location and stop the
vehicle as soon as possible. Driv-
ing with under-inflated tires may
permanently damage the tires and increase the likelihood of tire
failure. Serious vehicle damage
could occur and may lead to an
accident and could result in ser-
ious personal injury. Check the
tire pressure for all four tires.
Adjust the tire pressure to the
recommended COLD tire pressure
shown on the Tire and Loading
Information label to turn the low
tire pressure warning light OFF. If
the light still illuminates while
driving after adjusting the tire
pressure, a tire may be flat. If
you have a flat tire, replace it with
a spare tire as soon as possible.
. Since the spare tire is not
equipped with the TPMS, when a
spare tire is mounted or a wheel
is replaced, the TPMS will not
function and the low tire pressure
warning light will flash for ap-
proximately 1 minute. The light
will remain on after 1 minute.
Have your tires replaced and/or
TPMS system reset as soon as
possible. It is recommended you
visit a NISSAN dealer for these
services.
. Replacing tires with those not
originally specified by NISSAN
could affect the proper operation
In case of emergency6-3
EMERGENCY ENGINE SHUT OFF (models
with push-button ignition switch)FLAT TIRE
Page 403 of 512

6-4In case of emergency
of the TPMS.
. Do not inject any tire liquid or
aerosol tire sealant into the tires,
as this may cause a malfunction
of the tire pressure sensors.
CHANGING A FLAT TIRE
If you have a flat tire, follow the instruc-
tions below.
Stopping the vehicle
1. Safely move the vehicle off the road
and away from traffic.
2. Turn on the hazard warning flashers.
3. Park on a level surface and apply the parking brake.
4. Continuously Variable Transmission
(CVT) models:
Move the shift lever to the P (Park)
position.
Manual Transmission (MT) models:
Move the shift lever to the R (Reverse)
position.
5. Turn off the engine.
6. Raise the hood to warn other traffic, and to signal professional road assis-
tance personnel that you need assis-
tance. 7. Have all passengers get out of the
vehicle and stand in a safe place, away
from traffic and clear of the vehicle.
WARNING
.Make sure the parking brake is
securely applied and the Manual
Transmission is shifted into R
(Reverse), or the CVT into P (Park).
. Never change tires when the ve-
hicle is on a slope, ice or slippery
areas. This is hazardous.
. Never change tires if oncoming
traffic is close to your vehicle.
Wait for professional road assis-
tance.
MCE0001A
Blocking wheels
Place suitable blocksat both the front
and back of the wheel diagonally oppo-
site the flat tire to prevent the vehicle
from moving when it is jacked up.
WARNING
Be sure to block the wheel as the
vehicle may move and result in
personal injury.
Page 407 of 512
6-8In case of emergency
SCE0933
Installing the spare tire
The spare tire is designed for emer-
gency use. (See specific instructions
under the heading “Wheels and tires”
(P.8-29).)
1. Clean any mud or dirt from the sur-face between the wheel and hub.
2. Carefully put the spare tire on and tighten the wheel nuts finger tight.
Check that all the wheel nuts contact
the wheel surface horizontally.
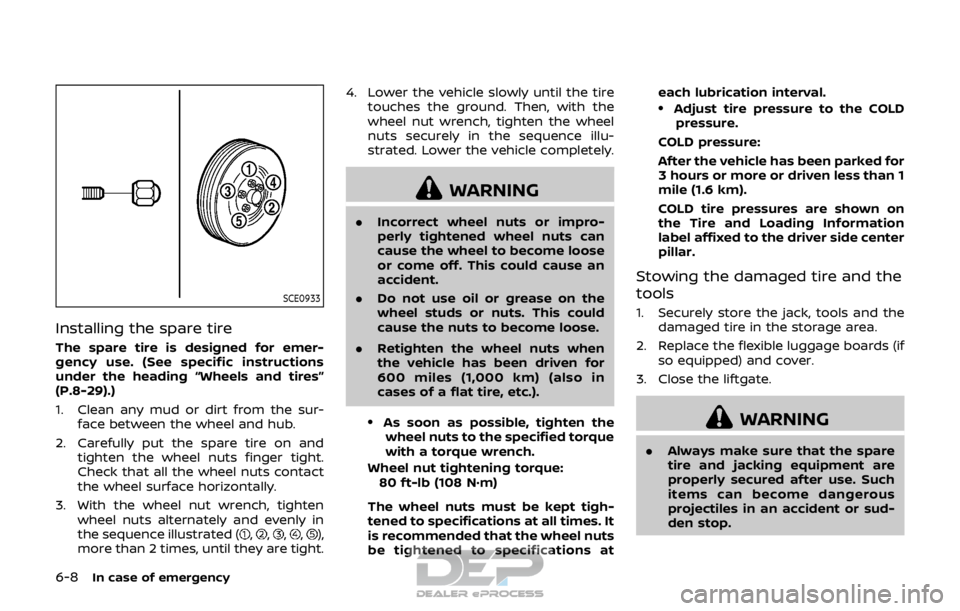
3. With the wheel nut wrench, tighten wheel nuts alternately and evenly in
the sequence illustrated (
,,,,),
more than 2 times, until they are tight. 4. Lower the vehicle slowly until the tire
touches the ground. Then, with the
wheel nut wrench, tighten the wheel
nuts securely in the sequence illu-
strated. Lower the vehicle completely.
WARNING
.Incorrect wheel nuts or impro-
perly tightened wheel nuts can
cause the wheel to become loose
or come off. This could cause an
accident.
. Do not use oil or grease on the
wheel studs or nuts. This could
cause the nuts to become loose.
. Retighten the wheel nuts when
the vehicle has been driven for
600 miles (1,000 km) (also in
cases of a flat tire, etc.).
.As soon as possible, tighten the
wheel nuts to the specified torque
with a torque wrench.
Wheel nut tightening torque: 80 ft-lb (108 N·m)
The wheel nuts must be kept tigh-
tened to specifications at all times. It
is recommended that the wheel nuts
be tightened to specifications at each lubrication interval.
.Adjust tire pressure to the COLD
pressure.
COLD pressure:
After the vehicle has been parked for
3 hours or more or driven less than 1
mile (1.6 km).
COLD tire pressures are shown on
the Tire and Loading Information
label affixed to the driver side center
pillar.
Stowing the damaged tire and the
tools
1. Securely store the jack, tools and the damaged tire in the storage area.
2. Replace the flexible luggage boards (if so equipped) and cover.
3. Close the liftgate.
WARNING
. Always make sure that the spare
tire and jacking equipment are
properly secured after use. Such
items can become dangerous
projectiles in an accident or sud-
den stop.