2017 NISSAN ROGUE SPORT clock
[x] Cancel search: clockPage 185 of 512

4-6Heater, air conditioner, audio and phone systems
Menu ItemResult
Audio For more details, see “Audio main operation” (P.4-63).
System Display Brightness Adjusts the brightness of the display.
Display Mode Adjusts to fit the level of lighting in the vehicle. Touch key to cycle through
options. “Day” and “Night” modes are suited for the respective times of day
while “Auto” controls the display automatically.
Scroll Direction Adjust the scroll direction of ENTER AUDIO/TUNE·SCROLL dial. Choose to
either move up or down.
Clock/Date Time Format The clock can be set to 12 hours or 24 hours.
Date Format The format of the day, month and year display can be selected.
Clock Mode Adjust the mode for the clock. “Auto” uses the system’s GPS to automatically
maintain the time. “Manual” allows you to set the clock using the “Set Clock/
Date Manually” key. Select “Time Zone” to have the time set to a specific time
zone.
Set Clock/Date Manually Adjust the clock manually. Touch the “+” or “-” keys to adjust the hours, minutes, day, month and year up or down. “Clock Mode” must be set to
“Manual” for this option to be available. When the “Time Format” is set to
“12h”, switching between “AM” and “PM” can be done by touching “MODE”.
Daylight Savings Time Adjusts the daylight savings time on or off. “Clock Mode” must be set to “Time Zone” for this option to be available.
Time Zone Choose the applicable time zone from the list.
Language Touch this key to change the language on the display.
NissanConnect Services Settings See the separate Navigation System Owner’s Manual for detail information.
Camera Settings Display Mode Touch this key to select the camera screen display mode (day, night, or
automatic).
Brightness Adjust camera screen brightness.
Contrast Adjust camera screen contrast.
Color Adjust camera screen color.
Page 210 of 512

JVH0664X
1. A/C button/Fan speed controldial
2. Air flow control buttons
3. MAX A/C button/Temperature control dial
4. Front defroster
button
5. Rear defrosterbutton (See “Rear
window and outside mirror defroster
switch” (P.2-42).)
6. Air recirculation
button
MANUAL AIR CONDITIONER AND
HEATER
Controls
Turning system on/off:
To turn on the system, turn the fan speed
control
dial out of the OFF position.
Turn the dial counterclockwise to the OFF
position to turn off the system.
Fan speed control:
Turn the fan speed control
dial
clockwise to increase the fan speed.
Turn the fan speed control
dial
counterclockwise to decrease the fan
speed. Temperature control:
Turn the temperature control dial to set
the desired temperature. Turn the dial
between the middle and the right posi-
tion to select the hot temperature. Turn
the dial between the middle and the left
position to select the cool temperature.
Air flow control:
Push one of the air flow control buttons
to select the air flow outlets.
— Air flows mainly from center and side
ventilators.
— Air flows mainly from center and sideventilators and foot outlets.
— Air flows mainly from the foot outletand partly from the defroster.
— Air flows mainly from the defrosterand foot outlets.
Air intake control:
The air intake control mode will change
each time the air recirculation
button
is pushed.
. When the indicator light is turned on,
the air recirculates inside the vehicle.
. When the indicator light is turned off,
the air flow is drawn from outside the
vehicle.
Heater, air conditioner, audio and phone systems4-31
Page 228 of 512

audio player operation, see “Blue-
tooth® audio player operation” (P.4-
54).
. Bass, Treble, Balance and Fade
Controls the sound of the audio
system. Balance adjusts the sound
between the left and right speakers.
Fade adjusts the sound between the
front and rear speakers.
Select the “Bass”, “Treble”, “Balance” or
“Fade” using the ENTER SETTING/
TUNE·FOLDER dial, and then push the
ENTER SETTING/TUNE·FOLDER dial.
Turn the ENTER SETTING/
TUNE·FOLDER dial to adjust the bass,
treble, balance and fade of the screen
to the preferred level. Push the ENTER
SETTING/TUNE·FOLDER dial to apply
the setting.
. Brightness and Contrast
Adjust the brightness and contrast of
the screen.
Select “Brightness” or “Contrast” using
the ENTER SETTING/TUNE·FOLDER dial
and then push the ENTER SETTING/
TUNE·FOLDER dial. Turn the ENTER
SETTING/TUNE·FOLDER dial to adjust
the brightness and contrast of the
screen to the preferred level. Push the
ENTER SETTING/TUNE·FOLDER dial to
apply the setting. .
Clock Adjust
Adjust the clock according to the
following procedure.
1) Select “Clock Adjust” using the
ENTER SETTING/TUNE·FOLDER dial
and then push the ENTER
SETTING/TUNE·FOLDER dial.
2) Adjust the hour with the ENTER SETTING/TUNE·FOLDER dial and
then push the ENTER SETTING/
TUNE·FOLDER dial.
3) Adjust the minute with the ENTER SETTING/TUNE·FOLDER dial and
then push the ENTER SETTING/
TUNE·FOLDER dial.
24 hour clock is not available.
. On-Screen Clock
When this item is turned on, a clock is
always displayed in the upper right
corner of the screen.
Select the “On-Screen Clock” using the
ENTER SETTING/TUNE·FOLDER dial
and then push the ENTER SETTING/
TUNE·FOLDER dial. You can toggle
between “ON” and “OFF” using the
ENTER SETTING/TUNE·FOLDER dial.
Push the ENTER SETTING/
TUNE·FOLDER dial to apply the setting.
. RDS Display
RDS (radio data system) information
can be shown on the display. Select “RDS Display” using the ENTER
SETTING/TUNE·FOLDER dial and then
push the ENTER SETTING/
TUNE·FOLDER dial. You can toggle
between “ON” and “OFF” using the
ENTER SETTING/TUNE·FOLDER dial.
Push the ENTER SETTING/
TUNE·FOLDER dial to apply the setting.
. Speed Sensitive Vol.
Select the “Speed Sensitive Vol.” using
the ENTER SETTING/TUNE·FOLDER dial
and then push the ENTER SETTING/
TUNE·FOLDER dial. To change the
Speed Sensitive Volume (Speed Sensi-
tive Vol.) level from off (0) to 5, turn the
ENTER SETTING/TUNE·FOLDER dial.
Push the ENTER SETTING/
TUNE·FOLDER dial to apply the setting.
. AUX Vol.
Controls the volume level of incoming
sound when an auxiliary device is
connected to the system. Select the
“AUX Vol.” using the ENTER SETTING/
TUNE·FOLDER dial and then push the
ENTER SETTING/TUNE·FOLDER dial.
Choose a setting between +1 and +3
or choose 0 to disable the feature
entirely. Push the ENTER SETTING/
TUNE·FOLDER dial to apply the setting.
. Language Select
The language settings can be chan-
ged.
Heater, air conditioner, audio and phone systems4-49
Page 235 of 512

4-56Heater, air conditioner, audio and phone systems
Audio main operation
The audio system operates when the
ignition switch is placed in the ACC or
ON position.
Head unit:
The auto loudness circuit enhances the
low and high frequency ranges automa-
tically.
Power/VOL dial:
Push the Power/VOL dial to turn on and
off the audio system.
Turn the Power/VOL dial to adjust the
volume.
Audio settings:
The settings screen will appear when
pushing the ENTER SETTING/TUNE·SC-
ROLL dial.
The following items are available in the
settings screen.
.Bluetooth
It is possible to set the Bluetooth®
settings. For details of the Bluetooth®
audio player operation, see “Blue-
tooth® audio player operation” (P.4-61).
. Bass, Treble, Balance and Fade
Controls the sound of the audio
system. Balance adjusts the sound
between the left and right speakers.
Fade adjusts the sound between the front and rear speakers.
Select the “Bass”, “Treble”, “Balance” or
“Fade” using the ENTER SETTING/TU-
NE·SCROLL dial and then push the
ENTER SETTING/TUNE·SCROLL dial.
Turn the ENTER SETTING/TUNE·SC-
ROLL dial to adjust the bass, treble,
balance and fade of the screen to the
preferred level. Push the ENTER
SETTING/TUNE·SCROLL dial to apply
the setting.
. Brightness and Contrast
Adjust the brightness and contrast of
the screen.
Select the “Brightness” or “Contrast”
using the ENTER SETTING/TUNE·SC-
ROLL dial and then push the ENTER
SETTING/TUNE·SCROLL dial. Turn the
ENTER SETTING/TUNE·SCROLL dial to
adjust the brightness and contrast of
the screen to the preferred level. Push
the ENTER SETTING/TUNE·SCROLL dial
to apply the setting.
. Clock Adjust
Adjust the clock according to the
following procedure.
1) Select “Clock Adjust” using the
ENTER SETTING/TUNE·SCROLL dial
and then push the ENTER
SETTING/TUNE·SCROLL dial. 2) Adjust the hour with the ENTER
SETTING/TUNE·SCROLL dial and
then push the ENTER SETTING/
TUNE·SCROLL dial.
3) Adjust the minute with the ENTER SETTING/TUNE·SCROLL dial and
then push the ENTER SETTING/
TUNE·SCROLL dial.
24 hour clock is not available.
. On-Screen Clock
When this item is turned on, a clock is
always displayed in the upper right
corner of the screen.
Select the “On-Screen Clock” using the
ENTER SETTING/TUNE·SCROLL dial
and then push the ENTER SETTING/
TUNE·SCROLL dial. You can toggle
between “ON” and “OFF” using the
ENTER SETTING/TUNE·SCROLL dial.
Push the ENTER SETTING/
TUNE·FOLDER dial to apply the setting.
. RDS Display
RDS (radio data system) information
can be shown on the display. Select
“RDS Display” using the ENTER
SETTING/TUNE·SCROLL dial and then
push the ENTER SETTING/TUNE·SC-
ROLL dial. You can toggle between
“ON” and “OFF” using the ENTER
SETTING/TUNE·SCROLL dial. Push the
ENTER SETTING/TUNE·SCROLL dial to
apply the setting.
Page 256 of 512

ANTENNA
To remove the antenna, hold the bottom
of the antenna and turn it counterclock-
wise.
To install the antenna, turn the antenna
clockwise and tighten.
CAUTION
.To avoid damaging or deforming
the antenna, be sure to remove
the antenna under the following
conditions.
— The vehicle enters a garage
with a low ceiling.
— The vehicle is covered with a car cover.
. Be sure that antenna is removed
before the vehicle enters an auto-
matic car wash.
. Always properly tighten the an-
tenna rod during installation.
Otherwise, the antenna rod may
break during vehicle operation.
SAA0451
CD/USB MEMORY CARE AND
CLEANING
CD
.Handle a CD by its edges. Never touch
the surface of the disc. Do not bend
the disc.
. Always place the discs in the storage
case when they are not being used.
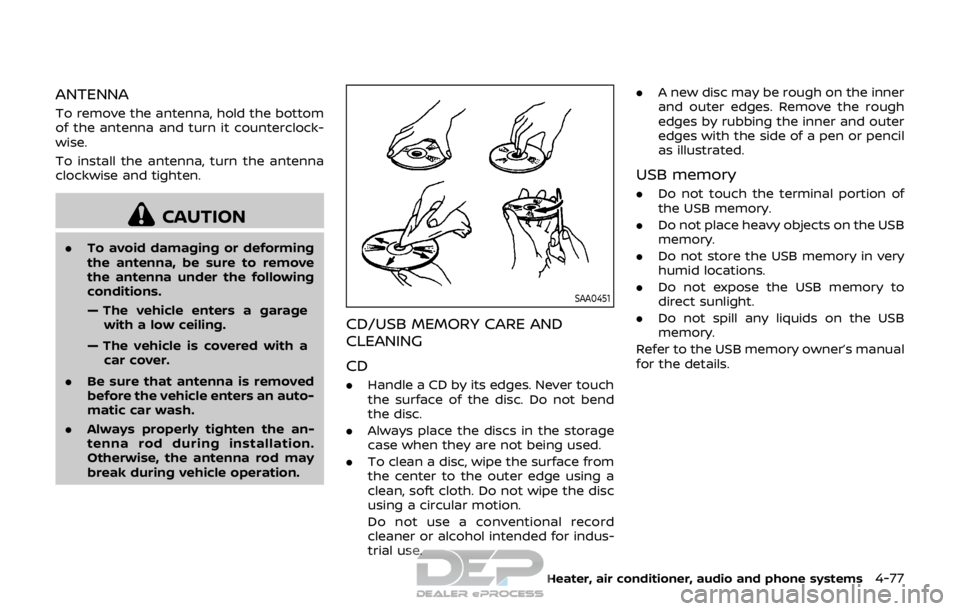
. To clean a disc, wipe the surface from
the center to the outer edge using a
clean, soft cloth. Do not wipe the disc
using a circular motion.
Do not use a conventional record
cleaner or alcohol intended for indus-
trial use. .
A new disc may be rough on the inner
and outer edges. Remove the rough
edges by rubbing the inner and outer
edges with the side of a pen or pencil
as illustrated.
USB memory
.Do not touch the terminal portion of
the USB memory.
. Do not place heavy objects on the USB
memory.
. Do not store the USB memory in very
humid locations.
. Do not expose the USB memory to
direct sunlight.
. Do not spill any liquids on the USB
memory.
Refer to the USB memory owner’s manual
for the details.
Heater, air conditioner, audio and phone systems4-77
Page 406 of 512

JVE0165X
Jack-up point
1. Place the jack directly under the jack-up point as illustrated so the top of
the jack contacts the vehicle at the
jack-up point. Align the jack head
between the two notches in the front
or the rear as shown. Also fit the
groove of the jack head between the
notches as shown.
The jack should be used on level firm
ground.
SCE0504
2. Loosen each wheel nut one or twoturns by turning it counterclockwise
with the wheel nut wrench. Do not
remove the wheel nuts until the tire
is off the ground.
3. To lift the vehicle, securely hold the jack lever and rod with both hands as
shown above. Carefully raise the ve-
hicle until the tire clears the ground.
Remove the wheel nuts, and then
remove the tire.
In case of emergency6-7
Page 433 of 512

8-8Do-it-yourself
JVM0421X
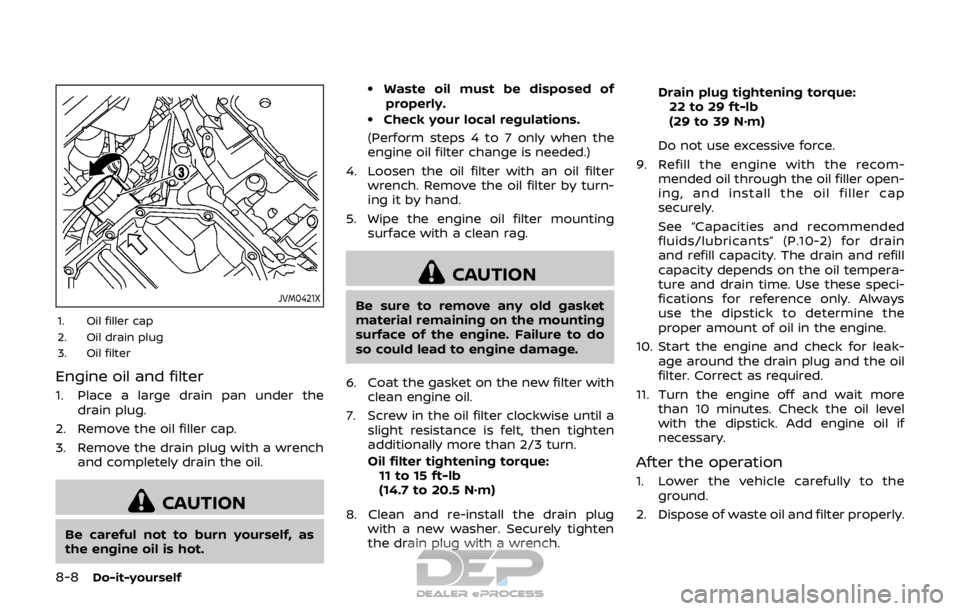
1. Oil filler cap
2. Oil drain plug
3. Oil filter
Engine oil and filter
1. Place a large drain pan under thedrain plug.
2. Remove the oil filler cap.
3. Remove the drain plug with a wrench and completely drain the oil.
CAUTION
Be careful not to burn yourself, as
the engine oil is hot.
.Waste oil must be disposed ofproperly.
.Check your local regulations.
(Perform steps 4 to 7 only when the
engine oil filter change is needed.)
4. Loosen the oil filter with an oil filter wrench. Remove the oil filter by turn-
ing it by hand.
5. Wipe the engine oil filter mounting surface with a clean rag.
CAUTION
Be sure to remove any old gasket
material remaining on the mounting
surface of the engine. Failure to do
so could lead to engine damage.
6. Coat the gasket on the new filter with clean engine oil.
7. Screw in the oil filter clockwise until a slight resistance is felt, then tighten
additionally more than 2/3 turn.
Oil filter tightening torque:11 to 15 ft-lb
(14.7 to 20.5 N·m)
8. Clean and re-install the drain plug with a new washer. Securely tighten
the drain plug with a wrench. Drain plug tightening torque:
22 to 29 ft-lb
(29 to 39 N·m)
Do not use excessive force.
9. Refill the engine with the recom- mended oil through the oil filler open-
ing, and install the oil filler cap
securely.
See “Capacities and recommended
fluids/lubricants” (P.10-2) for drain
and refill capacity. The drain and refill
capacity depends on the oil tempera-
ture and drain time. Use these speci-
fications for reference only. Always
use the dipstick to determine the
proper amount of oil in the engine.
10. Start the engine and check for leak- age around the drain plug and the oil
filter. Correct as required.
11. Turn the engine off and wait more than 10 minutes. Check the oil level
with the dipstick. Add engine oil if
necessary.
After the operation
1. Lower the vehicle carefully to the
ground.
2. Dispose of waste oil and filter properly.
Page 451 of 512

8-26Do-it-yourself
Replacing
LED headlight model:
If LED headlight replacement is required,
it is recommended that you visit a NISSAN
dealer for this service.
Halogen headlight model:
The headlight is a semi-sealed beam type
which uses a replaceable headlight (halo-
gen) bulb.
CAUTION
.Do not leave the bulb out of the
headlight reflector for a long
period of time. Dust, moisture,
smoke, etc. entering the head-
light body may affect bulb per-
formance.
. High pressure halogen gas is
sealed inside the halogen bulb.
The bulb may break if the glass
envelope is scratched or the bulb
is dropped.
. Only touch the base when hand-
ling the bulb. Never touch the
glass envelope. Touching the
glass envelope could significantly
affect bulb life and/or headlight
performance. .
Aiming is not necessary after
replacing the bulb. When aiming
adjustment is necessary, it is
recommended you visit a NISSAN
dealer for this service.
Use the same number and wattage as
originally installed as shown in the chart.
JVM0395X
Low-beam/High-beam:
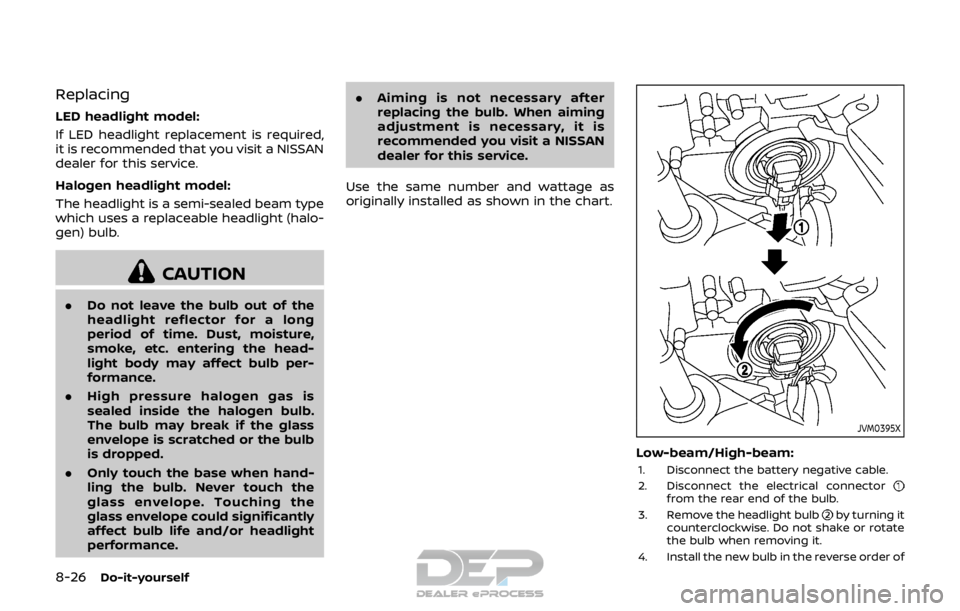
1. Disconnect the battery negative cable.
2. Disconnect the electrical connector
from the rear end of the bulb.
3. Remove the headlight bulb
by turning it
counterclockwise. Do not shake or rotate
the bulb when removing it.
4. Install the new bulb in the reverse order of