2017 NISSAN ROGUE instrument panel
[x] Cancel search: instrument panelPage 8 of 36
6
BLIND SPOT WARNING (BSW) (if so equipped)
The BSW system helps to alert the driver
when another vehicle moves into the
vehicle’s blind spot area.
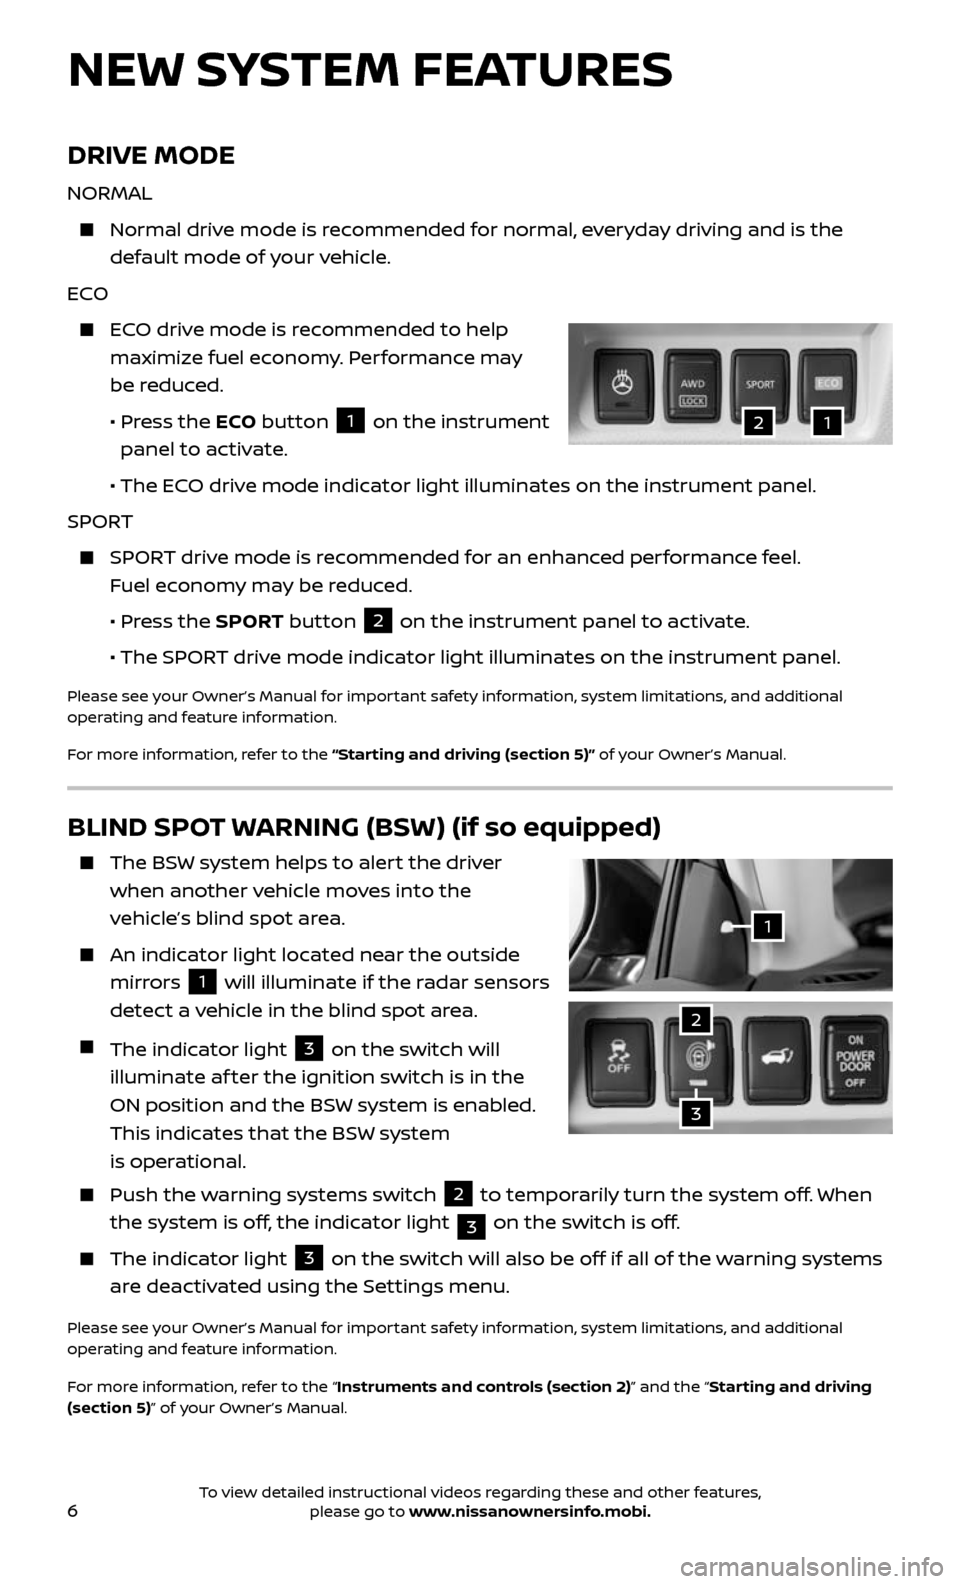
An indicator light located near the outside
mirrors
1 will illuminate if the radar sensors
detect a vehicle in the blind spot area.
The indicator light 3 on the switch will
illuminate af ter the ignition switch is in the
ON position and the BSW system is enabled.
This indicates that the BSW system
is operational.
Push the w arning systems switch 2 to temporarily turn the system off. When
the system is off, the indicator light
3 on the switch is off.
The indic
ator light 3 on the switch will also be off if all of the warning systems
are deactivated using the Settings menu.
Please see your Owner’s Manual for important safety information, system limitations, and additional
operating and feature information.
For more information, refer to the “Instruments and controls (section 2)” and the “Starting and driving
(section 5)” of your Owner’s Manual.
NEW SYSTEM FEATURES
2
DRIVE MODE
NORMAL
Normal driv e mode is recommended for normal, everyday driving and is the
default mode of your vehicle.
ECO
ECO drive mode is recommended to help
maximize fuel economy. Performance may
be reduced.
• Press the ECO button 1 on the instrument
panel to activate.
• The EC O drive mode indicator light illuminates on the instrument panel.
SPORT
SPORT drive mode is recommended for an enhanced performance feel.
Fuel economy may be reduced.
• Press the SPORT button 2 on the instrument panel to activate.
• The SPOR T drive mode indicator light illuminates on the instrument panel.
Please see your Owner’s Manual for important safety information, system limitations, and additional
operating and feature information.
For more information, refer to the “Starting and driving (section 5)” of your Owner’s Manual.
1
3
12
To view detailed instructional videos regarding these and other features, please go to www.nissanownersinfo.mobi.
Page 11 of 36
9
LOOSE FUEL CAP AND FUEL-FILLER DOOR
LOOSE FUEL CAP
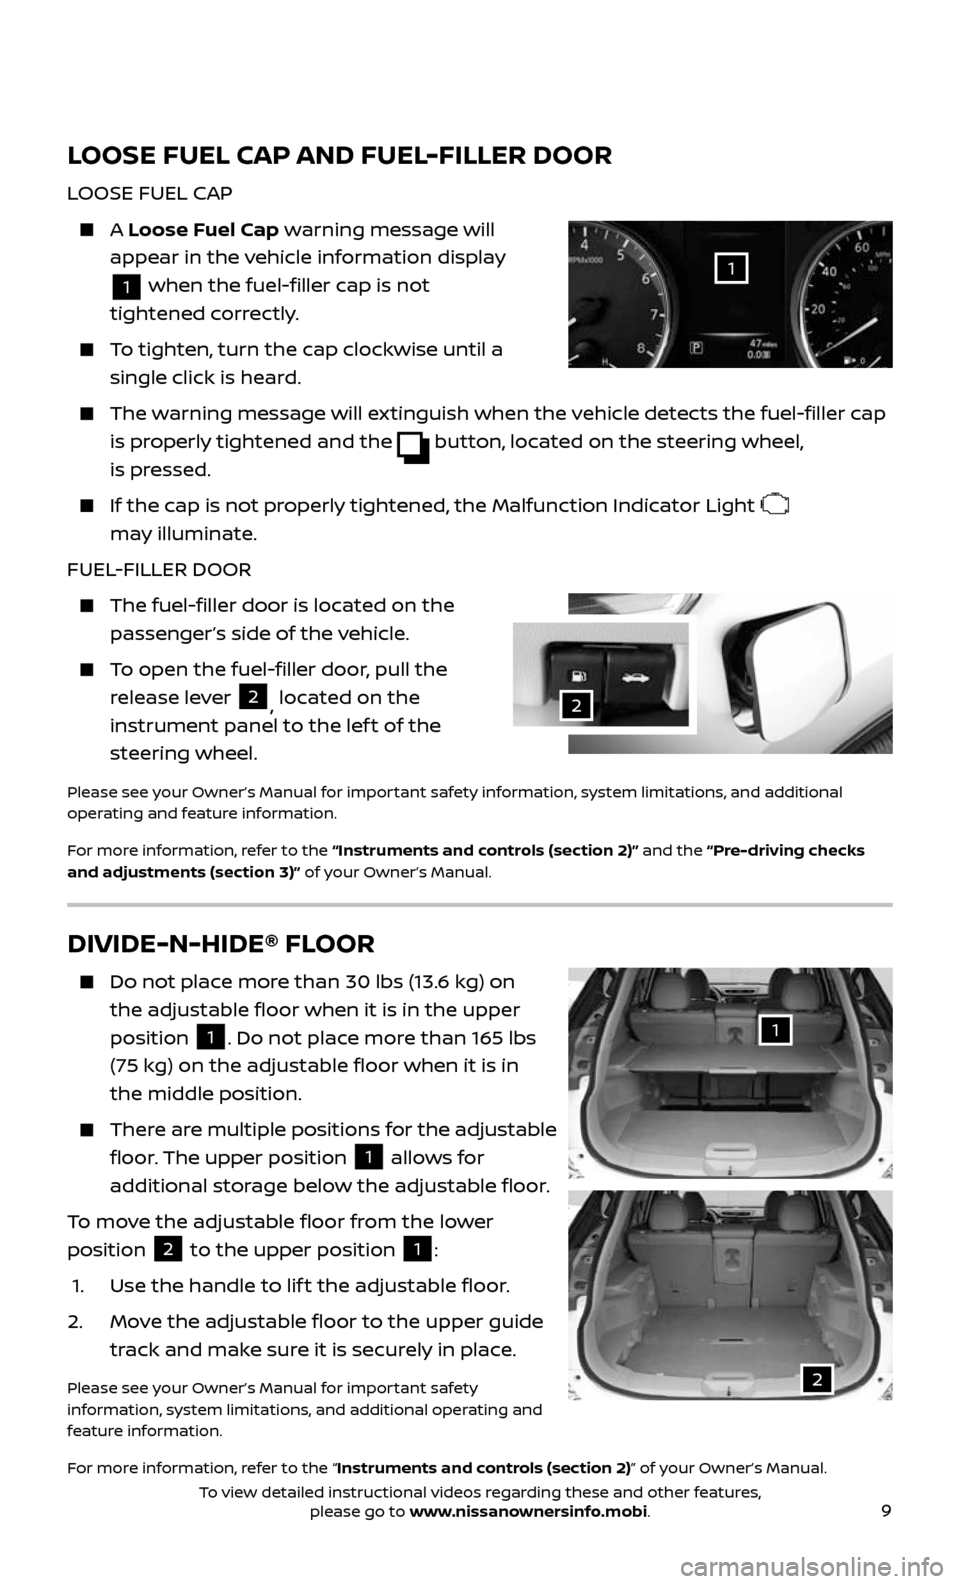
A Loose Fuel Cap warning message will
appear in the vehicle information display
1 when the fuel-filler cap is not
tightened correctly.
To tighten, turn the cap clockwise until a
single click is heard.
The warning message will extinguish when the vehicle detects the fuel-filler cap
is properly tightened and the button, located on the steering wheel,
is pressed.
If the cap is not properly tightened, the Malfunction Indicator Light
may illuminate.
FUEL-FILLER DOOR
The fuel-filler door is located on the
passenger’s side of the vehicle.
To open the fuel-filler door, pull the
release lever 2, located on the
instrument panel to the lef t of the
steering wheel.
Please see your Owner’s Manual for important safety information, system limitations, and additional
operating and feature information.
For more information, refer to the “Instruments and controls (section 2)” and the “Pre-driving checks
and adjustments (section 3)” of your Owner’s Manual.
1
2
DIVIDE-N-HIDE® FLOOR
Do not plac e more than 30 lbs (13.6 kg) on
the adjustable floor when it is in the upper
position
1. Do not place more than 165 lbs
(75 kg) on the adjustable floor when it is in
the middle position.
There are multiple positions for the adjustable
floor. The upper position 1 allows for
additional storage below the adjustable floor.
To move the adjustable floor from the lower
position
2 to the upper position 1:
1. Use the hand le to lif t the adjustable floor.
2. Move the adjustable floor to the upper guide
track and make sure it is securely in place.
Please see your Owner’s Manual for important safety
information, system limitations, and additional operating and
feature information.
For more information, refer to the “Instruments and controls (section 2)” of your Owner’s Manual.
1
2
To view detailed instructional videos regarding these and other features, please go to www.nissanownersinfo.mobi.
Page 15 of 36
13
ALL-WHEEL DRIVE (AWD) LOCK SWITCH (if so equipped)
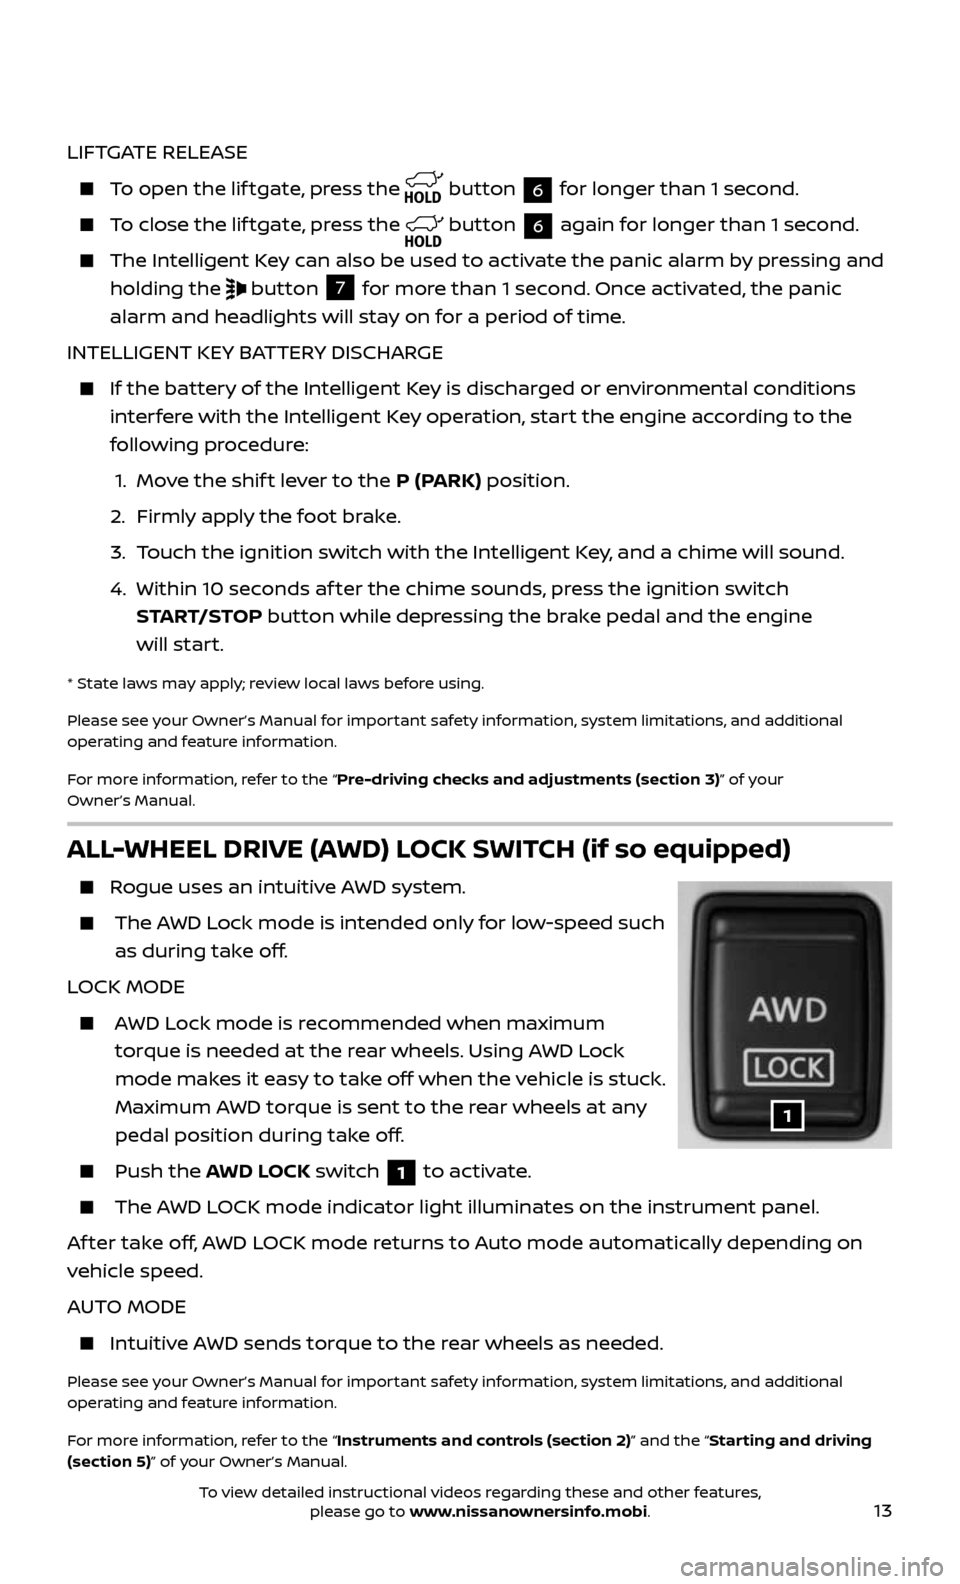
Rogue uses an intuitive AWD system.
The AWD Lock mode is intended only for low-speed such
as during take off.
LOCK MODE
AWD Lock mode is recommended when maximum
torque is needed at the rear wheels. Using AWD Lock
mode makes it easy to take off when the vehicle is stuck.
Maximum AWD torque is sent to the rear wheels at any
pedal position during take off.
Push the AWD LOCK switch 1 to activate.
The AWD LOCK mode indicator light illuminates on the instrument panel.
Af ter take off, AWD LOCK mode returns to Auto mode automatically depending on
vehicle speed.
AUTO MODE
Intuitive AWD sends torque to the rear wheels as needed.
Please see your Owner’s Manual for important safety information, system limitations, and additional
operating and feature information.
For more information, refer to the “Instruments and controls (section 2)” and the “Starting and driving
(section 5)” of your Owner’s Manual.
LIFTGATE RELEASE
To open the lif tgate, press the button 6 for longer than 1 second.
To close the lif tgate, press the button 6 again for longer than 1 second.
The Intel ligent Key can also be used to activate the panic alarm by pressing and
holding the
button 7 for more than 1 second. Once activated, the panic
alarm and headlights will stay on for a period of time.
INTELLIGENT KEY BATTERY DISCHARGE
If the bat tery of the Intelligent Key is discharged or environmental conditions
interfere with the Intelligent Key operation, start the engine according to the
following procedure:
1. Move the shif t lever to the P (PARK) position.
2. Firml y apply the foot brake.
3. Touch the ignition switch with the Intelligent Key, and a chime will sound.
4. Within 10 sec onds af ter the chime sounds, press the ignition switch
START/STOP button while depressing the brake pedal and the engine
will start.
* State laws may apply; review local laws before using.
Please see your Owner’s Manual for important safety information, system limitations, and additional
operating and feature information.
For more information, refer to the “Pre-driving checks and adjustments (section 3)” of your
Owner’s Manual.
1
To view detailed instructional videos regarding these and other features, please go to www.nissanownersinfo.mobi.
Page 16 of 36
14
POWER LIFTGATE (if so equipped)
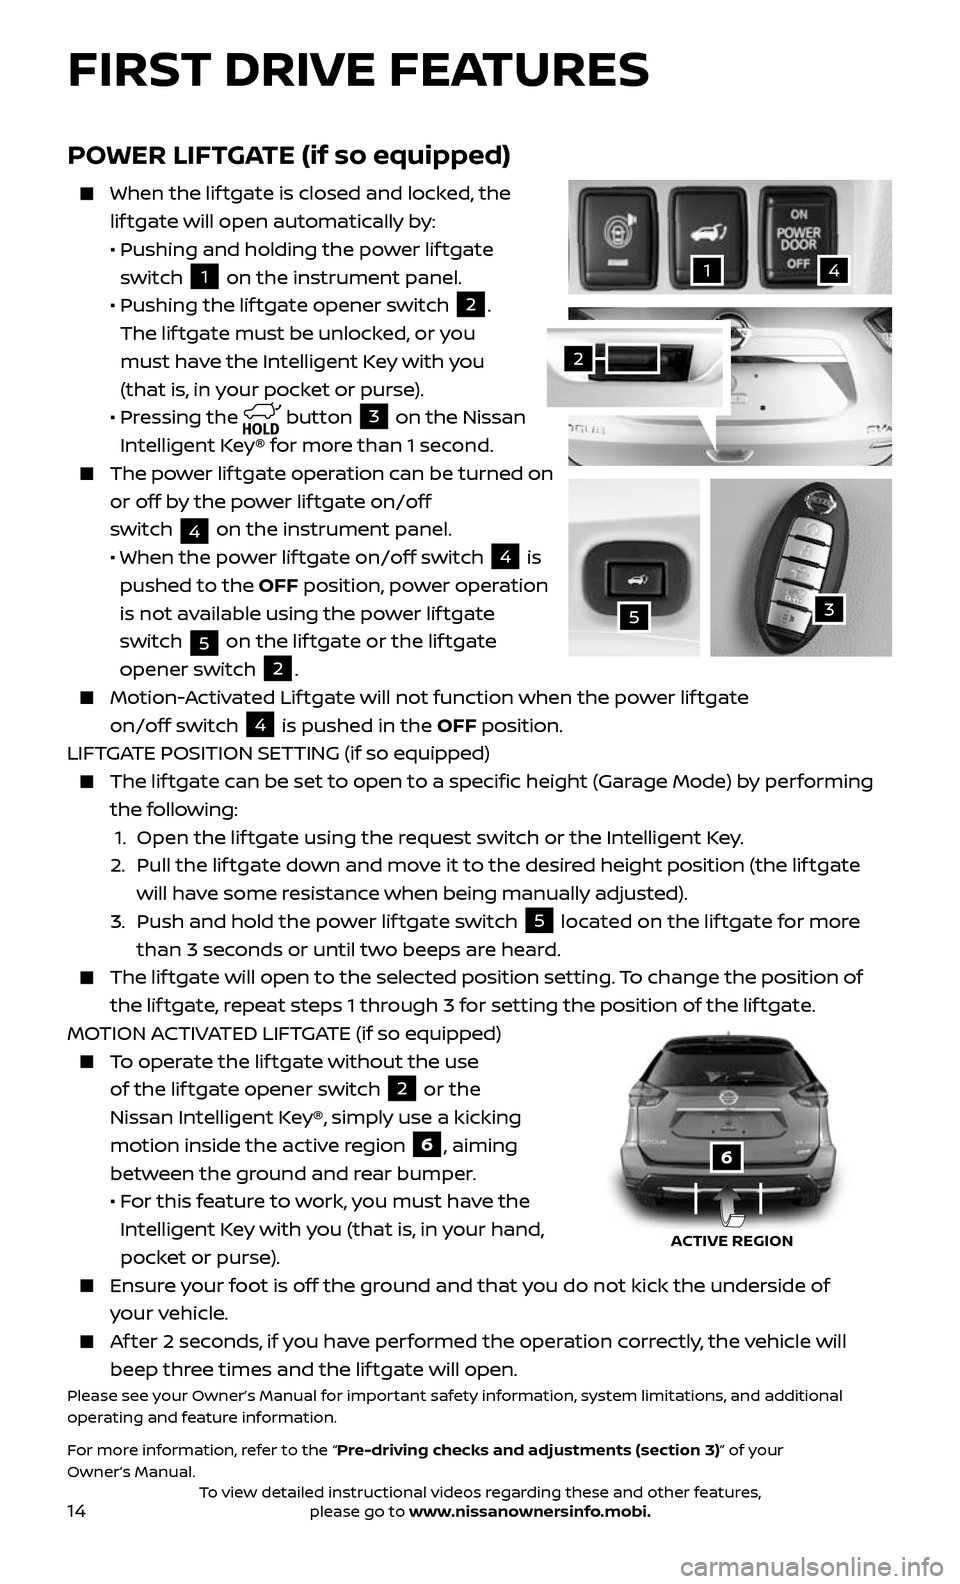
When the liftgate is closed and locked, the
lif tgate will open automatically by:
• Pushing and holding the po wer lif tgate
switch 1 on the instrument panel.
• Pushing the lif tgate opener switch 2.
The lif tgate must be unlocked, or you
must have the Intelligent Key with you
(that is, in your pocket or purse).
• Pressing the button 3 on the Nissan
Intelligent Key® for more than 1 second.
The power lif tgate operation can be turned on
or off by the power lif tgate on/off
switch
4 on the instrument panel.
• When the po wer lif tgate on/off switch 4 is
pushed to the OFF position, power operation
is not available using the power lif tgate
switch
5 on the lif tgate or the lif tgate
opener switch
2.
Motion-Activated Lif tgate will not function when the power lif tgate
on/off switch
4 is pushed in the OFF position.
LIFTGATE POSITION SETTING (if so equipped)
The liftgate can be set to open to a specific height (Garage Mode) by performing
the following:
1. Open the lif tgate using the request switch or the Intelligent Key.
2. Pull the lif tgate down and move it to the desired height position (the lif tgate
will have some resistance when being manually adjusted).
3. Push and hold the po wer lif tgate switch 5 located on the lif tgate for more
than 3 seconds or until two beeps are heard.
The liftgate will open to the selected position setting. To change the position of
the lif tgate, repeat steps 1 through 3 for setting the position of the lif tgate.
MOTION ACTIVATED LIFTGATE (if so equipped)
To operate the lif tgate without the use
of the lif tgate opener switch 2 or the
Nissan Intelligent Key®, simply use a kicking
motion inside the active region
6, aiming
between the ground and rear bumper.
• For this feature to work, you must have the
Intelligent Key with you (that is, in your hand,
pocket or purse).
Ensure your foot is off the ground and that you do not kick the underside of
your vehicle.
Af ter 2 seconds, if you have performed the operation correctly, the vehicle will
beep three times and the lif tgate will open.Please see your Owner’s Manual for important safety information, system limitations, and additional
operating and feature information.
For more information, refer to the “Pre-driving checks and adjustments (section 3)” of your
Owner’s Manual.
3
41
5
2
ACTIVE REGION
6
FIRST DRIVE FEATURES
To view detailed instructional videos regarding these and other features, please go to www.nissanownersinfo.mobi.
Page 19 of 36
17
HEADLIGHT CONTROL SWITCH
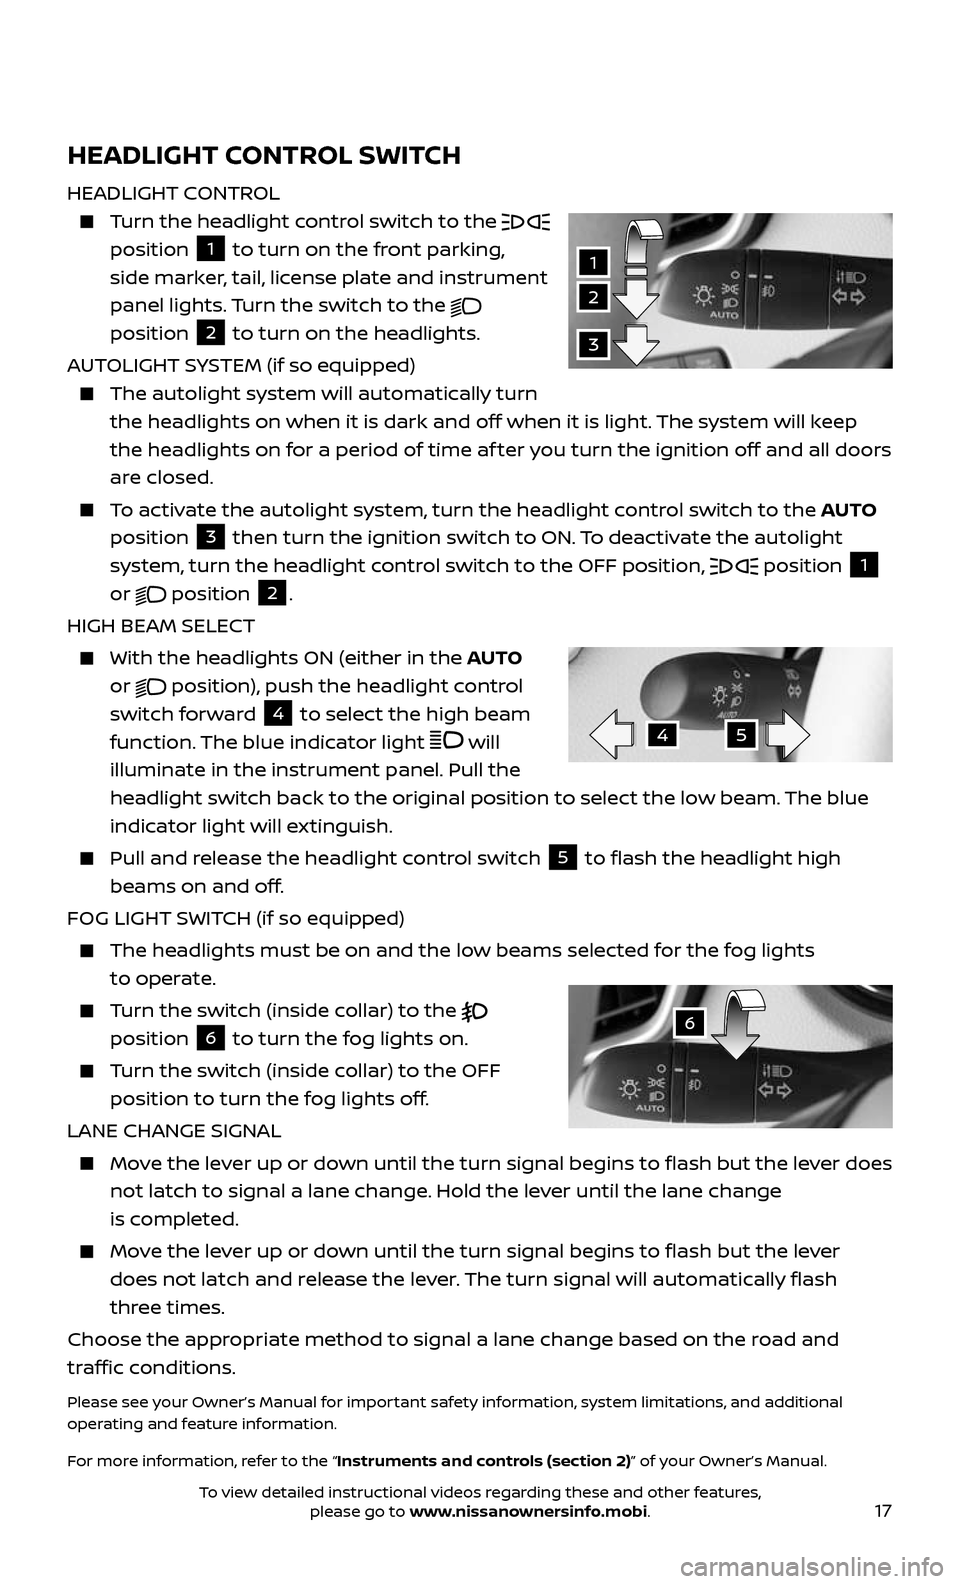
HEADLIGHT CONTROL
Turn the headlight control switch to the position 1 to turn on the front parking,
side marker, tail, license plate and instrument
panel lights. Turn the switch to the
position 2 to turn on the headlights.
AUTOLIGHT SYSTEM (if so equipped)
The autolight system wil l automatically turn
the headlights on when it is dark and off when it is light. The system will keep
the headlights on for a period of time af ter you turn the ignition off and all doors
are closed.
To activate the autolight system, turn the headlight control switch to the AUTO
position
3 then turn the ignition switch to ON. To deactivate the autolight
system, turn the headlight control switch to the OFF position,
position 1
or
position 2.
HIGH BEAM SELECT
With the he adlights ON (either in the AUTO
or
position), push the headlight control
switch forward 4 to select the high beam
function. The blue indicator light
will
illuminate in the instrument panel. Pull the
headlight switch back to the original position to select the low beam. The blue
indicator light will extinguish.
Pull and release the headlight control switch 5 to flash the headlight high
beams on and off.
FOG LIGHT SWITCH (if so equipped)
The headlights must be on and the low beams selected for the fog lights
to operate.
Turn the switch (inside collar) to the position 6 to turn the fog lights on.
Turn the switch (inside collar) to the OFF
position to turn the fog lights off.
LANE CHANGE SIGNAL
Move the lever up or down until the turn signal begins to flash but the lever does
not latch to signal a lane change. Hold the lever until the lane change
is completed.
Move the lever up or down until the turn signal begins to flash but the lever
does not latch and release the lever. The turn signal will automatically flash
three times.
Choose the appropriate method to signal a lane change based on the road and
traffic conditions.
Please see your Owner’s Manual for important safety information, system limitations, and additional
operating and feature information.
For more information, refer to the “Instruments and controls (section 2)” of your Owner’s Manual.
2
1
3
45
6
To view detailed instructional videos regarding these and other features, please go to www.nissanownersinfo.mobi.
Page 23 of 36
21
CRUISE CONTROL (if so equipped)
The cruise control system enables you to set
a constant cruising speed once the vehicle
has reached 25 mph (40 km/h). The system
will automatically maintain the set speed until
you tap the brake pedal, accelerate, cancel or
turn the system off.
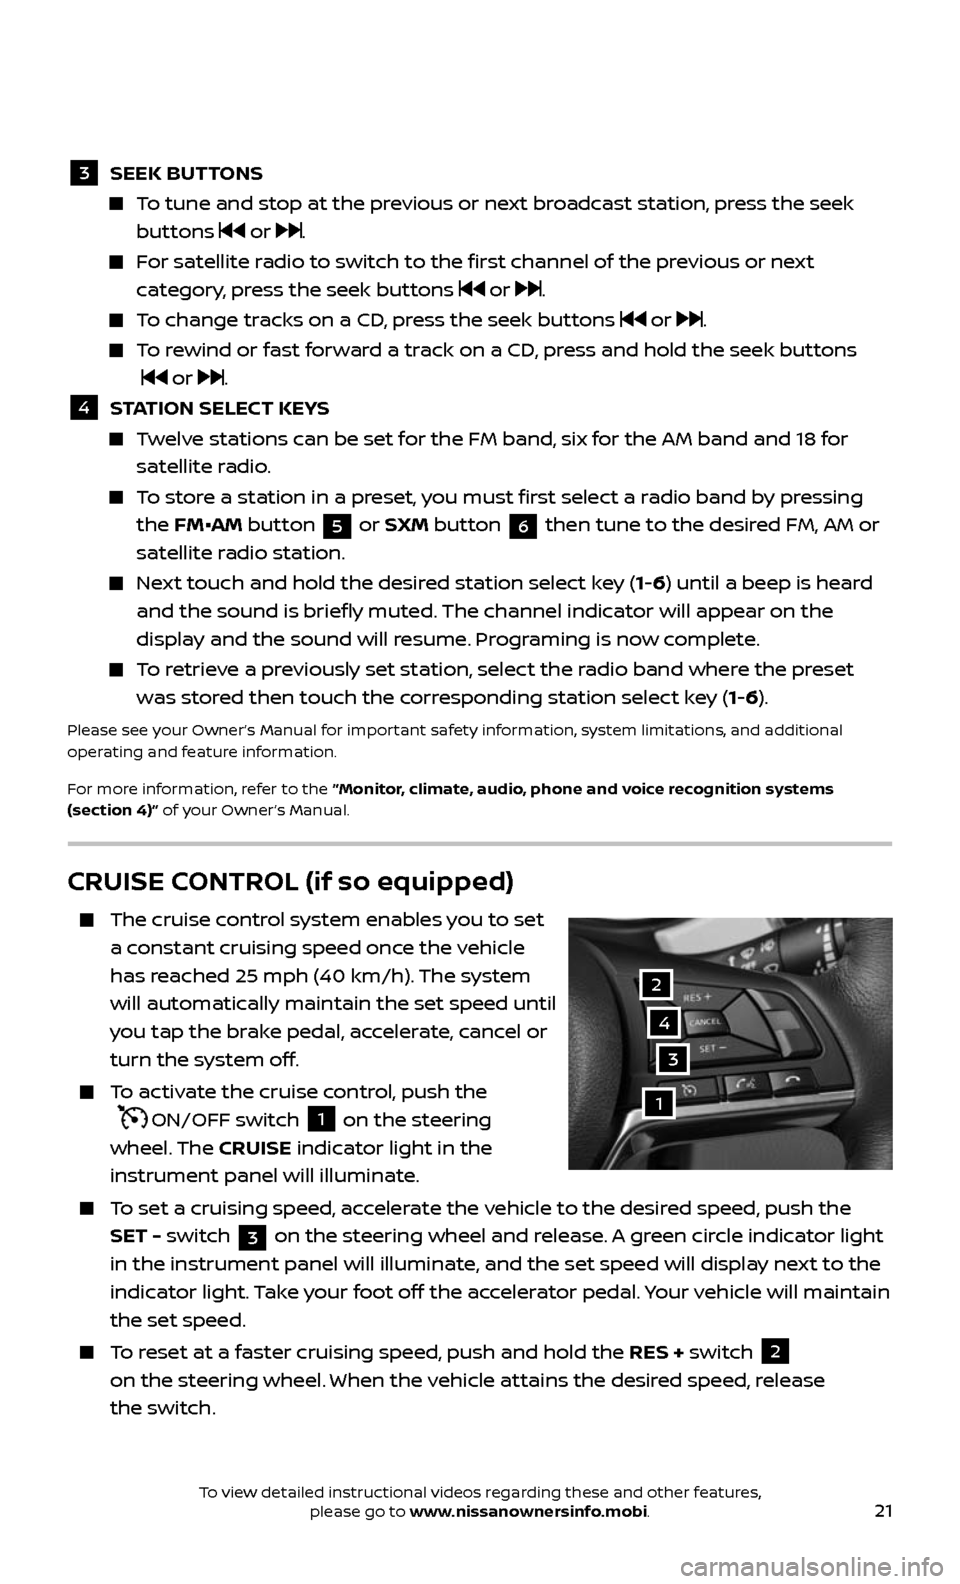
To activate the cruise control, push the
ON/OFF switch 1 on the steering
wheel. The CRUISE indicator light in the
instrument panel will illuminate.
To set a cruising speed, accelerate the vehicle to the desired speed, push the
SET - switch 3 on the steering wheel and release. A green circle indicator light
in the instrument panel will illuminate, and the set speed will display next to the
indicator light. Take your foot off the accelerator pedal. Your vehicle will maintain
the set speed.
To reset at a faster cruising speed, push and hold the RES + switch 2
on the steering wheel. When the vehicle attains the desired speed, release
the switch.
3
2
1
4
3 SEEK BUT TONS
To tune and stop at the previous or next broadcast station, press the seek
buttons or .
For satellite radio to switch to the first channel of the previous or next
category, press the seek buttons or .
To change tracks on a CD, press the seek buttons or .
To rewind or fast forward a track on a CD, press and hold the seek buttons
or .
4 STATION SELECT KEYS
Twelve stations can be set for the FM band, six for the AM band and 18 for
satellite radio.
To store a station in a preset, you must first select a radio band by pressing
the FM•AM button 5 or SXM button 6 then tune to the desired FM, AM or
satellite radio station.
Next touch and hold the desired station select key (1-6) until a beep is heard
and the sound is briefly muted. The channel indicator will appear on the
display and the sound will resume. Programing is now complete.
To retrieve a previously set station, select the radio band where the preset
was stored then touch the corresponding station select key (1-6).
Please see your Owner’s Manual for important safety information, system limitations, and additional
operating and feature information.
For more information, refer to the “Monitor, climate, audio, phone and voice recognition systems
(section 4)” of your Owner’s Manual.
To view detailed instructional videos regarding these and other features, please go to www.nissanownersinfo.mobi.
Page 24 of 36
22
INTELLIGENT CRUISE CONTROL (ICC) (if so equipped)
VEHICLE-TO-VEHICLE DISTANCE CONTROL MODE
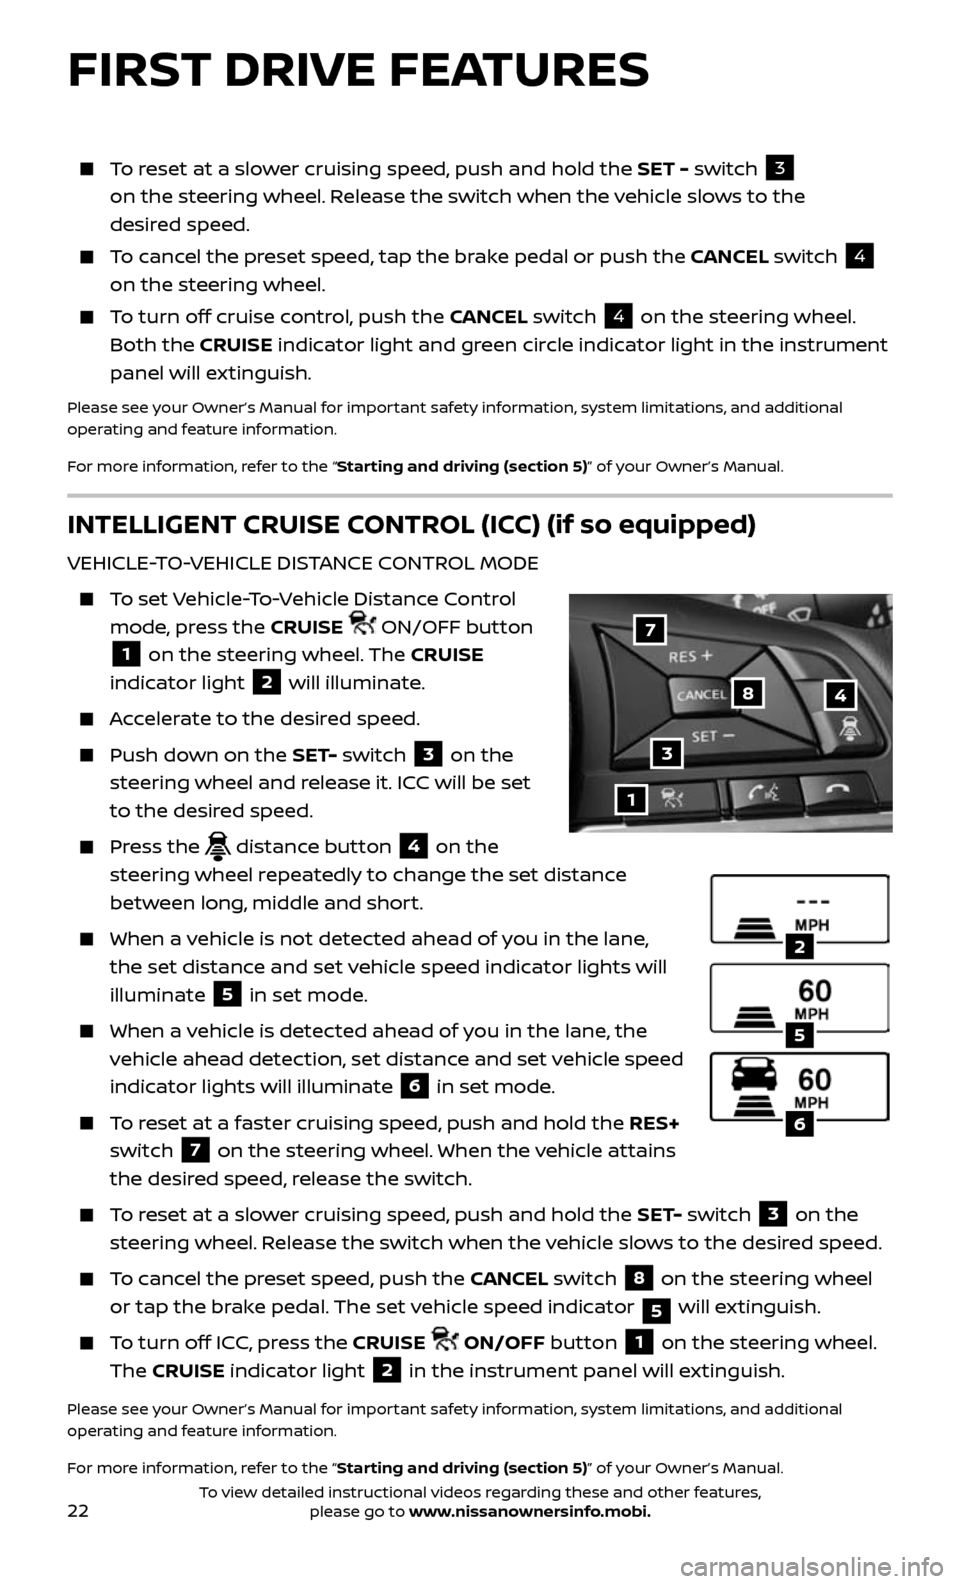
To set Vehicle-To-Vehicle Distance Control
mode, press the CRUISE ON/OFF button
1 on the steering wheel. The CRUISE
indicator light
2 will illuminate.
Accelerate to the desired speed.
Push down on the SET- switch 3 on the
steering wheel and release it. ICC will be set
to the desired speed.
Press the distance button 4 on the
steering wheel repeatedly to change the set distance
between long, middle and short.
When a v ehicle is not detected ahead of you in the lane,
the set distance and set vehicle speed indicator lights will
illuminate
5 in set mode.
When a vehicle is detected ahead of you in the lane, the
vehicle ahead detection, set distance and set vehicle speed
indicator lights will illuminate
6 in set mode.
To reset at a faster cruising speed, push and hold the RES+
switch
7 on the steering wheel. When the vehicle attains
the desired speed, release the switch.
To reset at a slower cruising speed, push and hold the SET- switch 3 on the
steering wheel. Release the switch when the vehicle slows to the desired speed.
To cancel the preset speed, push the CANCEL switch 8 on the steering wheel
or tap the brake pedal. The set vehicle speed indicator
5 will extinguish.
To turn off ICC, press the CRUISE ON/OFF button 1 on the steering wheel.
The CRUISE indicator light
2 in the instrument panel will extinguish.
Please see your Owner’s Manual for important safety information, system limitations, and additional
operating and feature information.
For more information, refer to the “Starting and driving (section 5)” of your Owner’s Manual.
1
48
7
3
2
5
6
FIRST DRIVE FEATURES
To reset at a slower cruising speed, push and hold the SET - switch 3
on the steering wheel. Release the switch when the vehicle slows to the
desired speed.
To cancel the preset speed, tap the brake pedal or push the CANCEL switch 4
on the steering wheel.
To turn off cruise control, push the CANCEL switch 4 on the steering wheel.
Both the CRUISE indicator light and green circle indicator light in the instrument
panel will extinguish.
Please see your Owner’s Manual for important safety information, system limitations, and additional
operating and feature information.
For more information, refer to the “Starting and driving (section 5)” of your Owner’s Manual.
To view detailed instructional videos regarding these and other features, please go to www.nissanownersinfo.mobi.