2017 NISSAN QUEST transmission
[x] Cancel search: transmissionPage 17 of 520
0-8Illustrated table of contents
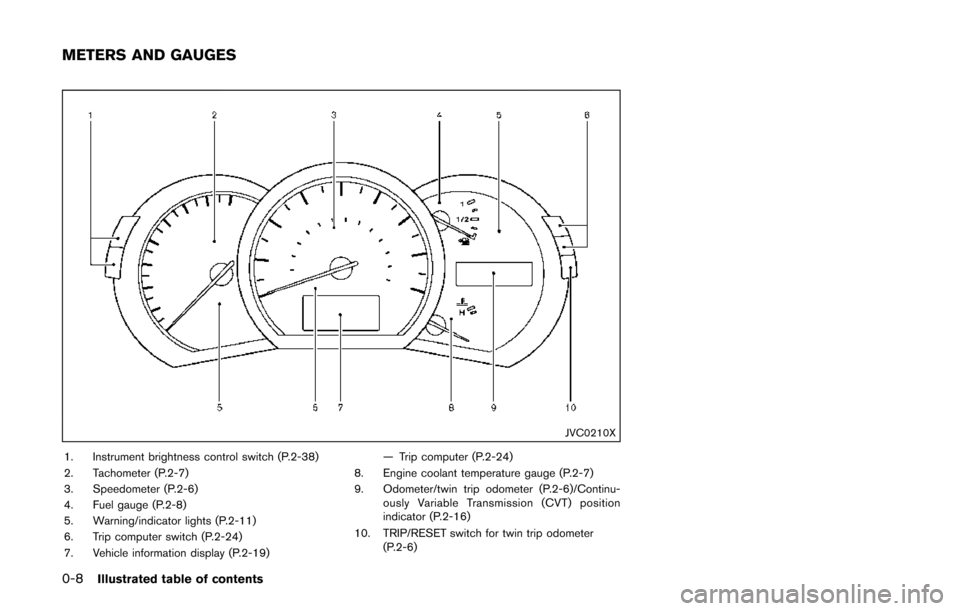
JVC0210X
1. Instrument brightness control switch (P.2-38)
2. Tachometer (P.2-7)
3. Speedometer (P.2-6)
4. Fuel gauge (P.2-8)
5. Warning/indicator lights (P.2-11)
6. Trip computer switch (P.2-24)
7. Vehicle information display (P.2-19)— Trip computer (P.2-24)
8. Engine coolant temperature gauge (P.2-7)
9. Odometer/twin trip odometer (P.2-6)/Continu- ously Variable Transmission (CVT) position
indicator (P.2-16)
10. TRIP/RESET switch for twin trip odometer (P.2-6)
METERS AND GAUGES
Page 22 of 520
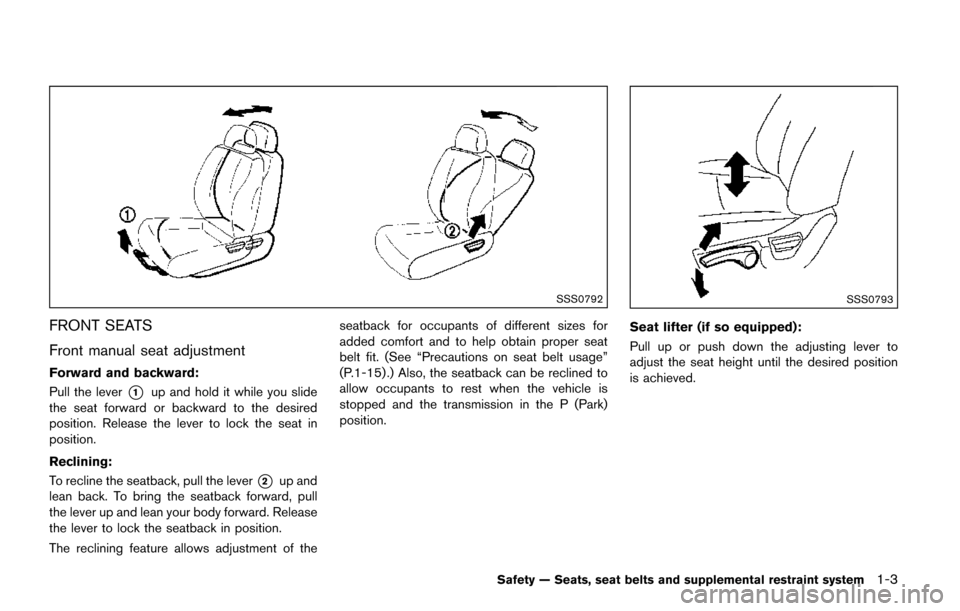
SSS0792
FRONT SEATS
Front manual seat adjustment
Forward and backward:
Pull the lever
*1up and hold it while you slide
the seat forward or backward to the desired
position. Release the lever to lock the seat in
position.
Reclining:
To recline the seatback, pull the lever
*2up and
lean back. To bring the seatback forward, pull
the lever up and lean your body forward. Release
the lever to lock the seatback in position.
The reclining feature allows adjustment of the seatback for occupants of different sizes for
added comfort and to help obtain proper seat
belt fit. (See “Precautions on seat belt usage”
(P.1-15) .) Also, the seatback can be reclined to
allow occupants to rest when the vehicle is
stopped and the transmission in the P (Park)
position.
SSS0793
Seat lifter (if so equipped):
Pull up or push down the adjusting lever to
adjust the seat height until the desired position
is achieved.
Safety — Seats, seat belts and supplemental restraint system1-3
Page 23 of 520
1-4Safety — Seats, seat belts and supplemental restraint system
Front power seat adjustment
Operating tips:
.The power seat motor has an auto-reset
overload protection circuit. If the motor
stops during operation, wait 30 seconds,
then reactivate the switch.
. Do not operate the power seat switch for a
long period of time when the engine is off.
This will discharge the battery.
See “Automatic drive positioner” (P.3-36) for the
seat position memory function (if so equipped) .
CAUTION
When adjusting the seat positions, be
sure not to contact any moving parts to
avoid possible injuries and/or da-
mages.
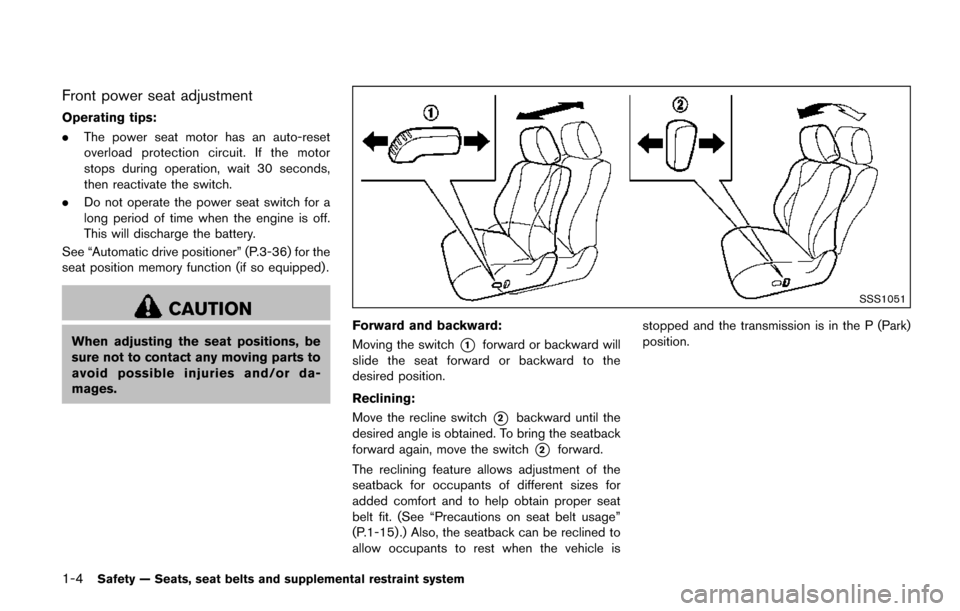
SSS1051
Forward and backward:
Moving the switch
*1forward or backward will
slide the seat forward or backward to the
desired position.
Reclining:
Move the recline switch
*2backward until the
desired angle is obtained. To bring the seatback
forward again, move the switch
*2forward.
The reclining feature allows adjustment of the
seatback for occupants of different sizes for
added comfort and to help obtain proper seat
belt fit. (See “Precautions on seat belt usage”
(P.1-15) .) Also, the seatback can be reclined to
allow occupants to rest when the vehicle is stopped and the transmission is in the P (Park)
position.
Page 25 of 520
1-6Safety — Seats, seat belts and supplemental restraint system
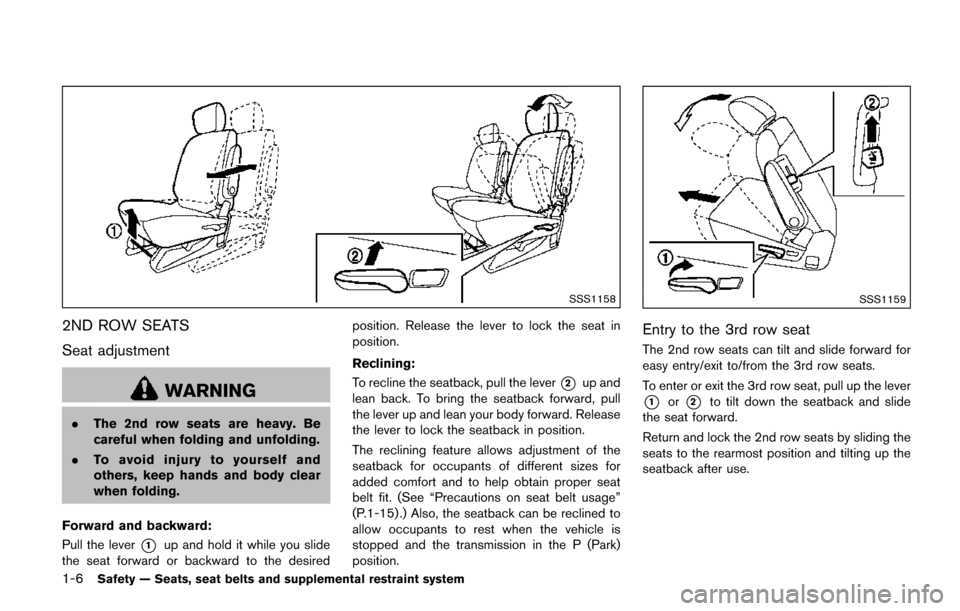
SSS1158
2ND ROW SEATS
Seat adjustment
WARNING
.The 2nd row seats are heavy. Be
careful when folding and unfolding.
. To avoid injury to yourself and
others, keep hands and body clear
when folding.
Forward and backward:
Pull the lever
*1up and hold it while you slide
the seat forward or backward to the desired position. Release the lever to lock the seat in
position.
Reclining:
To recline the seatback, pull the lever
*2up and
lean back. To bring the seatback forward, pull
the lever up and lean your body forward. Release
the lever to lock the seatback in position.
The reclining feature allows adjustment of the
seatback for occupants of different sizes for
added comfort and to help obtain proper seat
belt fit. (See “Precautions on seat belt usage”
(P.1-15) .) Also, the seatback can be reclined to
allow occupants to rest when the vehicle is
stopped and the transmission in the P (Park)
position.
SSS1159
Entry to the 3rd row seat
The 2nd row seats can tilt and slide forward for
easy entry/exit to/from the 3rd row seats.
To enter or exit the 3rd row seat, pull up the lever
*1or*2to tilt down the seatback and slide
the seat forward.
Return and lock the 2nd row seats by sliding the
seats to the rearmost position and tilting up the
seatback after use.
Page 92 of 520
JVC0210X
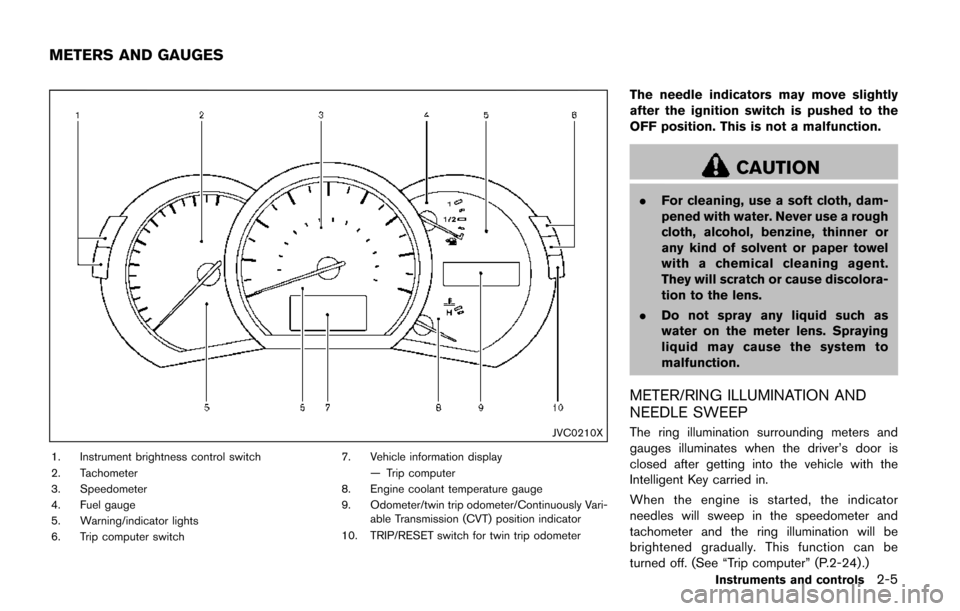
1. Instrument brightness control switch
2. Tachometer
3. Speedometer
4. Fuel gauge
5. Warning/indicator lights
6. Trip computer switch7. Vehicle information display
— Trip computer
8. Engine coolant temperature gauge
9. Odometer/twin trip odometer/Continuously Vari- able Transmission (CVT) position indicator
10. TRIP/RESET switch for twin trip odometer
The needle indicators may move slightly
after the ignition switch is pushed to the
OFF position. This is not a malfunction.
CAUTION
. For cleaning, use a soft cloth, dam-
pened with water. Never use a rough
cloth, alcohol, benzine, thinner or
any kind of solvent or paper towel
with a chemical cleaning agent.
They will scratch or cause discolora-
tion to the lens.
. Do not spray any liquid such as
water on the meter lens. Spraying
liquid may cause the system to
malfunction.
METER/RING ILLUMINATION AND
NEEDLE SWEEP
The ring illumination surrounding meters and
gauges illuminates when the driver’s door is
closed after getting into the vehicle with the
Intelligent Key carried in.
When the engine is started, the indicator
needles will sweep in the speedometer and
tachometer and the ring illumination will be
brightened gradually. This function can be
turned off. (See “Trip computer” (P.2-24) .)
Instruments and controls2-5
METERS AND GAUGES
Page 98 of 520
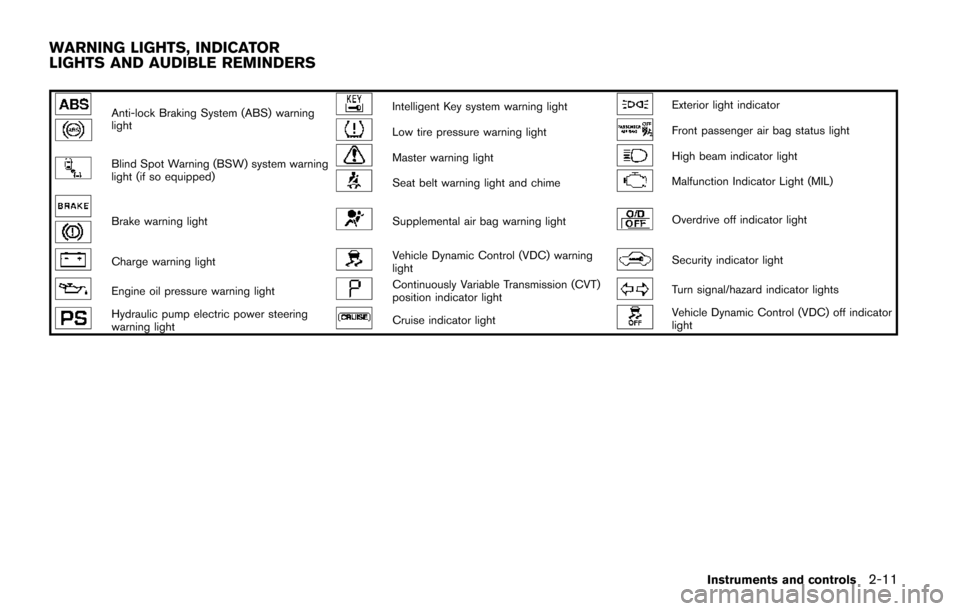
Anti-lock Braking System (ABS) warning
lightIntelligent Key system warning lightExterior light indicator
Low tire pressure warning lightFront passenger air bag status light
Blind Spot Warning (BSW) system warning
light (if so equipped)Master warning lightHigh beam indicator light
Seat belt warning light and chimeMalfunction Indicator Light (MIL)
Brake warning lightSupplemental air bag warning lightOverdrive off indicator light
Charge warning lightVehicle Dynamic Control (VDC) warning
lightSecurity indicator light
Engine oil pressure warning lightContinuously Variable Transmission (CVT)
position indicator lightTurn signal/hazard indicator lights
Hydraulic pump electric power steering
warning lightCruise indicator lightVehicle Dynamic Control (VDC) off indicator
light
Instruments and controls2-11
WARNING LIGHTS, INDICATOR
LIGHTS AND AUDIBLE REMINDERS
Page 104 of 520
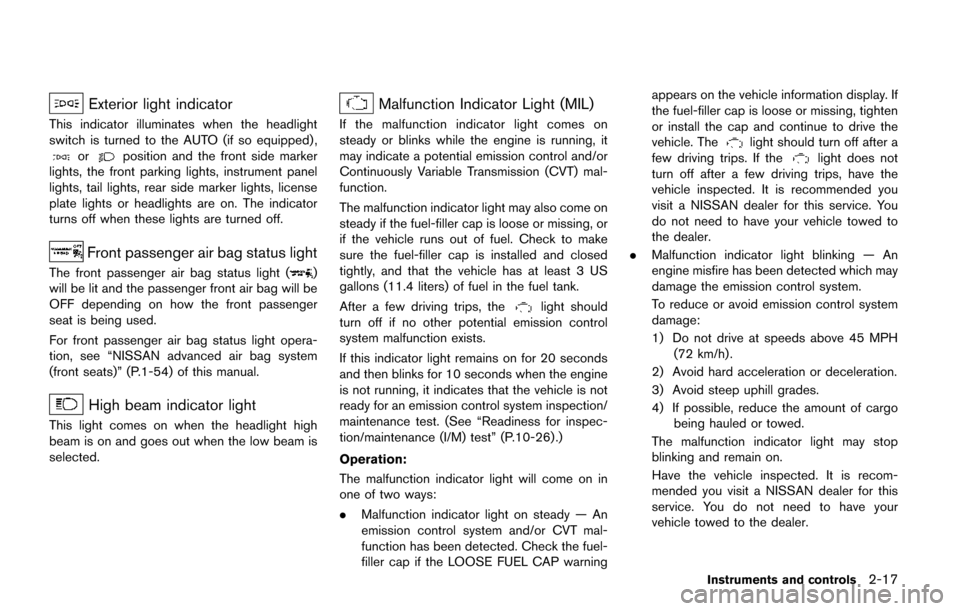
Exterior light indicator
This indicator illuminates when the headlight
switch is turned to the AUTO (if so equipped) ,
orposition and the front side marker
lights, the front parking lights, instrument panel
lights, tail lights, rear side marker lights, license
plate lights or headlights are on. The indicator
turns off when these lights are turned off.
Front passenger air bag status light
The front passenger air bag status light ()
will be lit and the passenger front air bag will be
OFF depending on how the front passenger
seat is being used.
For front passenger air bag status light opera-
tion, see “NISSAN advanced air bag system
(front seats)” (P.1-54) of this manual.
High beam indicator light
This light comes on when the headlight high
beam is on and goes out when the low beam is
selected.
Malfunction Indicator Light (MIL)
If the malfunction indicator light comes on
steady or blinks while the engine is running, it
may indicate a potential emission control and/or
Continuously Variable Transmission (CVT) mal-
function.
The malfunction indicator light may also come on
steady if the fuel-filler cap is loose or missing, or
if the vehicle runs out of fuel. Check to make
sure the fuel-filler cap is installed and closed
tightly, and that the vehicle has at least 3 US
gallons (11.4 liters) of fuel in the fuel tank.
After a few driving trips, the
light should
turn off if no other potential emission control
system malfunction exists.
If this indicator light remains on for 20 seconds
and then blinks for 10 seconds when the engine
is not running, it indicates that the vehicle is not
ready for an emission control system inspection/
maintenance test. (See “Readiness for inspec-
tion/maintenance (I/M) test” (P.10-26) .)
Operation:
The malfunction indicator light will come on in
one of two ways:
. Malfunction indicator light on steady — An
emission control system and/or CVT mal-
function has been detected. Check the fuel-
filler cap if the LOOSE FUEL CAP warning appears on the vehicle information display. If
the fuel-filler cap is loose or missing, tighten
or install the cap and continue to drive the
vehicle. The
light should turn off after a
few driving trips. If thelight does not
turn off after a few driving trips, have the
vehicle inspected. It is recommended you
visit a NISSAN dealer for this service. You
do not need to have your vehicle towed to
the dealer.
. Malfunction indicator light blinking — An
engine misfire has been detected which may
damage the emission control system.
To reduce or avoid emission control system
damage:
1) Do not drive at speeds above 45 MPH
(72 km/h) .
2) Avoid hard acceleration or deceleration.
3) Avoid steep uphill grades.
4) If possible, reduce the amount of cargo being hauled or towed.
The malfunction indicator light may stop
blinking and remain on.
Have the vehicle inspected. It is recom-
mended you visit a NISSAN dealer for this
service. You do not need to have your
vehicle towed to the dealer.
Instruments and controls2-17
Page 105 of 520
2-18Instruments and controls
CAUTION
Continued vehicle operation without
having the emission control system
and/or CVT system checked and re-
paired as necessary could lead to poor
driveability, reduced fuel economy, and
possible damage to the emission con-
trol system.
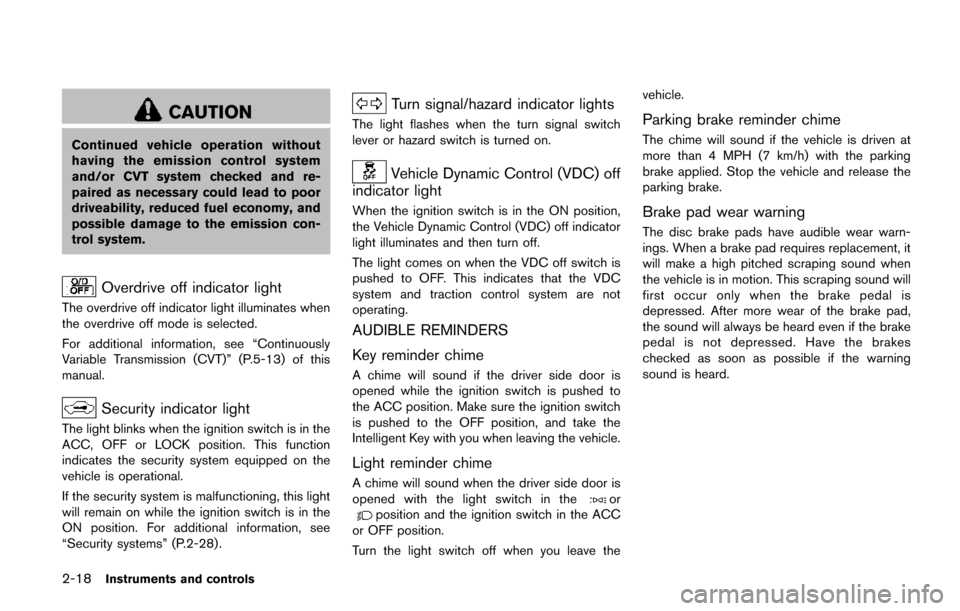
Overdrive off indicator light
The overdrive off indicator light illuminates when
the overdrive off mode is selected.
For additional information, see “Continuously
Variable Transmission (CVT)” (P.5-13) of this
manual.
Security indicator light
The light blinks when the ignition switch is in the
ACC, OFF or LOCK position. This function
indicates the security system equipped on the
vehicle is operational.
If the security system is malfunctioning, this light
will remain on while the ignition switch is in the
ON position. For additional information, see
“Security systems” (P.2-28) .
Turn signal/hazard indicator lights
The light flashes when the turn signal switch
lever or hazard switch is turned on.
Vehicle Dynamic Control (VDC) off
indicator light
When the ignition switch is in the ON position,
the Vehicle Dynamic Control (VDC) off indicator
light illuminates and then turn off.
The light comes on when the VDC off switch is
pushed to OFF. This indicates that the VDC
system and traction control system are not
operating.
AUDIBLE REMINDERS
Key reminder chime
A chime will sound if the driver side door is
opened while the ignition switch is pushed to
the ACC position. Make sure the ignition switch
is pushed to the OFF position, and take the
Intelligent Key with you when leaving the vehicle.
Light reminder chime
A chime will sound when the driver side door is
opened with the light switch in theorposition and the ignition switch in the ACC
or OFF position.
Turn the light switch off when you leave the vehicle.
Parking brake reminder chime
The chime will sound if the vehicle is driven at
more than 4 MPH (7 km/h) with the parking
brake applied. Stop the vehicle and release the
parking brake.
Brake pad wear warning
The disc brake pads have audible wear warn-
ings. When a brake pad requires replacement, it
will make a high pitched scraping sound when
the vehicle is in motion. This scraping sound will
first occur only when the brake pedal is
depressed. After more wear of the brake pad,
the sound will always be heard even if the brake
pedal is not depressed. Have the brakes
checked as soon as possible if the warning
sound is heard.