2017 NISSAN QUEST door lock
[x] Cancel search: door lockPage 177 of 520
3-26Pre-driving checks and adjustments
WARNING
.Always be sure the liftgate has been
closed securely to prevent it from
opening while driving.
. Do not drive with the liftgate open.
This could allow dangerous exhaust
gases to be drawn into the vehicle.
See “Exhaust gas (carbon monox-
ide)” (P.5-2) of this manual.
. Do not leave children unattended
inside the vehicle. They could un-
knowingly activate switches or con-
trols. Unattended children could
become involved in serious acci-
dents.
. Always be sure that hands and feet
are clear of the gate frame to avoid
injury while closing the liftgate.
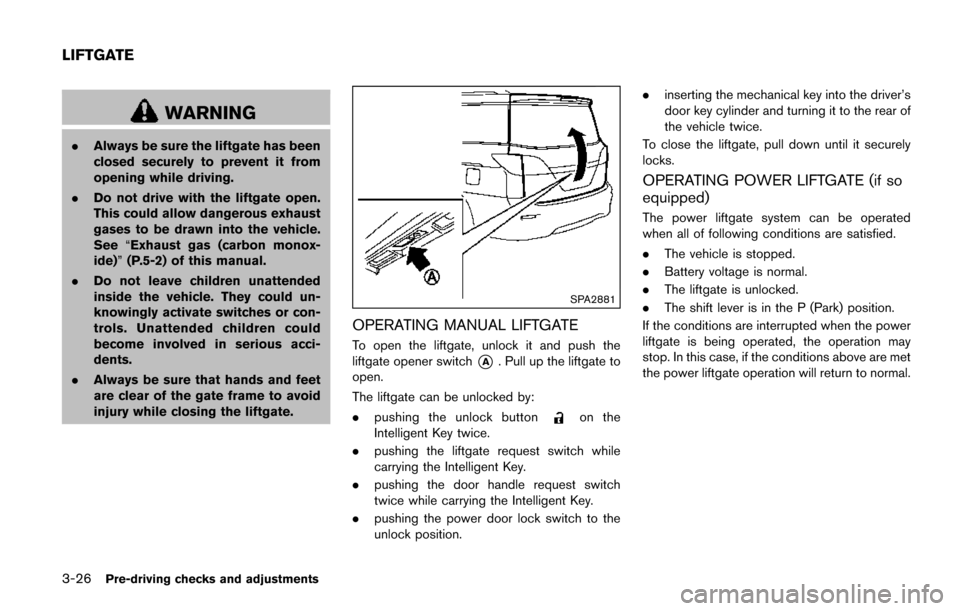
SPA2881
OPERATING MANUAL LIFTGATE
To open the liftgate, unlock it and push the
liftgate opener switch
*A. Pull up the liftgate to
open.
The liftgate can be unlocked by:
. pushing the unlock button
on the
Intelligent Key twice.
. pushing the liftgate request switch while
carrying the Intelligent Key.
. pushing the door handle request switch
twice while carrying the Intelligent Key.
. pushing the power door lock switch to the
unlock position. .
inserting the mechanical key into the driver’s
door key cylinder and turning it to the rear of
the vehicle twice.
To close the liftgate, pull down until it securely
locks.
OPERATING POWER LIFTGATE (if so
equipped)
The power liftgate system can be operated
when all of following conditions are satisfied.
. The vehicle is stopped.
. Battery voltage is normal.
. The liftgate is unlocked.
. The shift lever is in the P (Park) position.
If the conditions are interrupted when the power
liftgate is being operated, the operation may
stop. In this case, if the conditions above are met
the power liftgate operation will return to normal.
LIFTGATE
Page 179 of 520
3-28Pre-driving checks and adjustments
Power open
When the liftgate is fully closed, the liftgate will
fully open automatically by:
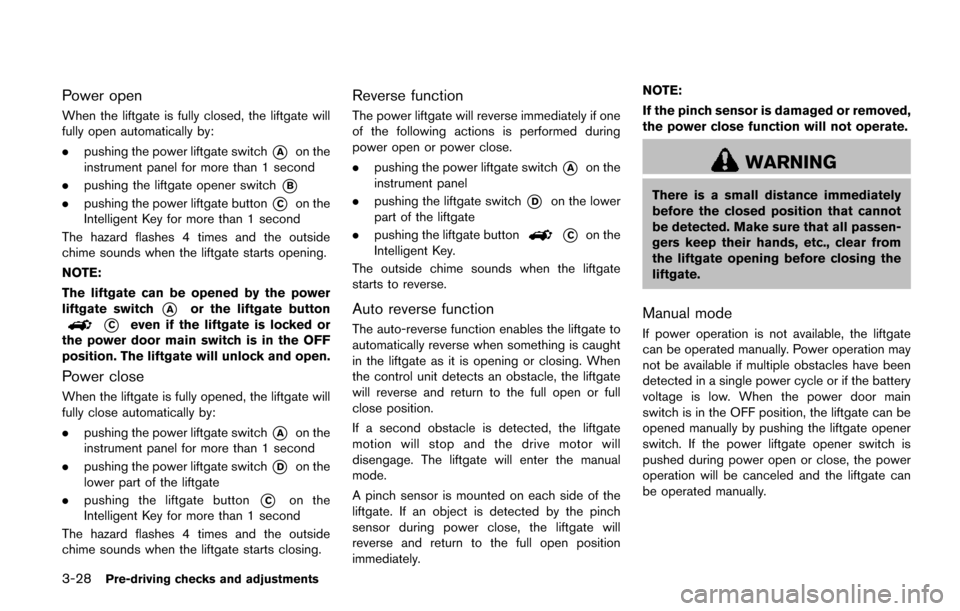
.pushing the power liftgate switch
*Aon the
instrument panel for more than 1 second
. pushing the liftgate opener switch
*B
.pushing the power liftgate button*Con the
Intelligent Key for more than 1 second
The hazard flashes 4 times and the outside
chime sounds when the liftgate starts opening.
NOTE:
The liftgate can be opened by the power
liftgate switch
*Aor the liftgate button
*Ceven if the liftgate is locked or
the power door main switch is in the OFF
position. The liftgate will unlock and open.
Power close
When the liftgate is fully opened, the liftgate will
fully close automatically by:
. pushing the power liftgate switch
*Aon the
instrument panel for more than 1 second
. pushing the power liftgate switch
*Don the
lower part of the liftgate
. pushing the liftgate button
*Con the
Intelligent Key for more than 1 second
The hazard flashes 4 times and the outside
chime sounds when the liftgate starts closing.
Reverse function
The power liftgate will reverse immediately if one
of the following actions is performed during
power open or power close.
. pushing the power liftgate switch
*Aon the
instrument panel
. pushing the liftgate switch
*Don the lower
part of the liftgate
. pushing the liftgate button
*Con the
Intelligent Key.
The outside chime sounds when the liftgate
starts to reverse.
Auto reverse function
The auto-reverse function enables the liftgate to
automatically reverse when something is caught
in the liftgate as it is opening or closing. When
the control unit detects an obstacle, the liftgate
will reverse and return to the full open or full
close position.
If a second obstacle is detected, the liftgate
motion will stop and the drive motor will
disengage. The liftgate will enter the manual
mode.
A pinch sensor is mounted on each side of the
liftgate. If an object is detected by the pinch
sensor during power close, the liftgate will
reverse and return to the full open position
immediately. NOTE:
If the pinch sensor is damaged or removed,
the power close function will not operate.
WARNING
There is a small distance immediately
before the closed position that cannot
be detected. Make sure that all passen-
gers keep their hands, etc., clear from
the liftgate opening before closing the
liftgate.
Manual mode
If power operation is not available, the liftgate
can be operated manually. Power operation may
not be available if multiple obstacles have been
detected in a single power cycle or if the battery
voltage is low. When the power door main
switch is in the OFF position, the liftgate can be
opened manually by pushing the liftgate opener
switch. If the power liftgate opener switch is
pushed during power open or close, the power
operation will be canceled and the liftgate can
be operated manually.
Page 187 of 520
3-36Pre-driving checks and adjustments
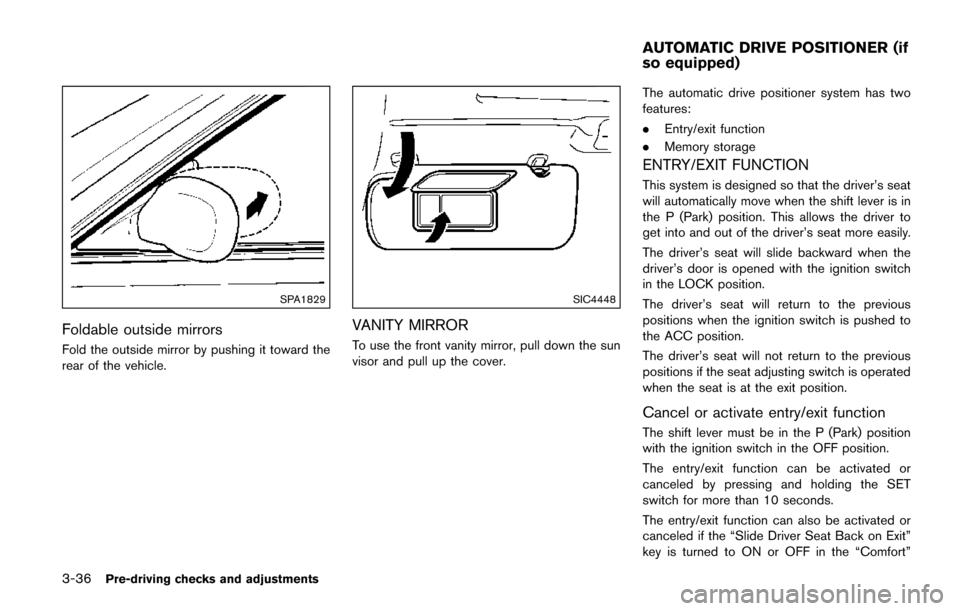
SPA1829
Foldable outside mirrors
Fold the outside mirror by pushing it toward the
rear of the vehicle.
SIC4448
VANITY MIRROR
To use the front vanity mirror, pull down the sun
visor and pull up the cover.The automatic drive positioner system has two
features:
.
Entry/exit function
. Memory storage
ENTRY/EXIT FUNCTION
This system is designed so that the driver’s seat
will automatically move when the shift lever is in
the P (Park) position. This allows the driver to
get into and out of the driver’s seat more easily.
The driver’s seat will slide backward when the
driver’s door is opened with the ignition switch
in the LOCK position.
The driver’s seat will return to the previous
positions when the ignition switch is pushed to
the ACC position.
The driver’s seat will not return to the previous
positions if the seat adjusting switch is operated
when the seat is at the exit position.
Cancel or activate entry/exit function
The shift lever must be in the P (Park) position
with the ignition switch in the OFF position.
The entry/exit function can be activated or
canceled by pressing and holding the SET
switch for more than 10 seconds.
The entry/exit function can also be activated or
canceled if the “Slide Driver Seat Back on Exit”
key is turned to ON or OFF in the “Comfort”
AUTOMATIC DRIVE POSITIONER (if
so equipped)
Page 188 of 520
settings. (See “Vehicle information and settings
(models with center multi-function control pa-
nel)” (P.4-10) .)
Initialize entry/exit function
If the battery cable is disconnected, or if the fuse
opens, the entry/exit function will not work
though this function was set on before. In such
a case, after connecting the battery or replacing
with a new fuse, open and close the driver’s
door more than two times after the ignition
switch is placed in the LOCK position from the
ON position. The entry/exit function will be
activated.
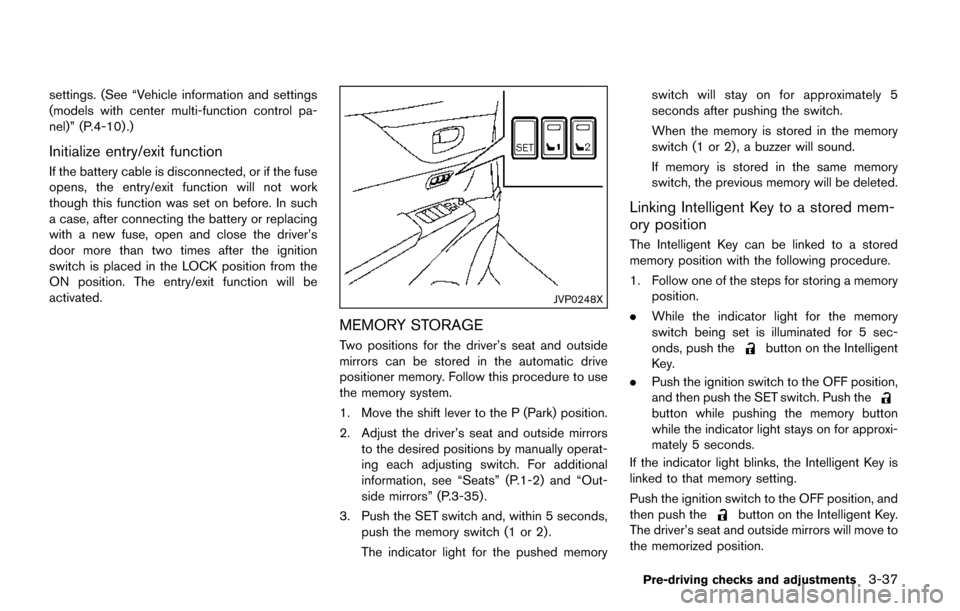
JVP0248X
MEMORY STORAGE
Two positions for the driver’s seat and outside
mirrors can be stored in the automatic drive
positioner memory. Follow this procedure to use
the memory system.
1. Move the shift lever to the P (Park) position.
2. Adjust the driver’s seat and outside mirrorsto the desired positions by manually operat-
ing each adjusting switch. For additional
information, see “Seats” (P.1-2) and “Out-
side mirrors” (P.3-35) .
3. Push the SET switch and, within 5 seconds, push the memory switch (1 or 2) .
The indicator light for the pushed memory switch will stay on for approximately 5
seconds after pushing the switch.
When the memory is stored in the memory
switch (1 or 2) , a buzzer will sound.
If memory is stored in the same memory
switch, the previous memory will be deleted.
Linking Intelligent Key to a stored mem-
ory position
The Intelligent Key can be linked to a stored
memory position with the following procedure.
1. Follow one of the steps for storing a memory
position.
. While the indicator light for the memory
switch being set is illuminated for 5 sec-
onds, push the
button on the Intelligent
Key.
. Push the ignition switch to the OFF position,
and then push the SET switch. Push the
button while pushing the memory button
while the indicator light stays on for approxi-
mately 5 seconds.
If the indicator light blinks, the Intelligent Key is
linked to that memory setting.
Push the ignition switch to the OFF position, and
then push the
button on the Intelligent Key.
The driver’s seat and outside mirrors will move to
the memorized position.
Pre-driving checks and adjustments3-37
Page 209 of 520
4-20Monitor, heater, air conditioner, audio, phone and voice recognition systems
When any mode button is pushed with the
screen off, the screen turns on for further
operation. The screen will turn off automatically
5 seconds after the operation is finished.
To turn on the screen, set this item to the ON
position, or push and hold the “
OFF”
button.
. Brightness/Contrast/Background Color
To adjust the brightness and contrast of the
screen, select the “Brightness” or “Contrast”
key.
Then, you can adjust the brightness and the
contrast using the multi-function controller.
For information on the “Background Color” key,
refer to the separate Navigation System Own-
er’s Manual.
Color Theme:
Choose the theme color of the menu screen.
SAA2488
Models with navigation system
JVH0182MModels without navigation system
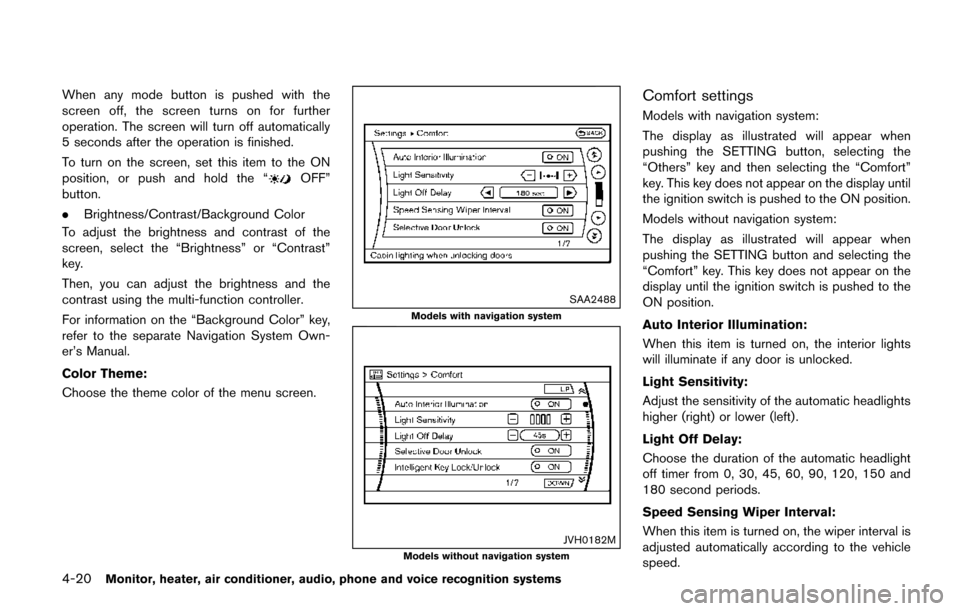
Comfort settings
Models with navigation system:
The display as illustrated will appear when
pushing the SETTING button, selecting the
“Others” key and then selecting the “Comfort”
key. This key does not appear on the display until
the ignition switch is pushed to the ON position.
Models without navigation system:
The display as illustrated will appear when
pushing the SETTING button and selecting the
“Comfort” key. This key does not appear on the
display until the ignition switch is pushed to the
ON position.
Auto Interior Illumination:
When this item is turned on, the interior lights
will illuminate if any door is unlocked.
Light Sensitivity:
Adjust the sensitivity of the automatic headlights
higher (right) or lower (left) .
Light Off Delay:
Choose the duration of the automatic headlight
off timer from 0, 30, 45, 60, 90, 120, 150 and
180 second periods.
Speed Sensing Wiper Interval:
When this item is turned on, the wiper interval is
adjusted automatically according to the vehicle
speed.
Page 210 of 520
Slide Driver Seat Back on Exit (if so
equipped):
When this item is turned on, the driver’s seat
moves backward for easy exit if the ignition
switch is in the OFF position and the driver’s
door is opened. After getting into the vehicle and
pushing the ignition switch to the ACC position,
the driver’s seat moves to the previous position.
Selective Door Unlock:
When this item is turned on, only the driver’s
door is unlocked first after the door unlock
operation. When the door handle request switch
on the driver’s or front passenger’s side door is
pushed to be unlocked, only the corresponding
door is unlocked first. All the doors can be
unlocked if the door unlock operation is per-
formed again within 60 seconds.
When this item is turned off, all the doors will be
unlocked after the door unlock operation is
performed once.
Intelligent Key Lock/Unlock:
When this item is turned on, door lock/unlock
function by pushing the door handle request
switch will be activated.
Return All Settings to Default:
Select this item and then select “YES” to return
all settings to the default.
SAA2487
Models with navigation system
SAA3675Models without navigation system
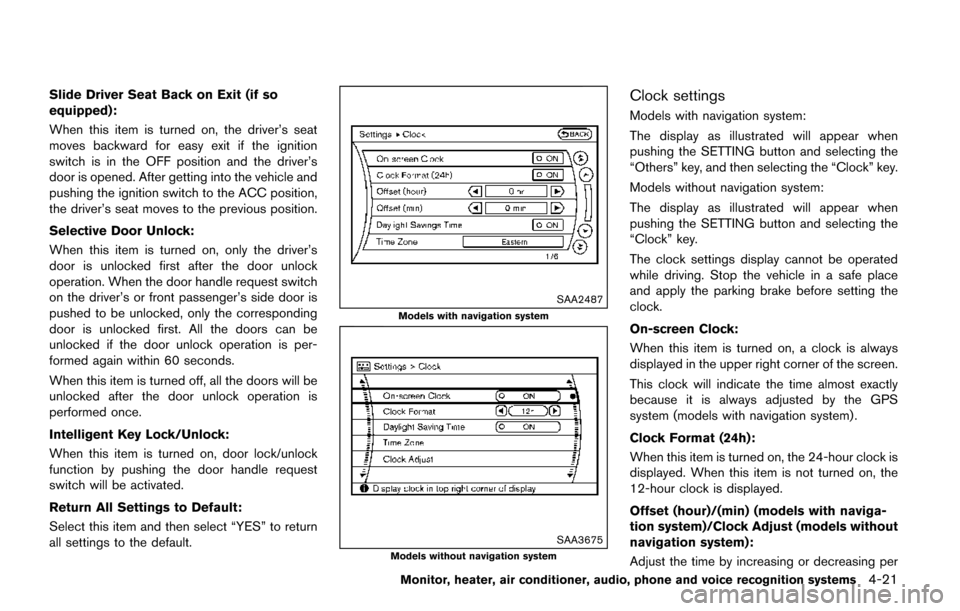
Clock settings
Models with navigation system:
The display as illustrated will appear when
pushing the SETTING button and selecting the
“Others” key, and then selecting the “Clock” key.
Models without navigation system:
The display as illustrated will appear when
pushing the SETTING button and selecting the
“Clock” key.
The clock settings display cannot be operated
while driving. Stop the vehicle in a safe place
and apply the parking brake before setting the
clock.
On-screen Clock:
When this item is turned on, a clock is always
displayed in the upper right corner of the screen.
This clock will indicate the time almost exactly
because it is always adjusted by the GPS
system (models with navigation system) .
Clock Format (24h):
When this item is turned on, the 24-hour clock is
displayed. When this item is not turned on, the
12-hour clock is displayed.
Offset (hour)/(min) (models with naviga-
tion system)/Clock Adjust (models without
navigation system):
Adjust the time by increasing or decreasing per
Monitor, heater, air conditioner, audio, phone and voice recognition systems4-21
Page 251 of 520
4-62Monitor, heater, air conditioner, audio, phone and voice recognition systems
Static and flutter: During signal interference from
buildings, large hills or due to antenna position,
usually in conjunction with increased distance
from the station transmitter, static or flutter can
be heard. This can be reduced by lowering the
treble setting to reduce the treble response.
Multipath reception: Because of the reflective
characteristics of FM signals, direct and re-
flected signals reach the receiver at the same
time. The signals may cancel each other,
resulting in momentary flutter or loss of sound.
AM radio reception:
AM signals, because of their low frequency, can
bend around objects and skip along the ground.
In addition, the signals can be bounced off the
ionosphere and bent back to earth. Because of
these characteristics. AM signals are also
subject to interference as they travel from
transmitter to receiver.
Fading: Occurs while the vehicle is passing
through freeway underpasses or in areas with
many tall buildings. It can also occur for several
seconds during ionospheric turbulence even in
areas where no obstacles exist.
Static: Caused by thunderstorms, electrical
power lines, electric signs and even traffic lights.Satellite radio reception (if so equipped):
When the satellite radio is used for the first time
or the battery has been replaced, the satellite
radio may not work properly. This is not a
malfunction. Wait more than 10 minutes with the
satellite radio ON and the vehicle outside of any
metal or large building for the satellite radio to
receive all of the necessary data.
The satellite radio mode requires an active
SiriusXM Satellite Radio subscription. The sa-
tellite radio is not available in Alaska, Hawaii and
Guam.
The satellite radio performance may be affected
if cargo carried on the roof blocks the satellite
radio signal.
If possible, do not put cargo near the satellite
antenna.
A build up of ice on the satellite radio antenna
can affect satellite radio performance. Remove
the ice to restore satellite radio reception.
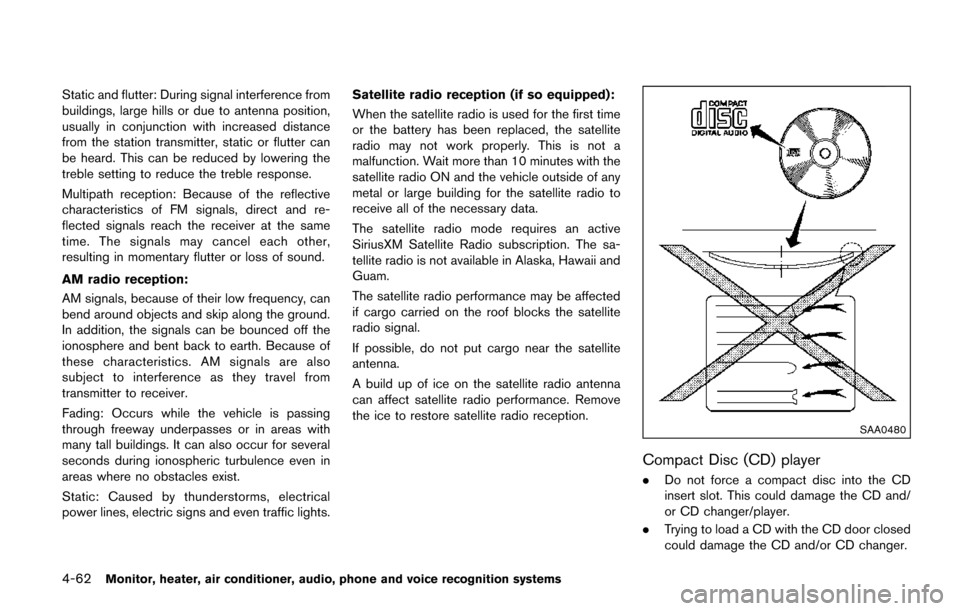
SAA0480
Compact Disc (CD) player
.
Do not force a compact disc into the CD
insert slot. This could damage the CD and/
or CD changer/player.
. Trying to load a CD with the CD door closed
could damage the CD and/or CD changer.
Page 332 of 520
Training procedure
1. Position the vehicle in a reasonably quietoutdoor location.
2. Sit in the driver’s seat with the engine running, the parking brake on, and the
transmission in Park.
3. Press and hold the
button for more than
5 seconds.
4. The system announces: “Press the PHONE SEND (
) button for the hands-free
phone system to enter the speaker adapta-
tion mode or press the PHONE END (
)
button to select a different language.”
5. Press the
button.
For information on selecting a different
language, see “Choosing a language” (P.4-
137) .
6. If the connected phone is already in use, the system will prompt you to overwrite. Follow
the instructions provided by the system.
7. When preparation is complete and you are ready to begin, press the
button.
8. The SA mode will be explained. Follow the instructions provided by the system.
9. When training is finished, the system will tell you an adequate number of phrases have
been recorded. 10. The system will announce that speaker
adaptation has been completed and the
system is ready.
The SA mode will stop if:
. The
button is pressed for more than 5
seconds in SA mode.
. The vehicle is driven during SA mode.
. The ignition switch is turned to the OFF or
LOCK position.
Training phrases
During the SA mode, the system instructs you to
say the following phrases.
(The system will prompt you for each phrase.)
.phonebook transfer entry
. dial 3 0 4 2 9
. delete call back number
. Incoming
. Transfer entry
. 8 pause 9 3 2 pause 7
. delete all entries
. call 7 2409
. phonebook delete entry
. next entry
. dial star 2 1 7 0
. yes .
no
. select
. Missed
. dial 8 5 6 9 2
. Bluetooth on
. Outgoing
. call 3 1 9 0 2
. 9 7 pause pause 3 0 8
. cancel
. call back number
. call star 2 0 9 5
. delete phone
. dial 8 3 0 5 1
. Record Name
. 4 3 pause 2 9 pause 0
. delete redial number
. phonebook list names
. call 8 0 5 4 1
. correction
. connect phone
. dial 7 4 0 1 8
. previous entry
. delete
. dial 9 7 2 6 6
. call 7 6 3 0 1
Monitor, heater, air conditioner, audio, phone and voice recognition systems4-143