2017 NISSAN QUEST turn signal
[x] Cancel search: turn signalPage 121 of 520
2-34Instruments and controls
tion. It is generally desirable not to turn
off the headlights for short intervals
(for example, when the vehicle stops at
a traffic signal) . This way the life of the
xenon headlights is not reduced.
. If the xenon headlight bulb is close to
burning out, the brightness will drasti-
cally decrease, the light will start
blinking, or the color of the light will
become reddish. If one or more of the
above signs appear, it is recommended
you visit a NISSAN dealer.
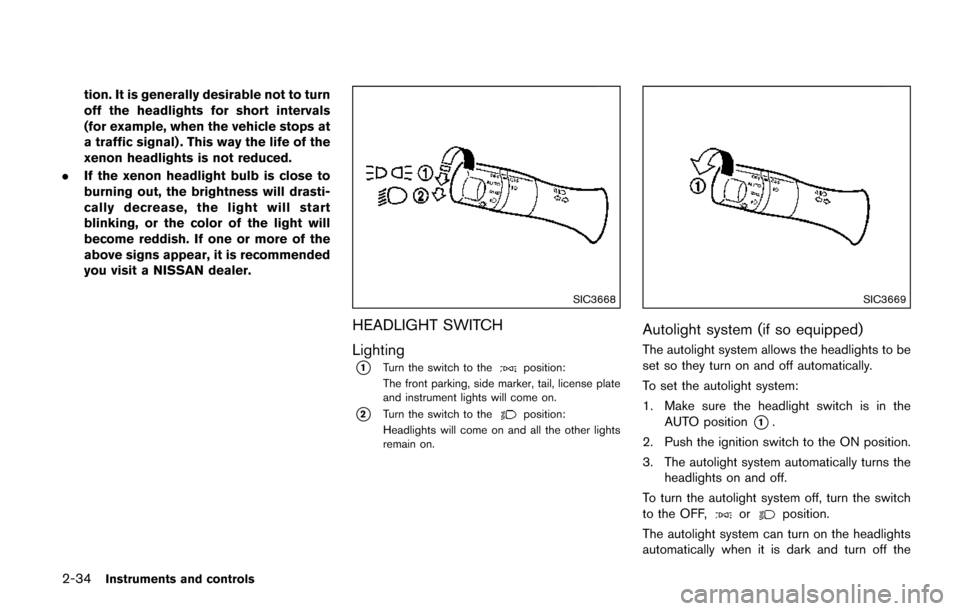
SIC3668
HEADLIGHT SWITCH
Lighting
*1Turn the switch to theposition:
The front parking, side marker, tail, license plate
and instrument lights will come on.
*2Turn the switch to theposition:
Headlights will come on and all the other lights
remain on.
SIC3669
Autolight system (if so equipped)
The autolight system allows the headlights to be
set so they turn on and off automatically.
To set the autolight system:
1. Make sure the headlight switch is in the AUTO position
*1.
2. Push the ignition switch to the ON position.
3. The autolight system automatically turns the headlights on and off.
To turn the autolight system off, turn the switch
to the OFF,
orposition.
The autolight system can turn on the headlights
automatically when it is dark and turn off the
Page 125 of 520
2-38Instruments and controls
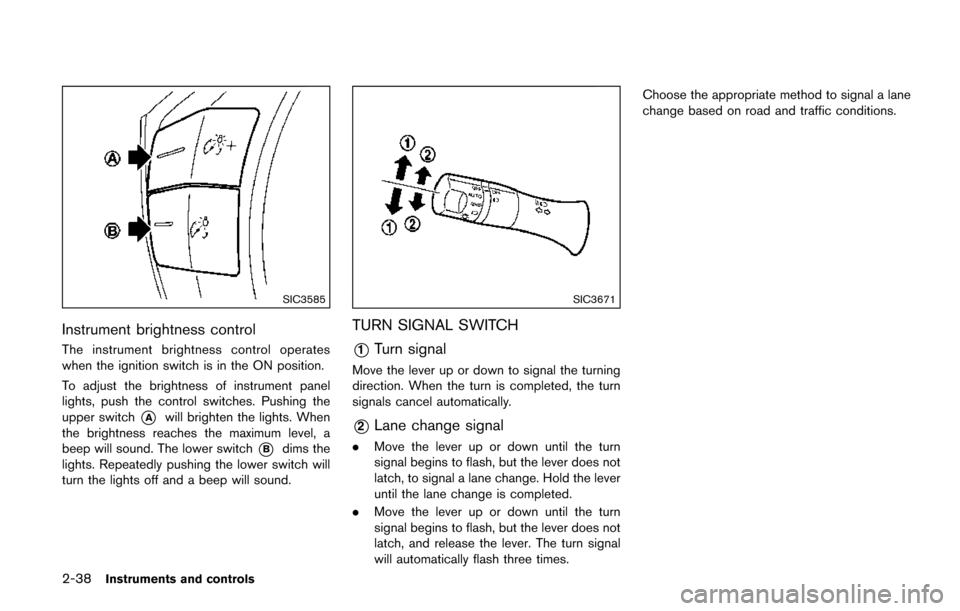
SIC3585
Instrument brightness control
The instrument brightness control operates
when the ignition switch is in the ON position.
To adjust the brightness of instrument panel
lights, push the control switches. Pushing the
upper switch
*Awill brighten the lights. When
the brightness reaches the maximum level, a
beep will sound. The lower switch
*Bdims the
lights. Repeatedly pushing the lower switch will
turn the lights off and a beep will sound.
SIC3671
TURN SIGNAL SWITCH
*1Turn signal
Move the lever up or down to signal the turning
direction. When the turn is completed, the turn
signals cancel automatically.
*2Lane change signal
. Move the lever up or down until the turn
signal begins to flash, but the lever does not
latch, to signal a lane change. Hold the lever
until the lane change is completed.
. Move the lever up or down until the turn
signal begins to flash, but the lever does not
latch, and release the lever. The turn signal
will automatically flash three times. Choose the appropriate method to signal a lane
change based on road and traffic conditions.
Page 128 of 520
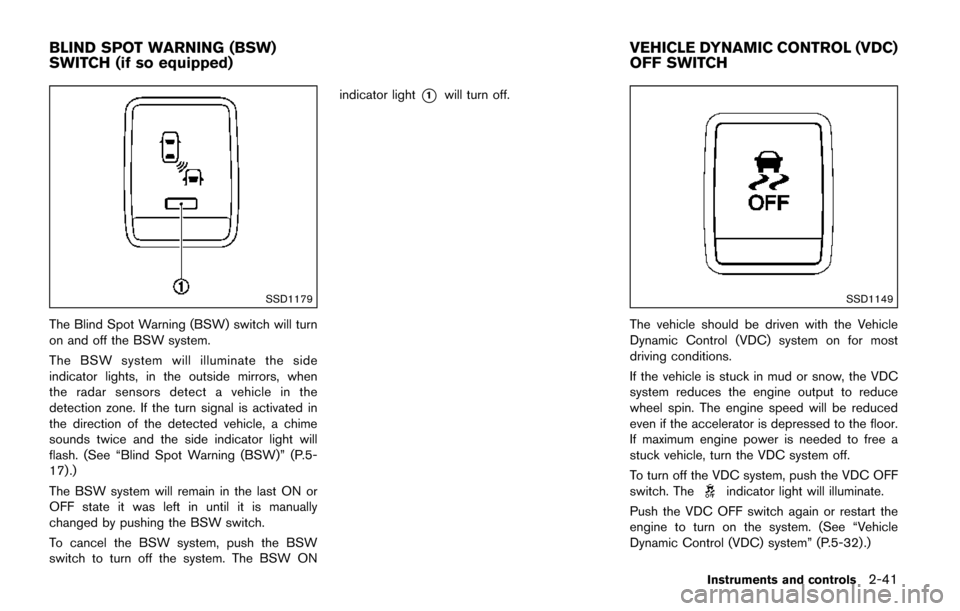
SSD1179
The Blind Spot Warning (BSW) switch will turn
on and off the BSW system.
The BSW system will illuminate the side
indicator lights, in the outside mirrors, when
the radar sensors detect a vehicle in the
detection zone. If the turn signal is activated in
the direction of the detected vehicle, a chime
sounds twice and the side indicator light will
flash. (See “Blind Spot Warning (BSW)” (P.5-
17) .)
The BSW system will remain in the last ON or
OFF state it was left in until it is manually
changed by pushing the BSW switch.
To cancel the BSW system, push the BSW
switch to turn off the system. The BSW ONindicator light
*1will turn off.
SSD1149
The vehicle should be driven with the Vehicle
Dynamic Control (VDC) system on for most
driving conditions.
If the vehicle is stuck in mud or snow, the VDC
system reduces the engine output to reduce
wheel spin. The engine speed will be reduced
even if the accelerator is depressed to the floor.
If maximum engine power is needed to free a
stuck vehicle, turn the VDC system off.
To turn off the VDC system, push the VDC OFF
switch. The
indicator light will illuminate.
Push the VDC OFF switch again or restart the
engine to turn on the system. (See “Vehicle
Dynamic Control (VDC) system” (P.5-32) .)
Instruments and controls2-41
BLIND SPOT WARNING (BSW)
SWITCH (if so equipped) VEHICLE DYNAMIC CONTROL (VDC)
OFF SWITCH
Page 149 of 520
2-62Instruments and controls
4. At the receiver located on the garage dooropener motor in the garage, locate the
“learn” or “smart” button (the name and
color of the button may vary by manufacturer
but it is usually located near where the
hanging antenna wire is attached to the
unit) . If there is difficulty locating the button,
reference the garage door opener’s manual.
5. Press and release the “learn” or “smart” button.
NOTE:
Once the button is pressed, you have
approximately 30 seconds to initiate
the next step.
6. Return to the vehicle and firmly press and hold the programmed HomeLink
Šbutton for
two seconds and release. Repeat the
“press/hold/release” sequence up to 3
times to complete the programming pro-
cess. HomeLink
Šshould now activate your
rolling code equipped device.
7. If you have any questions or are having difficulty programming your HomeLink
Šbut-
tons, refer to the HomeLinkŠweb site at:
www.homelink.com or call 1-800-355-
3515.
PROGRAMMING HomeLinkŠFOR CA-
NADIAN CUSTOMERS AND GATE
OPENERS
Canadian radio-frequency laws require trans-
mitter signals to “time-out” (or quit) after several
seconds of transmission – which may not be
long enough for HomeLink
Što pick up the signal
during programming. Similar to this Canadian
law, some U.S. gate operators are designed to
“time-out” in the same manner.
If you live in Canada or you are having difficulties
programming a gate operator or garage door
opener by using the “Programming HomeLink
Š”
procedures, replace “Programming HomeLinkŠ”
Step 2 with the following:
NOTE:
When programming a garage door opener,
etc., unplug the device during the “cycling”
process to prevent possible damage to the
garage door opener components.
Step 2: Using both hands, simultaneously press
and hold the desired HomeLink
Šbutton and the
hand-held transmitter button. During program-
ming, your hand-held transmitter may automati-
cally stop transmitting. Continue to press and
hold the desired HomeLink
Šbutton while you
press and re-press (“cycle”) your hand-held
transmitter every two seconds until the fre-
quency signal has been learned. The HomeLink
Š
indicator light will flash slowly and then rapidly
after several seconds upon successful program-
ming. DO NOT release until the HomeLink
Š
indicator light flashes slowly and then rapidly.
When the indicator light flashes rapidly, both
buttons may be released. The rapid flashing
indicates successful programming.
Proceed with “Programming HomeLink
Š” step 3
to complete.
Remember to plug the device back in when
programming is completed.
OPERATING THE HomeLinkŠUNIVER-
SAL TRANSCEIVER
The HomeLinkŠUniversal Transceiver, after it is
programmed, can be used to activate the
programmed device. To operate, simply press
and release the appropriate programmed
HomeLink
ŠUniversal Transceiver button. The
amber indicator light will illuminate while the
signal is being transmitted.
For convenience, the hand-held transmitter of
the device may also be used at any time.
Page 164 of 520
OPERATING SLIDING DOOR BY
POWER ASSIST
To operate, pull the inside or outside door
handle until you hear the buzzer, the door will
automatically open or close.
If the door handle is operated while the sliding
door is moving, the door will reverse directions
and stop at either the full open or closed
position.
SLIDING DOOR AUTO REVERSE
FUNCTION
If an obstacle is detected while the power
sliding door is being operated, the door will
reverse directions and return to the full open or
full closed position.
If you touch the sensor of the sliding door while
the sliding door is closing automatically, the door
will start moving in the reverse direction and
stop at the fully opened position.
WARNING
.Radio waves could adversely affect
electric medical equipment. Those
who use a pacemaker should con-
tact the electric medical equipment
manufacturer for the possible influ-
ences before use.
. The Intelligent Key transmits radio
waves when the buttons are
pushed. The FAA advises that radio
waves may affect aircraft navigation
and communication systems. Do not
operate the Intelligent Key while on
an airplane. Make sure the buttons
are not operated unintentionally
when the unit is stored for a flight.
The Intelligent Key system can operate all the
door locks (including the liftgate) using the
remote keyless function or pushing the request
switch on the vehicle without taking the key out
from a pocket or purse. The operating environ-
ment and/or conditions may affect the Intelligent
Key system operation.
Be sure to read the following before using the
Intelligent Key system.
CAUTION
. Be sure to carry the Intelligent Key
with you when operating the vehi-
cle.
. Never leave the Intelligent Key in
the vehicle when you leave the
vehicle.
The Intelligent Key is always communicating with
the vehicle as it receives radio waves. The
Intelligent Key system transmits weak radio
signals. Environmental conditions may interfere
with the operation of the Intelligent Key system
under the following operating conditions.
. When operating near a location where
strong radio signals are transmitted, such
as a TV tower, power station and broad-
casting station.
. When in possession of wireless equipment,
such as a cellular telephone, transceiver,
and CB radio.
. When the Intelligent Key is in contact with or
covered by metallic materials.
. When any type of radio wave remote control
is used nearby.
. When the Intelligent Key is placed near an
electric appliance such as a personal
Pre-driving checks and adjustments3-13
INTELLIGENT KEY SYSTEM
Page 225 of 520
4-36Monitor, heater, air conditioner, audio, phone and voice recognition systems
.Tire angle display does not indicate
the actual tire angle.
JVH1141X
Front-side view:
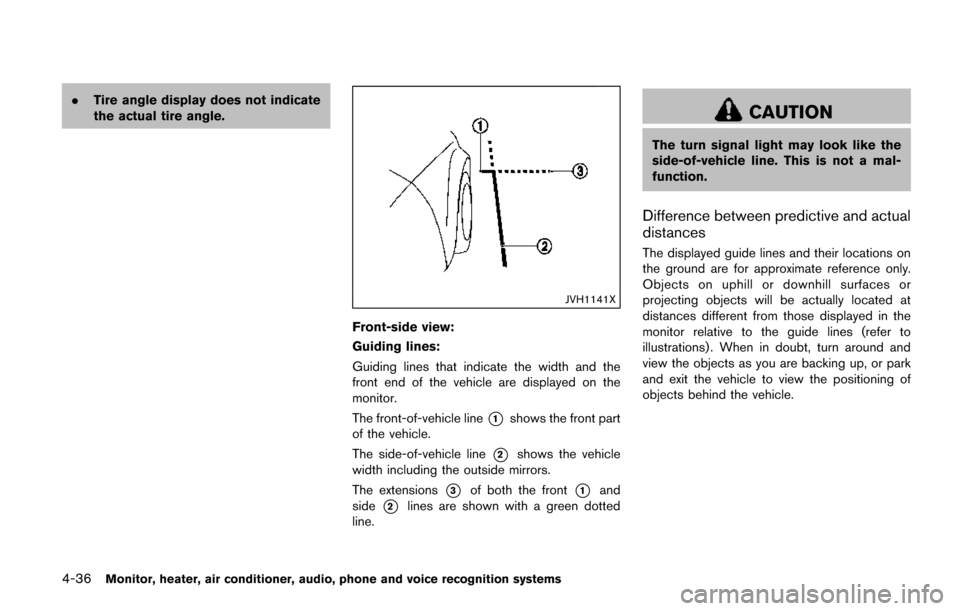
Guiding lines:
Guiding lines that indicate the width and the
front end of the vehicle are displayed on the
monitor.
The front-of-vehicle line
*1shows the front part
of the vehicle.
The side-of-vehicle line
*2shows the vehicle
width including the outside mirrors.
The extensions
*3of both the front*1and
side
*2lines are shown with a green dotted
line.
CAUTION
The turn signal light may look like the
side-of-vehicle line. This is not a mal-
function.
Difference between predictive and actual
distances
The displayed guide lines and their locations on
the ground are for approximate reference only.
Objects on uphill or downhill surfaces or
projecting objects will be actually located at
distances different from those displayed in the
monitor relative to the guide lines (refer to
illustrations) . When in doubt, turn around and
view the objects as you are backing up, or park
and exit the vehicle to view the positioning of
objects behind the vehicle.
Page 250 of 520
AUDIO OPERATION PRECAUTIONS
Radio
Push the ignition switch to the ACC or ON
position and push the radio band select button
to turn on the radio. If you listen to the radio with
the engine not running, the ignition switch
should be pushed to the ACC position.
Radio reception is affected by station signal
strength, distance from radio transmitter, build-
ings, bridges, mountains and other external
influences. Intermittent changes in reception
quality normally are caused by these external
influences.
Using a cellular phone in or near the
vehicle may influence radio reception
quality.
Radio reception:
Your vehicle radio system is equipped with
state-of-the-art electronic circuits to enhance
radio reception. These circuits are designed to
extend reception range, and to enhance the
quality of that reception.
However there are some general characteristics
of both FM and AM radio signals that can affect
radio reception quality in a moving vehicle, even
when the finest equipment is used. These
characteristics are completely normal in a given
reception area, and do not indicate any mal-function in your vehicle radio system.
Reception conditions will constantly change
because of vehicle movement. Buildings, terrain,
signal distance and interference from other
vehicles can work against ideal reception.
Described below are some of the factors that
can affect your radio reception.
Some cellular phones or other devices may
cause interference or a buzzing noise to come
from the audio system speakers. Storing the
device in a different location may reduce or
eliminate the noise.
SAA0306
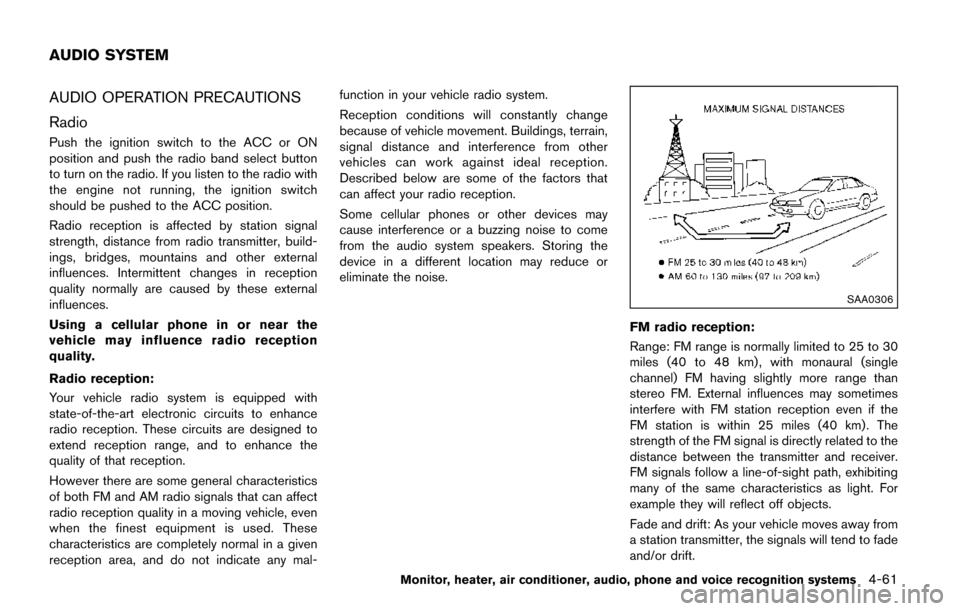
FM radio reception:
Range: FM range is normally limited to 25 to 30
miles (40 to 48 km) , with monaural (single
channel) FM having slightly more range than
stereo FM. External influences may sometimes
interfere with FM station reception even if the
FM station is within 25 miles (40 km). The
strength of the FM signal is directly related to the
distance between the transmitter and receiver.
FM signals follow a line-of-sight path, exhibiting
many of the same characteristics as light. For
example they will reflect off objects.
Fade and drift: As your vehicle moves away from
a station transmitter, the signals will tend to fade
and/or drift.
Monitor, heater, air conditioner, audio, phone and voice recognition systems4-61
AUDIO SYSTEM
Page 268 of 520
.Language Select
The language settings can be changed.
Select “Language Select” using the TU-
NE·SCROLL control knob and then push the
ENTER/SETTING button. Use the TU-
NE·SCROLL control knob knob to select
the preferred language.
DISP button:
Display of the screen can be canceled by
pushing the DISP button. You can still listen to
music that is being played back even while the
screen display is turned off. If you want to
display the screen again, either push the DISP
button once more or push the FM·AM, CD,
MEDIA or iPod MENU button.
MEDIA button:
Pushing the MEDIA button will switch the audio
source as follows:
CD ?USB/iPod
Š?Bluetooth ?AUX ?CD
FM-AM-SAT radio operation
radio (FM·AM) band select:
Pushing the FM·AM button will change the band
as follows:
AM ?FM1 ?FM2 ?AM
radio (SAT) band select:
Pushing the XM band select button will change
the band as follows:
XM1 ?XM2 ?XM3 ?XM1
When the XM band select button is pushed
while the ignition switch is in the ACC or ON
position, the radio will come on at the channel
last played.
The last channel played will also come on when
the power button is pushed to ON.
The satellite radio is not available in Alaska,
Hawaii and Guam.
If another audio source is playing when the radio
band select button is turned to ON, the audio
source will automatically be turned off and the
last radio channel played will come on.
When the stereo broadcast signal is weak, the
radio will automatically change from stereo to
monaural reception. TUNE (Tuning):
.
For AM and FM radio
Turn the radio TUNE·SCROLL control knob
for manual tuning.
. For SiriusXM Satellite Radio
Turn the radio TUNE·SCROLL control knob
to seek channels from all of the categories
when any category is not selected.
SEEK tuning/CAT (category):
. For AM and FM radio
Push the SEEK button
orto tune
from low to high or high to low frequencies
and to stop at the next broadcasting station.
. For SiriusXM Satellite Radio
Push the SEEK button
orto tune to
the first channel of the next or previous
category.
SCAN tuning:
Push the SCAN tuning button to tune from low
to high frequencies and stop at each broad-
casting station for 5 seconds. Pushing the
button again during this 5 seconds period will
stop SCAN tuning and the radio will remain
tuned to that station.
If the SCAN tuning button is not pushed within 5
seconds, SCAN tuning moves to the next
Monitor, heater, air conditioner, audio, phone and voice recognition systems4-79