2017 NISSAN QUEST tire type
[x] Cancel search: tire typePage 461 of 520
8-32Do-it-yourself
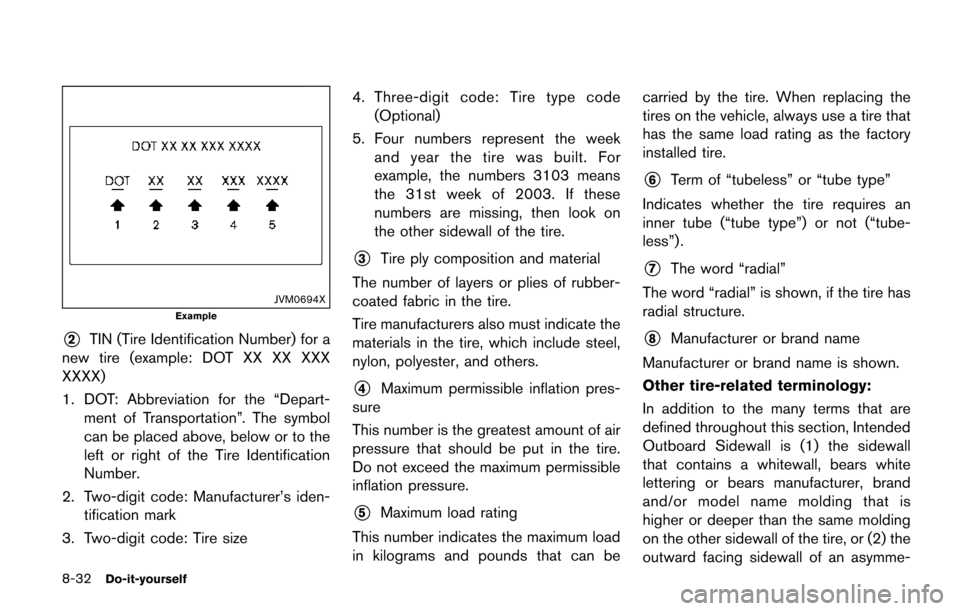
JVM0694X
Example
*2TIN (Tire Identification Number) for a
new tire (example: DOT XX XX XXX
XXXX)
1. DOT: Abbreviation for the “Depart- ment of Transportation”. The symbol
can be placed above, below or to the
left or right of the Tire Identification
Number.
2. Two-digit code: Manufacturer’s iden- tification mark
3. Two-digit code: Tire size 4. Three-digit code: Tire type code
(Optional)
5. Four numbers represent the week and year the tire was built. For
example, the numbers 3103 means
the 31st week of 2003. If these
numbers are missing, then look on
the other sidewall of the tire.
*3Tire ply composition and material
The number of layers or plies of rubber-
coated fabric in the tire.
Tire manufacturers also must indicate the
materials in the tire, which include steel,
nylon, polyester, and others.
*4Maximum permissible inflation pres-
sure
This number is the greatest amount of air
pressure that should be put in the tire.
Do not exceed the maximum permissible
inflation pressure.
*5Maximum load rating
This number indicates the maximum load
in kilograms and pounds that can be carried by the tire. When replacing the
tires on the vehicle, always use a tire that
has the same load rating as the factory
installed tire.
*6Term of “tubeless” or “tube type”
Indicates whether the tire requires an
inner tube (“tube type”) or not (“tube-
less”) .
*7The word “radial”
The word “radial” is shown, if the tire has
radial structure.
*8Manufacturer or brand name
Manufacturer or brand name is shown.
Other tire-related terminology:
In addition to the many terms that are
defined throughout this section, Intended
Outboard Sidewall is (1) the sidewall
that contains a whitewall, bears white
lettering or bears manufacturer, brand
and/or model name molding that is
higher or deeper than the same molding
on the other sidewall of the tire, or (2) the
outward facing sidewall of an asymme-
Page 462 of 520
trical tire that has a particular side that
must always face outward when
mounted on a vehicle.
TYPES OF TIRES
WARNING
.When changing or replacing tires,
be sure all four tires are of the same
type (Example: Summer, All Season
or Snow) and construction. A
NISSAN dealer may be able to help
you with information about tire type,
size, speed rating and availability.
. Replacement tires may have a lower
speed rating than the factory
equipped tires, and may not match
the potential maximum vehicle
speed. Never exceed the maximum
speed rating of the tire.
. Replacing tires with those not ori-
ginally specified by NISSAN could
affect the proper operation of the
TPMS.
. For additional information regard-
ing tires, refer to “Important Tire
Safety Information” (US) or“Tire
Safety Information” (Canada) in the Warranty Information Booklet.
All season tires
NISSAN specifies all season tires on some
models to provide good performance all year,
including snowy and icy road conditions. All
Season tires are identified by ALL SEASON
and/or M&S (Mud and Snow) on the tire
sidewall. Snow tires have better snow traction
than All Season tires and may be more appro-
priate in some areas.
Summer tires
NISSAN specifies summer tires on some
models to provide superior performance on dry
roads. Summer tire performance is substantially
reduced in snow and ice. Summer tires do not
have the tire traction rating M&S on the tire
sidewall.
If you plan to operate your vehicle in snowy or
icy conditions, NISSAN recommends the use of
SNOW tires or ALL SEASON tires on all four
wheels.
Snow tires
If snow tires are needed, it is necessary to select
tires equivalent in size and load rating to the
original equipment tires. If you do not, it can
adversely affect the safety and handling of your
vehicle.
Generally, snow tires will have lower speed
ratings than factory equipped tires and may not
match the potential maximum vehicle speed.
Never exceed the maximum speed rating of the
tire.
If you install snow tires, they must be the same
size, brand, construction and tread pattern on all
four wheels.
For additional traction on icy roads, studded
tires may be used. However, some U.S. states
and Canadian provinces prohibit their use.
Check local, state and provincial laws before
installing studded tires. Skid and traction cap-
abilities of studded snow tires, on wet or dry
surfaces, may be poorer than that of non-
studded snow tires.
TIRE CHAINS
CAUTION
.
NISSAN recommends using the fol-
lowing tire cables made by Peerless
Do-it-yourself8-33
Page 463 of 520
8-34Do-it-yourself
Chain Company on P235/55R18 size
tire due to limited tire clearance.
Call 800-533-8056 to order tire
chains for your vehicle.
— P235/55R18 - Peerless Chainpart number SC1040
Failure to use the correct traction
device will cause damage to the
brakes, suspension or other vehicle
parts. Or, you should install
P225/65R16 size tire on your vehi-
cle.
. Only certain SAE class “S” tire
chains can be used on this vehicle.
Using the wrong Class “S” chains
on this vehicle will cause damage to
the vehicle. If you plan to use tire
chains/cables, you should use a tire
chain that meets the minimum
clearances for your vehicle.
Use of tire chains may be prohibited according
to location. Check the local laws before instal-
ling tire chains. When installing tire chains, make
sure they are the proper size for the tires on your
vehicle and are installed according to the chain
manufacturer’s suggestions.
For 18-inch size tire, the tire chain part number
and Peerless Chain Company phone number are correct at the time of printing that is shown
on the back cover of this Owner’s Manual.
Always confirm the correct part numbers with
Peerless Chain Company before ordering. Only
use other types of traction devices if the traction
device manufacturer recommends it for use on
your specific vehicle and the tire and wheel
installed on your vehicle.
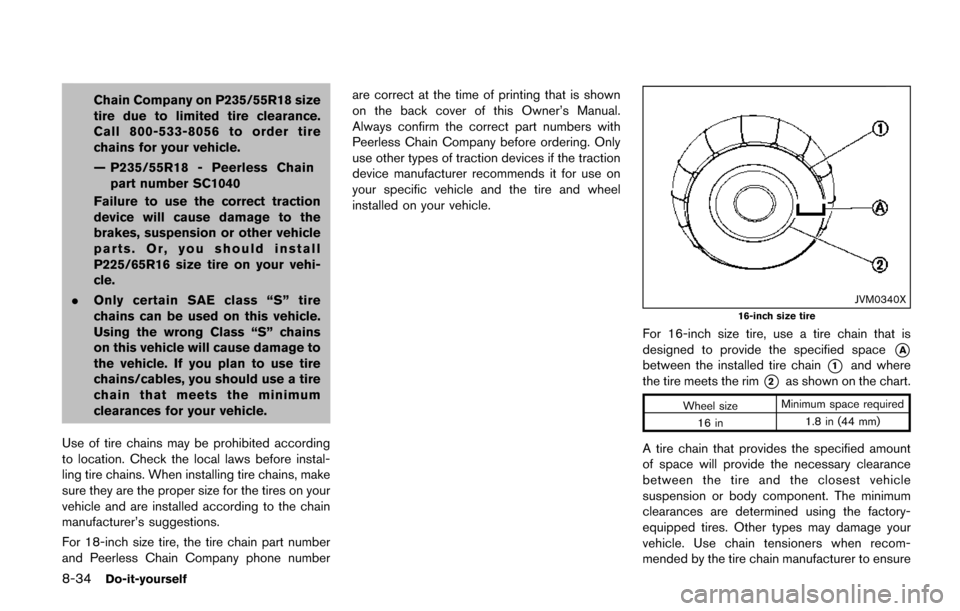
JVM0340X
16-inch size tire
For 16-inch size tire, use a tire chain that is
designed to provide the specified space
*A
between the installed tire chain*1and where
the tire meets the rim
*2as shown on the chart.
Wheel size Minimum space required
16 in 1.8 in (44 mm)
A tire chain that provides the specified amount
of space will provide the necessary clearance
between the tire and the closest vehicle
suspension or body component. The minimum
clearances are determined using the factory-
equipped tires. Other types may damage your
vehicle. Use chain tensioners when recom-
mended by the tire chain manufacturer to ensure
Page 465 of 520
8-36Do-it-yourself
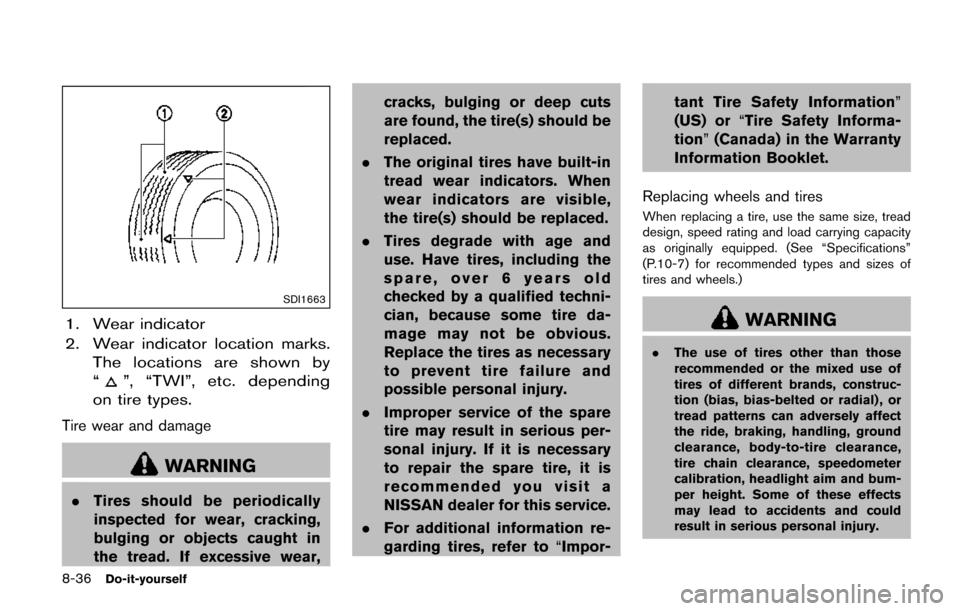
SDI1663
1. Wear indicator
2. Wear indicator location marks.The locations are shown by
“
”, “TWI”, etc. depending
on tire types.
Tire wear and damage
WARNING
. Tires should be periodically
inspected for wear, cracking,
bulging or objects caught in
the tread. If excessive wear, cracks, bulging or deep cuts
are found, the tire(s) should be
replaced.
. The original tires have built-in
tread wear indicators. When
wear indicators are visible,
the tire(s) should be replaced.
. Tires degrade with age and
use. Have tires, including the
spare, over 6 years old
checked by a qualified techni-
cian, because some tire da-
mage may not be obvious.
Replace the tires as necessary
to prevent tire failure and
possible personal injury.
. Improper service of the spare
tire may result in serious per-
sonal injury. If it is necessary
to repair the spare tire, it is
recommended you visit a
NISSAN dealer for this service.
. For additional information re-
garding tires, refer to “Impor-tant Tire Safety Information”
(US) or
“Tire Safety Informa-
tion” (Canada) in the Warranty
Information Booklet.
Replacing wheels and tires
When replacing a tire, use the same size, tread
design, speed rating and load carrying capacity
as originally equipped. (See “Specifications”
(P.10-7) for recommended types and sizes of
tires and wheels.)
WARNING
. The use of tires other than those
recommended or the mixed use of
tires of different brands, construc-
tion (bias, bias-belted or radial) , or
tread patterns can adversely affect
the ride, braking, handling, ground
clearance, body-to-tire clearance,
tire chain clearance, speedometer
calibration, headlight aim and bum-
per height. Some of these effects
may lead to accidents and could
result in serious personal injury.
Page 490 of 520
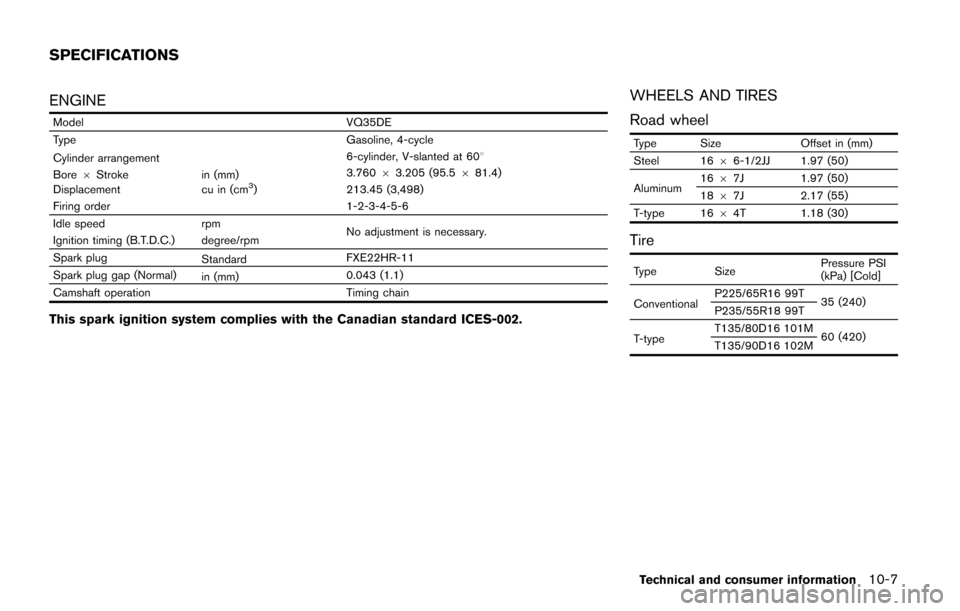
ENGINE
ModelVQ35DE
Type Gasoline, 4-cycle
Cylinder arrangement 6-cylinder, V-slanted at 608
Bore 6Stroke in (mm) 3.760
63.205 (95.5 681.4)
Displacement cu in (cm
3)213.45 (3,498)
Firing order 1-2-3-4-5-6
Idle speed rpm
No adjustment is necessary.
Ignition timing (B.T.D.C.) degree/rpm
Spark plug StandardFXE22HR-11
Spark plug gap (Normal) in (mm)0.043 (1.1)
Camshaft operation Timing chain
This spark ignition system complies with the Canadian standard ICES-002.
WHEELS AND TIRES
Road wheel
Type SizeOffset in (mm)
Steel 16 66-1/2JJ 1.97 (50)
Aluminum 16
67J 1.97 (50)
18 67J 2.17 (55)
T-type 16 64T 1.18 (30)
Tire
Type Size Pressure PSI
(kPa) [Cold]
Conventional P225/65R16 99T
35 (240)
P235/55R18 99T
T-type T135/80D16 101M
60 (420)
T135/90D16 102M
Technical and consumer information10-7
SPECIFICATIONS
Page 497 of 520
10-14Technical and consumer information
in Step 4.
6.If your vehicle will be towing a trailer,
load from your trailer will be trans-
ferred to your vehicle. Consult this
manual to determine how this re-
duces the available cargo and lug-
gage load capacity of your vehicle.
Before driving a loaded vehicle, confirm
that you do not exceed the Gross Vehicle
Weight Rating (GVWR) or the Gross
Axle Weight Rating (GAWR) for your
vehicle. (See “Measurement of weights”
(P.10-15) .)
Also check tires for proper inflation
pressures. See the Tire and Loading
Information label.
SIC4732
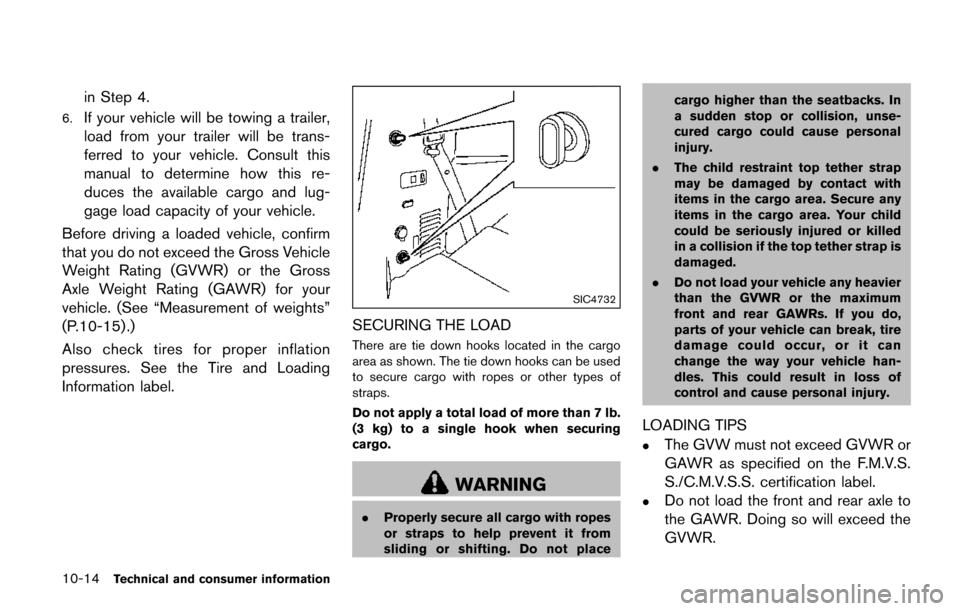
SECURING THE LOAD
There are tie down hooks located in the cargo
area as shown. The tie down hooks can be used
to secure cargo with ropes or other types of
straps.
Do not apply a total load of more than 7 lb.
(3 kg) to a single hook when securing
cargo.
WARNING
. Properly secure all cargo with ropes
or straps to help prevent it from
sliding or shifting. Do not place cargo higher than the seatbacks. In
a sudden stop or collision, unse-
cured cargo could cause personal
injury.
. The child restraint top tether strap
may be damaged by contact with
items in the cargo area. Secure any
items in the cargo area. Your child
could be seriously injured or killed
in a collision if the top tether strap is
damaged.
. Do not load your vehicle any heavier
than the GVWR or the maximum
front and rear GAWRs. If you do,
parts of your vehicle can break, tire
damage could occur, or it can
change the way your vehicle han-
dles. This could result in loss of
control and cause personal injury.
LOADING TIPS
.The GVW must not exceed GVWR or
GAWR as specified on the F.M.V.S.
S./C.M.V.S.S. certification label.
.Do not load the front and rear axle to
the GAWR. Doing so will exceed the
GVWR.
Page 504 of 520
is removed, seal the bolt holes to
prevent exhaust fumes, water or
dust from entering the passenger
compartment.
. Regularly check that all trailer hitch
mounting bolts are securely
mounted.
Tire pressures
.When towing a trailer, inflate the
vehicle tires to the recommended
cold tire pressure indicated on the
Tire and Loading Information label.
.Trailer tire condition, size, load rating
and proper inflation pressure should
be in accordance with the trailer and
tire manufacturers’ specifications.
Safety chains
Always use a suitable chain between your
vehicle and the trailer. The safety chains should
be crossed and should be attached to the hitch,
not to the vehicle bumper or axle. The safety
chains can be attached to the bumper if the
hitch ball is mounted to the bumper. Be sure to
leave enough slack in the chains to permit
turning corners.
Trailer lights
CAUTION
When splicing into the vehicle electrical
system, a commercially available
power-type module/converter must be
used to provide power for all trailer
lighting. This unit uses the vehicle
battery as a direct power source for all
trailer lights while using the vehicle tail
light, stoplight and turn signal circuits
as a signal source. The module/con-
verter must draw no more than 15
milliamps from the stop and tail lamp
circuits. Using a module/converter that
exceeds these power requirements may
damage the vehicle’s electrical system.
See a reputable trailer dealer to obtain
the proper equipment and to have it
installed.
Trailer lights should comply with federal and/or
local regulations. For assistance in hooking up
trailer lights, it is recommended you contact a
NISSAN dealer or reputable trailer dealer.
Trailer brakes
If your trailer is equipped with a braking system,
make sure it conforms to federal and/or local
regulations and that it is properly installed.
WARNING
Never connect a trailer brake system
directly to the vehicle brake system.
Pre-towing tips
. Be certain your vehicle maintains a level
position when a loaded or unloaded trailer is
hitched. Do not drive the vehicle if it has an
abnormal nose-up or nose-down condition;
check for improper tongue load, overload,
worn suspension or other possible causes
of either condition.
. Always secure items in the trailer to prevent
load shift while driving.
. Keep the cargo load as low as possible in
the trailer to keep the trailer center of gravity
low.
. Load the trailer so approximately 60% of the
trailer load is in the front half and 40% is in
the back half. Also make sure the load is
balanced side to side.
Technical and consumer information10-21
Page 514 of 520
LOOSE FUEL CAP warning ............................. 3-32
Fuel efficient driving tips ........................................... 5-27
Fuses ............................................................................. 8-18
Fusible links ................................................................. 8-18
G
Garage door opener, HomeLink�Š
Universal Transceiver ................................................. 2-60
Gas cap ........................................................................ 3-30
Gauge .............................................................................. 2-5 Engine coolant temperature gauge ................... 2-7
Fuel gauge ............................................................... 2-8
Odometer ................................................................. 2-6
Speedometer ........................................................... 2-6
Tachometer ............................................................... 2-7
Trip computer ....................................................... 2-24
General maintenance .................................................. 9-2
Glove box ..................................................................... 2-47
H
Hands-free phone system, Bluetooth�Š
(Type A) ..................................................................... 4-122
Hands-free phone system, Bluetooth�Š
(Type B) ..................................................................... 4-133
Hands-free phone system, Bluetooth�Š
(Type C) ..................................................................... 4-146
Hazard warning flasher switch .................................. 6-2
Head restraints/headrests ........................................ 1-10
Headlights Aiming control ...................................................... 2-37
Bulb replacement ................................................ 8-22
Headlight switch .................................................. 2-34
Xenon headlights ................................................. 2-33
Heated seats ............................................................... 2-39 Heater
Engine block heater ............................................ 5-35
Heater and air conditioner operation ............. 4-47
HomeLink
�ŠUniversal Transceiver .......................... 2-60
Hood release ............................................................... 3-25
Hook, Coat hooks ...................................................... 2-51
Horn ............................................................................... 2-39
Hydraulic pump electric power steering .............. 5-30
I
Ignition switch (Push-button) .................................... 5-8
Immobilizer system ..................................................... 2-30
In-cabin microfilter ...................................................... 4-60
Indicator Lights ...................................................................... 2-16
Vehicle information display ................................ 2-19
INFO button ................................................................. 4-11
Inside mirror ................................................................. 3-33
Inspection/maintenance (I/M) test ....................... 10-26
Instrument brightness control .................................. 2-38
Instrument panel ................................................ 2-4, 2-44
Intelligent Key system ....................................... 3-3, 3-13 Battery replacement ............................................ 8-20
Intelligent Key system warning light ............... 2-14
Key operating range ........................................... 3-15
Key operation ........................................................ 3-16
Warning signals ................................................... 3-19
Interior light control switch ...................................... 2-58
Interior light replacement .......................................... 8-24
Interior lights ................................................................ 2-57
iPod
�Šplayer operation .............................................. 4-99
ISOFIX child restraint ................................................ 1-29
J
Jump starting ............................................................... 6-10
K
Keyless entry (See remote keyless
entry system) ............................................................... 3-21
Keys ................................................................................. 3-3 For Intelligent Key system ........................ 3-3, 3-13
L
LabelsAir bag warning labels ....................................... 1-63
Air conditioner specification label ................. 10-10
Emission control information label ................ 10-10
Engine serial number .......................................... 10-9
F.M.V.S.S./C.M.V.S.S. certification label ........ 10-9
Tire and Loading Information label .... 8-29, 10-10
Vehicle identification number (VIN) ................ 10-8
LATCH system ............................................................ 1-29
License plate, Installing front license plate ....... 10-11
Liftgate .......................................................................... 3-26
Light Air bag warning light .......................................... 1-64
Bulb replacement ................................................ 8-22
Cargo lights .......................................................... 2-60
Fog light switch ................................................... 2-39
Headlight switch .................................................. 2-34
Headlights bulb replacement ........................... 8-22
Indicator lights ...................................................... 2-16
Interior light control switch ............................... 2-58
Interior lights ......................................................... 2-57
Map lights .............................................................. 2-57
Mood lights ........................................................... 2-59
Replacement ......................................................... 8-22
11-3