2017 NISSAN QUEST change time
[x] Cancel search: change timePage 4 of 520
WARNING
Installing an aftermarket On-Board Di-
agnostic (OBD) plug-in device that uses
the port during normal driving, for
example remote insurance company
monitoring, remote vehicle diagnostics,
telematics or engine reprogramming,
may cause interference or damage to
vehicle systems. We do not recommend
or endorse the use of any aftermarket
OBD plug-in devices, unless specifically
approved by NISSAN. The vehicle war-
ranty may not cover damage caused by
any aftermarket plug-in device.
WHEN READING THE MANUAL
This manual includes information for all
features and equipment available on this
model. Features and equipment in your
vehicle may vary depending on model, trim
level, options selected, order, date of
production, region or availability. There-
fore, you may find information about
features or equipment that are not in-
cluded or installed on your vehicle.
All information, specifications and illustrations in
this manual are those in effect at the time ofprinting. NISSAN reserves the right to change
specifications, performance, design or compo-
nent suppliers without notice and without
obligation. From time to time, NISSAN may
update or revise this manual to provide owners
with the most accurate information currently
available. Please carefully read and retain with
this manual all revision updates sent to you by
NISSAN to ensure you have access to accurate
and up-to-date information regarding your ve-
hicle. Current versions of vehicle Owner’s
Manuals and any updates can also be found in
the Owner section of the NISSAN website at
https://owners.nissanusa.com/nowners/naviga-
tion/manualsGuide. If you have questions con-
cerning any information in your Owner’s Manual,
contact NISSAN Consumer Affairs. See the
NISSAN CUSTOMER CARE PROGRAM page
in this Owner’s Manual for contact information.
IMPORTANT INFORMATION ABOUT
THIS MANUAL
You will see various symbols in this manual. They
are used in the following ways:
WARNING
This is used to indicate the presence of
a hazard that could cause death or
serious personal injury. To avoid or
reduce the risk, the procedures must
be followed precisely.
CAUTION
This is used to indicate the presence of
a hazard that could cause minor or
moderate personal injury or damage to
your vehicle. To avoid or reduce the risk,
the procedures must be followed care-
fully.
Page 35 of 520
1-16Safety — Seats, seat belts and supplemental restraint system
WARNING
.Every person who drives or rides in
this vehicle should use a seat belt at
all times. Children should be prop-
erly restrained in the rear seat and,
if appropriate, in a child restraint.
. The seat belt should be properly
adjusted to a snug fit. Failure to do
so may reduce the effectiveness of
the entire restraint system and in-
crease the chance or severity of
injury in an accident. Serious injury
or death can occur if the seat belt is
not worn properly.
. Always route the shoulder belt over
your shoulder and across your
chest. Never put the belt behind
your back, under your arm or across
your neck. The belt should be away
from your face and neck, but not
falling off your shoulder.
. Position the lap belt as low and
snug as possible AROUND THE
HIPS, NOT THE WAIST. A lap belt
worn too high could increase the
risk of internal injuries in an acci-
dent. .
Be sure the seat belt tongue is
securely fastened to the proper
buckle.
. Do not wear the seat belt inside out
or twisted. Doing so may reduce its
effectiveness.
. Do not allow more than one person
to use the same seat belt.
. Never carry more people in the
vehicle than there are seat belts.
. If the seat belt warning light glows
continuously while the ignition is
turned ON with all doors closed and
all seat belts fastened, it may in-
dicate a malfunction in the system.
Have the system checked. It is
recommended you visit a NISSAN
dealer for this service.
. No changes should be made to the
seat belt system. For example, do
not modify the seat belt, add mate-
rial or install devices that may
change the seat belt routing or
tension. Doing so may affect the
operation of the seat belt system.
Modifying or tampering with the
seat belt system may result in
serious personal injury. .
Once a seat belt pretensioner has
activated, it cannot be reused and
must be replaced together with the
retractor. It is recommended you
visit a NISSAN dealer for this ser-
vice.
. All seat belt assemblies, including
retractors and attaching hardware,
should be inspected after any colli-
sion. It is recommended you visit a
NISSAN dealer for this service.
NISSAN recommends that all seat
belt assemblies in use during a
collision be replaced unless the
collision was minor and the belts
show no damage and continue to
operate properly.
Seat belt assemblies not in use
during a collision should also be
inspected and replaced if either
damage or improper operation is
noted.
. All child restraints and attaching
hardware should be inspected after
any collision. Always follow the
restraint manufacturer’s inspection
instructions and replacement re-
commendations. The child restraints
should be replaced if they are
Page 97 of 520
2-10Instruments and controls
ZONE VARIATION CHANGE PROCE-
DURE
The difference between magnetic north and
geographical north is known as variance. In
some areas, this difference can sometimes be
great enough to cause false compass readings.
Follow these instructions to set the variance for
your particular location if this happens:
1. Push the
switch for more than 3
seconds. The current zone number will
appear in the display.
2. Find your current location and variance number on the zone map.
NOTE:
Use zone number 5 for Hawaii.
3. Push the
switch repeatedly until the
new zone number appears in the display,
then release the switch. After you release
the switch, the display will show a compass
direction within a few seconds.
.If the compass deviates from the correct indication soon after repeated adjust-
ment, have the compass checked. It is
recommended you visit a NISSAN dealer
for this service.
.The compass may not indicate the
correct compass point in tunnels or while
driving up or down a steep hill. (The compass returns to the correct com-
pass point when the vehicle moves to an
area where the geomagnetism is stabilized.)
CAUTION
.
Do not install a ski rack, antenna,
etc., which are attached to the
vehicle by means of a magnet. They
affect the operation of the compass.
. When cleaning the mirror, use a
paper towel or similar material
dampened with glass cleaner. Do
not spray glass cleaner directly on
the mirror as it may cause the liquid
cleaner to enter the mirror housing.
Page 111 of 520
2-24Instruments and controls
SIC3580
TRIP COMPUTER
Switches for the trip computer are located on
the right side of the combination meter panel. To
operate the trip computer, push the side of the
switches as shown above.
*Aswitch
*Bswitch
When the ignition switch is pushed to the ON
position, modes of the trip computer can be
selected by pushing the
switch*A.Each time the
switch*Ais pushed, the
display will change as follows:
Current and average fuel consumption ?
Average fuel consumption and speed ?
Elapsed time and trip odometer ?Distance to
empty (dte) ?Outside air temperature (ICY) ?
Setting ?Warning check
SIC4700
Current and average fuel consumption
(MPG, l (liter)/100 km or km/l)
The current and average fuel consumption mode
shows the current and average fuel consump-
tion.
Page 125 of 520
2-38Instruments and controls
SIC3585
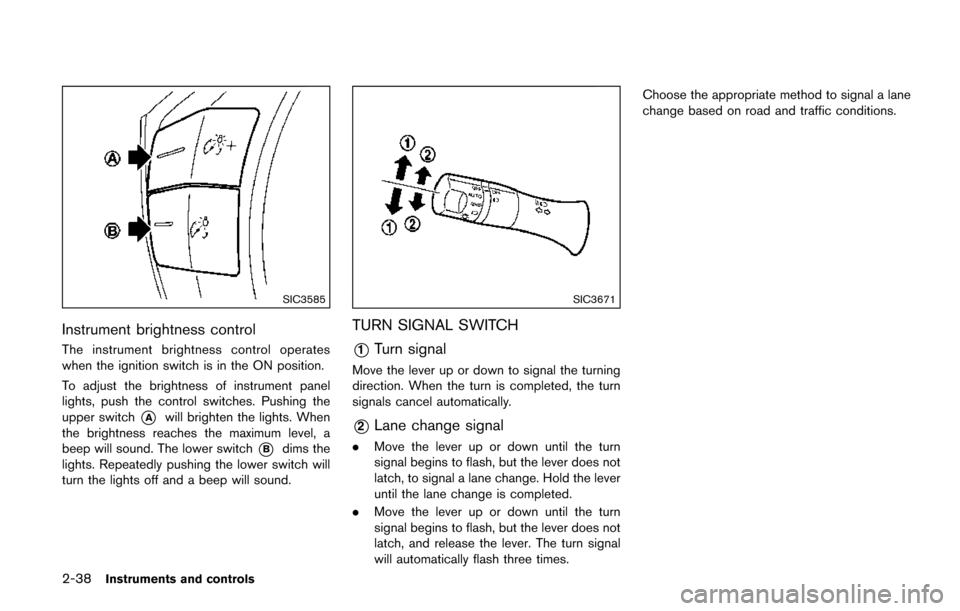
Instrument brightness control
The instrument brightness control operates
when the ignition switch is in the ON position.
To adjust the brightness of instrument panel
lights, push the control switches. Pushing the
upper switch
*Awill brighten the lights. When
the brightness reaches the maximum level, a
beep will sound. The lower switch
*Bdims the
lights. Repeatedly pushing the lower switch will
turn the lights off and a beep will sound.
SIC3671
TURN SIGNAL SWITCH
*1Turn signal
Move the lever up or down to signal the turning
direction. When the turn is completed, the turn
signals cancel automatically.
*2Lane change signal
. Move the lever up or down until the turn
signal begins to flash, but the lever does not
latch, to signal a lane change. Hold the lever
until the lane change is completed.
. Move the lever up or down until the turn
signal begins to flash, but the lever does not
latch, and release the lever. The turn signal
will automatically flash three times. Choose the appropriate method to signal a lane
change based on road and traffic conditions.
Page 150 of 520
PROGRAMMING TROUBLESHOOT-
ING
If the HomeLink�Šdoes not quickly learn the
hand-held transmitter information:
. replace the hand-held transmitter batteries
with new batteries.
. position the hand-held transmitter with its
battery area facing away from the
HomeLink
�Šsurface.
. press and hold both the HomeLink�Šand
hand-held transmitter buttons without inter-
ruption.
. position the hand-held transmitter 1-3 in
(26-76 mm) away from the HomeLink
�Š
surface. Hold the transmitter in that position
for up to 15 seconds. If HomeLink�Šis not
programmed within that time, try holding the
transmitter in another position - keeping the
indicator light in view at all times.
If you have any questions or are having difficulty
programming your HomeLink
�Šbuttons, refer to
the HomeLink�Šweb site at: www.homelink.com
or 1-800-355-3515.
CLEARING THE PROGRAMMED IN-
FORMATION
The following procedure clears the programmed
information from both buttons. Individual buttons
cannot be cleared. However, individual buttons
can be reprogrammed, see “Reprogramming a
single HomeLink
�Šbutton” (P.2-63) .
To clear all programming
1. Press and hold the two outer HomeLink�Š
buttons until the indicator light begins to
flash in approximately 10 seconds. Do not
hold for longer than 20 seconds.
2. Release both buttons.
HomeLink
�Šis now in the programming mode
and can be programmed at any time beginning
with “Programming HomeLink
�Š” - Step 1.
REPROGRAMMING A SINGLE
HomeLink�ŠBUTTON
To reprogram a HomeLink�ŠUniversal Transcei-
ver button, complete the following.
1. Press and hold the desired HomeLink
�Š
button. DO NOT release the button.
2. The indicator light will begin to flash after 20 seconds. Without releasing the HomeLink
�Š
button, proceed with “Programming
HomeLink�Š” - Step 1. For questions or comments, contact HomeLink
�Š
at: www.homelink.com or 1-800-355-3515.
The HomeLink�ŠUniversal Transceiver button
has now been reprogrammed. The new device
can be activated by pushing the HomeLink
�Š
button that was just programmed. This proce-
dure will not affect any other programmed
HomeLink
�Šbuttons.
IF YOUR VEHICLE IS STOLEN
If your vehicle is stolen, you should change the
codes of any non-rolling code device that has
been programmed into HomeLink
�Š. Consult the
Owner’s Manual of each device or call the
manufacturer or dealer of those devices for
additional information.
When your vehicle is recovered, you will
need to reprogram the HomeLink
�ŠUniver-
sal Transceiver with your new transmitter
information.
FCC Notice:
For USA:
This device complies with Part 15 of the
FCC Rules. Operation is subject to the
following two conditions: (1) This device
may not cause harmful interference, and
(2) this device must accept any interfer-
ence received, including interference that
may cause undesired operation.
Instruments and controls2-63
Page 213 of 520
4-24Monitor, heater, air conditioner, audio, phone and voice recognition systems
SAA2492
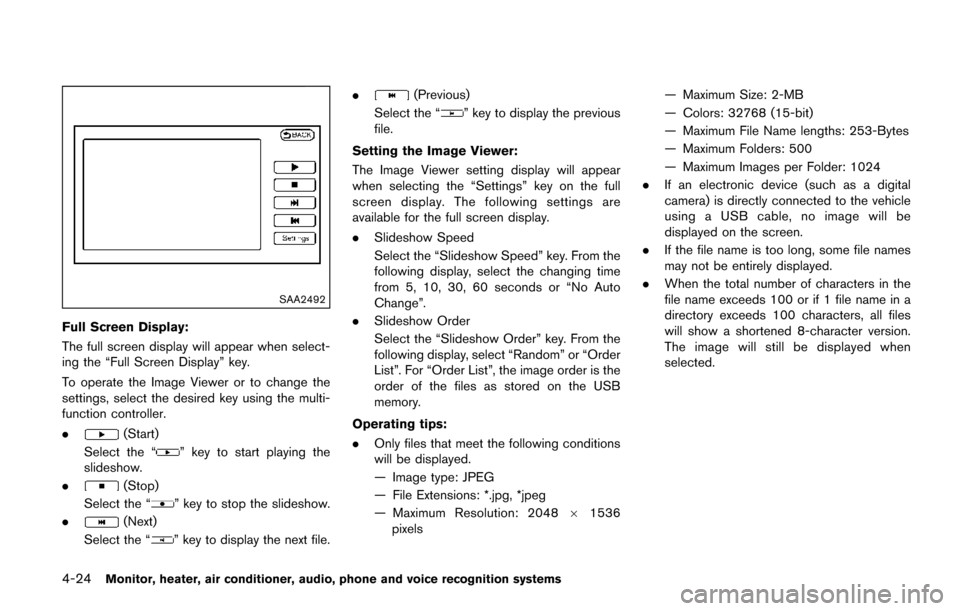
Full Screen Display:
The full screen display will appear when select-
ing the “Full Screen Display” key.
To operate the Image Viewer or to change the
settings, select the desired key using the multi-
function controller.
.
(Start)
Select the “
” key to start playing the
slideshow.
.
(Stop)
Select the “
” key to stop the slideshow.
.
(Next)
Select the “
” key to display the next file. .
(Previous)
Select the “
” key to display the previous
file.
Setting the Image Viewer:
The Image Viewer setting display will appear
when selecting the “Settings” key on the full
screen display. The following settings are
available for the full screen display.
. Slideshow Speed
Select the “Slideshow Speed” key. From the
following display, select the changing time
from 5, 10, 30, 60 seconds or “No Auto
Change”.
. Slideshow Order
Select the “Slideshow Order” key. From the
following display, select “Random” or “Order
List”. For “Order List”, the image order is the
order of the files as stored on the USB
memory.
Operating tips:
. Only files that meet the following conditions
will be displayed.
— Image type: JPEG
— File Extensions: *.jpg, *jpeg
— Maximum Resolution: 2048 61536
pixels — Maximum Size: 2-MB
— Colors: 32768 (15-bit)
— Maximum File Name lengths: 253-Bytes
— Maximum Folders: 500
— Maximum Images per Folder: 1024
. If an electronic device (such as a digital
camera) is directly connected to the vehicle
using a USB cable, no image will be
displayed on the screen.
. If the file name is too long, some file names
may not be entirely displayed.
. When the total number of characters in the
file name exceeds 100 or if 1 file name in a
directory exceeds 100 characters, all files
will show a shortened 8-character version.
The image will still be displayed when
selected.
Page 240 of 520
3. Push the fan speed control buttons to setthe desired fan speed.
4. Push the A/C button on. (The A/C indicator light will illuminate.)
5. Push the temperature control buttons to set the desired temperature between the middle
and the cool position.
. For quick cooling when the outside tem-
perature is high, push the air recirculation
button to switch to the air recirculation
mode. (The indicator light turns on.) Be sure
to turn off the air recirculation mode for
normal cooling.
. A visible mist may be seen coming from the
ventilators in hot, humid conditions as the air
is cooled rapidly. This does not indicate a
malfunction.
Dehumidified heating:
This mode is used to heat and dehumidify the
air.
1. Push the outside air circulation “
” button
to switch to the outside air circulation mode.
(The indicator light turns on.)
2. Push the air flow control button to change to the
position.
3. Push the fan speed control buttons to the desired fan speed. 4. Push the A/C button on. (The A/C indicator
light will illuminate.)
5. Push the temperature control buttons to set the desired temperature between the middle
and the hot position.
Dehumidified or defrosting/defogging:
This mode is used to defog the windows and
dehumidify the air.
1. Push the front defroster button
on. (The
indicator light turns on.)
2. Push the fan speed control buttons to set the desired fan speed.
3. Push the temperature control buttons to set the desired temperature.
When the
mode is selected, the air
conditioner will automatically turn on. This will
dehumidify the air and help to defog the
windows.
To remove frost from the outside surface of the
windshield quickly, set the temperature to the
maximum hot position and the fan speed to
maximum position.
Rear air conditioning system
Operating from front control buttons:
To control the rear air conditioning system
independently with the front air conditioner
control panel, push the “REAR” button. When
the rear air conditioning system control is on, the
indicator light on the “REAR” button will
illuminate and “REAR” will appear on the display.
In this state, the rear air conditioning system can
be adjusted with the front air conditioner control
panel. However, if no operation is conducted for
approximately 10 seconds after the “REAR”
button is pushed, the front air conditioner
control panel will automatically switch to the
front air conditioning mode.
To cancel the rear air conditioning mode and
switch back to the front air conditioning mode,
push “REAR” button one more time.
. Temperature control
Push the temperature control buttons
(“
” and “”) to set the desired
temperature.
. Fan speed control
Push the fan speed control “
”
button or “” button to control the
fan speed.
. Air flow control
Push the “MODE” button to change the air
Monitor, heater, air conditioner, audio, phone and voice recognition systems4-51