2017 NISSAN QASHQAI oil level
[x] Cancel search: oil levelPage 93 of 508

2-14Instruments and controls
TPMS will not function and the low
tire pressure warning light will flash
for approximately 1 minute. The
light will remain on after 1 minute.
Have your tires replaced and/or
TPMS system reset as soon as
possible. It is recommended you
visit a NISSAN dealer for these
services.
.Replacing tires with those not ori-
ginally specified by NISSAN could
affect the proper operation of the
TPMS.
CAUTION
.The TPMS is not a substitute for the
regular tire pressure check. Be sure
to check the tire pressure regularly.
.If the vehicle is being driven at
speeds of less than 16 MPH (25
km/h) , the TPMS may not operate
correctly.
.Be sure to install the specified size
of tires to the four wheels correctly.
Master warning light
When the ignition switch is in the ON position,
the master warning light illuminates if any of the
following are displayed on the vehicle informa-
tion display.
.No Key detected warning (if so equipped)
.Shift to Park warning (Continuously Variable
Transmission (CVT) models) (if so
equipped)
.Key battery low warning (if so equipped)
.Engine start operation for Intelligent Key
system indicator (if so equipped)
.Key ID incorrect warning (if so equipped)
.Release Parking Brake warning
.Low fuel level warning
.Low Washer Fluid (if so equipped)
.Door/liftgate open warning
.Key System Error: See Owner’s Manual
warning (if so equipped)
.Loose Fuel Cap
.Tire Pressure Low - Add Air warning
.Low oil pressure Stop vehicle warning
.AWD Error: See Owner’s Manual warning (if
so equipped)
.AWD High Temp. Stop vehicle warning (if so
equipped).Tire Size Incorrect: See Owner’s Manual
warning (if so equipped)
.Battery Voltage Low Charge Battery warn-
ing
.Shipping Mode On Push Storage Fuse
warning
.Power will turn off to save the battery
warning
.Power turned off to save the battery warning
.Reminder: Turn OFF Headlights warning
.Headlight System Error: See Owner’s Man-
ual warning (if so equipped)
.Timer Alert - Time for a driver break?
indicator (if so equipped)
.Chassis Control System Error: See Owner’s
Manual warning
.CVT Error: See Owner’s Manual warning
(for Continuously Variable Transmission
(CVT) models)
.Malfunction warning (if so equipped)
.Unavailable: High Cabin Temperature warn-
ing (if so equipped)
.Not Available: Poor Road Conditions warn-
ing (if so equipped)
.Currently unavailable warning (if so
equipped)
.Unavailable: Front Radar Obstruction warn-
ing (if so equipped)
Page 108 of 508

10. Low Washer Fluid warning (if so
equipped)
This warning appears when the window washer
fluid is at a low level. Add window washer fluid
as necessary. For additional information, refer to
“Window washer fluid” (P.8-10) .
11. Door/liftgate open warning
This warning appears if any of the doors and/or
the liftgate are open or not closed securely. The
vehicle icon indicates which door or the liftgate
is open on the display.
12. Key System Error: See Owner’s
Manual warning (if so equipped)
This warning appears if there is a malfunction in
the Intelligent Key system.
If this warning appears while the engine is
stopped, the engine cannot be started. If this
warning appears while the engine is running, the
vehicle can be driven. However, it is recom-
mended that you visit a NISSAN dealer for repair
as soon as possible.
13. Loose Fuel Cap warning
This warning appears when the fuel-filler cap is
not tightened correctly after the vehicle has
been refueled. For additional information, refer to
“Fuel-filler cap” (P.3-27) .
14. Tire Pressure Low — Add Air
warning
This warning appears when the low tire pressure
warning light in the meter illuminates and low tire
pressure is detected. The warning appears each
time the ignition switch is placed in the ON
position as long as the low tire pressure warning
light remains illuminated. If this warning appears,
stop the vehicle and adjust the pressure to the
recommended COLD tire pressure shown on
the Tire and Loading Information label. (See
“Low tire pressure warning light” (P.2-13) and
“Tire Pressure Monitoring System (TPMS)” (P.5-
5) .)
15. Low Oil Pressure Stop Vehicle
warning
This warning appears if low engine oil pressure
is detected. If the warning appears during
normal driving, pull off the road in a safe area
and stop the engine immediately. It is recom-
mended that you call a NISSAN dealer.
The low oil pressure warning is not designed to
indicate a low oil level. Use the dipstick to checkthe oil level. (See “Engine oil” (P.8-6) .)
CAUTION
Running the engine with the engine oil
pressure warning displayed could
cause serious damage to the engine.
16. AWD Error: See Owner’s Manual
warning (if so equipped)
This warning appears when the All-Wheel Drive
(AWD) system is not functioning properly while
the engine is running. Reduce vehicle speed and
have the system checked. It is recommended
that you visit a NISSAN dealer for this service.
See “All-Wheel Drive (AWD)” (P.5-96) .
17. AWD High Temp. Stop vehicle
warning (if so equipped)
This warning may appear while trying to free a
stuck vehicle due to increased oil temperature.
The driving mode may change to Two-Wheel
Drive (2WD) . If this warning is displayed, stop
the vehicle with the engine idling, as soon as it is
safe to do so. Then if the warning turns off, you
can continue driving. See “All-Wheel Drive
(AWD)” (P.5-96) .
Instruments and controls2-29
Page 302 of 508

chime sounds. The engine will start.
After step 3 is performed, when the ignition
switch is pushed without depressing the brake
pedal, the ignition switch position will change to
ACC.
NOTE:
.When the ignition switch is pushed to
the ON position or the engine is started
by the above procedures, the“Key
Battery Low”warning appears (on the
Vehicle information display) even if the
Intelligent Key is inside the vehicle.
This is not a malfunction. To turn off the
warning, touch the ignition switch with
the Intelligent Key again.
.If the“Key Battery Low”warning ap-
pears (on the Vehicle information dis-
play) , replace the battery as soon as
possible. (See“Intelligent Key battery
replacement”(P.8-23) .).Make sure the area around the vehicle is
clear.
.Check fluid levels such as engine oil, cool-
ant, brake fluid, and window washer fluid as
frequently as possible, or at least whenever
you refuel.
.Check that all windows and lights are clean.
.Visually inspect tires for their appearance
and condition. Also check tires for proper
inflation.
.Lock all doors.
.Position seat and adjust head restraints.
.Adjust inside and outside mirrors.
.Fasten seat belts and ask all passengers to
do likewise.
.Check the operation of warning lights when
the ignition switch is placed in the ON
position. (See “Warning lights, indicator
lights and audible reminders” (P.2-10) .)1. Apply the parking brake.
2.Continuously Variable Transmission
(CVT) model:
Move the shift lever to the P (Park) or N
(Neutral) position. (P is recommended.)
The starter is designed so that it does not
operate unless the shift lever is in either of
the above positions.
Manual Transmission (MT) model:
Move the shift lever to the N (Neutral)
position, and depress the clutch pedal to
the floor while starting the engine.
3. Crank the enginewith your foot off the
accelerator pedalby turning the ignition
switch to START. Release the switch when
the engine starts. If the engine starts, but
fails to run, repeat the above procedure.
.If the engine is very hard to start in
extremely cold weather or when restart-
ing, depress the accelerator pedal a little
(approximately 1/3 to the floor) and hold
it and then crank the engine. Release the
accelerator pedal when the engine starts.
.If the engine is very hard to start because
it is flooded, depress the accelerator
pedal all the way to the floor and hold it.
Crank the engine for 5 - 6 seconds. After
cranking the engine, release the accel-
Starting and driving5-17
BEFORE STARTING THE ENGINESTARTING THE ENGINE (model
without Intelligent Key system)
Page 424 of 508

8 Do-it-yourself
Maintenance precautions ........................................................ 8-2
Engine compartment check locations .................................. 8-3
MR20DD engine model ..................................................... 8-4
Engine cooling system ............................................................. 8-4
Checking engine coolant level ......................................... 8-5
Changing engine coolant .................................................. 8-6
Engine oil .................................................................................... 8-6
Checking engine oil level .................................................. 8-6
Changing engine oil and filter .......................................... 8-6
Continuously Variable Transmission (CVT) fluid ............... 8-9
Brake and clutch (if so equipped) fluid ............................... 8-9
Window washer fluid ............................................................ 8-10
Battery ....................................................................................... 8-11
Jump starting ..................................................................... 8-12
Variable voltage control system .......................................... 8-13
Drive belt .................................................................................. 8-13
Spark plugs ............................................................................. 8-14
Replacing spark plugs .................................................... 8-14
Air cleaner ................................................................................ 8-14Windshield wiper blades ..................................................... 8-15
Cleaning ........................................................................... 8-15
Replacing ......................................................................... 8-16
Rear window wiper blade ................................................... 8-17
Brakes ...................................................................................... 8-17
Self-adjusting brakes .................................................... 8-17
Brake pad wear warning .............................................. 8-17
Fuses ........................................................................................ 8-18
Engine compartment ..................................................... 8-18
Passenger compartment .............................................. 8-20
Key fob battery replacement .............................................. 8-21
Intelligent Key battery replacement ................................... 8-23
Lights ........................................................................................ 8-25
Headlights ........................................................................ 8-25
Exterior and interior lights ............................................ 8-27
Wheels and tires ................................................................... 8-29
Tire pressure ................................................................... 8-29
Tire labeling ..................................................................... 8-33
Types of tires ................................................................... 8-35
Tire chains ....................................................................... 8-36
Changing wheels and tires .......................................... 8-37
Page 425 of 508

8-2Do-it-yourself
When performing any inspection or mainte-
nance work on your vehicle, always take care
to prevent serious accidental injury to yourself or
damage to the vehicle. The following are general
precautions which should be closely observed.
WARNING
.Park the vehicle on a level surface,
apply the parking brake securely
and block the wheels to prevent
the vehicle from moving. Move the
shift lever to the P (Park) position
(CVT model) or the shift lever to the
N (Neutral) position (MT model) .
.Be sure the ignition switch is in the
OFF or LOCK position when per-
forming any parts replacement or
repairs.
.If you must work with the engine
running, keep your hands, clothing,
hair and tools away from moving
fans, belts and any other moving
parts.
.It is advisable to secure or remove
any loose clothing and remove any
jewelry, such as rings, watches, etc.
before working on your vehicle..Always wear eye protection when-
ever you work on your vehicle.
.If you must run the engine in an
enclosed space such as a garage, be
sure there is proper ventilation for
exhaust gases to escape.
.Never get under the vehicle while it
is supported only by a jack. If it is
necessary to work under the vehicle,
support it with safety stands.
.Because the fuel lines are under
high pressure even when the engine
is off, it is recommended you visit a
NISSAN dealer for service of the
fuel filter or fuel lines.
.Do not work under the hood while
the engine is hot. Always turn off
the engine and wait until it cools
down.
.If you must work with the engine
running, keep your hands, clothing,
hair and tools away from moving
fans, belts and any other moving
parts.
.Keep smoking materials, flame and
sparks away from fuel and the
battery..On gasoline engine models with the
Multiport Fuel Injection (MFI) sys-
tem, the fuel filter and fuel lines
should be serviced because the fuel
lines are under high pressure even
when the engine is turned off. It is
recommended that you visit a
NISSAN dealer for this service.
.Your vehicle is equipped with an
automatic engine cooling fan. It may
come on at any time without warn-
ing, even if the ignition switch is in
the OFF position and the engine is
not running. To avoid injury, always
disconnect the negative battery
cable before working near the fan.
.Avoid direct contact with used en-
gine oil and coolant. Improperly
disposed engine oil, engine coolant,
and/or other vehicle fluids can hurt
the environment. Always conform to
local regulations for disposal of
vehicle fluids.
MAINTENANCE PRECAUTIONS
Page 429 of 508

8-6Do-it-yourself
service.
CHANGING ENGINE COOLANT
A NISSAN dealer can change the engine
coolant. The service procedure can be found
in the NISSAN Service Manual.
Improper servicing can result in reduced
heater performance and engine overheat-
ing.
WARNING
.To avoid being scalded, never
change the coolant when the engine
is hot.
.Never remove the radiator or cool-
ant reservoir cap when the engine is
hot. Serious burns could be caused
by high pressure fluid escaping from
the radiator.
.Avoid direct skin contact with used
coolant. If skin contact is made,
wash thoroughly with soap or hand
cleaner as soon as possible.
.Keep coolant out of the reach of
children and pets.
Engine coolant must be disposed of properly.
Check your local regulations.SDI1993
CHECKING ENGINE OIL LEVEL
1. Park the vehicle on a level surface and apply
the parking brake.
2. Run the engine until it reaches operating
temperature.
3. Turn off the engine.Wait more than 10
minutes for the oil to drain back into
the oil pan.
4. Remove the dipstick and wipe it clean.
Reinsert it all the way.
5. Remove the dipstick again and check the oil
level. It should be within the range
*C. If the
oil level is below
*A, remove the oil filler
cap and pour recommended oil through theopening.Do not overfill
*B.
6. Recheck oil level with the dipstick.
It is normal to add some oil between oil
maintenance intervals or during the break-
in period, depending on the severity of
operating conditions.
CAUTION
Oil level should be checked regularly.
Operating the engine with an insuffi-
cient amount of oil can damage the
engine, and such damage is not cov-
ered by the warranty.
CHANGING ENGINE OIL AND FILTER
WARNING
.Used oil must be disposed of prop-
erly. Never pour or dump oil into the
ground, canals, rivers, etc. It should
be disposed of at proper waste
facilities. NISSAN recommends hav-
ing your oil changed by a NISSAN
dealer.
.Be careful not to burn yourself, as
the engine oil may be hot.
ENGINE OIL
Page 430 of 508

.Prolonged and repeated contact
with used engine oil may cause skin
cancer.
.Avoid direct skin contact with used
oil. If contacted, wash thoroughly
with soap or hand cleaner and
plenty of water as soon as possible.
.Store used engine oil in marked
containers out of the reach of chil-
dren.
Vehicle set-up
1. Park the vehicle on a level surface and apply
the parking brake.
2. Run the engine until it reaches the operating
temperature.
3. Turn the engine off and wait more than 10
minutes.
4. Raise and support the vehicle using a
suitable floor jack and safety jack stands.
.Place the safety jack stands under the
vehicle jack-up points.
.A suitable adapter should be attached to
the jack stand saddle.
CAUTION
Make sure the correct lifting and sup-
port points are used to avoid vehicle
damage.
JVM0414X
Do-it-yourself8-7
Page 431 of 508
8-8Do-it-yourself
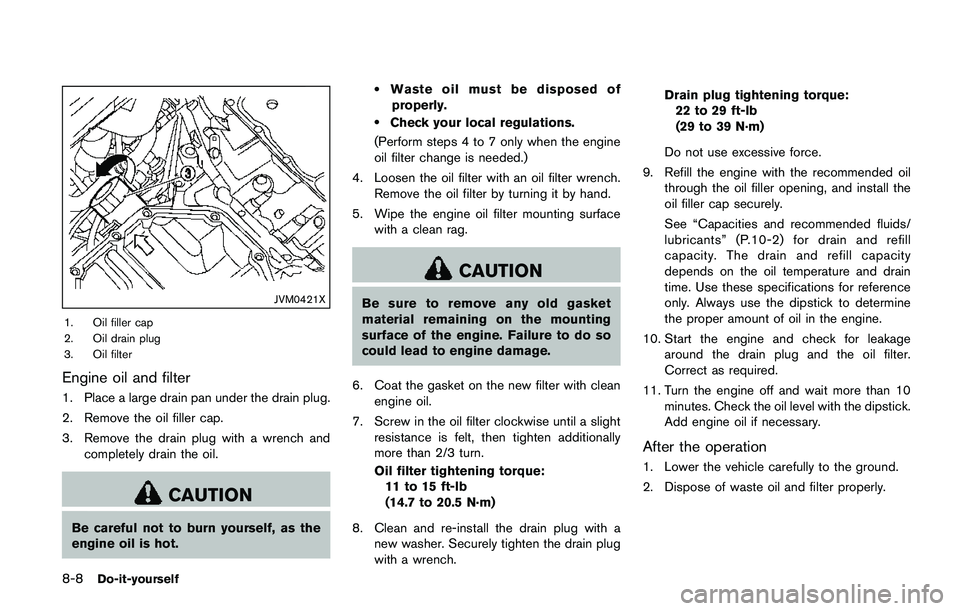
JVM0421X
1. Oil filler cap
2. Oil drain plug
3. Oil filter
Engine oil and filter
1. Place a large drain pan under the drain plug.
2. Remove the oil filler cap.
3. Remove the drain plug with a wrench and
completely drain the oil.
CAUTION
Be careful not to burn yourself, as the
engine oil is hot.
.Waste oil must be disposed of
properly.
.Check your local regulations.
(Perform steps 4 to 7 only when the engine
oil filter change is needed.)
4. Loosen the oil filter with an oil filter wrench.
Remove the oil filter by turning it by hand.
5. Wipe the engine oil filter mounting surface
with a clean rag.
CAUTION
Be sure to remove any old gasket
material remaining on the mounting
surface of the engine. Failure to do so
could lead to engine damage.
6. Coat the gasket on the new filter with clean
engine oil.
7. Screw in the oil filter clockwise until a slight
resistance is felt, then tighten additionally
more than 2/3 turn.
Oil filter tightening torque:
11 to 15 ft-lb
(14.7 to 20.5 N·m)
8. Clean and re-install the drain plug with a
new washer. Securely tighten the drain plug
with a wrench.Drain plug tightening torque:
22 to 29 ft-lb
(29 to 39 N·m)
Do not use excessive force.
9. Refill the engine with the recommended oil
through the oil filler opening, and install the
oil filler cap securely.
See “Capacities and recommended fluids/
lubricants” (P.10-2) for drain and refill
capacity. The drain and refill capacity
depends on the oil temperature and drain
time. Use these specifications for reference
only. Always use the dipstick to determine
the proper amount of oil in the engine.
10. Start the engine and check for leakage
around the drain plug and the oil filter.
Correct as required.
11. Turn the engine off and wait more than 10
minutes. Check the oil level with the dipstick.
Add engine oil if necessary.
After the operation
1. Lower the vehicle carefully to the ground.
2. Dispose of waste oil and filter properly.